Uli Köhler

How to fix Python skyfield FileNotFoundError: [Errno 2] No such file or directory: ‘de413.bsp’

Problem:

When trying to use the Python skyfield library, you see an exception like

Input In [2], in <cell line: 11>()
      8 from calendar import monthrange
     10 ts = api.load.timescale()
---> 11 ephem = api.load_file('de413.bsp')

File /usr/local/lib/python3.10/dist-packages/skyfield/iokit.py:412, in load_file(path)
    410 base, ext = os.path.splitext(path)
    411 if ext == '.bsp':
--> 412     return SpiceKernel(path)
    413 raise ValueError('unrecognized file extension: {}'.format(path))

File /usr/local/lib/python3.10/dist-packages/skyfield/jpllib.py:71, in SpiceKernel.__init__(self, path)
     69 self.path = path
     70 self.filename = os.path.basename(path)
---> 71 self.spk = SPK.open(path)
     72 self.segments = [SPICESegment(self, s) for s in self.spk.segments]
     73 self.codes = set(s.center for s in self.segments).union(
     74                  s.target for s in self.segments)

File /usr/local/lib/python3.10/dist-packages/jplephem/spk.py:49, in SPK.open(cls, path)
     46 @classmethod
     47 def open(cls, path):
     48     """Open the file at `path` and return an SPK instance."""
---> 49     return cls(DAF(open(path, 'rb')))

FileNotFoundError: [Errno 2] No such file or directory: 'de413.bsp'

Solution:

Take a look at the api.load(...) line in your code:

ephem = api.load_file('de413.bsp')

It tries to load the data from the file de413.bsp in the current directory. This file contains positional data of objects in the sky and you need to manually download that file.

You can download the file from NASA. Just take care to either place it into the right directory or modifying the path in the api.load() call to point to the file.

URL for downloading the file:

https://ssd.jpl.nasa.gov/ftp/eph/planets/bsp/de413.bsp

My preferred way to download it is using wget:

wget https://ssd.jpl.nasa.gov/ftp/eph/planets/bsp/de413.bsp

This command will place the file into the current directory.
Posted by Uli Köhler in Python, skyfield

How to override PHP memory limit on the command line

Use -d memory_limit=512M to override the memory limit or other PHP parameters on the command line without modifying php.ini:

php -d memory_limit=512M script.php


Posted by Uli Köhler in PHP

How to fix Nextcloud updater PHP Fatal error:  Allowed memory size of … bytes exhausted

Problem:

While trying to update Nextcloud using the command line (e.g. SSH) using a command like

php updater/updater.phar

you see an error message containing PHP Fatal error:  Allowed memory size of ... bytes exhausted such as this one:

[✔] Check for expected files
[✔] Check for write permissions
[✔] Create backup
[✔] Downloading
[ ] Verify integrity ...PHP Fatal error:  Allowed memory size of 134217728 bytes exhausted (tried to allocate 155061456 bytes) in phar:///owncloud.mydomain.com/updater/updater.phar/lib/Updater.php on line 637

Solution:

First, try to adjust the memory limit in your webhosting panel or php.ini. If this is not possible – such as for my hoster, which has different settings for the FastCGI PHP as opposed to the command line (CLI) PHP, you can manually set the memory limit using

php -d memory_limit=512M updater/updater.phar


Posted by Uli Köhler in Networking, Nextcloud, PHP

How to fix Nextcloud Step … is currently in process. Please call this command later.

Problem:

While trying to update Nextcloud using the command line (e.g. SSH) using a command like

php updater/updater.phar

you see the following error message:

Nextcloud Updater - version: v20.0.0beta4-11-g68fa0d4

Step 5 is currently in process. Please call this command later.

Solution:

No matter if the step that appears to be currently in progress is Step 3Step 5 or any other step, the solution is always the same: Reset the update by deleting the data/updater-occ[random-string] folder.

Recommended: If you are paranoid about losing data, just rename the directory:

mv data/updater-occ* ../DELETEME-updater

Not recommended: You can also just delete the directory

rm -rf data/updater-occ*


Posted by Uli Köhler in Networking, Nextcloud

Traefik container labels for the Unifi controller via docker-compose

For the basic configuration & setup of the Unifi controller via docker-compose, see Simple Unifi controller setup using docker-compose ! This post just covers the Traefik label part.

This setup is based on our previous post on the Unifi docker-compose setup. Furthermore, our traefik configuration is discussed in more detail in our post on Simple Traefik docker-compose setup with Lets Encrypt Cloudflare DNS-01 & TLS-ALPN-01 & HTTP-01 challenges.

For this example, we’ll use a wildcart Let’s Encrypt certificate for the domain *.mydomain.com via the Traefik certificate provider named cloudflare, with the Unifi controller running on unifi.mydomain.com

Here’s the container label config:

labels:
  - "traefik.enable=true"
  - "traefik.http.routers.unifi.rule=Host(`unifi.mydomain.com`)"
  - "traefik.http.routers.unifi.entrypoints=websecure"
  - "traefik.http.routers.unifi.tls.certresolver=cloudflare"
  - "traefik.http.routers.unifi.tls.domains[0].main=mydomain.com"
  - "traefik.http.routers.unifi.tls.domains[0].sans=*.mydomain.com"
  - "traefik.http.services.unifi.loadbalancer.server.port=8443"
  - "traefik.http.services.unifi.loadbalancer.server.scheme=https"

Note particularly these lines which make Traefik access the Unifi controller via HTTPS:

- "traefik.http.services.unifi.loadbalancer.server.port=8443"
- "traefik.http.services.unifi.loadbalancer.server.scheme=https"

Complete example

version: '2.3'
services:
  mongo_unifi:
    image: mongo:3.6
    network_mode: host
    restart: always
    volumes:
      - ./mongo_db:/data/db
      - ./mongo/dbcfg:/data/configdb
    command: mongod --port 29718
  controller:
    image: "jacobalberty/unifi:latest"
    depends_on:
      - mongo_unifi
    init: true
    network_mode: host
    restart: always
    volumes:
      - ./unifi_dir:/unifi
      - ./unifi_data:/unifi/data
      - ./unifi_log:/unifi/log
      - ./unifi_cert:/unifi/cert
      - ./unifi_init:/unifi/init.d
      - ./unifi_run:/var/run/unifi
      - ./unifi_backup:/unifi/data/backup
#    sysctls:
#      net.ipv4.ip_unprivileged_port_start: 0
    environment:
      - DB_URI=mongodb://localhost:29718/unifi
      - STATDB_URI=mongodb://localhost:29718/unifi_stat
      - DB_NAME=unifi
      - UNIFI_HTTP_PORT=8090
    labels:
      - "traefik.enable=true"
      - "traefik.http.routers.unifi.rule=Host(`unifi.mydomain.com`)"
      - "traefik.http.routers.unifi.entrypoints=websecure"
      - "traefik.http.routers.unifi.tls.certresolver=cloudflare"
      - "traefik.http.routers.unifi.tls.domains[0].main=mydomain.com"
      - "traefik.http.routers.unifi.tls.domains[0].sans=*.mydomain.com"
      - "traefik.http.services.unifi.loadbalancer.server.port=8443"
      - "traefik.http.services.unifi.loadbalancer.server.scheme=https"
# Ports commentet out since network mode is set to "host"
#    ports:
#      - "3478:3478/udp" # STUN
#      - "6789:6789/tcp" # Speed test
#      - "8080:8080/tcp" # Device/ controller comm.
#      - "8443:8443/tcp" # Controller GUI/API as seen in a web browser
#      - "8880:8880/tcp" # HTTP portal redirection
#      - "8843:8843/tcp" # HTTPS portal redirection
#      - "10001:10001/udp" # AP discovery
  logs:
    image: bash
    depends_on:
      - controller
    command: bash -c 'tail -F /unifi/log/*.log'
    restart: always
    volumes:
      - ./unifi_log:/unifi/log
Posted by Uli Köhler in Networking, Traefik

How to check MikroTik RouterOS license level

How to find RouterOS license using the web interface

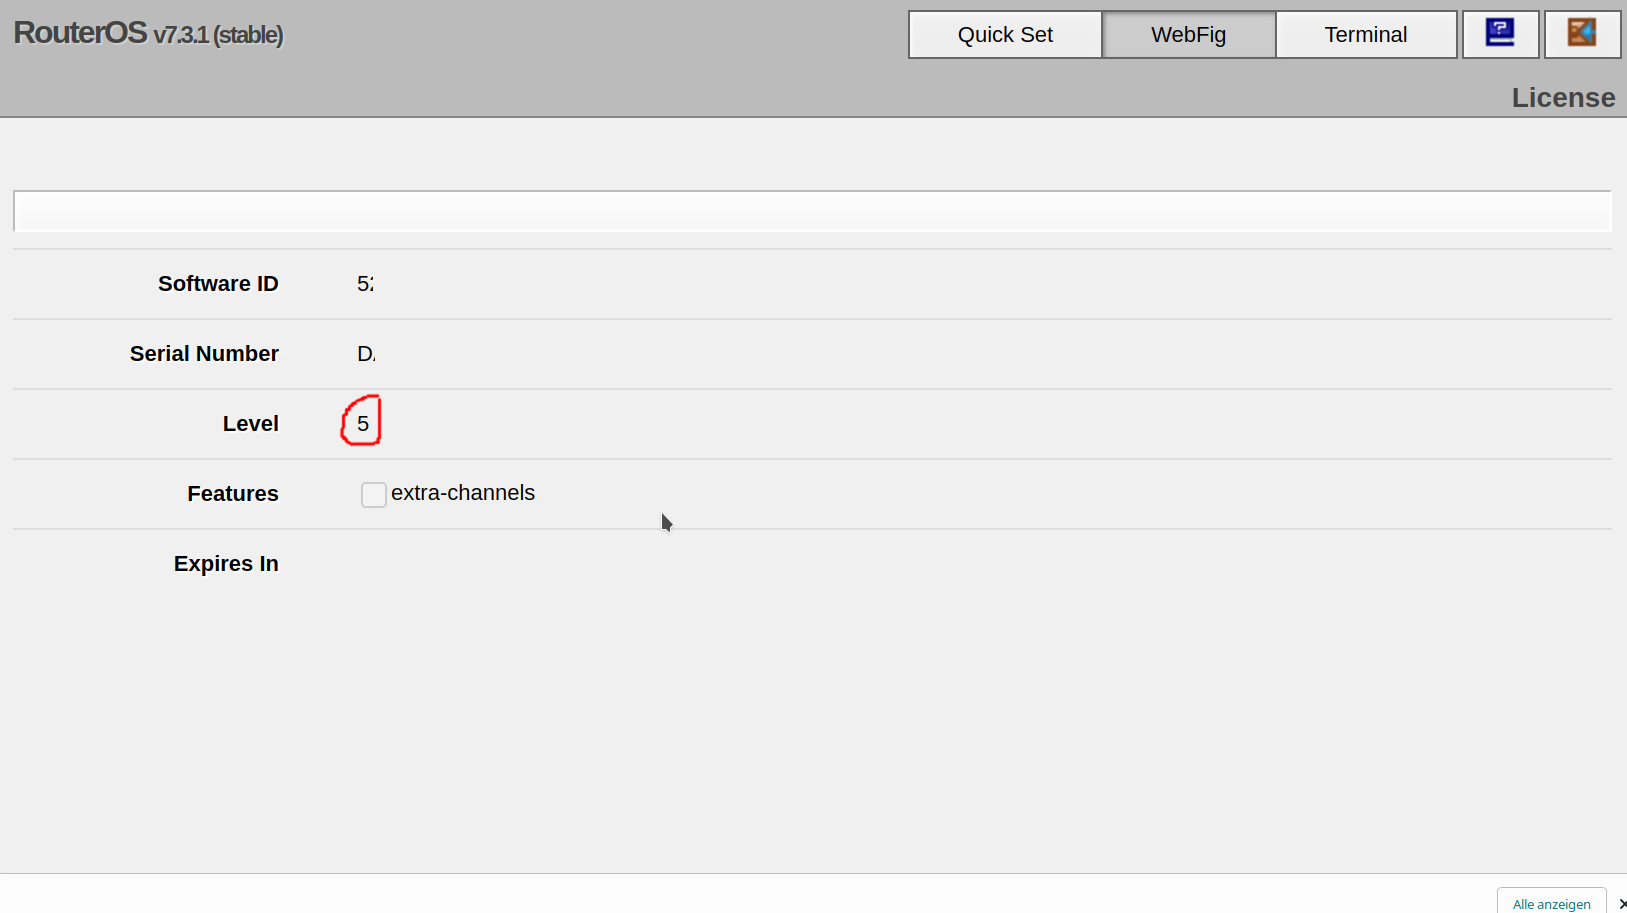
In the WebFig web UI, you can check the license level by clicking on System -> License

How to find RouterOS license level using the Terminal

Run the following command:

/system license print

Look for the nlevel line. In the following example, the MikroTik RouterOS license level is Level 5:

[admin@MyRouter] > /system license print
  software-id: 5ABC-DEF0
       nlevel: 5
     features: 
Posted by Uli Köhler in MikroTik, Networking

How to find out architecture of your Mikrotik RouterOS router

Find out the CPU architecture using the webinterface (WebFig)

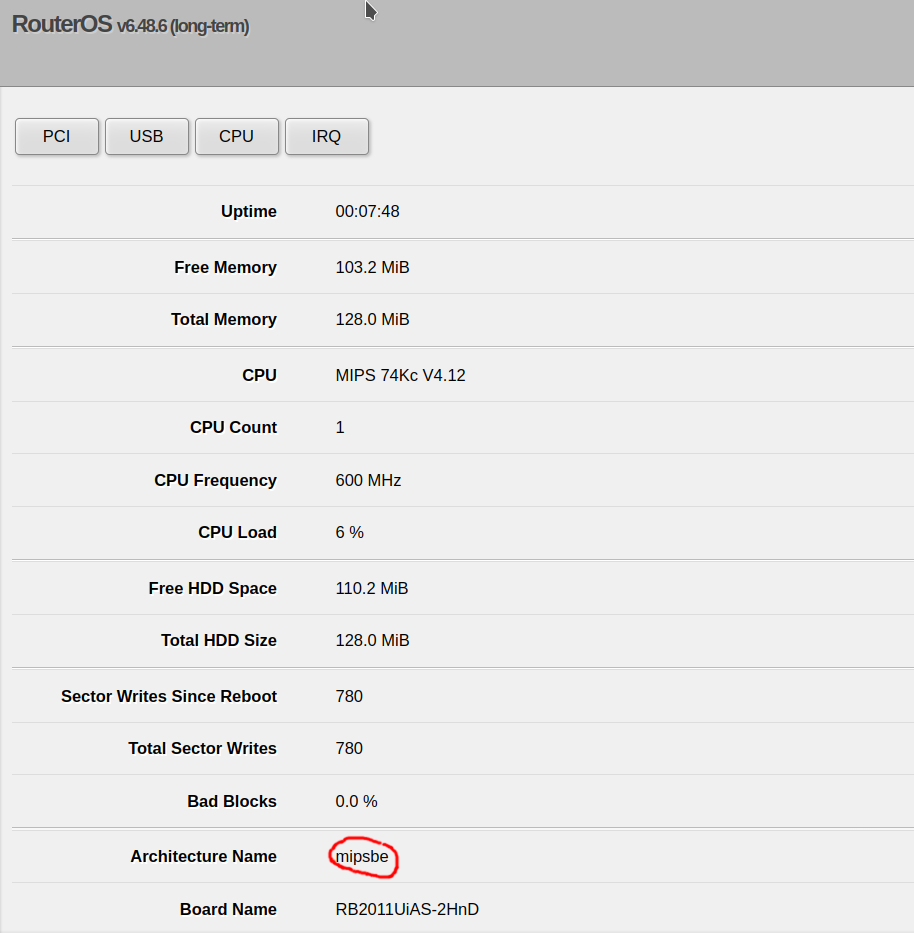
In the WebFig Web UI you can go to System -> Resources where you can see the architecture listed as Architecture name:

Find out the CPU architecture using the terminal

On the terminal, run

/system resource print

and look for the architecture-name line. In the following example, the architecutre is arm:

[admin@MyRouter] > /system resource print
                   uptime: 10m24s
                  version: 7.3.1 (stable)
               build-time: Jun/09/2022 08:58:15
         factory-software: 6.44.6
              free-memory: 446.0MiB
             total-memory: 512.0MiB
                      cpu: ARM
                cpu-count: 2
                 cpu-load: 0%
           free-hdd-space: 1148.0KiB
          total-hdd-space: 16.0MiB
  write-sect-since-reboot: 595
         write-sect-total: 139871
               bad-blocks: 0%
        architecture-name: arm
               board-name: CRS326-24G-2S+
                 platform: MikroTik


Posted by Uli Köhler in MikroTik, Networking

How to see PlatformIO actual commands during build or upload

Having a look at the actual commands being used by PlatformIO is pretty easy:

Instead of clicking Build or Upload, open the Advanced folder and select Verbose Build or Verbose Upload.

This will show you all raw commands such as esptool.py commands that are being run.

Posted by Uli Köhler in PlatformIO

How to fix /dev/ttyUSB0 or /dev/ttyACM0 permission error

Problem:

When trying to connect to a USB device, you see an error like

[Errno 13] Permission denied: '/dev/ttyUSB0'

and the USB connection can’t be established.

Solution:

On Debian & Ubuntu, the /dev/ttyUSBx and /dev/ttyACMx devices are owned by the dialout group. Therefore, the solution is to add your user to the dialout group:

sudo usermod -a -G dialout $USER

After that, you need to logout completely and login again (if in doubt, reboot your computer)!

While you can sometimes quickly solve this issue by running whatever command you want to use as root using sudo, this is not a recommended solution since it will allow the program you’re calling full access to the entire computer – not just access restricted to the USB device. Therefore, this approach poses a significant security risk and additionally, some programs don’t work properly when called using sudo.

Posted by Uli Köhler in Embedded, Linux

How to install ESP32 esptool / esptool.py on Ubuntu

The recommended way is to install the current version using pip since the version installed using apt might be out of date:

sudo pip install esptool

After that, you can use esptool.py – note that you need to call it as esptool.py, not just as esptool!

In case you are missing pip , install python3-dev using apt:

sudo apt -y install python3-pip


Posted by Uli Köhler in ESP8266/ESP32, Linux, Python

Which MikroTik switch can you use with 100M SFP modules?

Generally, 100M SFP modules can not be used with SFP+ ports. They sometimes can be used with SFP ports, however there is no guarantee it will work properly until you’ve actually tested the compatibility of the hardware!

Besides using a 100M SFP Module with a 100M-compatible SFP port, there is also the possibility of using a SFP Module with integrated converter. FS offers such a device for ~55€ but at the moment I do not know if it is compatible with an Mikrostil device.

Compatible devices

The MikroTik help page lists the CRS106-5S-1C as being compatible with both 100M and 1G SFP modules:

This unit is compatible with 100Mbit and 1.25G SFP modules

It has 5 SFP ports and 1 Combo SFP or GigE port.

Furthermore, the MikroTik wiki has a list of devices compatible with 100M fiberoptic transceivers – at the time of writing this post:

  • CCR1009-7G-1C
  • CCR1009-7G-1C-1S+
  • CRS106-1C-5S
  • CRS328-4C-20S-4S+
  • LHG XL 52 ac
  • RBD22/D23/mANTBox 52 15s/NetMetal ac²

Besides manually searching the MikroTik site for other compatible devices, I also used Google to search for similar sentences on the MikroTik site. I could not find any other MikroTik device for which any statement about 100Mbit SFP compatibility is being explicitly made.

Incompatible devices

For the following devices I have checked the respective MikroTik help page and it does not list compatibility with 100M SFP modules. This does not automatically mean they aren’t compatible but it’s much less likely. Possibly the help page will be updated in the future to indicate compatibility. I have not physically tested any of those devices with 100M transceivers.

  • CRS310-1G-5S-4S+IN
  • CRS112-8P-4S-IN
  • hEX S
  • CRS109-8G-1S-2HnD-IN
  • CRS212-1G-10S-1S+IN

Often, the help pages with read something like Compatible with 1.25G SFP modules. This means that standard 100Mbit SFP modules are incompatible.

Posted by Uli Köhler in Electronics, MikroTik, Networking

Which Ethernet PHY to use for 100Base-FX (SFP) operation?

For new designs I primarily recommend the Texas Instruments DP83822. It comes in a 5x5mm QFN package and provides RMII, MII and even RGMII interfaces to the Microcontroller or other Ethernet MAC.

Be sure to select the DP83822xF – the F means Fiber!

Since at the time of writing this article, the DP83822 has supply shortages, the following alternatives are available for 100Base-FX operation:

  • DP83869HM is a Gigabit Ethernet transceiver that supports 100Base-FX but does not support MII or RMII (only the Gigabit interfaces RGMII & SGMII)
  • DP83620 is a plain 10/100 PHY with RMII & fiber support
  • BCM5221 (MII & RMII) & BCM5241 (MII) are plain old 10/100 PHYs but in typical broadcom fashion, they don’t even give you the datasheet to download on their website. But you can find it via Google
  • BCM5248 is a 8-port PHY with fiber support
  • ST802RT1 (LQFP48)
  • Marvell’s 88E3015 & 88E3018 feature fiber support and have good documentation on the fiber interface. They are available in QFN packages but only support MII & RGMII – RMII is not supported !
  • KS8721BL, KS8721SL & KSZ8721CL (LQFP/SSOP)
  • KSZ8001L (LQFP/SSOP)
  • KSZ8041FTL (LQFP/SSOP – you must buy the FTL variant!)
  • (LQFP/SSOP)
  • The VSC8211 is a Gigabit Ethernet PHY but supports 100Base-FX & RMII interface. It is available in a 117-pin BGA package and hence rather difficult to use.
  • The LAN9355 3-port Ethernet switch features two 100Base-FX fiber interfaces and a RMII interface. It is more complex to use than a standalone PHY but can forward traffic without software interaction.
  • The KSZ8893FQL 3-port Ethernet switch features one 100Base-FX fiber interface and a RMII interface. It is rather expensive
  • The Cortina LXT971A is a simple 100Base-FX PHY from a rather unknown manufacturer. It only has MII, not RMII ! Cortina appears to have been bought by Intel.
  • LU3X34FTR is a 4-port 10/100 PHY with fiber support

Compared to the DP83822, within the context of 100Base-FX operation, there are few technical differences in whether you use the DP83822. In my experience, Ethernet PHYs are mostly difference with regards to their electrical immunity (ESD and so on) which is not really relevant in the fiber context unless someone directly touches the PCB, and the ability to compensate for a degrated Ethernet signal (which is not really relevant for fiber contexts). The only real difference between the DP83822 and many other parts is that the DP83822 comes in a small VQFN package, which the Micrel/Microchip KSZ devices come in much larger SSOP or LQFP packages. My recommendation is to select based on availability first, on size second.

Posted by Uli Köhler in Electronics, Networking

How to fix docker MariaDB correct definition of table mysql.column_stats: expected column ‘hist_type’ at position 9…

Problem:

In the log of your MySQL docker server, you see logs like

mariadb_1    | 2022-06-07 20:24:00 283 [ERROR] Incorrect definition of table mysql.column_stats: expected column 'hist_type' at position 9 to have type enum('SINGLE_PREC_HB','DOUBLE_PREC_HB','JSON_HB'), found type enum('SINGLE_PREC_HB','DOUBLE_PREC_HB').
mariadb_1    | 2022-06-07 20:24:00 283 [ERROR] Incorrect definition of table mysql.column_stats: expected column 'histogram' at position 10 to have type longblob, found type varbinary(255).

Solution:

This happens after doing a version upgrade of the MySQL version.

In order to fix it, run the upgrade by running mysql_upgrade in the contaienr

docker-compose exec mariadb mysql_upgrade -uroot -pchopahl0aib4eiphuk5bao3shiVoow

where chopahl0aib4eiphuk5bao3shiVoow is your MySQL root password.

If you have your password in .env as we recommend, you can use this command:

source .env && docker-compose exec mariadb mysql_upgrade -uroot -p${MARIADB_ROOT_PASSWORD}


Posted by Uli Köhler in Docker

How to disable XCP-NG Windows Update PCIe device on the command line

This post shows you how to disable the XCP-NG windows update device on the command line. This prevents automatic installation of the Citrix drivers, enabling manual install of a custom version.

Note that you can easily disable the Windows update PCIe device in XenOrchestra using a single click, but not in XCP-NG center!

Prerequisite: Shut down the VM in question – usually you need to disable the device before installing Windows!

First, get the UUID of the VM usinjg

xe vm-list

which will output, for each virtual machine, something like:

uuid ( RO)           : 98002b8d-070f-9638-071c-be7e6c82f6a3
     name-label ( RW): CoreOS
    power-state ( RO): running

From that, copy the UUID such as 98002b8d-070f-9638-071c-be7e6c82f6a3.

Now run:

xe vm-param-set uuid=YOURUUID has-vendor-device=false

for example,

xe vm-param-set uuid=98002b8d-070f-9638-071c-be7e6c82f6a3 has-vendor-device=false

Now you can startup your VM with the driver installation PCIe device being disabled.

Posted by Uli Köhler in Networking, Virtualization

How to get router identity (name) in MikroTik RouterOS scripting

Use

[/system identity get name]

For example, you can use it like this:

/tool e-mail send [email protected] subject="My identity is $[/system identity get name]"


Posted by Uli Köhler in MikroTik, Networking

How to insert output of command into string in MikroTik RouterOS (scripting)

If you have a MikroTik RouterOS command such as

/tool e-mail send [email protected] subject="MikroTik test E-Mail"

you can insert the output of a command such as

/system identity get name

into it by using the $[...] syntax:

/tool e-mail send [email protected] subject="My identity is $[/system identity get name]"


Posted by Uli Köhler in MikroTik, Networking

How to configure SMTP server on MikroTik RouterOS

Use the following command in order to configure SMTP settings for a MikroTik router:

/tool e-mail set address=smtp.mydomain.com from="MikroTik <[email protected]>" tls=starttls [email protected] password=uFoome0Noh

Alternatively, you can configure these settings directly on the web interface at WebFig => Tools => EMail.

Posted by Uli Köhler in Allgemein

How to setup Cloudflare DNS-over-HTTPS (DoH) cache on MikroTik RouterOS router

Compared to standard UDP DNS, DNS-over-HTTPS (DoH) provides the huge advantage that – due to it being encrypted, someone able to sniff the traffic will not be able to determine what domain names are being used.

However, consider the disadvantage that the latency of resolving a domain name is significantly larger with DoH – however, setting up the MikroTik router as DNS cache will significantly reduce the overall DNS latency, at least for cached domain names.

The following list of RouterOS commands will setup the internal DNS server as a DNS cache running on DNS-over-HTTPS.

First, download CA certificates onto the router in order to be able to verify CloudFlare’s HTTPS certificates:

/tool fetch url=https://curl.se/ca/cacert.pem

Wait for it to finish downloading, e.g.

[admin@MikroTik] > /tool fetch url=https://curl.se/ca/cacert.pem
      status: finished
  downloaded: 210KiBz pause]
       total: 210KiB
    duration: 1s

Now import the file and setup the DNS server:

/certificate import file-name=cacert.pem passphrase=""
/ip dns set allow-remote-requests=yes cache-size=8192KiB max-concurrent-queries=1000 max-concurrent-tcp-sessions=2000 servers=1.1.1.1 use-doh-server=https://cloudflare-dns.com/dns-query verify-doh-cert=yes


Posted by Uli Köhler in MikroTik, Networking

MikroTik webinterface reverse proxy using Traefik

The following Traefik .toml file which reverse proxies a MikroTik router’s WebFig webinterface is based on our Traefik setup from Simple Traefik docker-compose setup with Lets Encrypt Cloudflare DNS-01 & TLS-ALPN-01 & HTTP-01 challenges. It assumes that the MikroTik router is reachable at 10.1.2.3 via HTTP.

No Authentication beyond the MikroTik router’s WebFig internal authentication is performed. However – at least when using our Traefik config from our previous post it enforces HTTPS i.e. encrypted access.

Save the following file under config/mikrotik01.toml. Traefik will automatically reload, no restart will be required.

[http.routers.mikrotik01]
rule = "Host(`mikrotik01.mydomain.com`)"
service = "mikrotik01"

[http.routers.mikrotik01.tls]
certresolver = "cloudflare"

[[http.routers.mikrotik01.tls.domains]]
main = "mydomain.com"
sans = ["*.mydomain.com"]

[http.services]
[http.services.mikrotik01.loadBalancer]
[[http.services.mikrotik01.loadBalancer.servers]]
url = "http://10.1.2.3.4/"


Posted by Uli Köhler in MikroTik, Networking, Traefik