Similarly to my previous article about installing Redmine via docker behind a reverse proxy, this article details. Since I am running an instance of Redmine and an instance of Gitlab on the same virtual server, plus tens of other services.
While the Gitlab CE docker container is nicely preconfigured for standalone use on a dedicated VPS, running it behind a reverse proxy is not supported and will lead to a multitude of error messages – in effect, requiring lots of extra work to get up and running.
Note that we will not setup GitLab for SSH access. This is possible using this setup, but usually makes more trouble than it is worth. See this article on how to store git https passwords so you don’t have to enter your password every time.
Installing Docker & Docker-Compose
# Install prerequisites
sudo apt-get update
sudo apt-get -y install apt-transport-https ca-certificates curl software-properties-common
# Add docker's package signing key
curl -fsSL https://download.docker.com/linux/ubuntu/gpg | sudo apt-key add -
# Add repository
sudo add-apt-repository -y "deb [arch=amd64] https://download.docker.com/linux/ubuntu $(lsb_release -cs) stable"
# Install latest stable docker stable version
sudo apt-get update
sudo apt-get -y install docker-ce
# Install docker-compose
sudo curl -L "https://github.com/docker/compose/releases/download/1.23.2/docker-compose-$(uname -s)-$(uname -m)" -o /usr/local/bin/docker-compose
sudo chmod a+x /usr/local/bin/docker-compose

# Add current user to the docker group
sudo usermod -a -G docker $USER
# Enable & start docker service
sudo systemctl enable docker
sudo systemctl start docker
After running this shell script, log out & login from the system in order for the docker group to be added to the current user.
Creating the directory & docker-compose configuration
We will install Gitlab in /var/lib/gitlab which will host the data directories and the docker-compose script. You can use any directory if you use it consistently in all the configs (most importantly, docker-compose.yml and the systemd service).
# Create directories
sudo mkdir /var/lib/gitlab
Next, we’ll create /var/lib/gitlab/docker-compose.yml.
There’s a couple of things you need to change here:
- Set
gitlab_rails['gitlab_email_from'] and gitlab_rails['gitlab_email_display_name'] to whatever sender address & name you want emails to be sent from - Set the SMTP credentials (
gitlab_rails['smtp_address'], gitlab_rails['smtp_port'], gitlab_rails['smtp_user_name'], gitlab_rails['smtp_password'] & gitlab_rails['smtp_domain']) to a valid SMTP server. In rare cases you also have to change the other gitlab_rails['smtp_...'] settings. - You need to change every 4 occurrences of
gitlab.mydomain.de to your domain. - The ports configuration, in this case
'9080:80' means that Gitlab will be mapped to port 9080 on the local PC. This port is chosen somewhat arbitarily – as we will run Gitlab behind an nginx reverse proxy, the port does not need to be any port in particular (as long as you use the same port everywhere), but it may not be used by anything else. You can use any port here, provided that it’s not used for anything else. Leave 80 as-is and only change 9080 if required.
gitlab:
   image: 'gitlab/gitlab-ce:latest'
   restart: always
   hostname: 'gitlab.mydomain.de'
   environment:
     GITLAB_OMNIBUS_CONFIG: |
       external_url 'https://gitlab.mydomain.de'
       letsencrypt['enabled'] = false
       # Email
       gitlab_rails['gitlab_email_enabled'] = true
       gitlab_rails['gitlab_email_from'] = '[email protected]'
       gitlab_rails['gitlab_email_display_name'] = 'My GitLab'
       # SMTP
       gitlab_rails['smtp_enable'] = true
       gitlab_rails['smtp_address'] = "mail.mydomain.de"
       gitlab_rails['smtp_port'] = 25
       gitlab_rails['smtp_user_name'] = "[email protected]"
       gitlab_rails['smtp_password'] = "yourSMTPPassword"
       gitlab_rails['smtp_domain'] = "mydomain.de"
       gitlab_rails['smtp_authentication'] = "login"
       gitlab_rails['smtp_enable_starttls_auto'] = true
       gitlab_rails['smtp_tls'] = true
       gitlab_rails['smtp_openssl_verify_mode'] = 'none'
       # Reverse proxy nginx config
       nginx['listen_port'] = 80
       nginx['listen_https'] = false
       nginx['proxy_set_headers'] = {
         "X-Forwarded-Proto" => "https",
         "X-Forwarded-Ssl" => "on",
         "Host" => "gitlab.mydomain.de",
         "X-Real-IP" => "$$remote_addr",
         "X-Forwarded-For" => "$$proxy_add_x_forwarded_for",
         "Upgrade" => "$$http_upgrade",
         "Connection" => "$$connection_upgrade"
       }
   ports:
     - '9080:80'
   volumes:
     - './config:/etc/gitlab'
     - './logs:/var/log/gitlab'
     - './data:/var/opt/gitlab'
Setting up the systemd service
Next, we’ll configure the systemd service in /etc/systemd/system/gitlab.service.
Set User=... to your preferred user in the [Service] section. That user needs to be a member of the docker group. Also check if the WorkingDirectory=... is correct.
[Unit]
Description=Gitlab
Requires=docker.service
After=docker.service

[Service]
Restart=always
User=root
Group=docker
WorkingDirectory=/var/lib/gitlab
# Shutdown container (if running) when unit is stopped
ExecStartPre=/usr/local/bin/docker-compose -f docker-compose.yml down -v
# Start container when unit is started
ExecStart=/usr/local/bin/docker-compose -f /docker-compose.yml up
# Stop container when unit is stopped
ExecStop=/usr/local/bin/docker-compose -f docker-compose.yml down -v

[Install]
WantedBy=multi-user.target
After creating the file, we can enable and start the gitlab service:
sudo systemctl enable gitlab
sudo systemctl start gitlab
The output of sudo systemctl start gitlab should be empty. In case it is
Job for gitlab.service failed because the control process exited with error code.
See "systemctl status gitlab.service" and "journalctl -xe" for details.
you can debug the issue using journalctl -xe and journalctl -e
The first startup usually takes about 10 minutes, so grab at least one cup of coffee. You can follow the progress using journalctl -xefu gitlab. Once you see lines like
Dec 17 17:28:04 instance-1 docker-compose[4087]: gitlab_1 | {"method":"GET","path":"/-/metrics","format":"html","controller":"MetricsController","action":"index","status":200,"duration":28.82,"view":22.82,"db":0.97,"time":"2018-12-17T17:28:03.252Z","params":[],"remote_ip":null,"user_id":null,"username":null,"ua":null}the startup is finished.
Now you can check if GitLab is running using
wget -O- http://localhost:9080/
(if you changed the port config before, you need to use your custom port in the URL).
If it worked, it will show a debug message output. Since gitlab will automatically redirect you to your domain (gitlab.mydomain.de in this example) you should see something like
--2018-12-17 17:28:32--  http://localhost:9080/
Resolving localhost (localhost)... 127.0.0.1
Connecting to localhost (localhost)|127.0.0.1|:9080... connected.
HTTP request sent, awaiting response... 302 Found
Location: https://gitlab.gridbox.de/users/sign_in [following]
--2018-12-17 17:28:32--  https://gitlab.mydomain.de/users/sign_in
Resolving gitlab.gridbox.de (gitlab.mydomain.de)... 35.198.165.121
Connecting to gitlab.gridbox.de (gitlab.mydomain.de)|35.198.165.121|:443... failed: Connection refused.
Since we have not setup nginx as a reverse proxy yet, it’s totally fine that it’s saying connection refused. The redirection worked if you see the output listed above.
Setting up the nginx reverse proxy (optional but recommended)
We’ll use nginx to proxy the requests from a certain domain (Using Apache, if you use it already, is also possible but it is outside the scope of this tutorial to tell you how to do that). Install it using
sudo apt -y install nginx
First, you’ll need a domain name with DNS being configured. For this example, we’ll assume that your domain name is gitlab.mydomain.de ! You need to change it to your domain name!
First, we’ll create the config file in /etc/nginx/sites-enabled/gitlab.conf. Remember to replace gitlab.mydomain.de by your domain name! If you use a port different from 9080, replace that as ewll.
map $http_upgrade $connection_upgrade {
    default upgrade;
    '' close;
}

server {
    server_name gitlab.mydomain.de;

    access_log /var/log/nginx/gitlab.access_log;
    error_log /var/log/nginx/gitlab.error_log info;

    location / {
        proxy_pass http://127.0.0.1:9080; # docker container listens here
        proxy_read_timeout 3600s;
        proxy_http_version 1.1;
        # Websocket connection
        proxy_set_header Upgrade $http_upgrade;
        proxy_set_header Connection $connection_upgrade;
    }

    listen 80;
}
Now run sudo nginx -t to test if there are any errors in the config file. If everything is alright, you’ll see
nginx: the configuration file /etc/nginx/nginx.conf syntax is ok
nginx: configuration file /etc/nginx/nginx.conf test is successful
Once you have fixed all errors, if any, run sudo service nginx reload to apply the configuration.
We need to setup a Let’s Encrypt SSL certificate before we can check if Gitlab is working:
Securing the nginx reverse proxy using Let’s Encrypt
First we need to install certbot and the certbot nginx plugin in order to create & install the certificate in nginx:
sudo apt -y install python3-certbot python3-certbot-nginx
Fortunately certbot automates most of the process of installing & configuring SSL and the certificate. Run
sudo certbot --nginx
It will ask you to enter your Email address and agree to the terms of service and if you want to receive the EFF newsletter.
After that, certbot will ask you to select the correct domain name:
Which names would you like to activate HTTPS for?
-------------------------------------------------------------------------------
1: gitlab.mydomain.de
-------------------------------------------------------------------------------
Select the appropriate numbers separated by commas and/or spaces, or leave input
blank to select all options shown (Enter 'c' to cancel):
In this case, there is only one domain name (there will be more if you have more domains active on nginx!).
Therefore, enter 1 and press enter. certbot will now generate the certificate. In case of success you will see an output including a line like
Deploying Certificate to VirtualHost /etc/nginx/sites-enabled/gitlab.mydomain.de.conf
Now it will ask you whether to redirect all requests to HTTPS automatically:
Please choose whether or not to redirect HTTP traffic to HTTPS, removing HTTP access.
-------------------------------------------------------------------------------
1: No redirect - Make no further changes to the webserver configuration.
2: Redirect - Make all requests redirect to secure HTTPS access. Choose this for
new sites, or if you're confident your site works on HTTPS. You can undo this
change by editing your web server's configuration.
-------------------------------------------------------------------------------
Select the appropriate number [1-2] then [enter] (press 'c' to cancel):
Choose Redirect here: Type 2 and press enter. Now you can login to GitLab and finish the installation.
You need to renew the certificate every 3 months for it to stay valid, and run sudo service nginx reload afterwards to use the new certificate. If you fail to do this, users will see certificate expired error messages and won’t be able to access Gitlab easily! See this post for details on how to mostly automate this process!
Setting up Gitlab
Now you can open a browser and have a first look at your new GitLab installation:
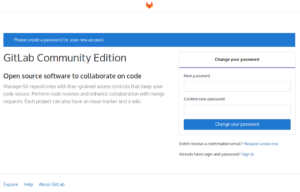
Set the new password and then login with the username root and your newly set password.
After that, open the admin area at the top by clicking at the wrench icon in the purple navigation bar at the top.

At the navigation bar at the left, click on Settings (it’s at the bottom – you need to scroll down) and then click on General.
Click the Expand button to the right of Visibility and access controls. Scroll down until you see Enabled Git access protocols and select Only HTTP(S) in the combo box.
Then click the green Save changes button.
Since we have now disabled SSH access (which we didn’t set up in the first place), you can now use GitLab. A good place to start is to create a new project and try checking it out. See this article on how to store git https passwords so you don’t have to enter your git password every time.
Note: If GitLab doesn’t send emails, check config/gitlab.rb, search for smtp and if neccessary fix the SMTP settings there. After that, sudo systemctl stop gitlab && sudo systemctl start gitlab
