uint8_t mac[6];
WiFi.macAddress(mac);
uint8_t mac[6]; WiFi.macAddress(mac);
On the ESP32, you can use heap_caps_print_heap_info() to print information to the serial port about how much memory is free on the heap (plus other details such as the largest free block).
#include <esp_heap_caps.h>

void setup() {
}

void loop() {
  heap_caps_print_heap_info(MALLOC_CAP_8BIT);
}Heap summary for capabilities 0x00000004:
At 0x3ffb8000 len 6688 free 0 allocated 4404 min_free 0
largest_free_block 0 alloc_blocks 8 free_blocks 0 total_blocks 8
At 0x3ffb0000 len 25480 free 0 allocated 22204 min_free 0
largest_free_block 0 alloc_blocks 70 free_blocks 0 total_blocks 70
At 0x3ffae6e0 len 6192 free 8 allocated 3860 min_free 8
largest_free_block 0 alloc_blocks 10 free_blocks 1 total_blocks 11
At 0x3ffb6388 len 7288 free 0 allocated 4524 min_free 0
largest_free_block 0 alloc_blocks 38 free_blocks 0 total_blocks 38
At 0x3ffb9a20 len 16648 free 8 allocated 13964 min_free 0
largest_free_block 0 alloc_blocks 32 free_blocks 1 total_blocks 33
At 0x3ffcc5d0 len 80432 free 8 allocated 73140 min_free 8
largest_free_block 0 alloc_blocks 320 free_blocks 1 total_blocks 321
At 0x3ffe0440 len 15072 free 0 allocated 12260 min_free 0
largest_free_block 0 alloc_blocks 41 free_blocks 0 total_blocks 41
At 0x3ffe4350 len 113840 free 18440 allocated 90724 min_free 2560
largest_free_block 7796 alloc_blocks 157 free_blocks 12 total_blocks 169
Totals:
free 18464 allocated 225080 min_free 2576 largest_free_block 7796
If you see an error message like the following one on your microcontroller (such as ESP32):
E (46462) esp-tls-mbedtls: mbedtls_ssl_handshake returned -0x0010
this means MBEDTLS_ERR_MPI_ALLOC_FAILED. In other words, mbedtls can’t allocate enough memory for its operation.
In order to fix this, try to reduce the amount of memory other parts of your application consume.
If you see an error message like the following one on your microcontroller (such as ESP32):
E (137011) esp-tls-mbedtls: mbedtls_ssl_handshake returned -0x2700
this means MBEDTLS_ERR_X509_CERT_VERIFY_FAILED.
Either you are using the wrong certificate on the server or you are using the wrong certificate on the mbed-tls side for verifying the certificate.
In order to check the server side, it is often helpful to check the server’s TLS certificate using OpenSSL:
openssl s_client -connect myhostname.com:443
If you see an error message like the following one on your microcontroller (such as ESP32):
E (41544) esp-tls-mbedtls: mbedtls_ssl_handshake returned -0x3B00
this means MBEDTLS_ERR_PK_INVALID_PUBKEY.
As of the version of mbed TLS used in esp-idf v4.4.3, only RSA & (certain types of) Elliptic Curve keys are supported. In my tests, X25519/EC256 keys didn’t work and there were indications that P-384 keys also didn’t work. Generally, using RSA keys is a safe bet when working with mbed-tls.
Also see our previous post which uses dynamically allocated memory using xTaskCreate(): How to add FreeRTOS task (thread) to any PlatformIO project
#include <freertos/FreeRTOS.h>
#include <freertos/task.h>

constexpr size_t MY_TASK_STACK_SIZE = 1024;
static StaticTask_t myTaskBuffer;
static StackType_t myTaskStack[ MY_TASK_STACK_SIZE ];


void MyTask(void * parameter)
{
    while(true)
    {
        // TODO Your code goes here
    }
}

void setup()
{
    xTaskCreateStatic(
        MyTask, // Task function
        "MyTask", // Name
        MY_TASK_STACK_SIZE, // Stack size
        nullptr, // Parameter
        tskIDLE_PRIORITY,
        myTaskStack,
        &myTaskBuffer);
}

void loop() {
}
On FreeRTOS on the ESP32, you want to use a critical zone like this:
portENTER_CRITICAL();
// Your critical code goes here!
portEXIT_CRITICAL();
but while compiling the procject, you see an error message like
src/main.cpp: In function 'void MyFunc(size_t, int16_t)':
/home/uli/.platformio/packages/framework-arduinoespressif32@src-f2ea83e2545300b10a69ff44ef9dc6cd/tools/sdk/esp32/include/freertos/port/xtensa/include/freertos/portmacro.h:476:75: error: too few arguments to function 'void vPortEnterCritical(portMUX_TYPE*)'
 #define portENTER_CRITICAL(mux)                     vPortEnterCritical(mux)
You need to use portENTER_CRITICAL() and portEXIT_CRITICAL() with a spinlock, i.e.
portENTER_CRITICAL(&mySpinlock);
// TODO Your critical code goes here!
portEXIT_CRITICAL(&mySpinlock);
In order to see a full example on how to initialize a spinlock in FreeRTOS and use it for critical zones, see our previous post ESP32 critical zone example using FreeRTOS / PlatformIO
In order to enter a critical zone on the ESP32 using FreeRTOS, you have to do the following:
Globally declare a spinlock:
portMUX_TYPE mySpinlock;
In setup(), initialize the spinlock:
spinlock_initialize(&mySpinlock);
Now, wherever you want to enter a critical zone, run:
portENTER_CRITICAL(&mySpinlock);
// TODO Your critical code goes here!
portEXIT_CRITICAL(&mySpinlock);
When using this in an interrupt handler, use this instead:
portENTER_CRITICAL_ISR(&mySpinlock);
// TODO Your critical code goes here!
portEXIT_CRITICAL_ISR(&mySpinlock);
FreeRTOS will ensure that no two threads using mySpinlock are run at the same time.
When trying to compile your Arduino PlatformIO project, you see multiple error messages like the following.
In file included from /home/uli/.platformio/packages/toolchain-xtensa-esp32/xtensa-esp32-elf/sys-include/stdlib.h:19,
                 from /home/uli/.platformio/packages/toolchain-xtensa-esp32/xtensa-esp32-elf/include/c++/8.4.0/cstdlib:75,
                 from /home/uli/.platformio/packages/toolchain-xtensa-esp32/xtensa-esp32-elf/include/c++/8.4.0/stdlib.h:36,
                 from /home/uli/.platformio/packages/framework-arduinoespressif32/cores/esp32/WString.h:26,
                 from /home/uli/.platformio/packages/framework-arduinoespressif32/cores/esp32/Print.h:26,
                 from /home/uli/.platformio/packages/framework-arduinoespressif32/libraries/WiFi/src/WiFi.h:27,
                 from /home/uli/.platformio/packages/framework-arduinoespressif32/libraries/WiFi/src/WiFi.cpp:24:
/home/uli/.platformio/packages/framework-arduinoespressif32/tools/sdk/esp32/include/freertos/port/xtensa/include/freertos/portmacro.h:717:41: error: static assertion failed: portGET_ARGUMENT_COUNT() result does not match for 0 arguments
_Static_assert(portGET_ARGUMENT_COUNT() == 0, "portGET_ARGUMENT_COUNT() result does not match for 0 arguments");For me, the solution was as follows. I had
build_flags = --std=c++17
in my platformio.ini. Replacing it by
build_flags = --std=gnu++17
fixed the issue for me.
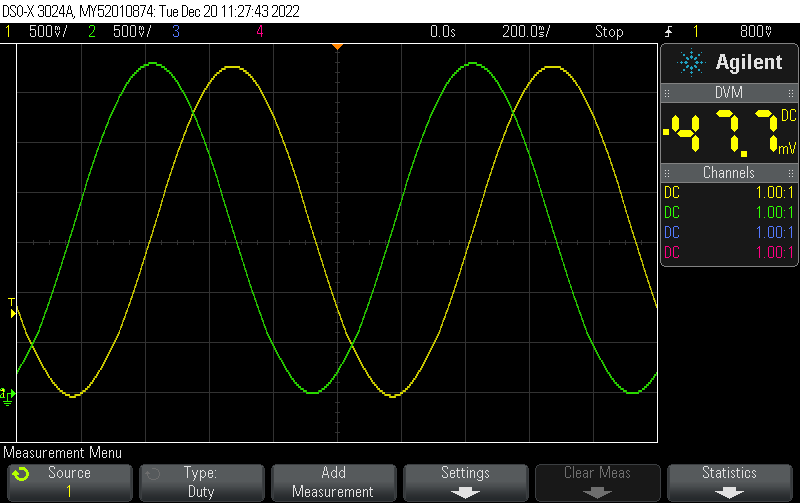
Based on our previous post How to generate PWM output representing a sine wave on the ESP32 (Arduino/PlatformIO) this post uses two different IO pins to generate both a sine and a cosine wave dynamically.
#include <Arduino.h>
#include <driver/ledc.h>

void setup() {
    Serial.begin(115200);

    ledcSetup(LEDC_CHANNEL_0, 10000 /* Hz */, 12);
    ledcSetup(LEDC_CHANNEL_1, 10000 /* Hz */, 12);

    ledcAttachPin(GPIO_NUM_32, LEDC_CHANNEL_0);
    ledcAttachPin(GPIO_NUM_25, LEDC_CHANNEL_1);
}

/**
 * @brief Calculate the PWM duty cycle (assuming 12 bits resolution) of a sine wave of
 * given frequency. micros() is used as a timebase
 *
 * @param frequency The frequency in Hz
 * @return int the corresponding 12-bit PWM value
 */
int sinePWMValue(float frequency, int maxPWMValue, float (*sinCos)(float)) {
  unsigned long currentMicros = micros(); // get the current time in microseconds

  // calculate the sine wave value for the current time
  int halfMax = maxPWMValue/2;
  int sineValue = halfMax + (halfMax-10) * sinCos(2 * PI * currentMicros / (1000000 / frequency));
  return sineValue;
}

void loop() {
    // Example of how to change the duty cycle to 25%
    ledcWrite(LEDC_CHANNEL_0, sinePWMValue(1.0, 4096, sinf));
    ledcWrite(LEDC_CHANNEL_1, sinePWMValue(1.0, 4096, cosf));
}
The output, filtered by a 4th order Salley-Key filter each (using the LM324) looks like this:
The following function will compute the value of a sine wave using micros() as a timebase, with adjustable frequency. It is hardcoded to expect a 12 bit resolution PWM
/**
 * @brief Calculate the PWM duty cycle (assuming 12 bits resolution) of a sine wave of
 * given frequency. micros() is used as a timebase
 *
 * @param frequency The frequency in Hz
 * @return int the corresponding 12-bit PWM value
 */
int sinePWMValue(float frequency) {
  unsigned long currentMicros = micros(); // get the current time in microseconds

  // calculate the sine wave value for the current time
  int sineValue = 2048 + 2047 * sin(2 * PI * currentMicros / (1000000 / frequency));
  return sineValue;
}
Based on this, we can use the basic code of our previous post ESP32 minimal Arduino PWM output example (PlatformIO) to generate a 1Hz sine wave (represented by a 10kHz PWM):
#include <Arduino.h>
#include <driver/ledc.h>

void setup() {
    Serial.begin(115200);

    ledcSetup(LEDC_CHANNEL_0, 10000 /* Hz */, 12);

    ledcAttachPin(GPIO_NUM_14, LEDC_CHANNEL_0);
    ledcWrite(LEDC_CHANNEL_0, 2048); // 50%
}

/**
 * @brief Calculate the PWM duty cycle (assuming 12 bits resolution) of a sine wave of
 * given frequency. micros() is used as a timebase
 *
 * @param frequency The frequency in Hz
 * @return int the corresponding 12-bit PWM value
 */
int sinePWMValue(float frequency) {
  unsigned long currentMicros = micros(); // get the current time in microseconds

  // calculate the sine wave value for the current time
  int sineValue = 2048 + 2047 * sin(2 * PI * currentMicros / (1000000 / frequency));
  return sineValue;
}

void loop() {
    // Example of how to change the duty cycle to 25%
    ledcWrite(LEDC_CHANNEL_0, sinePWMValue(1.0));
}
#include <Arduino.h>
#include <driver/ledc.h>

void setup() {
    Serial.begin(115200);

    ledcSetup(LEDC_CHANNEL_0, 10000 /* Hz */, 12);

    ledcAttachPin(GPIO_NUM_14, LEDC_CHANNEL_0);
    ledcWrite(LEDC_CHANNEL_0, 2048); // 50%
}

void loop() {
    // Example of how to change the duty cycle to 25%
    ledcWrite(LEDC_CHANNEL_0, 1024);
}
This example configures the LEDC PWM timer at 10 kHz with 12 bit resolution, outputting a 50% duty cycle PWM on IO14. This code uses the ESP-IDF API directly in order to configure the PWM
#include <Arduino.h>
#include <driver/ledc.h>

void setup() {
    Serial.begin(115200);

    ledc_timer_config_t ledc_timer = {
        .speed_mode       = LEDC_HIGH_SPEED_MODE,
        .duty_resolution  = LEDC_TIMER_12_BIT,
        .timer_num        = LEDC_TIMER_0,
        .freq_hz          = 10000,
        .clk_cfg          = LEDC_AUTO_CLK
    };
    ESP_ERROR_CHECK(ledc_timer_config(&ledc_timer));

    ledc_channel_config_t ledc_channel = {
        .gpio_num       = GPIO_NUM_14,
        .speed_mode     = LEDC_HIGH_SPEED_MODE,
        .channel        = LEDC_CHANNEL_0,
        .intr_type      = LEDC_INTR_DISABLE,
        .timer_sel      = LEDC_TIMER_0,
        .duty           = 2048, // Set duty to 50%
        .hpoint         = 0
    };
    ESP_ERROR_CHECK(ledc_channel_config(&ledc_channel));
}

void loop() {
}
When you see the following error message:
error: 'class HardwareSerial' has no member named 'prinln'; did you mean 'println'?
You have a typo in your code: You are trying to call prinln() but you’re missing the t in println(). Add the t so you’re calling println() and retry compiling your project.
When you see a log message like
[ 13701][E][WiFiUdp.cpp:183] endPacket(): could not send data: 118
on your microcontroller, you can use Serial.println(strerror(118)); to find out what the error code 118 means.
In the case of 118 (tested with arduino-espressif32 v2.0.5) the error means
Host unreachable
Typically, this error means that you are not connected to the internet / network but it might also mean that the
Note that the error message by itself does not give any indication what part of your code tried to send the UDP packet – hence, it’s not immediately clear what host specifically can’t be reached. However, this message specifically happens with code that sends UDP packets. In almost all cases, the error won’t happen when the microcontroller responds to UDP packets from another host (such as ArduinoOTA) but when the microcontroller tries to send packets to the network initiated by the microcontroller itself (such as NTP).
The following example reads a HTTPS/TLS certificate from LittleFS (cert.pem and privkey.pem – these are just standard X.509 PEM files) and uses those to initialize a HTTPS server. Most of this example is based on the esp-idf https_server example.
Our code to initialize the HTTPS server uses code from the following posts:
The core initialization sequence works like this:
// These need to be GLOBAL variables, they still need to exist
// after initialization!
std::string cert;
std::string privkey;

httpd_ssl_config_t conf = HTTPD_SSL_CONFIG_DEFAULT();
httpd_handle_t server = nullptr;

void InitializeHTTPServer() {
        std::string cert = ReadFileToString("/cert.pem");
        std::string privkey = ReadFileToString("/privkey.pem");

        conf.cacert_pem = (const uint8_t*)this->cert.c_str();
        conf.cacert_len = this->cert.size() + 1;

        conf.prvtkey_pem = (const uint8_t*)this->privkey.c_str();
        conf.prvtkey_len = this->privkey.size() + 1;

        esp_err_t ret = httpd_ssl_start(&server, &conf);
        if (ESP_OK != ret) {
            ESP_LOGI(TAG, "Error starting server!");
            return;
        }
}
However it is typically far more convenient to use our HTTPSServer class:
class HTTPSServer {
public:

    HTTPSServer(): conf(HTTPD_SSL_CONFIG_DEFAULT()) {
    }

    void ReadCertificateInfoFromFilesystem() {
        cert = ReadFileToString("/cert.pem");
        privkey = ReadFileToString("/privkey.pem");
    }

    void StartServer() {
        // Start the httpd server
        ESP_LOGI(TAG, "Starting server");

        ReadCertificateInfoFromFilesystem();

        conf.cacert_pem = (const uint8_t*)this->cert.c_str();
        conf.cacert_len = this->cert.size() + 1;

        conf.prvtkey_pem = (const uint8_t*)this->privkey.c_str();
        conf.prvtkey_len = this->privkey.size() + 1;

        esp_err_t ret = httpd_ssl_start(&server, &conf);
        if (ESP_OK != ret) {
            ESP_LOGI(TAG, "Error starting server!");
            return;
        }
    }

    void RegisterHandler(const httpd_uri_t *uri_handler) {
        httpd_register_uri_handler(this->server, uri_handler);
    }

    httpd_handle_t server = nullptr;

    httpd_ssl_config_t conf;
    std::string cert;
    std::string privkey;
};
void setup() {
    InitFilesystem();

    // TODO setup wifi network

    httpsServer.StartServer();
    // Register your
    httpsServer.RegisterHandler(&root);
}#include <Arduino.h>
#include <WiFi.h>
#include <LittleFS.h>
#include <string>
#include <esp_https_server.h>
#include "esp_tls.h"
//AsyncWebServer server(80);
static const char *TAG = "https-littlefs-example";
volatile bool filesystemOK = false;
void InitFilesystem() {
// Initialize LittleFS
if (!LittleFS.begin(false /* false: Do not format if mount failed */)) {
Serial.println("Failed to mount LittleFS");
if (!LittleFS.begin(true /* true: format */)) {
Serial.println("Failed to format LittleFS");
} else {
Serial.println("LittleFS formatted successfully");
filesystemOK = true;
}
} else { // Initial mount success
filesystemOK = true;
}
}
/* An HTTP GET handler */
static esp_err_t root_get_handler(httpd_req_t *req)
{
httpd_resp_set_type(req, "text/html");
httpd_resp_send(req, "<h1>Hello Secure World!</h1>", HTTPD_RESP_USE_STRLEN);
return ESP_OK;
}
static const httpd_uri_t root = {
.uri = "/",
.method = HTTP_GET,
.handler = root_get_handler
};
size_t LittleFSFilesize(const char* filename) {
auto file = LittleFS.open(filename, "r");
size_t filesize = file.size();
// Don't forget to clean up!
file.close();
return filesize;
}
std::string ReadFileToString(const char* filename) {
auto file = LittleFS.open(filename, "r");
size_t filesize = file.size();
// Read into temporary Arduino String
String data = file.readString();
// Don't forget to clean up!
file.close();
return std::string(data.c_str(), data.length());
}
class HTTPSServer {
public:
HTTPSServer(): conf(HTTPD_SSL_CONFIG_DEFAULT()) {
}
void ReadCertificateInfoFromFilesystem() {
cert = ReadFileToString("/cert.pem");
privkey = ReadFileToString("/privkey.pem");
}
void StartServer() {
// Start the httpd server
ESP_LOGI(TAG, "Starting server");
ReadCertificateInfoFromFilesystem();
conf.cacert_pem = (const uint8_t*)this->cert.c_str();
conf.cacert_len = this->cert.size() + 1;
conf.prvtkey_pem = (const uint8_t*)this->privkey.c_str();
conf.prvtkey_len = this->privkey.size() + 1;
esp_err_t ret = httpd_ssl_start(&server, &conf);
if (ESP_OK != ret) {
ESP_LOGI(TAG, "Error starting server!");
return;
}
// Set URI handlers
ESP_LOGI(TAG, "Registering URI handlers");
httpd_register_uri_handler(server, &root);
return;
}
void RegisterHandler(const httpd_uri_t *uri_handler) {
httpd_register_uri_handler(this->server, uri_handler);
}
httpd_handle_t server = nullptr;
httpd_ssl_config_t conf;
std::string cert;
std::string privkey;
};
HTTPSServer httpsServer;
void setup() {
Serial.begin(115200);
delay(500);
InitFilesystem();
// Connect Wifi, restart if not connecting
// https://techoverflow.net/2021/01/21/how-to-fix-esp32-not-connecting-to-the-wifi-network/
WiFi.begin("MyWifi", "Lobae1tie5achokef8riequohgohx");
uint32_t notConnectedCounter = 0;
while (WiFi.status() != WL_CONNECTED) {
delay(100);
Serial.println("Wifi connecting...");
notConnectedCounter++;
if(notConnectedCounter > 150) { // Reset board if not connected after 5s
Serial.println("Resetting due to Wifi not connecting...");
ESP.restart();
}
}
Serial.print("Wifi connected, IP address: ");
Serial.println(WiFi.localIP());
httpsServer.StartServer();
httpsServer.RegisterHandler(&root);
}
void loop() {
// put your main code here, to run repeatedly:
delay(1000);
}[env:esp32dev] platform = espressif32 platform_packages = framework-arduinoespressif32 @ https://github.com/espressif/arduino-esp32.git#2.0.5 board = esp32dev framework = arduino board_build.filesystem = littlefs monitor_speed = 115200
In order to use the LittleFS library that comes with Arduino on the ESP32, use the following function
#include <LittleFS.h>

bool filesystemOK = false;

void InitFilesystem() {
  // Initialize LittleFS
  if (!LittleFS.begin(false /* false: Do not format if mount failed */)) {
    Serial.println("Failed to mount LittleFS");
    if (!LittleFS.begin(true /* true: format */)) {
      Serial.println("Failed to format LittleFS");
    } else {
      Serial.println("LittleFS formatted successfully");
      filesystemOK = true;
    }
  } else { // Initial mount success
    filesystemOK = true;
  }
}
Additionally, you need to configure PlatformIO to use LittleFS:
board_build.filesystem = littlefs
Now, in setup(), call
InitFilesystem();
If you have errors including LittleFS.h, you might need to explicitly use a recent arduino-esp32 version in platformio.ini:
platform_packages = framework-arduinoespressif32 @ https://github.com/espressif/arduino-esp32.git#2.0.5
In case you absolutely need to use an older arduino-esp32 version that doesn’t support LittleFS out of the box, you can use the lorol/LittleFS library as outlined in our previous post: How to initialize LittleFS in PlatformIO on the ESP32 using the lorol/LittleFS library
platformio.ini example:[env:esp32dev] platform = espressif32 platform_packages = framework-arduinoespressif32 @ https://github.com/espressif/arduino-esp32.git#2.0.5 board = esp32dev framework = arduino board_build.filesystem = littlefs monitor_speed = 115200
The following code will print a std::string to Serial as sequence of Hex characters. It can easily be adapted to work with other types of strings.
const char* cstr = str.c_str();
for (size_t i = 0; i < str.size(); i++)
{
    Serial.printf("%02X ", cstr[i]);
}
This code is based on our previous post How to print byte as two hex digits in Arduino
In Arduino, if you have a std::string:
std::string str = "test";
you can’t directly print it – trying to do so leads to the following error messages:
src/main.cpp: In function 'void setup()':
src/main.cpp:122:22: error: no matching function for call to 'HardwareSerial::println(std::__cxx11::string&)'
   Serial.println(cert);
                      ^
In file included from /home/uli/.platformio/packages/framework-arduinoespressif32@src-76bf6cf11a70195daa934985b7bd68e2/cores/esp32/Stream.h:26,
                 from /home/uli/.platformio/packages/framework-arduinoespressif32@src-76bf6cf11a70195daa934985b7bd68e2/cores/esp32/Arduino.h:166,
                 from src/main.cpp:1:
/home/uli/.platformio/packages/framework-arduinoespressif32@src-76bf6cf11a70195daa934985b7bd68e2/cores/esp32/Print.h:96:12: note: candidate: 'size_t Print::println(const __FlashStringHelper*)'
     size_t println(const __FlashStringHelper *);
            ^~~~~~~
/home/uli/.platformio/packages/framework-arduinoespressif32@src-76bf6cf11a70195daa934985b7bd68e2/cores/esp32/Print.h:96:12: note:   no known conversion for argument 1 from 'std::__cxx11::string' {aka 'std::__cxx11::basic_string<char>'} to 'const __FlashStringHelper*'
/home/uli/.platformio/packages/framework-arduinoespressif32@src-76bf6cf11a70195daa934985b7bd68e2/cores/esp32/Print.h:97:12: note: candidate: 'size_t Print::println(const String&)'
     size_t println(const String &s);
You can use .c_str() to convert it to a NUL-terminated char* which can be printed directly:
Serial.println(str.c_str());
If you have an Arduino String:
String arduinoStr = "test123";
you can easily convert it to a std::string by using:
std::string stdStr(arduinoStr.c_str(), arduinoStr.length());
The std::string constructor will copy the data, therefore you can de-allocate the Arduino String instance safely.