ESP8266/ESP32

How to fix ESP32 error: ‘portTICK_PERIOD_MS’ was not declared in this scope

Problem:

While trying to compile your ESP-IDF firmware (with or without PlatformIO), you see an error message such as

src/main.cpp:13:27: error: 'portTICK_PERIOD_MS' was not declared in this scope
   13 |         vTaskDelay(1000 / portTICK_PERIOD_MS);

Solution:

Include FreeRTOS by adding the following lines to the top of the file where the error occured (src/main.cpp in this example):

#include <freertos/FreeRTOS.h>
#include <freertos/task.h>


Posted by Uli Köhler in ESP8266/ESP32, FreeRTOS, PlatformIO

How to fix ESP32 error: ‘vTaskDelay’ was not declared in this scope

Problem:

While trying to compile your ESP-IDF firmware (with or without PlatformIO), you see an error message such as

src/main.cpp:13:9: error: 'vTaskDelay' was not declared in this scope
   13 |         vTaskDelay(1000 / portTICK_PERIOD_MS);

Solution:

Include FreeRTOS by adding the following lines to the top of the file where the error occured (src/main.cpp in this example):

#include <freertos/FreeRTOS.h>
#include <freertos/task.h>


Posted by Uli Köhler in ESP8266/ESP32, FreeRTOS, PlatformIO

How to generate inverted pulses using the ESP32 RMT module (Arduino & PlatformIO)

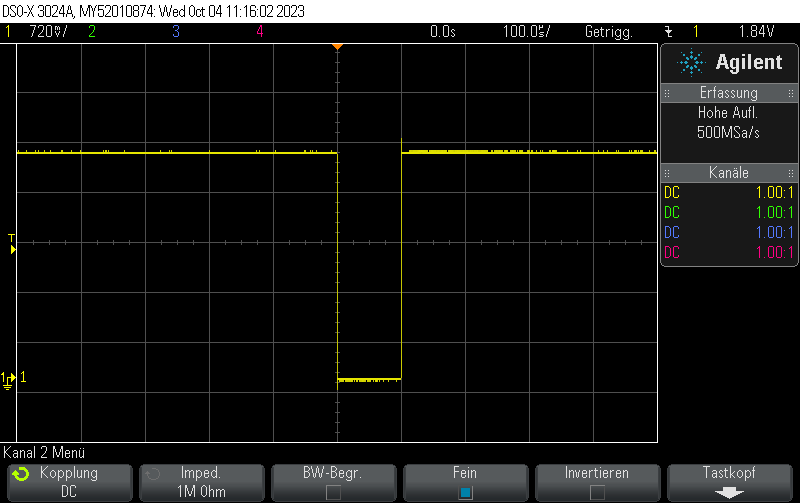
In our previous post ESP32 RMT pulse generation minimal example using Arduino & PlatformIO using the RMT peripheral. The pulses have a steady state (off state) of 0V and a pulse voltage of 3.3V.

If we want to generate inverted pulses, we have to invert the level entries in the pulseRMT array:

static const rmt_item32_t pulseRMT[] = {
    {{{
      /*pulse duration=*/100, /*pulse level*/0,
      // After pulse, output 1
      0, 1
    }}},
};

and additionally configure the RMT output when the pulse is finished using

config.tx_config.idle_level = RMT_IDLE_LEVEL_HIGH;
config.tx_config.idle_output_en = true;

This is how the pulse looks like:
Full example:

#include <Arduino.h>
#include <esp_log.h>
#include <driver/rmt.h>

// Output pulse train on D14
constexpr gpio_num_t rmtPin = GPIO_NUM_14;
constexpr rmt_channel_t RMT_TX_CHANNEL = RMT_CHANNEL_0;

static const rmt_item32_t pulseRMT[] = {
    {{{
      /*pulse duration=*/100, /*pulse level*/0,
      // After pulse, output 1
      0, 1
    }}},
};

void setup() {
  Serial.begin(115200);

  rmt_config_t config = RMT_DEFAULT_CONFIG_TX(rmtPin, RMT_TX_CHANNEL);
  config.clk_div = 80; // input clock 80 MHz => output clk 1 MHz
  config.tx_config.idle_level = RMT_IDLE_LEVEL_HIGH;
  config.tx_config.idle_output_en = true;

  ESP_ERROR_CHECK(rmt_config(&config));
  ESP_ERROR_CHECK(rmt_driver_install(config.channel, 0, 0));

}

void loop() {
  ESP_ERROR_CHECK(rmt_write_items(RMT_TX_CHANNEL, pulseRMT, sizeof(pulseRMT) / sizeof(rmt_item32_t), true));
  delay(10);
}


[env:esp32dev]
platform = espressif32
board = esp32dev
framework = arduino
monitor_speed = 115200

 

Posted by Uli Köhler in Arduino, C/C++, ESP8266/ESP32, PlatformIO

ESP32 HTTP float query parser with range check example using HumanESPHTTP

Example for HumanESPHTTP

static const httpd_uri_t setPowerHandler = {
    .uri       = "/api/set-power",
    .method    = HTTP_GET,
    .handler   = [](httpd_req_t *request) {
        QueryURLParser parser(request);
        if(parser.HasParameter("power")) {
            std::string power = parser.GetParameter("power");
            // Parse power as float
            float powerFloat;
            try {
              powerFloat = std::stof(power);
            } catch (const std::invalid_argument& e) {
              httpd_resp_set_status(request, "400 Bad Request");
              httpd_resp_set_type(request, "text/plain");
              httpd_resp_sendstr(request, "Error: Invalid argument for power parameter (not a float)!");
              return ESP_OK;
            }
            // Check range
            if(powerFloat < 0.0 || powerFloat > 1.0) {
              httpd_resp_set_status(request, "400 Bad Request");
              httpd_resp_set_type(request, "text/plain");
              httpd_resp_sendstr(request, "Error: Invalid argument for power parameter (not in range 0.0 ... 1.0)!");
              return ESP_OK;
            }
            // TODO: Your code goes here
            // Example code: send back power
            httpd_resp_send_chunk(request, "Power is: ", HTTPD_RESP_USE_STRLEN);
            httpd_resp_send_chunk(request, std::to_string(powerFloat).c_str(), HTTPD_RESP_USE_STRLEN);
            httpd_resp_send_chunk(request, nullptr, 0); // Finished
        } else {
            httpd_resp_set_type(request, "text/plain");
              httpd_resp_set_status(request, "400 Bad Request");
            httpd_resp_sendstr(request, "No 'power' query parameter found!");
        }
        return ESP_OK;
    }
};


Posted by Uli Köhler in C/C++, ESP8266/ESP32

ESP32 RMT pulse generation minimal example using Arduino & PlatformIO

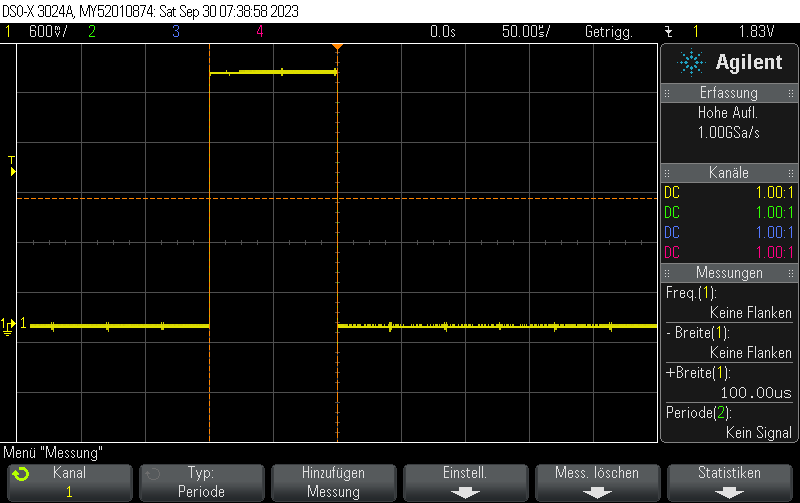
The following example will generate 100us pulses every 10ms. The pulses are generated using the RMT peripheral.

#include <Arduino.h>
#include <esp_log.h>
#include <driver/rmt.h>

// Output pulse train on D14
constexpr gpio_num_t rmtPin = GPIO_NUM_14;
constexpr rmt_channel_t RMT_TX_CHANNEL = RMT_CHANNEL_0;


static const rmt_item32_t pulseRMT[] = {
    {{{
      /*pulse duration=*/100, /*pulse level*/1,
      // After pulse, output 0
      0, 0
    }}},
};


void setup() {
  Serial.begin(115200);

  rmt_config_t config = RMT_DEFAULT_CONFIG_TX(rmtPin, RMT_TX_CHANNEL);
  config.clk_div = 80; // input clock 80 MHz => output clk 1 MHz

  ESP_ERROR_CHECK(rmt_config(&config));
  ESP_ERROR_CHECK(rmt_driver_install(config.channel, 0, 0));

}

void loop() {
  ESP_ERROR_CHECK(rmt_write_items(RMT_TX_CHANNEL, pulseRMT, sizeof(pulseRMT) / sizeof(rmt_item32_t), true));
  delay(10);
}


[env:esp32dev]
platform = espressif32
board = esp32dev
framework = arduino
monitor_speed = 115200
 

Posted by Uli Köhler in Arduino, C/C++, ESP8266/ESP32, PlatformIO

What is the default esp_eth_update_input_path() handler function?

By default, esp-idf or the Arduino framework handles incoming Ethernet packets using the

static esp_err_t eth_input_to_netif(esp_eth_handle_t eth_handle, uint8_t *buffer, uint32_t length, void *priv);

function in components/esp_eth/src/esp_eth_netif_glue.c which (besides calling just calls the exported functionesp_netif_receive():

static esp_err_t eth_input_to_netif(esp_eth_handle_t eth_handle, uint8_t *buffer, uint32_t length, void *priv)
{
    return esp_netif_receive((esp_netif_t *)priv, buffer, length, NULL);
}

The function esp_netif_receive() is declared in esp_netif.h and implemented in esp_netif_lwip.c.

This function will call esp_netif->lwip_input_fn(...) on the packet, which will in turn call the interface-type specific .input_fn(...), which is one of

or for wrapped interfaces:

  • esp_netif_lwip_slip_input
  • esp_netif_lwip_ppp_input
Posted by Uli Köhler in ESP8266/ESP32, Networking

How to use C++17 / C++23 with PlatformIO using ESP32 / Arduino

Problem:

By default, PlatformIO uses -std=gnu++11 as a compiler flag but you want to use C++17 or C++23 features.

If you just use

build_flags = -std=gnu++17

this will lead to g++ being called with g++ ... -std=gnu++17 ... -std=gnu++11 ... compiler flags. The latter one – gnu++11 i.e. C++11 will take precedence.

Solution:

In order to activate C++17, use

build_flags = -std=gnu++17
build_unflags = -std=gnu++11

In order to activate C++23 (not fully implemented yet in G++), you currently need to use -std=gnu++2a:

build_flags = -std=gnu++2a
build_unflags = -std=gnu++11


Posted by Uli Köhler in Arduino, ESP8266/ESP32, PlatformIO

ESP32 family reference manuals & datasheets (direct links)

ESP8xxx series

ESP32 series

ESP32S series

ESP32C series

ESP32H series

Source: Espressif document download page

Posted by Uli Köhler in ESP8266/ESP32

How to parse query URLs using ESP-IDF webserver on ESP32

This utility class allows you to easily parse query URLs. In order to use it, you must add -std=gnu++17 or later to your compiler flags.

class QueryURLParser {
public:
    QueryURLParser(httpd_req_t *req) {
        size_t queryURLLen = httpd_req_get_url_query_len(req) + 1;

        if(queryURLLen > 1) {
            // Allocate temporary buffer to store the parameter
            char buf[queryURLLen] = {0};
            if (httpd_req_get_url_query_str(req, buf, queryURLLen) != ESP_OK) {
                ESP_LOGE("Query URL parser", "Failed to extract query URL");
                // Set string to empty string => "not found"
                this->queryURLString = "";
            } else {
                // Copy into a std::string
                this->queryURLString = std::string(buf, queryURLLen);
            }
            delete[] buf;
        }
    }


    std::string GetParameter(const char* key) {
        // Allocate enough space to store the parameter.
        // NOTE: The parameter can only be as long as the query URL itself.
        // Therefore, allocating "too much" space upfront will
        // avoid unneccessary copying
        size_t bufSize = queryURLString.size();
        char* buf = (char*)malloc(bufSize);

        /* Get value of expected key from query string */
        esp_err_t err = httpd_query_key_value(queryURLString.c_str(), key, buf, bufSize);
        if(err != ESP_OK) {
          ESP_LOGE("Query URL parser", "parsing URL");
          Serial.println(esp_err_to_name(err));
          free(buf);
          return "";
        }
        // Convert to std::string
        std::string param(buf);
        free(buf);
        // Shrink param so it fits.
        return param;
    }

private:
    std::string queryURLString;
};

Usage example:

static const httpd_uri_t setMQTTURLHandler = {
    .uri       = "/api/set-mqtt-url",
    .method    = HTTP_GET,
    .handler   = [](httpd_req_t *req) {
        QueryURLParser parser(req);
        std::string url = parser.GetParameter("url");
        if(url.empty()) {
            return SendStatusError(req, "Query parameter 'url' missing");
        }
        // TODO Do something with [url]
        return SendStatusOK(req);
    }
};

SendStatusError() and SendStatusOK() are from our blogpost ESP-IDF webserver: How to respond with JSON success or error message.

Posted by Uli Köhler in C/C++, ESP8266/ESP32

ESP-IDF webserver: How to respond with JSON success or error message

These utility functions allow you to easily respond with a {"status": "ok"} or {"status": "error", "error": "..."}.

Note that the error message is not being escaped but sent as-is, so some error messages containing quotes (") or other special characters might break the JSON.

esp_err_t SendStatusOK(httpd_req_t *request) {
    httpd_resp_set_type(request, "application/json");
    httpd_resp_sendstr(request, "{\"status\":\"ok\"}");
    return ESP_OK;
}

esp_err_t SendStatusError(httpd_req_t *request, const char* description) {
    httpd_resp_set_type(request, "application/json");
    httpd_resp_send_chunk(request, "{\"status\":\"error\", \"error\": \"", HTTPD_RESP_USE_STRLEN);
    // NOTE: We silently assume that description does not have any special characters
    httpd_resp_send_chunk(request, description, HTTPD_RESP_USE_STRLEN);
    httpd_resp_send_chunk(request, "\"}", HTTPD_RESP_USE_STRLEN);
    httpd_resp_send_chunk(request, nullptr, 0); // Finished
    return ESP_OK;
}


Posted by Uli Köhler in C/C++, ESP8266/ESP32

Easy-to-use ESP32 IDF webserver C++ wrapper class

#include <esp_http_server.h>

/**
 * HTTP server.
 * Works with ESP-IDF library internally.
 * 
 * Usage:
 * First call http.StartServer()
 * Then call http.RegisterHandler(...) for all handlers
 */
class HTTPServer {
public:
    HTTPServer(): conf(HTTPD_DEFAULT_CONFIG()) {
    }

    void StartServer() {
        if (httpd_start(&server, &conf) != ESP_OK) {
            ESP_LOGE("HTTP server", "Error starting server!");
        }
    }

    void RegisterHandler(const httpd_uri_t *uri_handler) {
        httpd_register_uri_handler(this->server, uri_handler);
    }

    httpd_handle_t server = nullptr;
    httpd_config_t conf;
};

Usage example:

// Declare server globally
HTTPServer http;

// Example handler
static const httpd_uri_t rebootHandler = {
    .uri       = "/api/reboot",
    .method    = HTTP_GET,
    .handler   = [](httpd_req_t *req) {
        SendStatusOK(req);
        delay(20);
        ESP.restart();
        return ESP_OK;
    }
};

void setup() {
    // TODO setup wifi or Ethernet
    http.StartServer();
    http.RegisterHandler(&myHandler);
}


Posted by Uli Köhler in C/C++, Embedded, ESP8266/ESP32

ESP-IDF HTTP webserver minimal ArduinoJson serialization example

static const httpd_uri_t valueHandler = {
    .uri       = "/api/value",
    .method    = HTTP_GET,
    .handler   = [](httpd_req_t *req) {
        httpd_resp_set_type(req, "application/json");
        // create json docuemnt
        DynamicJsonDocument json(1024);
        json["value"] = 1.0;
        // Serialize JSON to string
        std::string buf;
        serializeJson(json, buf);
        // Send response
        httpd_resp_send(req, buf.c_str(), buf.length());
        return ESP_OK;
    }
};

In order to add the ArduinoJson to PlatformIO, add the following lib_deps to platformio.ini:

lib_deps =
    [email protected]


Posted by Uli Köhler in Arduino, ESP8266/ESP32

How to fix ESP32 error: ‘ESP_LOGE’ was not declared in this scope

Problem:

When trying compile your ESP32 project, you see an error message such as

.pio/libdeps/esp32dev/HumanESPHTTP/src/QueryURLParser.cpp:29:9: error: 'ESP_LOGE' was not declared in this scope
         ESP_LOGE("Query URL parser", "parsing URL");
         ^~~~~~~~

Solution:

At the top of the file where the error occurs (QueryURLParser.cpp in this example), add the following line:

#include <esp_log.h>


Posted by Uli Köhler in C/C++, ESP8266/ESP32

How to fix ESP32 Last error reported from esp-tls: 0x8008

Problem:

While trying to use TLS such as MQTTS or HTTPS on the ESP32, you see an error message like

E (333183) MQTT_CLIENT: mqtt_message_receive: transport_read() error: errno=119
[328153][E][MyMQTT.cpp:80] log_error_if_nonzero(): [MQTT] Last error reported from esp-tls: 0x8008
E (333191) MQTT_CLIENT: mqtt_process_receive: mqtt_message_receive() returned -1

Solution:

0x8008 means  ESP_ERR_ESP_TLS_TCP_CLOSED_FIN. In other words, a TCP connection had been established successfully but unexpectedly, the connection has been closed by the server.

This is often caused by the server software crashing, or restarting in some way. When a server process is terminated, the operating system will cleanup after it and close all connections.

In order to debug the issue, start by checking the log of your server message and/or system log to check for unintended crashes. If that doesn’t help, it’s sometimes helpful to packet capture the communication between the ESP32 and the server. You can also write a software script doing the same communication with the server as the ESP32. This will often allow you to try out changes much more easily than on the microcontroller and observe what’s happening using a debugger.

Posted by Uli Köhler in C/C++, Embedded, ESP8266/ESP32, Networking

How to fix ESP32 TRANSPORT_WS: Sec-WebSocket-Accept not found

Problem:

Your ESP32 running a MQTT client is printing the following error messages:

E (285025) TRANSPORT_WS: Sec-WebSocket-Accept not found
E (285025) MQTT_CLIENT: Error transport connect

Solution:

You’re using MQTT over websockets (ws:// or wss://) but on the given MQTT URL, no MQTT-over-websocket server is running.

This is often caused by using a wrong URL (possibly the URL is missing the path), but it might also be caused by a misconfiguraton of the server or the reverse proxy.

It’s often best to try using a software websocket client to test the correct settings.

Posted by Uli Köhler in ESP8266/ESP32, MQTT, Networking

How to fix ESP32 Last error reported from esp-tls: 0x8001

Problem:

While trying to use TLS such as MQTTS or HTTPS on the ESP32, you see an error message like

[MQTT] Last error reported from esp-tls: 0x8001

Solution:

0x8001 means ESP_ERR_ESP_TLS_CANNOT_RESOLVE_HOSTNAME. In other words, the ESP32 is unable to resolve the hostname of the host you’re trying to connect to using DNS.

Typically, this is a DNS problem, so check the DNS settings of your network. Also check if the ESP32 has a correct DNS server set – for example, if the ESP32 has 0.0.0.0 as a DNS server, this explains why it isn’t able to resolve the hostname.

Sometimes this issue is also caused by the hostname not existing at all (i.e. there is no DNS entry for that hostname). You can easily check this by resolving the hostname you’re trying to connect

Posted by Uli Köhler in C/C++, Embedded, ESP8266/ESP32, Networking

Which pins on the ESP32-S2 are DAC outputs?

Only two pins on the ESP32-S2 are capable of being DAC outputs:

  • GPIO23 is DAC_1
  • GPIO24 is DAC_2

Source: ESP32-S2 datasheet

Posted by Uli Köhler in ESP8266/ESP32

How to output 2.048MHz clock on any pin on the ESP32

You can use the LEDC timer (typically used for PWM) to output a 50% duty cycle clock with 3.3V P-P amplitude on any output-capable GPIO pin.

First,

#include <driver/ledc.h>

then setup the timer. You only need to do this once on startup, no code in your loop function is required.

/**
 * Setup 2.048MHz clock output on GPIO33
 */
ledc_timer_config_t ledc_timer = {
    .speed_mode = LEDC_HIGH_SPEED_MODE,
    .bit_num    = LEDC_TIMER_2_BIT,
    .timer_num  = LEDC_TIMER_0,
    .freq_hz    = 2048000
};
ledc_channel_config_t ledc_channel = {
    .gpio_num   = GPIO_NUM_33,
    .speed_mode = LEDC_HIGH_SPEED_MODE,
    .channel    = LEDC_CHANNEL_0,
    .timer_sel  = LEDC_TIMER_0,
    .duty       = 2
};
ledc_timer_config(&ledc_timer);
ledc_channel_config(&ledc_channel);


Posted by Uli Köhler in ESP8266/ESP32

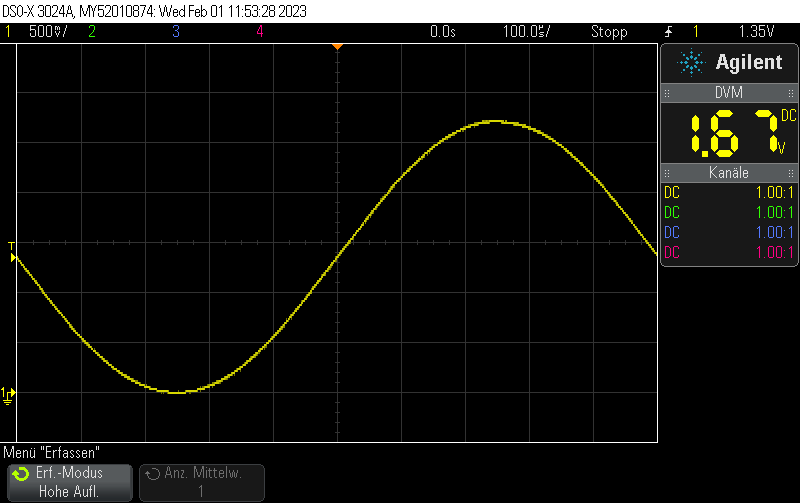
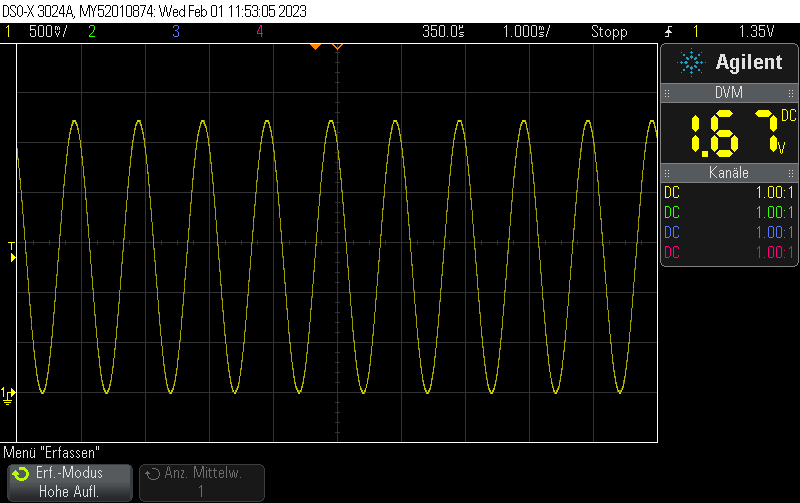
How does the ESP32 DAC cosine generator waveform look on an Oscilloscope?

The ESP32 DAC has a built-in cosine waveform generator. Even though it’s an 8-bit DAC, the waveform looks pretty clean.

For an example on how to generate this wavefrm in firmware, see How to use the ESP32 DAC sine/cosine waveform generator using Arduino / PlatformIO

Posted by Uli Köhler in Electronics, ESP8266/ESP32

How to use the ESP32 DAC sine/cosine waveform generator using Arduino / PlatformIO

The ESP32 and its derivatives such as the ESP32-S2 have a built-in sine/cosine waveform generator for the built-in 8-bit DAC.

Using it requires ESP-IDF v5.1+ (see the official example). Using it with Arduino is slightly harder, since the stable version of the arduino-esp32 framework at the time of writing this post is based on ESP-IDF v4.4 which does not provide the DAC cosine generator API.

Therefore, we have to explicitly specify the arduino-espressif32 version (git commit) in platformio.ini:

[env:esp32dev]
platform = espressif32
# Commit f9cddfde697b659b9e818ec514f1505d2bd4a8ae is branch esp-idf-v5.1-libs @2022-02-01
platform_packages = framework-arduinoespressif32 @ https://github.com/espressif/arduino-esp32.git#f9cddfde697b659b9e818ec514f1505d2bd4a8ae
board = esp32dev
framework = arduino

The example main source code is pretty simple:

#include <Arduino.h>
#include <driver/dac_cosine.h>

void setup() {
    dac_cosine_handle_t chan0_handle;
    dac_cosine_config_t cos0_cfg = {
        .chan_id = DAC_CHAN_1, // GPIO26
        .freq_hz = 1000,
        .clk_src = DAC_COSINE_CLK_SRC_DEFAULT,
        .atten = DAC_COSINE_ATTEN_DEFAULT,  
        .phase = DAC_COSINE_PHASE_0,  
        .offset = 0,
        //.flags.force_set_freq = false,
    };
    ESP_ERROR_CHECK(dac_cosine_new_channel(&cos0_cfg, &chan0_handle));
    ESP_ERROR_CHECK(dac_cosine_start(chan0_handle));
}

void loop() {
  // put your main code here, to run repeatedly:
  delay(1000);
}

If you want to see how the generated waveform looks on an oscilloscope, see How does the ESP32 DAC cosine generator waveform look on an Oscilloscope?

Posted by Uli Köhler in Arduino, ESP8266/ESP32, PlatformIO