Embedded

ESP32 HTTP POST with JSON body using ArduinoJson

This example parses a HTTP POST request body using ArduinoJson. I recommend using my HumanESPHTTP library as simple server library based on the ESP-IDF HTTP server.

constexpr size_t JsonParseBufferSize = 2048;
typedef ArduinoJson::StaticJsonDocument JsonParseBuffer;

/**
 * This buffer is used to parse /api/configure events
*/
static JsonParseBuffer document;

static const httpd_uri_t configureHandler = {
    .uri       = "/api/configure",
    .method    = HTTP_POST,
    .handler   = [](httpd_req_t *req) {
        // Receive POST body data into a new buffer
        char* jsonBody = (char*)malloc(req->content_len + 1);
        jsonBody[req->content_len] = '\0'; // NUL terminate [just in case]
        if(jsonBody == nullptr) {
            return SendStatusError(req, "Failed to allocate memory for JSON body");
        }
        int err = httpd_req_recv(req, jsonBody, req->content_len);
        if(err != req->content_len) {
            free(jsonBody);
            return SendStatusError(req, "Failed to read request body");
        }
        // Parse the body as JSON
        deserializeJson(document, jsonBody, req->content_len);
        // TODO: Do something with [document]
        // Cleanup
        free(jsonBody);
        return SendStatusOK(req);
    }
};

which uses the following utility functions:

esp_err_t SendStatusError(httpd_req_t *request, const char* description) {
    httpd_resp_set_type(request, "application/json");
    httpd_resp_send_chunk(request, "{\"status\":\"error\", \"error\": \"", HTTPD_RESP_USE_STRLEN);
    // NOTE: We silently assume that description does not have any special characters
    httpd_resp_send_chunk(request, description, HTTPD_RESP_USE_STRLEN);
    httpd_resp_send_chunk(request, "\"}", HTTPD_RESP_USE_STRLEN);
    httpd_resp_send_chunk(request, nullptr, 0); // Finished
    return ESP_OK;
}

esp_err_t SendStatusOK(httpd_req_t *request) {
    httpd_resp_set_type(request, "application/json");
    httpd_resp_sendstr(request, "{\"status\":\"ok\"}");
    return ESP_OK;
}
 

Posted by Uli Köhler in C/C++, ESP8266/ESP32

How to fix ESP32 rmt: rmt_transmit(466): loop count is not supported

If you encounter

rmt: rmt_transmit(466): loop count is not supported

on the ESP32, this is because you have used a rmt_transmit_config_t with explicitly set loop_count.

rmt_transmit_config_t cfg = {
  .loop_count = 1,
  .flags = {
      .eot_level = 0,
   }
};
ESP_ERROR_CHECK(rmt_transmit(/* ... */, &cfg));

but your IC (e.g. ESP32-D0WD-V3)  does not support hardware loop mode.

Fixing this is easy: Just comment out the .loop_count line:

rmt_transmit_config_t cfg = {
  //.loop_count = 1, // DISABLED as chip does not support it
  .flags = {
      .eot_level = 0,
   }
};
ESP_ERROR_CHECK(rmt_transmit(/* ... */, &cfg));

Note that if you leave .loop_count at its default, it will always act as if .loop_count = 1.

Posted by Uli Köhler in C/C++, ESP8266/ESP32

ESP32-D0WD-V3 does not support RMT sync manager

I was trying to use a RMT sync manager on the ESP32-D0WD-V3 (Version 3.1). However, trying to use rmt_new_sync_manager() returns ESP_ERR_NOT_SUPPORTED with the following message:

␛[0;31mE (560) rmt: rmt_new_sync_manager(331): sync manager not supported␛[0m
ESP_ERROR_CHECK failed: esp_err_t 0x106 (ESP_ERR_NOT_SUPPORTED) at 0x400d2681

This leads me to believe that the ESP32-D0WD-V3 does not support any RMT sync managers. So far, I have not tried with other controllers.

Posted by Uli Köhler in ESP8266/ESP32

ESP-IDF minimal Wifi client hello world example using PlatformIO

This basic example showcases how to use PlatformIO with ESP-IDF only (no Arduino) to connect to Wifi in station mode and print Hello world in a loop. It is based on the basic Hello World example from PlatformIO ESP32 with ESP-IDF minimal C++ example:

#include <cstdio>
#include <freertos/FreeRTOS.h>
#include <freertos/task.h>

#include <esp_wifi.h>
#include <esp_log.h>
#include <nvs_flash.h>
#include <esp_netif.h>
#include <esp_event.h>


extern "C" {
    void app_main(void);
}


static void NetworkEventHandler(void* arg, esp_event_base_t event_base,
                          int32_t event_id, void* event_data) {
    if (event_base == WIFI_EVENT && event_id == WIFI_EVENT_STA_START) {
        esp_wifi_connect();
    } else if (event_base == WIFI_EVENT && event_id == WIFI_EVENT_STA_DISCONNECTED) {
        esp_wifi_connect();
        ESP_LOGI("wifi", "Retrying to connect to Wifi...");
    } else if (event_base == IP_EVENT && event_id == IP_EVENT_STA_GOT_IP) {
        ip_event_got_ip_t* event = (ip_event_got_ip_t*) event_data;
        ESP_LOGI("wifi", "got ip:" IPSTR, IP2STR(&event->ip_info.ip));
    }
}

void InitNVS() {
    // Initialize NVS
    esp_err_t ret = nvs_flash_init();
    if (ret == ESP_ERR_NVS_NO_FREE_PAGES || ret == ESP_ERR_NVS_NEW_VERSION_FOUND) {
      ESP_ERROR_CHECK(nvs_flash_erase());
      ret = nvs_flash_init();
    }
    ESP_ERROR_CHECK(ret);
}

void InitWifi() {

    // Initialize TCP/IP network interface (required for Wi-Fi)
    ESP_ERROR_CHECK(esp_netif_init());

    // Initialize the event loop
    ESP_ERROR_CHECK(esp_event_loop_create_default());    
    esp_netif_create_default_wifi_sta();

    // Initialize Wi-Fi
    wifi_init_config_t cfg = WIFI_INIT_CONFIG_DEFAULT();
    ESP_ERROR_CHECK(esp_wifi_init(&cfg));

    // Set Wi-Fi to station mode
    ESP_ERROR_CHECK(esp_wifi_set_mode(WIFI_MODE_STA));

    // Configure the Wi-Fi connection
    wifi_config_t wifi_config = {
        .sta = {
            .ssid = "MyWifi",
            .password = "mypassword"
        }
    };
    // Register event handler
    ESP_ERROR_CHECK(esp_event_handler_instance_register(WIFI_EVENT,
                                                        ESP_EVENT_ANY_ID,
                                                        &NetworkEventHandler,
                                                        NULL,
                                                        NULL));
    ESP_ERROR_CHECK(esp_event_handler_instance_register(IP_EVENT,
                                                        IP_EVENT_STA_GOT_IP,
                                                        &NetworkEventHandler,
                                                        NULL,
                                                        NULL));

    // Set Wi-Fi configuration and start Wi-Fi
    ESP_ERROR_CHECK(esp_wifi_set_config(WIFI_IF_STA, &wifi_config));
    ESP_ERROR_CHECK(esp_wifi_start());
}

void app_main() {
    InitNVS();
    InitWifi();

    while(true) {
        printf("Hello PlatformIO!\n");
        // Wait for one second
        vTaskDelay(1000 / portTICK_PERIOD_MS);
    }
}
[env:esp32dev]
platform = espressif32
board = esp32dev
framework = espidf
monitor_speed = 115200

All sdkconfig settings have been left at their respective defaults.

Posted by Uli Köhler in C/C++, ESP8266/ESP32, PlatformIO

How to fix ESP-IDF error: cannot convert ‘esp_interface_t’ to ‘wifi_interface_t’

Problem:

While trying to  compile your ESP-IDF app using code such as

ESP_ERROR_CHECK(esp_wifi_set_config(ESP_IF_WIFI_STA, &wifi_config));

you see an error message such as

src/main.cpp:76:41: error: cannot convert 'esp_interface_t' to 'wifi_interface_t'
   76 |     ESP_ERROR_CHECK(esp_wifi_set_config(ESP_IF_WIFI_STA, &wifi_config));
      |                                         ^~~~~~~~~~~~~~~
      |                                         |
      |                                         esp_interface_t

Solution:

Instead of ESP_IF_WIFI_STA, use WIFI_IF_STA (which has the correct type):

ESP_ERROR_CHECK(esp_wifi_set_config(WIFI_IF_STA, &wifi_config));


Posted by Uli Köhler in C/C++, ESP8266/ESP32

PlatformIO ESP32 with ESP-IDF minimal C++ example

By default, when you initialize a PlatformIO ESP-IDF project, it will generate main.c – not a C++ but a pure C file

This minimal example instead uses main.cpp (you can just rename your main.c – see How to use C++ main.cpp with PlatformIO on ESP32 / esp-idf for a detailed list of steps to do).

#include <cstdio>
#include <freertos/FreeRTOS.h>
#include <freertos/task.h>

extern "C" {
    void app_main(void);
}

void app_main() {
    while(true) {
        printf("Hello PlatformIO!\n");
        // Wait for one second
        vTaskDelay(1000 / portTICK_PERIOD_MS);
    }
}


Posted by Uli Köhler in C/C++, ESP8266/ESP32, PlatformIO

How to use C++ main.cpp with PlatformIO on ESP32 / esp-idf

When you are using PlatformIO to compile your firmware, it is easily possible to use a C++ main.cpp instead of the pure C main.c by just renaming main.c to main.cpp

However, you also need to properly declary app_main(). After the #include section of your main.cpp (or at the top of the file if you don’t have an #include section yet), add this code:

extern "C" {
    void app_main(void);
}

This will tell the compiler that app_main() is a C function, not a C++ function.

Full main.cpp example

#include <cstdio>
#include <freertos/FreeRTOS.h>
#include <freertos/task.h>

extern "C" {
    void app_main(void);
}

void app_main() {
    while(true) {
        printf("Hello PlatformIO!\n");
        // Wait for one second
        vTaskDelay(1000 / portTICK_PERIOD_MS);
    }
}


Posted by Uli Köhler in C/C++, ESP8266/ESP32, PlatformIO

How to fix ESP32 error: ‘portTICK_PERIOD_MS’ was not declared in this scope

Problem:

While trying to compile your ESP-IDF firmware (with or without PlatformIO), you see an error message such as

src/main.cpp:13:27: error: 'portTICK_PERIOD_MS' was not declared in this scope
   13 |         vTaskDelay(1000 / portTICK_PERIOD_MS);

Solution:

Include FreeRTOS by adding the following lines to the top of the file where the error occured (src/main.cpp in this example):

#include <freertos/FreeRTOS.h>
#include <freertos/task.h>


Posted by Uli Köhler in ESP8266/ESP32, FreeRTOS, PlatformIO

How to fix ESP32 error: ‘vTaskDelay’ was not declared in this scope

Problem:

While trying to compile your ESP-IDF firmware (with or without PlatformIO), you see an error message such as

src/main.cpp:13:9: error: 'vTaskDelay' was not declared in this scope
   13 |         vTaskDelay(1000 / portTICK_PERIOD_MS);

Solution:

Include FreeRTOS by adding the following lines to the top of the file where the error occured (src/main.cpp in this example):

#include <freertos/FreeRTOS.h>
#include <freertos/task.h>


Posted by Uli Köhler in ESP8266/ESP32, FreeRTOS, PlatformIO

How to generate inverted pulses using the ESP32 RMT module (Arduino & PlatformIO)

In our previous post ESP32 RMT pulse generation minimal example using Arduino & PlatformIO using the RMT peripheral. The pulses have a steady state (off state) of 0V and a pulse voltage of 3.3V.

If we want to generate inverted pulses, we have to invert the level entries in the pulseRMT array:

static const rmt_item32_t pulseRMT[] = {
    {{{
      /*pulse duration=*/100, /*pulse level*/0,
      // After pulse, output 1
      0, 1
    }}},
};

and additionally configure the RMT output when the pulse is finished using

config.tx_config.idle_level = RMT_IDLE_LEVEL_HIGH;
config.tx_config.idle_output_en = true;

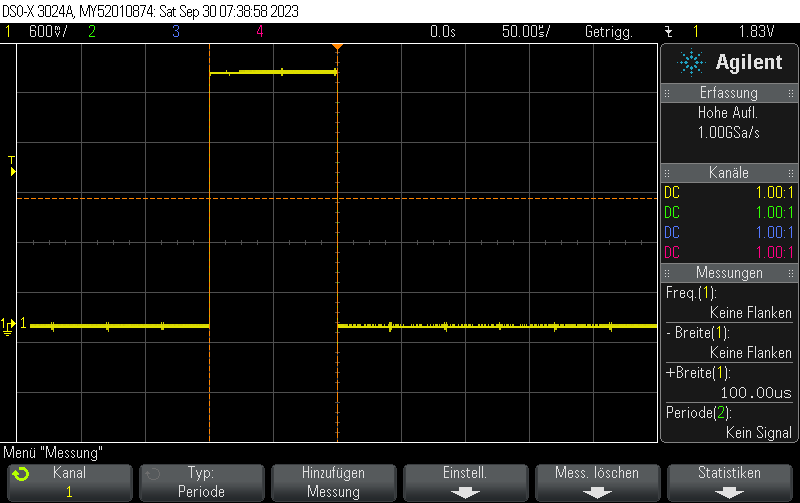
This is how the pulse looks like:

Full example:

#include <Arduino.h>
#include <esp_log.h>
#include <driver/rmt.h>

// Output pulse train on D14
constexpr gpio_num_t rmtPin = GPIO_NUM_14;
constexpr rmt_channel_t RMT_TX_CHANNEL = RMT_CHANNEL_0;

static const rmt_item32_t pulseRMT[] = {
    {{{
      /*pulse duration=*/100, /*pulse level*/0,
      // After pulse, output 1
      0, 1
    }}},
};

void setup() {
  Serial.begin(115200);

  rmt_config_t config = RMT_DEFAULT_CONFIG_TX(rmtPin, RMT_TX_CHANNEL);
  config.clk_div = 80; // input clock 80 MHz => output clk 1 MHz
  config.tx_config.idle_level = RMT_IDLE_LEVEL_HIGH;
  config.tx_config.idle_output_en = true;

  ESP_ERROR_CHECK(rmt_config(&config));
  ESP_ERROR_CHECK(rmt_driver_install(config.channel, 0, 0));

}

void loop() {
  ESP_ERROR_CHECK(rmt_write_items(RMT_TX_CHANNEL, pulseRMT, sizeof(pulseRMT) / sizeof(rmt_item32_t), true));
  delay(10);
}


[env:esp32dev]
platform = espressif32
board = esp32dev
framework = arduino
monitor_speed = 115200


Posted by Uli Köhler in Arduino, C/C++, ESP8266/ESP32, PlatformIO

ESP32 HTTP float query parser with range check example using HumanESPHTTP

Example for HumanESPHTTP

static const httpd_uri_t setPowerHandler = {
    .uri       = "/api/set-power",
    .method    = HTTP_GET,
    .handler   = [](httpd_req_t *request) {
        QueryURLParser parser(request);
        if(parser.HasParameter("power")) {
            std::string power = parser.GetParameter("power");
            // Parse power as float
            float powerFloat;
            try {
              powerFloat = std::stof(power);
            } catch (const std::invalid_argument& e) {
              httpd_resp_set_status(request, "400 Bad Request");
              httpd_resp_set_type(request, "text/plain");
              httpd_resp_sendstr(request, "Error: Invalid argument for power parameter (not a float)!");
              return ESP_OK;
            }
            // Check range
            if(powerFloat < 0.0 || powerFloat > 1.0) {
              httpd_resp_set_status(request, "400 Bad Request");
              httpd_resp_set_type(request, "text/plain");
              httpd_resp_sendstr(request, "Error: Invalid argument for power parameter (not in range 0.0 ... 1.0)!");
              return ESP_OK;
            }
            // TODO: Your code goes here
            // Example code: send back power
            httpd_resp_send_chunk(request, "Power is: ", HTTPD_RESP_USE_STRLEN);
            httpd_resp_send_chunk(request, std::to_string(powerFloat).c_str(), HTTPD_RESP_USE_STRLEN);
            httpd_resp_send_chunk(request, nullptr, 0); // Finished
        } else {
            httpd_resp_set_type(request, "text/plain");
              httpd_resp_set_status(request, "400 Bad Request");
            httpd_resp_sendstr(request, "No 'power' query parameter found!");
        }
        return ESP_OK;
    }
};


Posted by Uli Köhler in C/C++, ESP8266/ESP32

ESP32 RMT pulse generation minimal example using Arduino & PlatformIO

The following example will generate 100us pulses every 10ms. The pulses are generated using the RMT peripheral.

#include <Arduino.h>
#include <esp_log.h>
#include <driver/rmt.h>

// Output pulse train on D14
constexpr gpio_num_t rmtPin = GPIO_NUM_14;
constexpr rmt_channel_t RMT_TX_CHANNEL = RMT_CHANNEL_0;


static const rmt_item32_t pulseRMT[] = {
    {{{
      /*pulse duration=*/100, /*pulse level*/1,
      // After pulse, output 0
      0, 0
    }}},
};


void setup() {
  Serial.begin(115200);

  rmt_config_t config = RMT_DEFAULT_CONFIG_TX(rmtPin, RMT_TX_CHANNEL);
  config.clk_div = 80; // input clock 80 MHz => output clk 1 MHz

  ESP_ERROR_CHECK(rmt_config(&config));
  ESP_ERROR_CHECK(rmt_driver_install(config.channel, 0, 0));

}

void loop() {
  ESP_ERROR_CHECK(rmt_write_items(RMT_TX_CHANNEL, pulseRMT, sizeof(pulseRMT) / sizeof(rmt_item32_t), true));
  delay(10);
}


[env:esp32dev]
platform = espressif32
board = esp32dev
framework = arduino
monitor_speed = 115200


Posted by Uli Köhler in Arduino, C/C++, ESP8266/ESP32, PlatformIO

How to parse Ethernet packet header (src & dst MAC addresses) using lwIP

You can use this code, for example, in a custom packet handler function.

#include <lwip/prot/ethernet.h>

eth_hdr* hdr = reinterpret_cast<eth_hdr*>(buffer);
auto srcMAC = hdr->src.addr;
auto dstMAC = hdr->dest.addr;

Serial.printf("Received packet: Packet of length %d\n", len);
Serial.printf("    Src MAC: %02X:%02X:%02X:%02X:%02X:%02X\n", srcMAC[0], srcMAC[1], srcMAC[2], srcMAC[3], srcMAC[4], srcMAC[5]);
Serial.printf("    Dst MAC: %02X:%02X:%02X:%02X:%02X:%02X\n", dstMAC[0], dstMAC[1], dstMAC[2], dstMAC[3], dstMAC[4], dstMAC[5]);
Serial.printf("    Our MAC: %02X:%02X:%02X:%02X:%02X:%02X\n", ourEthernetMAC[0], ourEthernetMAC[1], ourEthernetMAC[2], ourEthernetMAC[3], ourEthernetMAC[4], ourEthernetMAC[5]);


Posted by Uli Köhler in Embedded, Networking

Where does lwIP parse the Ethernet packet header?

The Ethernet packet header is parsed in ethernet_input() in lwip/src/netif/ethernet.c:


Posted by Uli Köhler in Embedded, Networking

What is the default esp_eth_update_input_path() handler function?

By default, esp-idf or the Arduino framework handles incoming Ethernet packets using the

static esp_err_t eth_input_to_netif(esp_eth_handle_t eth_handle, uint8_t *buffer, uint32_t length, void *priv);

function in components/esp_eth/src/esp_eth_netif_glue.c which (besides calling just calls the exported functionesp_netif_receive():

static esp_err_t eth_input_to_netif(esp_eth_handle_t eth_handle, uint8_t *buffer, uint32_t length, void *priv)
{
    return esp_netif_receive((esp_netif_t *)priv, buffer, length, NULL);
}

The function esp_netif_receive() is declared in esp_netif.h and implemented in esp_netif_lwip.c.

This function will call esp_netif->lwip_input_fn(...) on the packet, which will in turn call the interface-type specific .input_fn(...), which is one of

or for wrapped interfaces:

  • esp_netif_lwip_slip_input
  • esp_netif_lwip_ppp_input
Posted by Uli Köhler in ESP8266/ESP32, Networking

How to add git repository to PlatformIO dependencies (lib_deps)

Typically, you would add a PlatformIO library dependency by adding the following to platformio.ini:

lib_deps =
    bblanchon/ArduinoJson@^6.21.3

but you can also add a git repository (the following example uses the main branch such as master or main):

lib_deps =
    https://github.com/ulikoehler/HumanESPHTTP.git

or you can use a specific branch or tag

lib_deps =
    https://github.com/ulikoehler/HumanESPHTTP.git#v1.0.0


Posted by Uli Köhler in PlatformIO

How to fix Arduino / PlatformIO undefined reference to `loop()’

Problem:

While trying to compile your Arduino or PlatformIO project, you see an error message such as
/home/uli/.platformio/packages/[email protected]+2021r2-patch5/bin/../lib/gcc/xtensa-esp32-elf/8.4.0/../../../../xtensa-esp32-elf/bin/ld: .pio/build/esp32dev/libFrameworkArduino.a(main.cpp.o):(.literal._Z8loopTaskPv+0x8): undefined reference to `loop()'

Solution:

You have not declared a loop() function in your source code. Open main.cpp or your .ino source code file and start with the following (empty) loop() function which does nothing:
void loop() {
    // Nothing to do here since HTTPServer
    // is running in a separate thread
    delay(1000);
}
After you’ve added any void loop() { /* ... */} function to your sourcecode try to build/upload again and the error message should have disappeared.
If you want, you can also add code such as to print a message to the serial port every time the loop is run:
void loop() {
    // Nothing to do here since HTTPServer
    // is running in a separate thread
    Serial.println("Hello world!");
    delay(1000);
}


Posted by Uli Köhler in Arduino, C/C++, PlatformIO

How to add “platformio” / “pio” shortcut on Linux command line

Typically, when you want to use the pio executable from PlatformIO, you need to first activate the virtual environment using

source ~/.platformio/penv/bin/activate

However, you can easily create a shortcut using a shell alias using:

For bash:

echo -e '\nalias platformio="source ~/.platformio/penv/bin/activate"\n' >> ~/.bashrc

For zsh:

echo -e '\nalias platformio="source ~/.platformio/penv/bin/activate"\n' >> ~/.zshrc

Note that in order for the change to take effect, you need to restart your shell (or open a new shell).

Now you can use run

platformio

and you’ll immediately have access to pio and other PlatformIO tools.

Posted by Uli Köhler in PlatformIO

How to create new PlatformIO project on the command line

You can create a new PlatformIO project on the command line by running e.g.

pio project init --board esp32dev --ide vscode --sample-code

Note that all options (--board and --ide) are optional. Without --sample-code, PlatformIO will not automatically generate src/main.cpp

This will initialize a new PlatformIO project in the current directory.

Posted by Uli Köhler in PlatformIO

How to use C++17 / C++23 with PlatformIO using ESP32 / Arduino

Problem:

By default, PlatformIO uses -std=gnu++11 as a compiler flag but you want to use C++17 or C++23 features.

If you just use

build_flags = -std=gnu++17

this will lead to g++ being called with g++ ... -std=gnu++17 ... -std=gnu++11 ... compiler flags. The latter one – gnu++11 i.e. C++11 will take precedence.

Solution:

In order to activate C++17, use

build_flags = -std=gnu++17
build_unflags = -std=gnu++11

In order to activate C++23 (not fully implemented yet in G++), you currently need to use -std=gnu++2a:

build_flags = -std=gnu++2a
build_unflags = -std=gnu++11


Posted by Uli Köhler in Arduino, ESP8266/ESP32, PlatformIO