Electronics

Short pulse generation with Arduino Uno Part 2: GPIO register access pulse width

When you use the following code to generate digital pulses with the Arduino Uno (cli() and sei() and to disable and enalbe interrupts in order to ensure consistent pulse width), you can generate the shortest possible pulses, limited by the Atmega328p’s 16MHz clock frequency:

#define PORT11 PORTB
#define PIN11 3
#define PIN11_MASK (1 << PIN11)


void loop() {
    cli(); // Disable interrupts
    PORT11 |= PIN11_MASK; // Turn pin 11 on
    PORT11 &= ~PIN11_MASK; // Turn pin 11 off
    sei(); // Enable interrupts again

    delay(10); // Wait 10ms
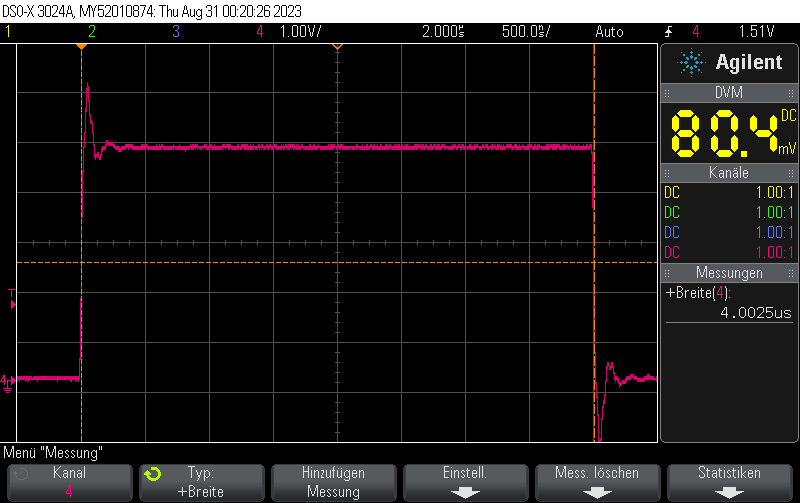
}

Based on the 16 MHz clock frequency of the ATMega328p, this generates pulses exactly almost exactly 125ns in lengh. This is equivalent to two clock cycles of the 16 MHz master clock.

Full example

#include <Arduino.h>
#include <avr/io.h>

#define PORT11 PORTB
#define PIN11 3
#define PIN11_MASK (1 << PIN11)

void setup() {
    pinMode(11, OUTPUT);
}

void loop() {
    cli();
    PORT11 |= PIN11_MASK;
    PORT11 &= ~PIN11_MASK;
    sei();

    delay(10);
}


Posted by Uli Köhler in Arduino, Electronics

Short pulse generation with Arduino Uno Part 1: digitalWrite() pulse width

When you use the following code to generate digital pulses with the Arduino Uno (cli() and sei() and to disable and enalbe interrupts in order to ensure consistent pulse width):

cli();
digitalWrite(outputPin, HIGH);
digitalWrite(outputPin, LOW);
sei();

the time it takes to digitalWrite() dominates. Based on the 16 MHz clock frequency of the ATMega328p, this generates pulses exactly 4 microseconds in length:

Posted by Uli Köhler in Arduino, Electronics

Where to find cheap PCB-mount BNC connectors?

As for most parts, if you order more than just a few pcs, LCSC is the cheapest source of these components (however, you need to consider the rather expensive shipping costs).

Here’s some BNC connectors:

I could not find any straight 50Ω connector.

Note that I don’t use them in typical RF applications, so I don’t have any information on impedance matching or accuracy etc.


Posted by Uli Köhler in Components, Electronics

Where to find “DuPont” style crimp terminals?

See our previous post Where to find “DuPont” style connector housings? for more background information.

We do not imply any compatibility, so check it by yourself.

Crimp terminal part numbers on LCSC:

For more defailed info, see the CJT A2541 series catalog.

Posted by Uli Köhler in Components, Electronics

Where to find “DuPont” style connector housings?

If you are reading this post, you probably bought a “DuPont” crimp connector set from Amazon, eBay or AliExpress and are now looking for additional components.

I found the exact same connectors that came with my set by looking through hundreds of products on LCSC. Currently, I have no DigiKey or Mouser link, but I will update this post if I find one in the future.

Also see Where to find “DuPont” style crimp terminals?

Note that I only looked for DuPont style connector with a plastic leaf spring on the side of every terminal housing. There are more or less similar types without that leaf spring but these appear to be for other (even if similar) types of crimp contacts.

We do not imply any compatibility, so check it by yourself.

Single-row housings

Dual-row housings

  • 2×2 housing: Not available on LCSC
  • 2×3 housing: Amphenol ICC 65043-034LF 0.393$/pc @1000pcs
  • 2×4 housing: Not available on LCSC
  • 2×5 housing: TXGA FHG25404-D10M1K6B 0.0471$/pc @1000pcs
  • 2×6 housing: Not available on LCSC
  • 2×7 housing: Not available on LCSC
  • 2×8 housing: Not available on LCSC
  • 2×9 housing: Not available on LCSC
  • 2×10 housing: Not available on LCSC
  • 2×11 housing: Not available on LCSC
  • 2×12 housing: Not available on LCSC
Posted by Uli Köhler in Components, Electronics

Printing micro-labels for 2.54mm connectors using the Brother PT-P750W thermo-transfer printer

In this post, we show how to create micro labels for 2.54mm electronics connectors using the Brother P750W thermo transfer printer and the free Brother P-Touch Editor software.

For this example, we’ll use standard 9mm tape (I use chinese knock-off black-on-white tape which works well) which is a good fit for Dupont-style connectors. However, you can also use 6mm tape.

First, note that this works only if you print using High-resolution modeYou can configure this at the top left in Brother P-Touch Editor. At the time of writing this post, I am using version 5.4.

Micro-label template download

Now, the easiest way is to just load one of our templates (and possibly delete some of the lines if you need fewer adjacent labels):

Download MicroLabel 2.54mm x2.lbx

Download MicroLabel 2.54mm x5.lbx


Download MicroLabel 2.54mm x10.lbx

Build your own label

First, we shall add the separating lines. Every line should be as wide as the tape (9mm in this example). You can leave the line thickness at default values.

The formula for line position measured from the top is 2mm + i*2.54mm with i=0..n. The horizontal position always should be 0mm.

Note that even the properties dialog only shows numbers rounded to mm, it will accept fractional millimeter inputs such as 4.54mm!.

Note that you have to use the language-specific decimal separator sign, so in Germany you must enter 4,54mm with comma separate whereas almost everywhere else you need to enter 4.54mm.

The text boxes shall be made as wide as the tape, their horizontal position being 0mm and their vertical position being 2mm + i*2.54mm + 0.1mm with i=0..n. The 0.1mm offset is neccessary to make the text center properly, mostly due to the line height.

Use a font size of 7 and fixed frame size:

Besides that, the main aspect to consider is that you can’t print 100% of the tape width, so if you want to fit more characters into a single text line, you might be able to decrease the text size slightly.


Posted by Uli Köhler in Electronics

Number of inpatient surgeries performed in Canada in 2021-2022 (Statistics)

According to CIHI, 1349787 inpatient surgeries have been performed in Canada in 2021-2022.

Source:

This number has been extracted from the CIHI Hospital Stays in Canada page, Inpatient Hospitalization, Surgery and Newborn Statistics material. In worksheet 4. Top 10 inp surgeries you can take any of the numbers regarding the total of Canada, e.g. Cell A6 (= Number of inpatient fracture surgeries 2021-2022), and divide it by the respective value in Column E, the percentage of that surgery of all inpatient surgeries.

The time range of the data is the canadian fiscal year, i.e. April 1, 2021, to March 31, 2022 (Source: The metadata PDF for the abovementioned source table). See the metadata PDF for discussion about coverage and other caveats which apply to the data.

Posted by Uli Köhler in Medical devices, Statistics

How to fix PlatformIO: ‘Can not find working Python 3.6+ interpreter’ on Linux

Problem:

When trying to open PlatformIO in Visual Studio Code, you see the following error message:

PlatformIO: Can not find working Python 3.6+ Interpreter. Please install the latest Python 3 and restart VSCode

even though you have Python3 already installed.

Solution:

The issue here is not that PlatformIO can’t find Python 3, it is that you don’t have venv (virtual environments) installed for your Python version!

On Ubuntu/Debian, you can install it using

sudo apt -y install python3-venv

Alternatively you can install it using pip:

pip install virtualenv


Posted by Uli Köhler in PlatformIO, Python

How to use picamera2 to capture high-resolution image with fixed exposure time

This script will capture a single camera frame from a Raspberry Pi HQ camera with its maximum resolution of 4056x3040px and a fixed exposure time of 10.0ms (which appears to be the minimum exposure time the IMX477 sensor is capable of) and a fixed analog gain of 1.0. The resulting image is saved to Exposure10ms.png

#!/usr/bin/env python3
import time
import picamera2
import numpy as np

with picamera2.Picamera2() as camera:
    camera_config = camera.create_still_configuration({"size":(4056, 3040)})
    camera.configure(camera_config)
    camera.set_controls({"ExposureTime": 10000, "AnalogueGain": 1.0})
    camera.start()
    camera.capture_file("Exposure10ms.png")
    camera.stop()

It appears to be important to use camera.set_control() after camera.configure().

Posted by Uli Köhler in Raspberry Pi, Video

How to livestream Raspberry Pi camera using libcamera-vid & VLC

On the pi, run the following command

libcamera-vid -t0 --width 1920 --height 1080 --framerate 10 --nopreview --codec h264 --profile high --intra 5 --listen -o tcp://0.0.0.0:8494

On the computer where you want to play the livestream, run the following command

vlc tcp/h264://192.168.1.234:8494

where 192.168.1.234 is the IP address of the raspberry pi.

Internally, this uses a raw H.264 stream over TCP. This works best over the local network, but it will also work over VPN or the internet, if your networking setup allows it.

Original source: Github discussion

Posted by Uli Köhler in Raspberry Pi, Video

How to set exposure time using picamera2

The following code will capture a 640×480 PNG image into Exposure10ms.png, using a fixed exposure of 10ms:

#!/usr/bin/env python3
import time
import picamera2
import numpy as np

with picamera2.Picamera2() as camera:
    camera.set_controls({"ExposureTime": 1000, "AnalogueGain": 1.0})
    camera.start()
    camera.capture_file("Exposure1ms.png")
    camera.stop()

Note that it is important to run camera.start() after camera.set_controls().

Posted by Uli Köhler in Python, Raspberry Pi

How to use picamera2 to capture Raspberry Pi HQ camera (IMX477) high resolution image

The following code will capture a single 4056x3056px image from a Raspberry Pi HQ camera using the IMX477 sensor into either a file or a numpy array. This is the maximum resolution supported by that camera.

Capturing to a file

This will capture a single frame to CameraTest.png. The PNG file will be quite large, around 15-25 Megabytes.

#!/usr/bin/env python3
import time
import picamera2
import numpy as np

with picamera2.Picamera2() as camera:
    # Create high resolution still capture config
    camera_config = camera.create_still_configuration({"size":(4056, 3040)})
    camera.configure(camera_config)
    # Start camera with config
    camera.start()
    # Capture a single frame to CameraTest.png
    camera.capture_file("CameraTest.png")

Capturing to a numpy array

#!/usr/bin/env python3
import time
import picamera2
import numpy as np

with picamera2.Picamera2() as camera:
    # Create high resolution still capture config
    camera_config = camera.create_still_configuration({"size":(4056, 3040)})
    camera.configure(camera_config)
    # Start capture
    camera.start()
    array = camera.capture_array("main")
    # TODO Do something with [array]
    print(array.shape)

Example output:

[0:55:52.878964095] [5768]  INFO Camera camera_manager.cpp:297 libcamera v0.0.5+83-bde9b04f
[0:55:52.913906171] [5769]  INFO RPI vc4.cpp:437 Registered camera /base/soc/i2c0mux/i2c@1/imx477@1a to Unicam device /dev/media3 and ISP device /dev/media0
[0:55:52.913998855] [5769]  INFO RPI pipeline_base.cpp:1101 Using configuration file '/usr/share/libcamera/pipeline/rpi/vc4/rpi_apps.yaml'
[0:55:52.921056014] [5768]  INFO Camera camera.cpp:1033 configuring streams: (0) 4056x3040-BGR888 (1) 4056x3040-SBGGR12_CSI2P
[0:55:52.922090144] [5769]  INFO RPI vc4.cpp:565 Sensor: /base/soc/i2c0mux/i2c@1/imx477@1a - Selected sensor format: 4056x3040-SBGGR12_1X12 - Selected unicam format: 4056x3040-pBCC
(3040, 4056, 3)

Note that the NumPy array is compatible with Python OpenCV functions.

Posted by Uli Köhler in Python, Raspberry Pi

Raspberry Pi HQ camera (IMX477) maximum supported resolution

The maximum resolution of the Raspberry Pi HQ camera with the Sony IMX477 sensor is 4056x3040px.

You can use the libcamera-hello --list-cameras command in order to list all supported resolutions. The output for the IMX477 sensor is

Available cameras
-----------------
0 : imx477 [4056x3040] (/base/soc/i2c0mux/i2c@1/imx477@1a)
    Modes: 'SRGGB10_CSI2P' : 1332x990 [120.05 fps - (696, 528)/2664x1980 crop]
           'SRGGB12_CSI2P' : 2028x1080 [50.03 fps - (0, 440)/4056x2160 crop]
                             2028x1520 [40.01 fps - (0, 0)/4056x3040 crop]
                             4056x3040 [10.00 fps - (0, 0)/4056x3040 crop]
Posted by Uli Köhler in Raspberry Pi

libcamera-hello output for the Raspberry Pi HQ camera (IMX477 sensor)

The following output of libcamera-hello --list-cameras is for the IMX477 which is the Raspberry Pi HQ camera:

Available cameras
-----------------
0 : imx477 [4056x3040] (/base/soc/i2c0mux/i2c@1/imx477@1a)
    Modes: 'SRGGB10_CSI2P' : 1332x990 [120.05 fps - (696, 528)/2664x1980 crop]
           'SRGGB12_CSI2P' : 2028x1080 [50.03 fps - (0, 440)/4056x2160 crop]
                             2028x1520 [40.01 fps - (0, 0)/4056x3040 crop]
                             4056x3040 [10.00 fps - (0, 0)/4056x3040 crop]


Posted by Uli Köhler in Raspberry Pi

How to install picamera2 Python library on Raspberry Pi

You can install picamera2 on Raspberry Pi OS / Raspbian using

sudo apt -y install python3-picamera2

Tested on Raspberry Pi OS bullseye

Posted by Uli Köhler in Raspberry Pi

How to capture image as NumPy array using PiCamera2

This will capture a raspberry pi camera image as numpy array.

The default size that will be used is 640x480px

#!/usr/bin/env python3
import time
import picamera2
import numpy as np

with picamera2.Picamera2() as camera:
    camera.start()
    time.sleep(1)
    array = camera.capture_array("main")
    # TODO Do something with array
    print(array.shape)

Example output:

[0:27:57.224504277] [3117]  INFO Camera camera_manager.cpp:297 libcamera v0.0.5+83-bde9b04f
[0:27:57.258472502] [3118]  INFO RPI vc4.cpp:437 Registered camera /base/soc/i2c0mux/i2c@1/imx477@1a to Unicam device /dev/media3 and ISP device /dev/media0
[0:27:57.258611296] [3118]  INFO RPI pipeline_base.cpp:1101 Using configuration file '/usr/share/libcamera/pipeline/rpi/vc4/rpi_apps.yaml'
[0:27:57.264790966] [3117]  INFO Camera camera.cpp:1033 configuring streams: (0) 640x480-XBGR8888 (1) 2028x1520-SBGGR12_CSI2P
[0:27:57.265395993] [3118]  INFO RPI vc4.cpp:565 Sensor: /base/soc/i2c0mux/i2c@1/imx477@1a - Selected sensor format: 2028x1520-SBGGR12_1X12 - Selected unicam format: 2028x1520-pBCC
(480, 640, 4)


Posted by Uli Köhler in Audio/Video, Raspberry Pi

How to install uvcdynctrl on Raspberry Pi OS Bullseye

Problem

You are trying to install uvcdynctrl on Raspberry Pi OS bullseye version using

sudo apt -y install uvcdynctrl

the system can’t find the package:

Reading package lists... Done
Building dependency tree... Done
Reading state information... Done
E: Unable to locate package uvcdynctrl

Solution

The uvcdynctrl package is not available in the standard Raspberry Pi OS repository, but only in the bullseye-backports repository.

In order to solve the problem, activate the backports repository:

Add the following lines at the end of /etc/apt/sources.list:

deb http://deb.debian.org/debian bullseye-backports main contrib non-free
deb-src http://deb.debian.org/debian bullseye-backports main contrib non-free

After that, run

sudo apt update

and finally, try to install uvcdynctrl again:

sudo apt -y install uvcdynctrl


Posted by Uli Köhler in Linux, Raspberry Pi

How to activate backports repository on Raspberry Pi OS (Raspbian)

Add the following lines at the end of /etc/apt/sources.list:

deb http://deb.debian.org/debian bullseye-backports main contrib non-free
deb-src http://deb.debian.org/debian bullseye-backports main contrib non-free

After that, run

sudo apt update


Posted by Uli Köhler in Linux, Raspberry Pi

How to install easyeda2kicad on Linux

sudo pip install easyeda2kicad pydantic==1.10.7
mkdir -p ~/Documents/Kicad/easyeda2kicad

This will fix both this pydantic error:

Traceback (most recent call last):
  File "/usr/local/bin/easyeda2kicad", line 5, in <module>
    from easyeda2kicad.__main__ import main
  File "/usr/local/lib/python3.10/dist-packages/easyeda2kicad/__main__.py", line 12, in <module>
    from easyeda2kicad.easyeda.easyeda_importer import (
  File "/usr/local/lib/python3.10/dist-packages/easyeda2kicad/easyeda/easyeda_importer.py", line 6, in <module>
    from easyeda2kicad.easyeda.parameters_easyeda import *
  File "/usr/local/lib/python3.10/dist-packages/easyeda2kicad/easyeda/parameters_easyeda.py", line 26, in <module>
    class EeSymbolPinSettings(BaseModel):
  File "/usr/local/lib/python3.10/dist-packages/pydantic/_internal/_model_construction.py", line 131, in __new__
    cls.__pydantic_decorators__ = DecoratorInfos.build(cls)
  File "/usr/local/lib/python3.10/dist-packages/pydantic/_internal/_decorators.py", line 414, in build
    res.validators[var_name] = Decorator.build(
  File "/usr/local/lib/python3.10/dist-packages/pydantic/_internal/_decorators.py", line 249, in build
    func = shim(func)
  File "/usr/local/lib/python3.10/dist-packages/pydantic/_internal/_decorators_v1.py", line 77, in make_generic_v1_field_validator
    raise PydanticUserError(
pydantic.errors.PydanticUserError: The `field` and `config` parameters are not available in Pydantic V2, please use the `info` parameter instead.

For further information visit https://errors.pydantic.dev/2.0.2/u/validator-field-config-info

and this error related to the missing directory:

-- easyeda2kicad.py v0.6.3 --
Traceback (most recent call last):
  File "/usr/local/bin/easyeda2kicad", line 8, in <module>
    sys.exit(main())
  File "/usr/local/lib/python3.10/dist-packages/easyeda2kicad/__main__.py", line 239, in main
    if not valid_arguments(arguments=arguments):
  File "/usr/local/lib/python3.10/dist-packages/easyeda2kicad/__main__.py", line 161, in valid_arguments
    os.mkdir(default_folder)
FileNotFoundError: [Errno 2] No such file or directory: '/home/uli/Documents/Kicad/easyeda2kicad'


Posted by Uli Köhler in KiCAD

Where to find cheap RS485 transceivers?

If you need to buy more than a few RS485 transceivers (1 receiver / 1 transmitter), you can typically find the cheapest ones on LCSC. Although LCSC charges significant shipping fees (if you don’t choose the slow mail service for shipping small quantities), the very good prices for the components themselves make it

Some examples:

  • SSP3085, VCC=5V, 500kbps, standard SOIC-8 pinout, 0,1245€/pc @ 100pc
  • XL485CS, VCC=5V, 10Mbps, standard SOIC-8 pinout, 0,1686€/pc @100pc
  • XL485-SS, VCC=5V, 10Mbps, standard MSOP-8 pinout, 0,1686€/pc @100pc
  • SIT3485ESA, VCC=3.3V, 12Mbps, standard SOIC-8 pinout, 0,1995€/pc @100pc
  • SP3485EEN, VCC=3.3V, 12Mbps, standard SOIC-8 pinout, 0,2134€/pc @100pc
  • SP3078EEN-L/TR, VCC=3.3V, 16Mbps, standard SOIC-8 pinout, 0,3576€/pc @100pc
  • ISL3178EIBZ-T, VCC=3.3V, 20Mbps, standard SOIC-8 pinout, 0,4141€/pc @100pc


Posted by Uli Köhler in Components, Electronics