Electronics

How to enable or disable NTP time synchronization on the Raspberry Pi

Disable NTP:

sudo systemctl disable --now systemd-timesyncd

Enable NTP:

sudo systemctl enable --now systemd-timesyncd

Verifying if NTP is active

You can verify if NTP is active or not by running

timedatectl

Then look for these lines:

System clock synchronized: yes
NTP service: active

System clock synchronized will tell you if the NTP service has successfully synchronized the system time to a NTP time server: yes if synchronized, no if not synchronized.

NTP service will tell you if the NTP service is running, i.e. if it is trying to synchronize the system time to a NTP time server: active if running, inactive when not running

Output with NTP active:

               Local time: Tue 2023-03-14 16:49:28 CET
           Universal time: Tue 2023-03-14 15:49:28 UTC
                 RTC time: Tue 2023-03-14 15:49:28
                Time zone: Europe/Berlin (CET, +0100)
System clock synchronized: yes
              NTP service: active
          RTC in local TZ: no

Output with NTP inactive:

               Local time: Tue 2023-03-14 16:48:01 CET
           Universal time: Tue 2023-03-14 15:48:01 UTC
                 RTC time: Tue 2023-03-14 15:48:01
                Time zone: Europe/Berlin (CET, +0100)
System clock synchronized: no
              NTP service: inactive
          RTC in local TZ: no
 

Posted by Uli Köhler in Linux, Raspberry Pi

How to enable I2C port on the Raspberry Pi using raspi-config

sudo raspi-config nonint do_i2c 0

Now load the relevant modules:

sudo modprobe "i2c-bcm2835"
sudo modprobe "i2c-dev"
sudo modprobe "rtc-ds1307"

and now check if the I2C device file exists using stat /dev/i2c-1:

$ stat /dev/i2c-1
  File: /dev/i2c-1
  Size: 0               Blocks: 0          IO Block: 4096   character special file
Device: 5h/5d   Inode: 169         Links: 1     Device type: 59,1
Access: (0660/crw-rw----)  Uid: (    0/    root)   Gid: (  998/     i2c)
Access: 2023-03-14 16:23:06.643999999 +0100
Modify: 2023-03-14 16:23:06.643999999 +0100
Change: 2023-03-14 16:23:06.643999999 +0100
 Birth: -

If you instead see

ls: cannot access '/dev/i2c-1': No such file or directory

either the driver is not loaded properly or I2C is disabled. Try rebooting the system and repeating the commands above and possibly checking dmesg for any error messages.

Posted by Uli Köhler in Raspberry Pi

How to fix Raspberry Pi i2cdetect: command not found

Problem:

When trying to detect I2C devices on the Raspberry Pi (Raspbian) using i2cdetect, you see the following error:

$ i2cdetect
bash: i2cdetect: command not found

Solution:

Install i2c-tools using

sudo apt -y install i2c-tools

After installing i2c-tools , you can use i2cdetect and other related tools such as i2cget.

Posted by Uli Köhler in Embedded, Linux, Raspberry Pi

How to get footprint graphical elements using KiCAD pcbnew plugin Python API

See our previous post How to get list of all footprints using KiCAD pcbnew plugin Python API and How to get all selected footprints using KiCAD pcbnew plugin Python API for more info on how to obtain a footprint object.

Once you have a pcbnew.FOOTPRINT object, you can get its graphical elements (which are basically the lines, rectangles, circles etc in the footprint – but not any silkscreen labels) using

footprint.GraphicalElements()

Example:

for graphical_element in footprint.GraphicalItems():   
    print(graphical_element)

Output:

<pcbnew.FP_TEXT; proxy of <Swig Object of type 'FP_TEXT *' at 0x7fc47f2c41e0> >
<pcbnew.FP_SHAPE; proxy of <Swig Object of type 'FP_SHAPE *' at 0x7fc47f0f10b0> >
<pcbnew.FP_SHAPE; proxy of <Swig Object of type 'FP_SHAPE *' at 0x7fc47f2c69d0> >
<pcbnew.FP_SHAPE; proxy of <Swig Object of type 'FP_SHAPE *' at 0x7fc47f2c6d30> >
<pcbnew.FP_SHAPE; proxy of <Swig Object of type 'FP_SHAPE *' at 0x7fc47f0f10e0> >
<pcbnew.FP_SHAPE; proxy of <Swig Object of type 'FP_SHAPE *' at 0x7fc47f2c6cd0> >
<pcbnew.FP_SHAPE; proxy of <Swig Object of type 'FP_SHAPE *' at 0x7fc47f2c6ca0> >
<pcbnew.FP_SHAPE; proxy of <Swig Object of type 'FP_SHAPE *' at 0x7fc47f0f38d0> >
<pcbnew.FP_SHAPE; proxy of <Swig Object of type 'FP_SHAPE *' at 0x7fc47f2c68b0> >
<pcbnew.FP_SHAPE; proxy of <Swig Object of type 'FP_SHAPE *' at 0x7fc47f2c41e0> >
<pcbnew.FP_SHAPE; proxy of <Swig Object of type 'FP_SHAPE *' at 0x7fc47f0f10b0> >
<pcbnew.FP_SHAPE; proxy of <Swig Object of type 'FP_SHAPE *' at 0x7fc47f2c69d0> >
<pcbnew.FP_SHAPE; proxy of <Swig Object of type 'FP_SHAPE *' at 0x7fc47f2c6d30> >

You can filter them using

fp_texts: list[pcbnew.FP_TEXT] = [
    item for footprint in selected_footprint.GraphicalItems()
    if type(item).__name__ == 'FP_TEXT'
]
fp_shapes: list[pcbnew.FP_SHAPE] = [
    item for footprint in selected_footprint.GraphicalItems()
    if type(item).__name__ == 'FP_SHAPE'
]


Posted by Uli Köhler in Electronics, KiCAD

How to get all selected footprints using KiCAD pcbnew plugin Python API

In our previous post, we showed how to get all selected objects using the KiCAD python API using

pcbnew.GetCurrentSelection()

You can simply filter these entries to obtain just a list of selected footprints using either a for loop with inline filtering:

for selected_object in pcbnew.GetCurrentSelection():
    if type(selected_object).__name__ == 'FOOTPRINT':
        print(selected_object.GetReference())

or using a list comprehension:

selected_footprints: list[pcbnew.FOOTPRINT] = [
    footprint for footprint in pcbnew.GetCurrentSelection() if type(footprint).__name__ == 'FOOTPRINT'
]

Complete plugin example:

#!/usr/bin/env python
import pcbnew
import os

class SimplePlugin(pcbnew.ActionPlugin):
    def defaults(self):
        self.name = "Plugin Name as shown in Pcbnew: Tools->External Plugins"
        self.category = "A descriptive category name"
        self.description = "A description of the plugin and what it does"
        self.show_toolbar_button = False # Optional, defaults to False
        self.icon_file_name = os.path.join(os.path.dirname(__file__), 'simple_plugin.png') # Optional, defaults to ""

    def Run(self):
        board: pcbnew.BOARD = pcbnew.GetBoard()
        footprints: list[pcbnew.FOOTPRINT] = board.GetFootprints()
        
        # TODO Do something useful with [board]
        for selected_object in pcbnew.GetCurrentSelection():
            print(selected_object)

SimplePlugin().register() # Instantiate and register to Pcbnew

Example output (excerpt):

D39
D32
D23
D37
D18
D34
D11
D15


Posted by Uli Köhler in Electronics, KiCAD

How to get all selected objects using KiCAD pcbnew plugin Python API

When you have a FOOTPRINT object or a list of footprints in KiCAD’s Python API such as from board.GetFootprints(), you can get their reference designators such as C11 or R4 using

pcbnew.GetCurrentSelection():

Not that not only footprints might be selected but also other objects such as shapes, vias, pads etc.

Complete plugin example:

#!/usr/bin/env python
import pcbnew
import os

class SimplePlugin(pcbnew.ActionPlugin):
    def defaults(self):
        self.name = "Plugin Name as shown in Pcbnew: Tools->External Plugins"
        self.category = "A descriptive category name"
        self.description = "A description of the plugin and what it does"
        self.show_toolbar_button = False # Optional, defaults to False
        self.icon_file_name = os.path.join(os.path.dirname(__file__), 'simple_plugin.png') # Optional, defaults to ""

    def Run(self):
        board: pcbnew.BOARD = pcbnew.GetBoard()
        footprints: list[pcbnew.FOOTPRINT] = board.GetFootprints()
        
        for selected_object in pcbnew.GetCurrentSelection():
            # TODO Do something useful with selected_object
            print(selected_object)

SimplePlugin().register() # Instantiate and register to Pcbnew

Example output (excerpt):

<pcbnew.PCB_VIA; proxy of <Swig Object of type 'PCB_VIA *' at 0x7fc49d2a8b70> >
<pcbnew.PCB_TRACK; proxy of <Swig Object of type 'PCB_TRACK *' at 0x7fc49d2a8de0> >
<pcbnew.PCB_TRACK; proxy of <Swig Object of type 'PCB_TRACK *' at 0x7fc49d2a8c30> >
<pcbnew.PCB_TRACK; proxy of <Swig Object of type 'PCB_TRACK *' at 0x7fc49d2a8b40> >
<pcbnew.PCB_TRACK; proxy of <Swig Object of type 'PCB_TRACK *' at 0x7fc49d2a8db0> >
<pcbnew.PCB_TRACK; proxy of <Swig Object of type 'PCB_TRACK *' at 0x7fc49d2a8c00> >
<pcbnew.PCB_TRACK; proxy of <Swig Object of type 'PCB_TRACK *' at 0x7fc49d2a8ba0> >
<pcbnew.PCB_VIA; proxy of <Swig Object of type 'PCB_VIA *' at 0x7fc49d2a8e10> >
<pcbnew.PCB_VIA; proxy of <Swig Object of type 'PCB_VIA *' at 0x7fc49d2a8bd0> >
<pcbnew.PCB_TRACK; proxy of <Swig Object of type 'PCB_TRACK *' at 0x7fc49d2a8b70> >
<pcbnew.PCB_TRACK; proxy of <Swig Object of type 'PCB_TRACK *' at 0x7fc49d2a8de0> >
<pcbnew.PCB_TRACK; proxy of <Swig Object of type 'PCB_TRACK *' at 0x7fc49d2a8c30> >
<pcbnew.PCB_TRACK; proxy of <Swig Object of type 'PCB_TRACK *' at 0x7fc49d2a8b40> >
<pcbnew.FOOTPRINT; proxy of <Swig Object of type 'std::deque< FOOTPRINT * >::value_type' at 0x7fc49d2a8db0> >
<pcbnew.FOOTPRINT; proxy of <Swig Object of type 'std::deque< FOOTPRINT * >::value_type' at 0x7fc49d2a8c00> >
<pcbnew.FOOTPRINT; proxy of <Swig Object of type 'std::deque< FOOTPRINT * >::value_type' at 0x7fc49d2a8ba0> >
<pcbnew.PCB_VIA; proxy of <Swig Object of type 'PCB_VIA *' at 0x7fc49d2a8e10> >
<pcbnew.PCB_VIA; proxy of <Swig Object of type 'PCB_VIA *' at 0x7fc49d2a8bd0> >
<pcbnew.FOOTPRINT; proxy of <Swig Object of type 'std::deque< FOOTPRINT * >::value_type' at 0x7fc49d2a8b70> >
<pcbnew.FOOTPRINT; proxy of <Swig Object of type 'std::deque< FOOTPRINT * >::value_type' at 0x7fc49d2a8de0> >
<pcbnew.PCB_TRACK; proxy of <Swig Object of type 'PCB_TRACK *' at 0x7fc49d2a8c30> >
<pcbnew.PCB_TRACK; proxy of <Swig Object of type 'PCB_TRACK *' at 0x7fc49d2a8b40> >
<pcbnew.FOOTPRINT; proxy of <Swig Object of type 'std::deque< FOOTPRINT * >::value_type' at 0x7fc49d2a8db0> >
<pcbnew.PCB_VIA; proxy of <Swig Object of type 'PCB_VIA *' at 0x7fc49d2a8c00> >
<pcbnew.FOOTPRINT; proxy of <Swig Object of type 'std::deque< FOOTPRINT * >::value_type' at 0x7fc49d2a8ba0> >
<pcbnew.FOOTPRINT; proxy of <Swig Object of type 'std::deque< FOOTPRINT * >::value_type' at 0x7fc49d2a8e10> >
<pcbnew.FOOTPRINT; proxy of <Swig Object of type 'std::deque< FOOTPRINT * >::value_type' at 0x7fc49d2a8bd0> >
<pcbnew.FOOTPRINT; proxy of <Swig Object of type 'std::deque< FOOTPRINT * >::value_type' at 0x7fc49d2a8b70> >
<pcbnew.PCB_TRACK; proxy of <Swig Object of type 'PCB_TRACK *' at 0x7fc49d2a8de0> >
<pcbnew.FOOTPRINT; proxy of <Swig Object of type 'std::deque< FOOTPRINT * >::value_type' at 0x7fc49d2a8c30> >
<pcbnew.PCB_TRACK; proxy of <Swig Object of type 'PCB_TRACK *' at 0x7fc49d2a8b40> >
<pcbnew.PCB_VIA; proxy of <Swig Object of type 'PCB_VIA *' at 0x7fc49d2a8db0> >
<pcbnew.PCB_TRACK; proxy of <Swig Object of type 'PCB_TRACK *' at 0x7fc49d2a8c00> >
<pcbnew.PCB_TRACK; proxy of <Swig Object of type 'PCB_TRACK *' at 0x7fc49d2a8ba0> >
<pcbnew.FOOTPRINT; proxy of <Swig Object of type 'std::deque< FOOTPRINT * >::value_type' at 0x7fc49d2a8e10> >
<pcbnew.FOOTPRINT; proxy of <Swig Object of type 'std::deque< FOOTPRINT * >::value_type' at 0x7fc49d2a8bd0> >
<pcbnew.PCB_VIA; proxy of <Swig Object of type 'PCB_VIA *' at 0x7fc49d2a8b70> >


Posted by Uli Köhler in Electronics, KiCAD

How to get list footprint Reference Designators KiCAD pcbnew plugin Python API

When you have a FOOTPRINT object or a list of footprints in KiCAD’s Python API such as from board.GetFootprints(), you can get their reference designators such as C11 or R4 using

footprint.GetReference()

Complete plugin example:

#!/usr/bin/env python
import pcbnew
import os

class SimplePlugin(pcbnew.ActionPlugin):
    def defaults(self):
        self.name = "Plugin Name as shown in Pcbnew: Tools->External Plugins"
        self.category = "A descriptive category name"
        self.description = "A description of the plugin and what it does"
        self.show_toolbar_button = False # Optional, defaults to False
        self.icon_file_name = os.path.join(os.path.dirname(__file__), 'simple_plugin.png') # Optional, defaults to ""

    def Run(self):
        board: pcbnew.BOARD = pcbnew.GetBoard()
        footprints: list[pcbnew.FOOTPRINT] = board.GetFootprints()
        
        # TODO Do something useful with [board]
        for footprint in footprints:
            print(footprint.GetReference())

SimplePlugin().register() # Instantiate and register to Pcbnew


Posted by Uli Köhler in Electronics, KiCAD

How to get list of all footprints using KiCAD pcbnew plugin Python API

When using KiCAD’s Python API for pcbnew, you can obtain a list of FOOTPRINTobjects using

board: pcbnew.BOARD = pcbnew.GetBoard()
footprints: list[pcbnew.FOOTPRINT] = board.GetFootprints()

The : pcbnew.BOARD and : list[pcbnew.FOOTPRINT] are optional but will tell your editor (such as visual studio code) which object to expect for better autocompletion.

Complete plugin example:

#!/usr/bin/env python
import pcbnew
import os

class SimplePlugin(pcbnew.ActionPlugin):
    def defaults(self):
        self.name = "Plugin Name as shown in Pcbnew: Tools->External Plugins"
        self.category = "A descriptive category name"
        self.description = "A description of the plugin and what it does"
        self.show_toolbar_button = False # Optional, defaults to False
        self.icon_file_name = os.path.join(os.path.dirname(__file__), 'simple_plugin.png') # Optional, defaults to ""

    def Run(self):
        board: pcbnew.BOARD = pcbnew.GetBoard()
        footprints: list[pcbnew.FOOTPRINT] = board.GetFootprints()
        
        # TODO Do something useful with [board]
        for footprint in footprints:
            print(footprint)

SimplePlugin().register() # Instantiate and register to Pcbnew


Posted by Uli Köhler in Electronics, KiCAD

How to get board object using KiCAD pcbnew plugin Python API

When using KiCAD’s Python API for pcbnew, you can simply get a board object using pcbnew.GetBoard():

board: pcbnew.BOARD = pcbnew.GetBoard()

The : pcbnew.BOARD is optional but will tell your editor (such as visual studio code) which object to expect for better autocompletion.

Complete plugin example:

#!/usr/bin/env python
import pcbnew
import os

class SimplePlugin(pcbnew.ActionPlugin):
    def defaults(self):
        self.name = "Plugin Name as shown in Pcbnew: Tools->External Plugins"
        self.category = "A descriptive category name"
        self.description = "A description of the plugin and what it does"
        self.show_toolbar_button = False # Optional, defaults to False
        self.icon_file_name = os.path.join(os.path.dirname(__file__), 'simple_plugin.png') # Optional, defaults to ""

    def Run(self):
        board: pcbnew.BOARD = pcbnew.GetBoard()
        # TODO Do something useful with [board]
        print(board)

SimplePlugin().register() # Instantiate and register to Pcbnew


Posted by Uli Köhler in Electronics, KiCAD

ESP-IDF HTTP webserver minimal ArduinoJson serialization example

static const httpd_uri_t valueHandler = {
    .uri       = "/api/value",
    .method    = HTTP_GET,
    .handler   = [](httpd_req_t *req) {
        httpd_resp_set_type(req, "application/json");
        // create json docuemnt
        DynamicJsonDocument json(1024);
        json["value"] = 1.0;
        // Serialize JSON to string
        std::string buf;
        serializeJson(json, buf);
        // Send response
        httpd_resp_send(req, buf.c_str(), buf.length());
        return ESP_OK;
    }
};

In order to add the ArduinoJson to PlatformIO, add the following lib_deps to platformio.ini:

lib_deps =
    [email protected]


Posted by Uli Köhler in Arduino, ESP8266/ESP32

How to fix erpc ValueError: The generated shim code version … is different to the rest of eRPC code

Problem:

When trying to import your erpc project generated Python code using e.g.

from erpc_myproject import *

You see the following error message:

Traceback (most recent call last)
Cell In [1], line 1
----> 1 from erpc_myproject import *

File ./erpc_myproject/__init__.py:13
     11     version = "unknown"
     12 if version != "1.9.1":
---> 13     raise ValueError("The generated shim code version (1.9.1) is different to the rest of eRPC code (%s). \
     14 Install newer version by running \"python setup.py install\" in folder erpc/erpc_python/." % repr(version))
     16 from . import common
     17 from . import client

ValueError: The generated shim code version (1.9.1) is different to the rest of eRPC code ('unknown'). Install newer version by running "python setup.py install" in folder erpc/erpc_python/.

Solution:

Either you have not installed the erpc Python library (if the error message lists ... different to the rest of eRPC code ('unknown')) or you have installed the wrong version (e.g. ... (1.9.1) is different to the rest of eRPC code ('1.10.0')).

If you have not installed erpc at all, simply use

pip install erpc

and retry running your script.

If you have installed the wrong version, you have two options:

Option 1 (preferred): Re-generate the code

Just use the original command (some erpcgen call) you’ve used to re-generate the code using the currently installed version.

Option 2: Install the correct version

For this, you need to determine what the correct version is. Let’s consider the following error message:

ValueError: The generated shim code version (1.9.1) is different to the rest of eRPC code ('1.10.0'). Install newer version by running "python setup.py install" in folder erpc/erpc_python/.

From this message, we can read that the shim code version is 1.9.1 whereas you have 1.10.0 installed. Therefore, in order to make it work, we need to install erpc version 1.9.1.

Install it using

pip install -U erpc==1.9.1

and then retry your command. If you are using jupyter notebooks or similar, you need to restart your kernel to load the new library!

Posted by Uli Köhler in Embedded, Python

How to read length-prefixed binary message from Serial using Arduino

The following function allows you to read a binary message, prefixed by a single length byte, from Serial:

#include <Arduino.h>

void setup() {
    Serial.begin(115200);
}

void HandleMessage(String msg) {
    // TODO: Your code to handle the message goes here.
    // See https://techoverflow.net/2022/11/15/how-to-print-string-as-sequence-of-hex-bytes-in-arduino/
    // for an example of how to print the message as a sequence of hex bytes.
}

void ReadMessageFromSerial() {
    // Wait until the length byte is available on Serial
    while (Serial.available() == 0);

    // Read the length of the message
    int length = Serial.read();

    // Read the rest of the message
    String message = "";
    for (int i = 0; i < length; i++) {
      while (Serial.available() == 0);
      message += char(Serial.read());
    }

    // Handle the message
    HandleMessage(message);
}

void loop() {
    ReadMessageFromSerial();
}


Posted by Uli Köhler in Allgemein, Arduino, Electronics, Embedded

Where to find cheap SMD microswitches?

The cheapest SMD (no THT soldering) switch

LCSC offers the SHOU HAN MSK12CO2-SZ microswitch for about 0,023€/pc @ 1kpc. One of the disadvantages of this switch is that even though it is a pure SMD (no through soldering required), it is shipping as bulk in a bag and not as tape. Therefore, it is not suitable for all commercial assembly lines and needs to be assembled manually.

But at least it is cheap – that is, if you buy enough stuff to justify the high LCSC shipping costs.

The KiCAD footprint for this switch is Button_Switch_SMD:SW_SPDT_PCM12. Even though it’s a different switch than the C&K PCM12, it’s mostly compatible footprint-wise – even though the drill sizes are very slightly off, the footprint works well.

This switch is likely rated to DC12V, 50mA (listed as such on the LCSC website). However, from the datasheet, the exact rating is unclear, it mostly covers the test conditions

The cheapest tape&reel SMD switch

If you are looking for an alternative suitable for automated assembly, take a look at the SK-3296S-01-L1 which comes as a taped reel. It is almost 35% more expensive but given that it’s still just 0,031€/pc @1kpc and given that you’re likely not a chinese electronics designer in extreme mass manufacturing, the price is hardly worth thinking about.

It is exactly compatible footprint-wise with the C&K PCM12, so the KiCAD Button_Switch_SMD:SW_SPDT_PCM12 works even better.

This switch is rated at DC12V, 50mA.

The cheapest 1 Ampere rated switch

This is the MK-13C03-G010 which is rated at 6V 1A or 12V 0.5A. This type of current rating with voltage is related to arcing when breaking the contact.

It is priced around 0,11€/pc @1kpc.

This one is compatible with the C&K PCM13 (but rated at higher current), so use the Button_Switch_SMD:SW_SPDT_PCM13

Posted by Uli Köhler in Components, Electronics

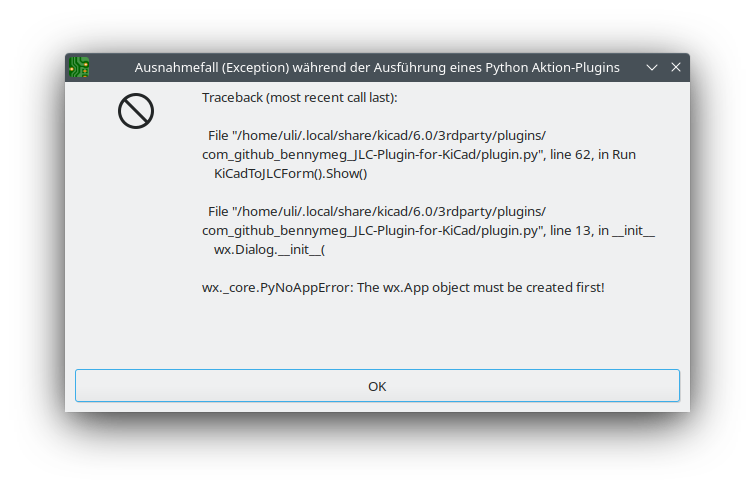
How to fix KiCAD JLCPCB fabrication plugin error: The wx.App object must be created first!

Problem:

When running the JLCPCB fabrication plugin in KiCAD to export fabrication data, you see the following error message:

wx._core.PyNoAppError: The wx.App object must be created first!

Solution:

This appears to be a bug with current versions of the JLCPCB fabrication plugin, but you can easily fix it by adding a line to plugin.py, which is located here:

/home/uli/.local/share/kicad/6.0/3rdparty/plugins/com_github_bennymeg_JLC-Plugin-for-KiCad/plugin.py

(depending on the operating system, the kicad folder will be located elsewhere).

Find the following lines which are almost at the top of the file:

# WX GUI form that show the plugin progress
class KiCadToJLCForm(wx.Frame):
    def __init__(self):

and add the following line directly after def __init__(self):

        self.app = wx.PySimpleApp()

Result:

# WX GUI form that show the plugin progress
class KiCadToJLCForm(wx.Frame):
    def __init__(self):
        self.app = wx.PySimpleApp()


Posted by Uli Köhler in KiCAD

What current rating do JST “XH” connectors have?

JST XH connector crimp contacts have a 3A current rating per contact (with 0.33mm² cables).

Source: JST website

Posted by Uli Köhler in Electronics

What are the part numbers for JST “XH” crimp contacts and where to buy them?

JST XH connector crimp contacts have the following part numbers:

  • SXH-001T-P0.6 (0.08…0.33mm²)
  • SXH-002T-P0.6 (0.05…0.13mm²)
  • SXH-001T-P0.6N (slighly different shape than the others, see datasheet, 0.13…0.33mm²)

Datasheet link

One source to buy them from is LCSC. They have high base shipping costs so if you just want to buy a couple of contacts, you should rather buy a crimp set on Aliexpress or Amazon, but in larger quantities it’s hard to beat LCSC.

Source: JST website

Posted by Uli Köhler in Electronics

How to fix ESP32 error: ‘ESP_LOGE’ was not declared in this scope

Problem:

When trying compile your ESP32 project, you see an error message such as

.pio/libdeps/esp32dev/HumanESPHTTP/src/QueryURLParser.cpp:29:9: error: 'ESP_LOGE' was not declared in this scope
         ESP_LOGE("Query URL parser", "parsing URL");
         ^~~~~~~~

Solution:

At the top of the file where the error occurs (QueryURLParser.cpp in this example), add the following line:

#include <esp_log.h>


Posted by Uli Köhler in C/C++, ESP8266/ESP32

What is a DALI “control gear”?

Typically, one DALI control gear is just a lamp that can be controlled using DALI.

More generally, a control gear can also be a DALI device controlling more than one physical lamp or some similar device. However, if you’re a DALI beginner, it’s much easier to think of control gear as individual lamps controllable by DALI.

Posted by Uli Köhler in DALI

How to set DAPC level (dim level) directly using DALI

In order to directly set the power level for a given control gear (lamp) using DALI, you have to send the following two bytes:

  1. The short address of the control gear, multiplied by 2
  2. The data byte containing the power level (0...255).

In order to distinguish between command messages (frames) and DAPC (direct arc power control) messages, remember that the 1st bit must always be 0 for DAPC messages.

For example, if you want to set half brightness level for the lamp with short address 3, send the following bytes:

  • 6 (= 3 * 2)
  • 127 (= half brightness)
Posted by Uli Köhler in DALI

How to convert DALI short address to address byte

In order to convert the address byte for a single DALI control gear to an address byte to send over the wire, multiply the short address by 2  and add 1. The following C macro can be used to compute the address byte:

#define DALI_SHORT_ADDR_TO_ADDR_BYTE(short_addr) (1 + (short_addr << 1))

Since the 1st bit is set (by adding 1), this will activate command mode, i.e. the control gear expects a command byte as data byte for the DALI message.

Posted by Uli Köhler in DALI