Networking

Simple Unifi controller setup using docker-compose

Updated 2022-12-24: Added --bind_ip 127.0.0.1 to prevent remote MongoDB access in context with network_mode: host. Thanks Matt Johnson for the suggestion 🙂

This setup runs both MongoDB and unifi using network_mode: host, this is why we are running MongoDB on a nonstandard port (so it will not interfere with other MongoDB instances). This has the huge benefit of allowing direct Layer 2 network access allowing L2 access point adoption.

Create a directory such as /opt/unifi and create docker-compose.yml

version: '2.3'
services:
  mongo:
    image: mongo:3.6
    network_mode: host
    restart: always
    volumes:
      - ./mongo_db:/data/db
      - ./mongo/dbcfg:/data/configdb
    command: mongod --bind_ip 127.0.0.1 --port 29718
  controller:
    image: "jacobalberty/unifi:latest"
    depends_on:
      - mongo
    init: true
    network_mode: host
    restart: always
    volumes:
      - ./unifi_dir:/unifi
      - ./unifi_data:/unifi/data
      - ./unifi_log:/unifi/log
      - ./unifi_cert:/unifi/cert
      - ./unifi_init:/unifi/init.d
      - ./unifi_run:/var/run/unifi
      - ./unifi_backup:/unifi/data/backup
    environment:
      - DB_URI=mongodb://localhost:29718/unifi
      - STATDB_URI=mongodb://localhost:29718/unifi_stat
      - DB_NAME=unifi
  logs:
    image: bash
    depends_on:
      - controller
    command: bash -c 'tail -F /unifi/log/*.log'
    restart: always
    volumes:
      - ./unifi_log:/unifi/log

Now create the directories with the correct permissions:

mkdir -p unifi_backup unifi_cert unifi_data unifi_dir unifi_init unifi_log unifi_run
chown -R 999:999 unifi_backup unifi_cert unifi_data unifi_dir unifi_init unifi_log unifi_run

Now you can use our script from Create a systemd service for your docker-compose project in 10 seconds to automatically start the controller on boot (and start it immediately):

curl -fsSL https://techoverflow.net/scripts/create-docker-compose-service.sh | sudo bash /dev/stdin

Now access https://<IP of controller>:8443 to get started with the setup or import a backup.
Posted by Uli Köhler in Docker, Networking

How to update WireGuard peer endpoint address using DNS on MikroTik RouterOS

Update 2022-12-30: Updated code, now uses variables

Assuming your peer comment is peer1 and the correct endpoint DNS record is peer1.mydomain.com, you can use this RouterOS script to update the endpoint based on the DNS record:

:local PEERCOMMENT 
:local DOMAIN 

:set PEERCOMMENT "peer1"
:set DOMAIN "peer1.mydomain.com"

:if ([interface wireguard peers get number=[find comment=$PEERCOMMENT] value-name=endpoint-address] != [/resolve $DOMAIN]) do={
    interface wireguard peers set number=[find comment=$PEERCOMMENT] endpoint-address=[/resolve $DOMAIN]
}

Modify the variables to suit your Wireguard config: Set PEERCOMMENT to the comment of the peer that should be updated and set DOMAIN to the DNS domain name that should be used to update the peer’s IP address

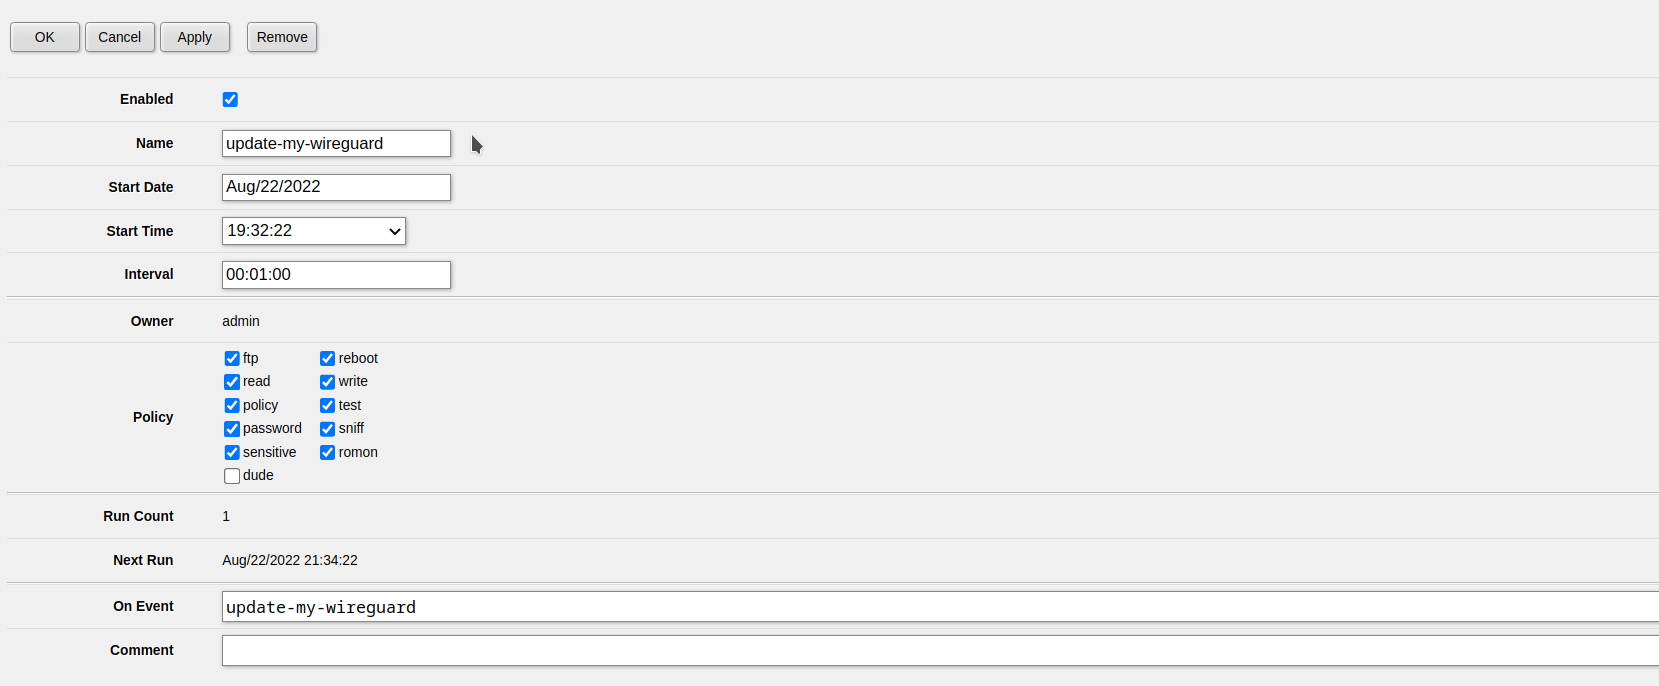
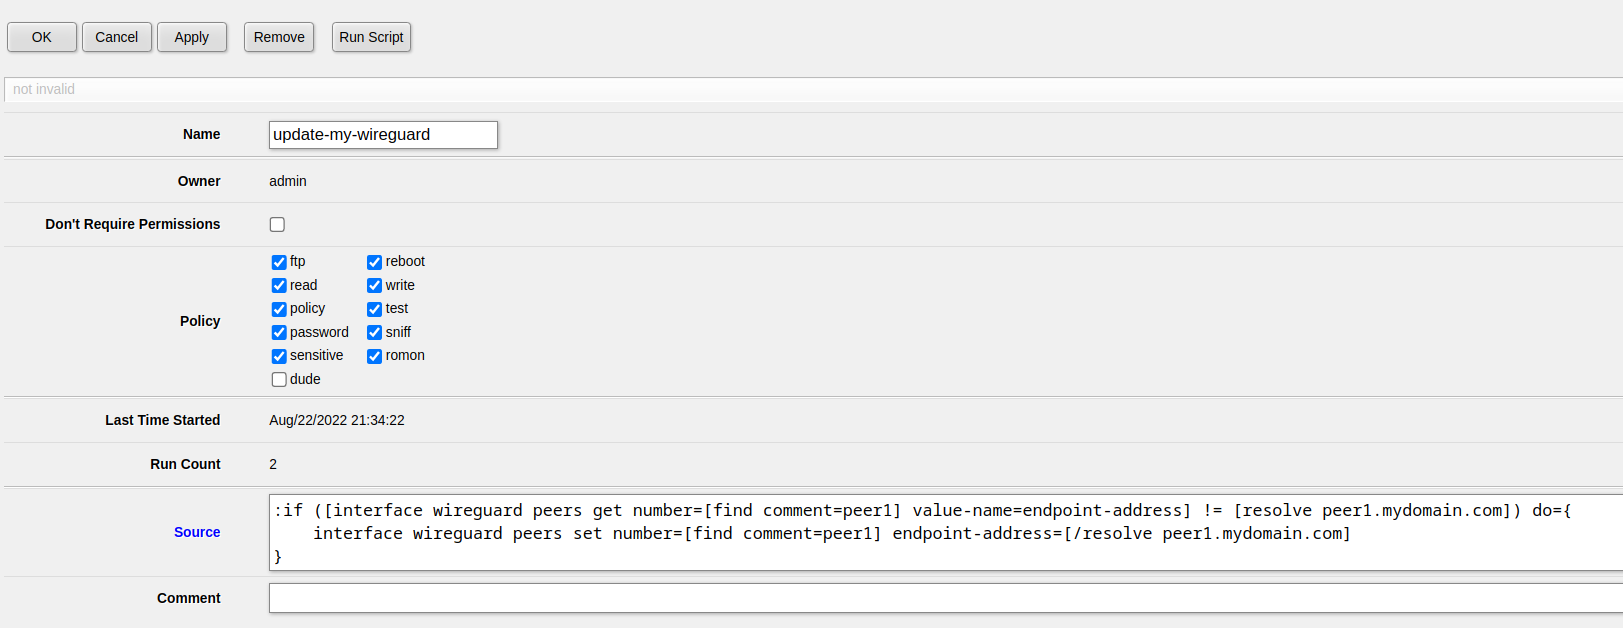
After that, add it as a new script in System -> Scripts, then add a Scheduler to run the script e.g. every 30 seconds under System -> Scheduler

Script settings

Scheduler settings

Related posts which might make the process easier to understand:

Posted by Uli Köhler in MikroTik, Wireguard

How to check if WireGuard Peer endpoint address equals DNS record using RouterOS scripting on MikroTik

Assuming your peer comment is peer1 and the correct endpoint DNS record is peer1.mydomain.com:

([interface wireguard peers get number=[find comment=peer1] value-name=endpoint-address] = [resolve peer1.mydomain.com])

This will return true if the peer endpoint is the same as the DNS record.

Example

[admin@CoreSwitch01] > :put ([interface wireguard peers get number=[find comment=peer1] value-name=endpoint-address] = [resolve peer1.mydomain.com])
true
Posted by Uli Köhler in MikroTik, Wireguard

RouterOS scripting: How to get Wireguard peer endpoint address on MikroTik

We assume that the peer you want to find info about has comment=peer1.mydomain.com. Use

Use

interface wireguard peers get number=[find comment=peer1.mydomain.com] value-name=endpoint-address

or use :put [...] to print the value:

:put [interface wireguard peers get number=[find comment=peer1.mydomain.com] value-name=endpoint-address]

Example

[admin@CoreSwitch01] > :put [interface wireguard peers get number=[find comment=peer1.mydomain.com] value-name=endpoint-address]
12.245.102.141


Posted by Uli Köhler in MikroTik, Wireguard

How to resolve DNS name in MikroTik RouterOS scripting/command line

In order to resolve a DNS name use

resolve <domain name>

Use

:put [resolve <domain name>]

to resolve a domain name and print the IP address.

Example

:put [resolve techoverflow.net]

Output:

[admin@CoreSwitch01] > :put [resolve techoverflow.net]
172.67.166.211
Posted by Uli Köhler in MikroTik

How to set username & password in Paho-MQTT

Set username & password in Paho-MQTT using

client.username_pw_set("myusername", "aeNg8aibai0oiloo7xiad1iaju1uch")

You need to call that before calling connect()!

Example of how to connect with username & password:

client = mqtt.Client("mqtt-test") # client ID "mqtt-test"
client.on_connect = on_connect
client.on_message = on_message
client.username_pw_set("myusername", "aeNg8aibai0oiloo7xiad1iaju1uch")
client.connect('127.0.0.1', 1883)
client.loop_forever()  # Start networking daemon


Posted by Uli Köhler in MQTT, Python

How to fix Paho-MQTT result code 5

When you see result code 5 in paho-mqtt this means Unauthorized! Typically it means you don’t have the correct username and password set.

Set username & password using

client.username_pw_set("myusername", "aeNg8aibai0oiloo7xiad1iaju1uch")

Example of how to connect with username & password:

client = mqtt.Client("mqtt-test") # client ID "mqtt-test"
client.on_connect = on_connect
client.on_message = on_message
client.username_pw_set("myusername", "aeNg8aibai0oiloo7xiad1iaju1uch")
client.connect('127.0.0.1', 1883)
client.loop_forever()  # Start networking daemon


Posted by Uli Köhler in MQTT, Python

Python MQTT subscribe minimal example (Paho-MQTT)

#!/usr/bin/env python3
import paho.mqtt.client as mqtt

def on_connect(client, userdata, flags, rc):
    # This will be called once the client connects
    print(f"Connected with result code {rc}")
    # Subscribe here!
    client.subscribe("my-topic")

def on_message(client, userdata, msg):
    print(f"Message received [{msg.topic}]: {msg.payload}")

client = mqtt.Client("mqtt-test") # client ID "mqtt-test"
client.on_connect = on_connect
client.on_message = on_message
client.username_pw_set("myusername", "aeNg8aibai0oiloo7xiad1iaju1uch")
client.connect('127.0.0.1', 1883)
client.loop_forever()  # Start networking daemon


Posted by Uli Köhler in MQTT, Python

How to fix Python ModuleNotFoundError: No module named ‘paho’

Problem:

When running your Python script, you see an error message like

Traceback (most recent call last):
  File "test.py", line 2, in <module>
    import paho.mqtt.client as mqtt
ModuleNotFoundError: No module named 'paho'

Solution:

Install the paho-mqtt package using

pip3 install paho-mqtt

or

pip install paho-mqtt
Posted by Uli Köhler in MQTT, Python

Simple HomeAssistant docker-compose setup

First, create a directory where HomeAssistant will reside. I use /opt/homeassistant.

Create docker-compose.yml:

version: '3.5'
services:
  homeassistant:
    container_name: homeassistant
    restart: unless-stopped
    image: ghcr.io/home-assistant/home-assistant:stable
    network_mode: host
    privileged: true
    environment:
      - TZ=Europe/Berlin
    volumes:
      - ./homeassistant_config:/config
    depends_on:
      - mosquitto
  mosquitto:
    image: eclipse-mosquitto
    network_mode: host
    volumes:
      - ./mosquitto_conf:/mosquitto/config
      - ./mosquitto_data:/mosquitto/data
      - ./mosquitto_log:/mosquitto/log

Now start homeassistant so it creates the default config files:

docker-compose up

Once you see

homeassistant    | [services.d] done.

Press Ctrl+C to abort.

Now we’ll create the Mosquitto MQTT server config file in mosquitto_conf/mosquitto.conf:

persistence true
persistence_location /mosquitto/data/
log_dest file /mosquitto/log/mosquitto.log

listener 1883
## Authentication ##
allow_anonymous false
password_file /mosquitto/config/mosquitto.passwd

Now create the mosquitto password file and fix the permissions using

touch mosquitto_conf/mosquitto.passwd
chown -R 1883:1883 mosquitto_conf

We can now start create the homeassistant mosquitto user using

docker-compose run mosquitto mosquitto_passwd -c /mosquitto/config/mosquitto.passwd homeassistant

Enter a random password that will be used for the homeassistant user

Now we can edit the homeassistant config homeassistant_config/configuration.yml. This is my config – ensure to insert the random MQTT password we used before instead of ep2ooy8di3avohn1Ahm6eegheiResh:

# Configure a default setup of Home Assistant (frontend, api, etc)
default_config:

http:
  use_x_forwarded_for: true
  trusted_proxies:
  - 127.0.0.1
  ip_ban_enabled: true
  login_attempts_threshold: 5

mqtt:
  broker: "127.0.0.1"
  username: "homeassistant"
  password: "ep2ooy8di3avohn1Ahm6eegheiResh"

# Text to speech
tts:
  - platform: google_translate

group: !include groups.yaml
automation: !include automations.yaml
script: !include scripts.yaml
scene: !include scenes.yaml

Now we can start the server using

docker-compose up

You can also use our script to generate a systemd service to autostart the docker-compose config on boot:

curl -fsSL https://techoverflow.net/scripts/create-docker-compose-service.sh | sudo bash /dev/stdin

Now login to the web interface on port 8123 and configure your HomeAssistant!

Posted by Uli Köhler in Container, Docker, Home-Assistant, MQTT

ESPAsyncWebserver handler example with String query argument

This example is based on our basic example and shows how to use an String query parameter, e.g. http://192.168.1.112/api/test?param=abc123

server.on("/api/test", HTTP_GET, [](AsyncWebServerRequest *request) {
      String param = request->getParam("param")->value();
      // TODO: Do something with param!

      // Respond with JSON {"status": "ok"}
      AsyncResponseStream *response = request->beginResponseStream("application/json");
      DynamicJsonDocument json(1024);
      json["status"] = "ok";
      json["param"] = param;
      serializeJson(json, *response);
      request->send(response);
});


Posted by Uli Köhler in ESP8266/ESP32, Networking

How to fix error: invalid conversion from ‘int’ to ‘esp_mqtt_event_id_t’ on the ESP8266 or ESP32

If you see an error message like

src/main.cpp: In function 'void InitMQTT()':
/home/uli/.platformio/packages/framework-arduinoespressif32/tools/sdk/esp32/include/esp_event/include/esp_event_base.h:37:32: error: invalid conversion from 'int' to 'esp_mqtt_event_id_t' [-fpermissive]
 #define ESP_EVENT_ANY_ID       -1               /**< register handler for any event id */

src/main.cpp:80:44: note: in expansion of macro 'ESP_EVENT_ANY_ID'
     esp_mqtt_client_register_event(client, ESP_EVENT_ANY_ID, mqtt_event_handler, client);
                                            ^~~~~~~~~~~~~~~~

replace ESP_EVENT_ANY_ID by MQTT_EVENT_ANY and recompile. This will fix the issue. Using ESP_EVENT_ANY_ID was possible in an outdated version of the MQTT library.


Posted by Uli Köhler in Arduino, Embedded, ESP8266/ESP32, MQTT, Networking, PlatformIO

How should the Ethernet RMII clock look on the Oscilloscope?

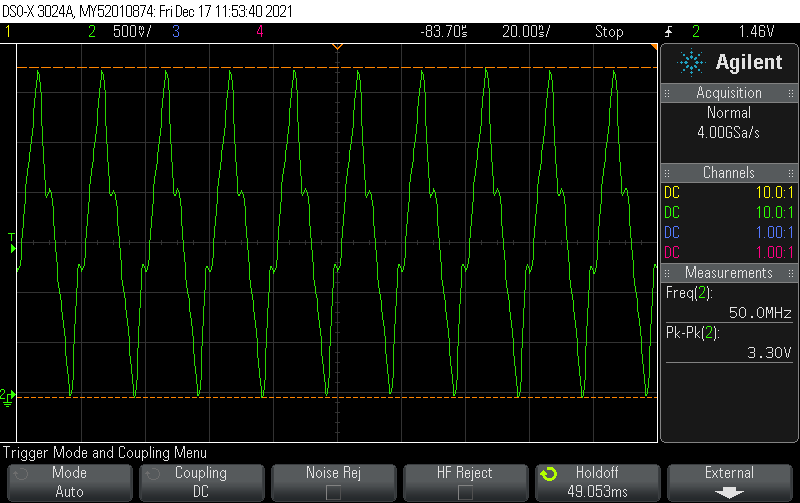
The Ethernet RMII clock should always be 50.0 MHz. Depending on the system, it should typically be 3.3V in amplitude. The RMII clock should be continous and never stop.

Posted by Uli Köhler in Electronics, Networking

How should a PoE flyback transformer look on the oscilloscope

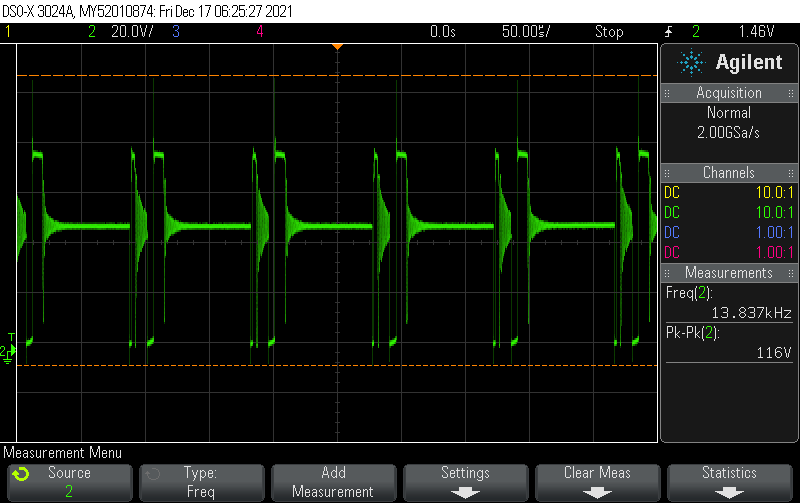
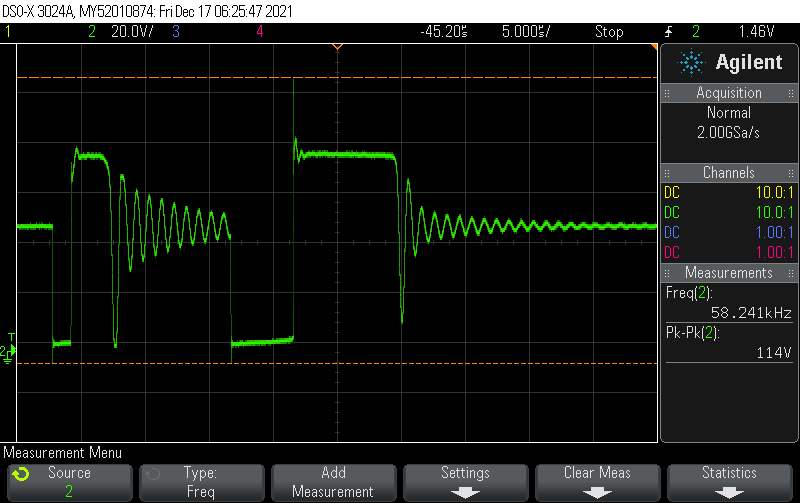
Measure at the pin not connected to the 48VDC line i.e. the pin of the transformer connected to the MOSFET / integrated flyback regulator IC (If unsure, try it out).

Depending on how exactly the IC works and the load (and the circuitry), these waveforms look quite differently. So the following pictures are mostly for basic reference.

Posted by Uli Köhler in Electronics, EMI, PoE

How to print SMTP port 587 STARTTLS certificate using openssl s_client

openssl s_client -starttls smtp -crlf -connect smtp,myserver.com:587 2>&1 </dev/null | sed --quiet '/-BEGIN CERTIFICATE-/,/-END CERTIFICATE-/p' | openssl x509 -noout -text


Posted by Uli Köhler in Networking

ESPAsyncWebserver basic ArduinoJSON handler example

server.on("/api/test", HTTP_GET, [](AsyncWebServerRequest *request) {
      // Respond with JSON {"status": "ok"}
      AsyncResponseStream *response = request->beginResponseStream("application/json");
      DynamicJsonDocument json(1024);
      json["status"] = "ok";
      serializeJson(json, *response);
      request->send(response);
});


Posted by Uli Köhler in ESP8266/ESP32, Networking

ESPAsyncWebserver handler example with int query argument

This example is based on our basic example and shows how to use an int query parameter, e.g. http://192.168.1.112/api/test?param=2

server.on("/api/test", HTTP_GET, [](AsyncWebServerRequest *request) {
      int param = request->getParam("param")->value().toInt();
      // TODO: Do something with param!

      // Respond with JSON {"status": "ok"}
      AsyncResponseStream *response = request->beginResponseStream("application/json");
      DynamicJsonDocument json(1024);
      json["status"] = "ok";
      json["param"] = param;
      serializeJson(json, *response);
      request->send(response);
});


Posted by Uli Köhler in ESP8266/ESP32, Networking

How to replace host part of IPv6 address using Python

In our previous post Bitwise operation with IPv6 addresses and networks in Python we showed how to perform bitwise operations in Python using the ipaddress module. In this post we will use this previous work to replace just the host part of an IPv6 address, leaving the network part as-is – in other words, we will combine two IPv6 addresses together using a configurable network prefix length.

import ipaddress

def bitwise_and_ipv6(addr1, addr2):
    result_int = int.from_bytes(addr1.packed, byteorder="big") & int.from_bytes(addr2.packed, byteorder="big")
    return ipaddress.IPv6Address(result_int.to_bytes(16, byteorder="big"))

def bitwise_or_ipv6(addr1, addr2):
    result_int = int.from_bytes(addr1.packed, byteorder="big") | int.from_bytes(addr2.packed, byteorder="big")
    return ipaddress.IPv6Address(result_int.to_bytes(16, byteorder="big"))

def bitwise_xor_ipv6(addr1, addr2):
    result_int = int.from_bytes(addr1.packed, byteorder="big") ^ int.from_bytes(addr2.packed, byteorder="big")
    return ipaddress.IPv6Address(result_int.to_bytes(16, byteorder="big"))

def replace_ipv6_host_part(net_addr, host_addr, netmask_length=64):
    # Compute bitmasks
    prefix_network = ipaddress.IPv6Network(f"::/{netmask_length}")
    hostmask = prefix_network.hostmask # ffff:ffff:ffff:ffff:: for /64
    netmask = prefix_network.netmask # ::ffff:ffff:ffff:ffff for /64
    # Compute address
    net_part = bitwise_and_ipv6(net_addr, netmask)
    host_part = bitwise_and_ipv6(host_addr, hostmask)
    # Put together resulting IP
    return bitwise_or_ipv6(net_part, host_part)

# Usage example:
# IP address from which we take the network part ("prefix")
net_addr = ipaddress.IPv6Address("2a01:c22:6f71:9f00:8ce6:2eff:fe60:cc69")
# IP address from which we take the host part (suffix)
host_addr = ipaddress.IPv6Address("::dead:babe:cafe:0000")
print(replace_ipv6_host_part(net_addr, host_addr))

This prints

IPv6Address('2a01:c22:6f71:9f00:dead:babe:cafe:0')


Posted by Uli Köhler in Networking, Python

Which strap resistor value to use for LAN9303?

The LAN9303 datasheet currently does explictly specify a strapping resistor value. However, the evalboard schematic effectively uses a 10kΩ resistor when strapping to GND or a 20kΩ resistor when strapping to VDD. I have experimentally verified that 10kOhm strapping resistors work when strapping to GND. On my boards, I do not explicitly strap to VDD because most strappable pins have internal pull-ups and I don’t need to use the LEDs.

Hence, my recommendation is to strap the LAN9303 using 10kΩ resistors.

Posted by Uli Köhler in Electronics, Embedded, Networking

How to get the LAN9303 into I2C managed mode

In order to set the LAN9303 into I2C managed mode where you can configure the chip using I2C,  strap MNGT1 to 1 and strap MNGT0 to 0. Since the MNGT[1:0] strap pins have an internal pull-up, you only need to strap MNGT0 (pin 26 on the QFN package) to GND using a 10kΩ resistor from this pin to GND.

Posted by Uli Köhler in Electronics, Embedded, Networking