Networking

Simple SNMPv3 client example for Netgear GS710TUP

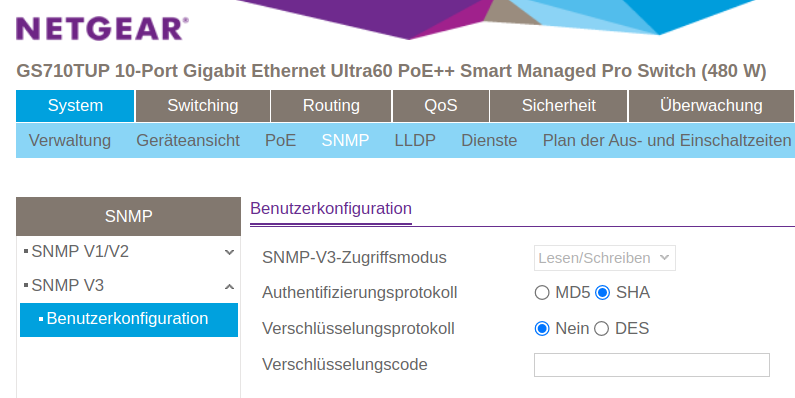
First, configure your Netgear GS710TUP to enable SHA authentication (instead of the less secure MD5 authentication) by opening System -> SNMP -> SNMPv3 , clicking on SHA and clicking Save:

Given that configuration, you can query information such as the switch uptime (which is represented by OID 1.3.6.1.2.1.1.3.0) using snmpwalk:

snmpwalk -v3 -l authNopriv -c public -a SHA1 -u admin -A 'switchAdminPassword' SWITCHIPADDRESS 1.3.6.1.2.1.1.3.0

Remember to replace switchAdminPassword by the admin password of your switch and SWITCHIPADDRESS by the IP address of the switch.

Posted by Uli Köhler in Networking, SNMP

How to get external IPv4 address using curl

Run the following command to print your external IP address:

curl -fsSL https://api4.ipify.org

Example output:

80.187.71.195


Posted by Uli Köhler in Networking

How to get external IPv4 address using wget

Run the following command to print your external IP address:

wget -qO- https://api4.ipify.org

Example output:

80.187.71.195


Posted by Uli Köhler in Networking

ESP32 Arduino HTTPS webserver example using certificate from LittleFS

The following example reads a HTTPS/TLS certificate from LittleFS (cert.pem and privkey.pem – these are just standard X.509 PEM files) and uses those to initialize a HTTPS server. Most of this example is based on the esp-idf https_server example.

Our code to initialize the HTTPS server uses code from the following posts:

The core initialization sequence works like this:

// These need to be GLOBAL variables, they still need to exist
// after initialization!
std::string cert;
std::string privkey;

httpd_ssl_config_t conf = HTTPD_SSL_CONFIG_DEFAULT();
httpd_handle_t server = nullptr;

void InitializeHTTPServer() {
        std::string cert = ReadFileToString("/cert.pem");
        std::string privkey = ReadFileToString("/privkey.pem");

        conf.cacert_pem = (const uint8_t*)this->cert.c_str();
        conf.cacert_len = this->cert.size() + 1;

        conf.prvtkey_pem = (const uint8_t*)this->privkey.c_str();
        conf.prvtkey_len = this->privkey.size() + 1;

        esp_err_t ret = httpd_ssl_start(&server, &conf);
        if (ESP_OK != ret) {
            ESP_LOGI(TAG, "Error starting server!");
            return;
        }
}

However it is typically far more convenient to use our HTTPSServer class:

class HTTPSServer {
public:

    HTTPSServer(): conf(HTTPD_SSL_CONFIG_DEFAULT()) {
    }

    void ReadCertificateInfoFromFilesystem() {
        cert = ReadFileToString("/cert.pem");
        privkey = ReadFileToString("/privkey.pem");
    }

    void StartServer() {
        // Start the httpd server
        ESP_LOGI(TAG, "Starting server");

        ReadCertificateInfoFromFilesystem();

        conf.cacert_pem = (const uint8_t*)this->cert.c_str();
        conf.cacert_len = this->cert.size() + 1;

        conf.prvtkey_pem = (const uint8_t*)this->privkey.c_str();
        conf.prvtkey_len = this->privkey.size() + 1;

        esp_err_t ret = httpd_ssl_start(&server, &conf);
        if (ESP_OK != ret) {
            ESP_LOGI(TAG, "Error starting server!");
            return;
        }
    }

    void RegisterHandler(const httpd_uri_t *uri_handler) {
        httpd_register_uri_handler(this->server, uri_handler);
    }

    httpd_handle_t server = nullptr;

    httpd_ssl_config_t conf;
    std::string cert;
    std::string privkey;
};

Usage example:

void setup() {
    InitFilesystem();

    // TODO setup wifi network

    httpsServer.StartServer();
    // Register your 
    httpsServer.RegisterHandler(&root);
}

Full example:

#include <Arduino.h>
#include <WiFi.h>
#include <LittleFS.h>
#include <string>
#include <esp_https_server.h>
#include "esp_tls.h"

//AsyncWebServer server(80);
static const char *TAG = "https-littlefs-example";

volatile bool filesystemOK = false;

void InitFilesystem() {
  // Initialize LittleFS
  if (!LittleFS.begin(false /* false: Do not format if mount failed */)) {
    Serial.println("Failed to mount LittleFS");
    if (!LittleFS.begin(true /* true: format */)) {
      Serial.println("Failed to format LittleFS");
    } else {
      Serial.println("LittleFS formatted successfully");
      filesystemOK = true;
    }
  } else { // Initial mount success
    filesystemOK = true;
  }
}

/* An HTTP GET handler */
static esp_err_t root_get_handler(httpd_req_t *req)
{
    httpd_resp_set_type(req, "text/html");
    httpd_resp_send(req, "<h1>Hello Secure World!</h1>", HTTPD_RESP_USE_STRLEN);

    return ESP_OK;
}

static const httpd_uri_t root = {
    .uri       = "/",
    .method    = HTTP_GET,
    .handler   = root_get_handler
};

size_t LittleFSFilesize(const char* filename) {
  auto file = LittleFS.open(filename, "r");
  size_t filesize = file.size();
  // Don't forget to clean up!
  file.close();
  return filesize;
}

std::string ReadFileToString(const char* filename) {
  auto file = LittleFS.open(filename, "r");
  size_t filesize = file.size();
  // Read into temporary Arduino String
  String data = file.readString();
  // Don't forget to clean up!
  file.close();
  return std::string(data.c_str(), data.length());
}

class HTTPSServer {
public:

    HTTPSServer(): conf(HTTPD_SSL_CONFIG_DEFAULT()) {
    }

    void ReadCertificateInfoFromFilesystem() {
        cert = ReadFileToString("/cert.pem");
        privkey = ReadFileToString("/privkey.pem");
    }

    void StartServer() {
        // Start the httpd server
        ESP_LOGI(TAG, "Starting server");

        ReadCertificateInfoFromFilesystem();

        conf.cacert_pem = (const uint8_t*)this->cert.c_str();
        conf.cacert_len = this->cert.size() + 1;

        conf.prvtkey_pem = (const uint8_t*)this->privkey.c_str();
        conf.prvtkey_len = this->privkey.size() + 1;

        esp_err_t ret = httpd_ssl_start(&server, &conf);
        if (ESP_OK != ret) {
            ESP_LOGI(TAG, "Error starting server!");
            return;
        }

        // Set URI handlers
        ESP_LOGI(TAG, "Registering URI handlers");
        httpd_register_uri_handler(server, &root);
        return;
    }

    void RegisterHandler(const httpd_uri_t *uri_handler) {
        httpd_register_uri_handler(this->server, uri_handler);
    }

    httpd_handle_t server = nullptr;

    httpd_ssl_config_t conf;
    std::string cert;
    std::string privkey;
};

HTTPSServer httpsServer;

void setup() {
    Serial.begin(115200);
    delay(500);

    InitFilesystem();

    // Connect Wifi, restart if not connecting
    // https://techoverflow.net/2021/01/21/how-to-fix-esp32-not-connecting-to-the-wifi-network/
    WiFi.begin("MyWifi", "Lobae1tie5achokef8riequohgohx");

    uint32_t notConnectedCounter = 0;
    while (WiFi.status() != WL_CONNECTED) {
        delay(100);
        Serial.println("Wifi connecting...");
        notConnectedCounter++;
        if(notConnectedCounter > 150) { // Reset board if not connected after 5s
            Serial.println("Resetting due to Wifi not connecting...");
            ESP.restart();
        }
    }
    Serial.print("Wifi connected, IP address: ");
    Serial.println(WiFi.localIP());

    httpsServer.StartServer();
    httpsServer.RegisterHandler(&root);
}

void loop() {
  // put your main code here, to run repeatedly:
  delay(1000);
}
[env:esp32dev]
platform = espressif32
platform_packages = framework-arduinoespressif32 @ https://github.com/espressif/arduino-esp32.git#2.0.5
board = esp32dev
framework = arduino
board_build.filesystem = littlefs
monitor_speed = 115200
 

Posted by Uli Köhler in Arduino, ESP8266/ESP32, Networking, PlatformIO

How to fix esp-tls-mbedtls: mbedtls_x509_crt_parse returned -0x2180

Problem:

While trying to use TLS on the ESP32, you are using a certificate and private key e.g. from NVS or from the filesystem. However when you try to connect using SSL, you see error messages like

E (9774) esp-tls-mbedtls: mbedtls_x509_crt_parse returned -0x2180
E (9775) esp-tls-mbedtls: Failed to set server pki context
E (9775) esp-tls-mbedtls: Failed to set server configurations, returned [0x8015] (ESP_ERR_MBEDTLS_X509_CRT_PARSE_FAILED)
E (9786) esp-tls-mbedtls: create_ssl_handle failed, returned [0x8015] (ESP_ERR_MBEDTLS_X509_CRT_PARSE_FAILED)
E (9795) esp_https_server: esp_tls_create_server_session failed

Solution:

-0x2180 means MBEDTLS_ERR_X509_INVALID_FORMAT

The most common issue here is that conf.cacert_len and conf.prvtkey_len must include the NUL terminator in the length.

Working Example:

conf.cacert_pem = (const uint8_t*)cert.c_str();
conf.cacert_len = this->cert.size() + 1;

conf.prvtkey_pem = (const uint8_t*)privkey.c_str();
conf.prvtkey_len = this->privkey.size() + 1;

Note the + 1 here: Without the + 1, you’ll see the mbedtls_x509_crt_parse returned -0x2180

Other causes:

If the length isn’t the issue, you likely have a malformed certificate. I suggest to print out the certificate’s content via the serial port, saving it to file we’ll call cert_esp32.pem and then running

openssl x509 -in cert_esp32.pem -noout -text

to verify that the certificate is correct. You can do the same for the private key, but typically either both the private key and the certificate are fine or both are not.

Posted by Uli Köhler in C/C++, Embedded, ESP8266/ESP32, Networking

How to install ZeroTier on Teltonika RUTX…/TRB… routers

You can install the ZeroTier using the LuCI webinterface and opening Services->Package Manager. On that page, install the ZeroTier package.

Then configure ZeroTier using Services -> VPN -> ZeroTier. First, add a new zerotier interface and then add one or more networks. Typically you can leave other settings as default.

Posted by Uli Köhler in Networking

How to filter for DNS “A” responses in Wireshark

In Wireshark, you can filter for DNS packets with an A (IPv4 record) response type using the

dns.resp.type == 1

filter. 1 is the binary code for the A response.

In particular, this will filter out NXDOMAIN responses that might clutter your view.

Example:

Posted by Uli Köhler in Networking

How to remote packet capture DNS requests / responses on MikroTik RouterOS

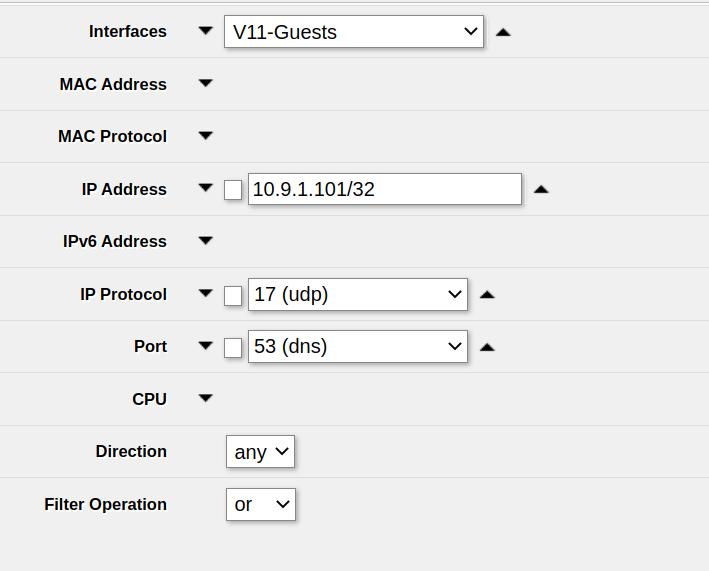
In order to packet capture just DNS packets using Tools -> Packet Sniffer, use the following settings:

  • IP protocol: Select udp (17 (udp))
  • Port: Enter 53 (53 (dns))

Note that this does not capture DNS-over-HTTPS traffic, but at the time of writing this article, this type of traffic is rare.

Example:

Posted by Uli Köhler in MikroTik, Networking

How to capture/sniff ICMPv6 traffic on MikroTik RouterOS

Problem:

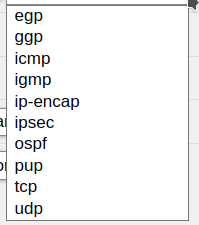
On RouterOS up to at least v7.4.1 you can’t select ICMPv6 as IP protocol in the Tools -> Packet Sniffer

If you select icmp, you will not sniff any ICMPv6 traffic.

Solution:

The solution is to enter the ICMPv6 IP protocol ID58 – into the IP protocol field manually:

After that, ensure that you apply the settings. You can start sniffing ICMPv6 traffic immediately.

Posted by Uli Köhler in MikroTik, Networking

How to configure nginx for static Angular UIs

In order to make Angular UIs work with nginx, you have to load index.html for any URL where you would otherwise return 404 in order to allow routing to work:

location / {
  try_files $uri $uri$args $uri$args/ /index.html;
}

Full example for default site with API:

server {
        listen 80 default_server;
        listen [::]:80 default_server;

        root /var/www/html;

        index index.html;

        server_name MyServer;

        location / {
          try_files $uri $uri$args $uri$args/ /index.html;
        }

        location /api {
                proxy_pass http://localhost:8080;
        }
}


Posted by Uli Köhler in nginx

How to test MikroTik UserManager (RADIUS) using radtest

On Ubuntu or other Linux distribution, you can easily install radtest using

sudo apt -y install freeradius-utils

After that, you need to create a Router representing your test PC on the MikroTik device so that RADIUS requests will be accepted.

Now you can run radtest like this:

radtest -t mschap [Username of the user to authenticate] [Password of the user to authenticate] [MikroTik IP] 1812 [Router shared secret]

Note the Router shared secret is the password that you used when setting up the Router instance for radtest in User manager -> Routers before and not the router’s admin password etc.

1812 is the default (and recommended) port for RADIUS.

Posted by Uli Köhler in MikroTik, Networking

How to fix MikroTik RouterOS User Manager error: Database disk not yet usable

Problem:

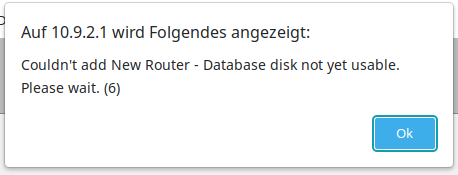
When trying to add for example a router to MikroTik’s User Manager, you see the following error popup:

Solution:

Initialize the database by using the following command in the terminal:

/user-manager/database save name=""

After that, the database is initialized and you will be able to use it.

Posted by Uli Köhler in MikroTik, Networking

EMQX 5.x HTTP ACL server using NodeJS

In our previous post EMQX 5.x HTTP password authentication server minimal example using NodeJS we provided a complete example of how to implement EMQX HTTP authentication.

This post provides an extension to our previous HTTP auth by adding a Koa router (i.e. a HTTP endpoint / URL) to provide ACL authentication, i.e. allow or deny topic level access with custom logic.

router.post('/emqx/acl', async ctx => {
    const body = ctx.request.body;
    console.log(body)
    // TODO: This example always returns true
    // You need to implement your authentication logic
    ctx.body = {
        result: "allow",
    };
});

Add that code before app.use(router.routes()); in the script from EMQX 5.x HTTP password authentication server minimal example using NodeJS.

My recommended Authorization configuration body which you can set in the EMQX dashboard is

{
  "action": "${action}",
  "client_id": "${clientid}",
  "ip": "${peerhost}",
  "topic": "${topic}",
  "username": "${username}"
}


Posted by Uli Köhler in EMQX, MQTT, NodeJS

EMQX 5.x HTTP password authentication server using NodeJS

Note: If you also want to implement ACL authorization via HTTP, see our extension to this example: EMQX 5.x HTTP ACL server using NodeJS

This server implements a minimal HTTP authentication server. In this minimal example, it will always allow authentication – you need to implement your own logic to verify passwords. Note: This server is written for EMQX versionx5.0 and will not work for EMQX 4.x without modification. See the official documentation on EMQX 5.x HTTP auth for more information.

#!/usr/bin/env node
const router = require('koa-router')();
const koaBody = require('koa-body');
const Koa = require('koa');
const app = new Koa();

app.use(koaBody());

router.post('/emqx/auth', async ctx => {
    const body = ctx.request.body;
    const username = body.username;
    const password = body.password;
    // TODO: This example always returns "allow"
    // You need to implement your authentication logic
    ctx.body = {
        result: "allow",
        is_superuser: false
    };
});

app.use(router.routes());

if (!module.parent) app.listen(19261);

This script is based on our previous post Minimal Koa.JS example with Router & Body parser, hence you can install the dependencies using

npm i --save koa koa-router koa-body

The request body config which you can set in the EMQX dashboard is

{
  "client_id": "${clientid}",
  "password": "${password}",
  "username": "${username}"
}


Posted by Uli Köhler in EMQX, MQTT, NodeJS

How to install mosquitto_sub on Ubuntu 22.04

You can install the mosquitto client (mosquitto_sub) by running

sudo apt -y install mosquitto-clients


Posted by Uli Köhler in Linux, MQTT

How to leave netmaker network

Once you have used netclient join to join a netmaker network, you can use

netclient leave --network mynetwork

to permanently leave the network named mynetwork (until you re-join of course).


Posted by Uli Köhler in Networking, VPN

How to load & start EMQX plugin using emqx_ctl

You can easily load (& start) an EMQX plugin such as emqx_auth_mnesia

./bin/emqx_ctl plugins load emqx_auth_mnesia

If you are using docker-compose and your container is named emqx, you can use

docker-compose exec emqx ./bin/emqx_ctl plugins load emqx_auth_mnesia

After running this command, the plugin will show up as Running in the dashboard:

Posted by Uli Köhler in EMQX, MQTT

How to change EMQX admin password

Changing the password is as simple as

./bin/emqx_ctl admins passwd admin "[new password]"

If you are using docker-compose and your container is named emqx, you can use

docker-compose exec ./bin/emqx_ctl admins passwd admin "[new password]"
Posted by Uli Köhler in EMQX, MQTT

What is the EMQX default username & password

The default credentials for EMQX are:

  • Username: admin
  • Password:public

It should go without saying that you must change the password!

Posted by Uli Köhler in EMQX, MQTT