In the default configuration, you can use snmpwalk using SNMPv1 to query information from the MikroTik RB260GS or RB260GSP.
snmpwalk -v1 -c public IPADDRESS
for example:
snmpwalk -v1 -c public 192.168.88.1
In the default configuration, you can use snmpwalk using SNMPv1 to query information from the MikroTik RB260GS or RB260GSP.
snmpwalk -v1 -c public IPADDRESS
for example:
snmpwalk -v1 -c public 192.168.88.1
In our previous post How to use pySNMP to query SNMPv3 information from Netgear GS710TUP we showed how to connect pySNMP to the Netgear GS710TUP to query simple informaton.
The following example script is the pySNMP equivalent to How to enable/disable PoE port power using SNMPv3 on the Netgear GS710TUP : It sets the relevant OID in 1.3.6.1.2.1.105.1.1.1.3 (pethPsePortAdminEnable).
The following OIDs for individual ports are available for the GS710TUP which has 8 PoE ports:
1.3.6.1.2.1.105.1.1.1.3.1.1 # Port 1
1.3.6.1.2.1.105.1.1.1.3.1.2 # Port 2
1.3.6.1.2.1.105.1.1.1.3.1.3 # Port 3
1.3.6.1.2.1.105.1.1.1.3.1.4 # Port 4
1.3.6.1.2.1.105.1.1.1.3.1.5 # Port 5
1.3.6.1.2.1.105.1.1.1.3.1.6 # Port 6
1.3.6.1.2.1.105.1.1.1.3.1.7 # Port 7
1.3.6.1.2.1.105.1.1.1.3.1.8 # Port 8
In our example, we’ll enable the power to port 1:
import pysnmp.hlapi as snmp

portNumber = 1

iterator = snmp.setCmd(
    snmp.SnmpEngine(),
    snmp.UsmUserData('admin', 'SWITCH_ADMIN_PASSWORD',
                     authProtocol=snmp.usmHMACSHAAuthProtocol,
                     privProtocol=snmp.usmNoPrivProtocol),
    snmp.UdpTransportTarget(('SWITCH_IP_ADDRESS', 161)),
    snmp.ContextData(),
    snmp.ObjectType(
        snmp.ObjectIdentity(f'1.3.6.1.2.1.105.1.1.1.3.1.{portNumber}'),
        snmp.Integer(1))
)

errorIndication, errorStatus, errorIndex, varBinds = next(iterator)

if errorIndication:
    print(errorIndication)
elif errorStatus:
    idx = int(errorIndex) - 1
    location = errorIndex and varBinds[idx][0] or '?'
    print(f"{errorStatus.prettyPrint()} at {location}")
else: # Success
    for varBind in varBinds:
        print(' = '.join([x.prettyPrint() for x in varBind]))
In order to disable power on port 1, replace
snmp.Integer(1)
by
snmp.Integer(2)
Note that an 1 value represents boolean true (as in enable PoE output) whereas 2 represents boolean false, disabling PoE output on the port.
In our previous post How to query if PoE ports are enabled using SNMPv3 on the Netgear GS710TUP we showed how to use snmpwalk to check whether PoE power is enabled on the GS710TUP.
In this post we’ll show how to enable port on
The relevant OID is 1.3.6.1.2.1.105.1.1.1.3 (pethPsePortAdminEnable), therefore the OID for a given port number 1...8 is
1.3.6.1.2.1.105.1.1.1.3.1.PORTNUMBER
i.e. the following OIDs are available for the GS710TUP which has 8 PoE ports:
1.3.6.1.2.1.105.1.1.1.3.1.1 # Port 1
1.3.6.1.2.1.105.1.1.1.3.1.2 # Port 2
1.3.6.1.2.1.105.1.1.1.3.1.3 # Port 3
1.3.6.1.2.1.105.1.1.1.3.1.4 # Port 4
1.3.6.1.2.1.105.1.1.1.3.1.5 # Port 5
1.3.6.1.2.1.105.1.1.1.3.1.6 # Port 6
1.3.6.1.2.1.105.1.1.1.3.1.7 # Port 7
1.3.6.1.2.1.105.1.1.1.3.1.8 # Port 8
We can therefore enable power on port 1 by using the following command:
snmpset -v3 -l authNopriv -c public -a SHA1 -u admin -A 'switchAdminPassword' SWITCHIPADDRESS 1.3.6.1.2.1.105.1.1.1.3.1.1 i 1
or disable power on port 1:
snmpset -v3 -l authNopriv -c public -a SHA1 -u admin -A 'switchAdminPassword' SWITCHIPADDRESS 1.3.6.1.2.1.105.1.1.1.3.1.1 i 2
Remember to replace switchAdminPassword by the admin password of your switch and SWITCHIPADDRESS by the IP address of the switch.
i tells snmpset to set an INTEGER. 1 represents true while 2 represents false.
Example output for enabling power on port 1 successfully:
SNMPv2-SMI::mib-2.105.1.1.1.3.1.1 = INTEGER: 1
In our previous post Simple SNMPv3 client example for Netgear GS710TUP we provided an example of how to use snmpwalk to show SNMP properties using SHA authentication without encryption (see the previous post for details on how to configure SNMPv3 correctly).
The Netgear GS710TUP also provides SNMP access to the PoE configuration using the POWER-ETHERNET MIB.
Given the following PoE port configuration on the web UI:
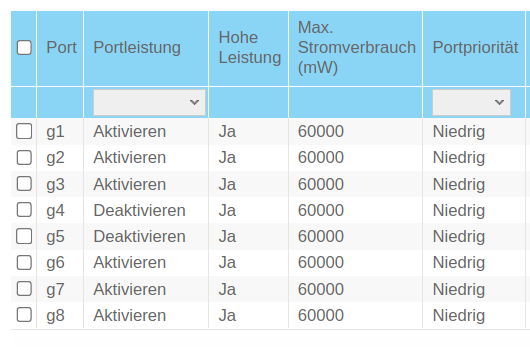
we can query if PoE is enabled or disabled using the OID 1.3.6.1.2.1.105.1.1.1.3 (pethPsePortAdminEnable):
snmpwalk -v3 -l authNopriv -c public -a SHA1 -u admin -A 'switchAdminPassword' SWITCHIPADDRESS 1.3.6.1.2.1.105.1.1.1.3
Remember to replace switchAdminPassword by the admin password of your switch and SWITCHIPADDRESS by the IP address of the switch.
Example output (without the proper MIB being installed):
SNMPv2-SMI::mib-2.105.1.1.1.3.1.1 = INTEGER: 1
SNMPv2-SMI::mib-2.105.1.1.1.3.1.2 = INTEGER: 1
SNMPv2-SMI::mib-2.105.1.1.1.3.1.3 = INTEGER: 1
SNMPv2-SMI::mib-2.105.1.1.1.3.1.4 = INTEGER: 2
SNMPv2-SMI::mib-2.105.1.1.1.3.1.5 = INTEGER: 2
SNMPv2-SMI::mib-2.105.1.1.1.3.1.6 = INTEGER: 1
SNMPv2-SMI::mib-2.105.1.1.1.3.1.7 = INTEGER: 1
SNMPv2-SMI::mib-2.105.1.1.1.3.1.8 = INTEGER: 1
The 8 lines represent the 8 PoE ports of the GS710TUP.
We can download the relevant MIB from the Netgear website and therefore get a nicer output:
snmpwalk -m GS110_710TUP_V1.0.5.9_MIBs/POWER-ETHERNET-MIB.txt -v3 -l authNopriv -c public -a SHA1 -u admin -A 'switchAdminPassword' SWITCHIPADDRESS 1.3.6.1.2.1.105.1.1.1.3
Output:
POWER-ETHERNET-MIB::pethPsePortAdminEnable.1.1 = INTEGER: true(1)
POWER-ETHERNET-MIB::pethPsePortAdminEnable.1.2 = INTEGER: true(1)
POWER-ETHERNET-MIB::pethPsePortAdminEnable.1.3 = INTEGER: true(1)
POWER-ETHERNET-MIB::pethPsePortAdminEnable.1.4 = INTEGER: false(2)
POWER-ETHERNET-MIB::pethPsePortAdminEnable.1.5 = INTEGER: false(2)
POWER-ETHERNET-MIB::pethPsePortAdminEnable.1.6 = INTEGER: true(1)
POWER-ETHERNET-MIB::pethPsePortAdminEnable.1.7 = INTEGER: true(1)
POWER-ETHERNET-MIB::pethPsePortAdminEnable.1.8 = INTEGER: true(1)
First, install pysnmp using
pip install pysnmp
On the Netgear GS710TUP, I enabled SNMPv3 without encryption/privacy but with SHA1 authentication as already outlined in our previous article Simple SNMPv3 client example for Netgear GS710TUP:
Using pysnmp, you can query the device like this (using the standard admin password which you also use to login to the router:
#!/usr/bin/env python3
import pysnmp.hlapi as snmp

iterator = snmp.getCmd(
    snmp.SnmpEngine(),
    snmp.UsmUserData('admin', 'SWITCH_ADMIN_PASSWORD',
                     authProtocol=snmp.usmHMACSHAAuthProtocol,
                     privProtocol=snmp.usmNoPrivProtocol),
    snmp.UdpTransportTarget(('SWITCH_IP_ADDRESS', 161)),
    snmp.ContextData(),
    snmp.ObjectType(snmp.ObjectIdentity('SNMPv2-MIB', 'sysDescr', 0))
)

errorIndication, errorStatus, errorIndex, varBinds = next(iterator)

if errorIndication:
    print(errorIndication)
elif errorStatus:
    idx = int(errorIndex) - 1
    location = errorIndex and varBinds[idx][0] or '?'
    print(f"{errorStatus.prettyPrint()} at {location}")
else: # Success
    for varBind in varBinds:
        print(' = '.join([x.prettyPrint() for x in varBind]))
SNMPv2-MIB::sysDescr.0 = GS710TUP 10-Port Gigabit Ethernet Ultra60 PoE++ Smart Managed Pro Switch (480W), Software Version 1.0.5.9, Boot Version 1.0.0.9
First, download the standard set of MIBs using
sudo apt -y install snmp-mibs-downloader
This will download all available MIBS files during package installation but if at any time you want to download/update them, use
sudo download-mibs
After that, you’ll need to activate loading the MIBS for the SNMP client (original source for this command: @CameronSparr on medium.com):
sudo sed -i 's/mibs :/# mibs :/g' /etc/snmp/snmp.conf
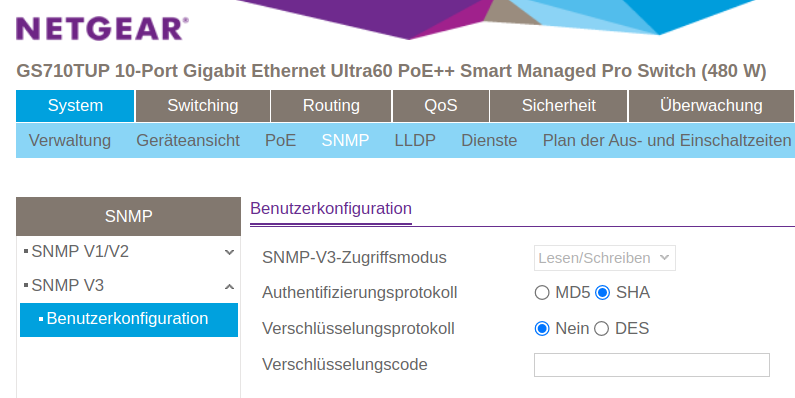
First, configure your Netgear GS710TUP to enable SHA authentication (instead of the less secure MD5 authentication) by opening System -> SNMP -> SNMPv3 , clicking on SHA and clicking Save:
Given that configuration, you can query information such as the switch uptime (which is represented by OID 1.3.6.1.2.1.1.3.0) using snmpwalk:
snmpwalk -v3 -l authNopriv -c public -a SHA1 -u admin -A 'switchAdminPassword' SWITCHIPADDRESS 1.3.6.1.2.1.1.3.0
Remember to replace switchAdminPassword by the admin password of your switch and SWITCHIPADDRESS by the IP address of the switch.