VPN

How to install Tailscale on Ubuntu in less than 1 minute

Just run this sequence of commands to install tailscale. This will automatically determine the correct Ubuntu version

curl -fsSL https://pkgs.tailscale.com/stable/ubuntu/$(lsb_release -sc).gpg | sudo apt-key add -
curl -fsSL https://pkgs.tailscale.com/stable/ubuntu/$(lsb_release -sc).list | sudo tee /etc/apt/sources.list.d/tailscale.list
sudo apt-get update
sudo apt-get install tailscale


Posted by Uli Köhler in Networking, Wireguard

How to setup headscale server in 5 minutes using docker-compose

This headscale setup is using sqlite – with a much lighter memory & CPU footprint than PostgreSQL for simple usecases, I recommend this for almost any installation: Headscale doesn’t have to manage that many requests and using sqlite3 is fine for all but the most demanding setups.

First, create the directory where headscale and all the data will reside in (we use /opt/headscale in this example).

sudo mkdir -p /opt/headscale

Now run the following script in /opt/headscale to initialize the files and directories headscale requires:

mkdir -p ./config
touch ./config/db.sqlite
curl https://raw.githubusercontent.com/juanfont/headscale/main/config-example.yaml -o ./config/config.yaml

docker-compose config

Note: We have an alternate docker-compose config for use with Traefik as an reverse proxy, see Headscale docker-compose config for Traefik HTTPS reverse proxy

Now it’s time to create /opt/headscale/docker-compose.yml:

version: '3.5'
services:
  headscale:
    image: headscale/headscale:latest
    volumes:
      - ./config:/etc/headscale/
      - ./data:/var/lib/headscale
    ports:
      - 27896:8080
    command: headscale serve
    restart: unless-stopped

This will configure headscale to run its HTTP server on port 27896. You can reverse proxy this port to the domain of your choice.

Configuration

Now we should edit the server name in config/config.yaml:

server_url: https://headscale.mydomain.com

Note that you need to restart tailscale after each

Next, see How to create namespace on headscale server for details on how you can create a namespace. Once you have created a namespace (comparable to an account on the commercial tailscale service), you can continue connecting clients (the client software is called tailscale), see e.g. How to connect tailscale to headscale server on Linux

Autostart

Using the method described in our previous post Create a systemd service for your docker-compose project in 10 seconds we will now setup autostart on boot for headscale using systemd. This command will also start it immediately:

curl -fsSL https://techoverflow.net/scripts/create-docker-compose-service.sh | sudo bash /dev/stdin

How to view the logs

Use this command to view & follow the logs:

docker-compose logs -f

Example output

headscale_1  | [GIN-debug] [WARNING] Creating an Engine instance with the Logger and Recovery middleware already attached.
headscale_1  | 
headscale_1  | [GIN-debug] [WARNING] Running in "debug" mode. Switch to "release" mode in production.
headscale_1  |  - using env:    export GIN_MODE=release
headscale_1  |  - using code:   gin.SetMode(gin.ReleaseMode)
headscale_1  | 
headscale_1  | [GIN-debug] GET    /metrics                  --> github.com/zsais/go-gin-prometheus.prometheusHandler.func1 (4 handlers)
headscale_1  | [GIN-debug] GET    /health                   --> github.com/juanfont/headscale.(*Headscale).Serve.func2 (4 handlers)
headscale_1  | [GIN-debug] GET    /key                      --> github.com/juanfont/headscale.(*Headscale).KeyHandler-fm (4 handlers)
headscale_1  | [GIN-debug] GET    /register                 --> github.com/juanfont/headscale.(*Headscale).RegisterWebAPI-fm (4 handlers)
headscale_1  | [GIN-debug] POST   /machine/:id/map          --> github.com/juanfont/headscale.(*Headscale).PollNetMapHandler-fm (4 handlers)
headscale_1  | [GIN-debug] POST   /machine/:id              --> github.com/juanfont/headscale.(*Headscale).RegistrationHandler-fm (4 handlers)
headscale_1  | [GIN-debug] GET    /oidc/register/:mkey      --> github.com/juanfont/headscale.(*Headscale).RegisterOIDC-fm (4 handlers)
headscale_1  | [GIN-debug] GET    /oidc/callback            --> github.com/juanfont/headscale.(*Headscale).OIDCCallback-fm (4 handlers)
headscale_1  | [GIN-debug] GET    /apple                    --> github.com/juanfont/headscale.(*Headscale).AppleMobileConfig-fm (4 handlers)
headscale_1  | [GIN-debug] GET    /apple/:platform          --> github.com/juanfont/headscale.(*Headscale).ApplePlatformConfig-fm (4 handlers)
headscale_1  | [GIN-debug] GET    /swagger                  --> github.com/juanfont/headscale.SwaggerUI (4 handlers)
headscale_1  | [GIN-debug] GET    /swagger/v1/openapiv2.json --> github.com/juanfont/headscale.SwaggerAPIv1 (4 handlers)
headscale_1  | [GIN-debug] GET    /api/v1/*any              --> github.com/gin-gonic/gin.WrapF.func1 (5 handlers)
headscale_1  | [GIN-debug] POST   /api/v1/*any              --> github.com/gin-gonic/gin.WrapF.func1 (5 handlers)
headscale_1  | [GIN-debug] PUT    /api/v1/*any              --> github.com/gin-gonic/gin.WrapF.func1 (5 handlers)
headscale_1  | [GIN-debug] PATCH  /api/v1/*any              --> github.com/gin-gonic/gin.WrapF.func1 (5 handlers)
headscale_1  | [GIN-debug] HEAD   /api/v1/*any              --> github.com/gin-gonic/gin.WrapF.func1 (5 handlers)
headscale_1  | [GIN-debug] OPTIONS /api/v1/*any              --> github.com/gin-gonic/gin.WrapF.func1 (5 handlers)
headscale_1  | [GIN-debug] DELETE /api/v1/*any              --> github.com/gin-gonic/gin.WrapF.func1 (5 handlers)
headscale_1  | [GIN-debug] CONNECT /api/v1/*any              --> github.com/gin-gonic/gin.WrapF.func1 (5 handlers)
headscale_1  | [GIN-debug] TRACE  /api/v1/*any              --> github.com/gin-gonic/gin.WrapF.func1 (5 handlers)
headscale_1  | 2022-01-16T19:04:04Z WRN Listening without TLS but ServerURL does not start with http://
headscale_1  | 2022-01-16T19:04:04Z INF listening and serving (multiplexed HTTP and gRPC) on: 0.0.0.0:8080
headscale_1  | 2022-01-16T19:04:04Z INF Setting up a DERPMap update worker frequency=86400000


Posted by Uli Köhler in Headscale, Networking, VPN, Wireguard

TPLink WDR3600 OpenWRT wireguard throughput benchmark

TechOverflow tested Wireguard bandwidth / throughput on the TPLink WDR3600 with OpenWRT 21.02, based on a standard iperf3 TCP benchmark. We did not use Pre-shared keys in this setup.

So far we were able to verify that the Wireguard bandwidth is approximately 27Mbit/s (unidirectional), measured using iperf3.

Connecting to host 192.168.239.254, port 5201
[  5] local 10.9.1.104 port 57502 connected to 192.168.239.254 port 5201
[ ID] Interval           Transfer     Bitrate         Retr  Cwnd
[  5]   0.00-1.00   sec  3.48 MBytes  29.2 Mbits/sec    0    215 KBytes       
[  5]   1.00-2.00   sec  3.86 MBytes  32.4 Mbits/sec    0    387 KBytes       
[  5]   2.00-3.00   sec  3.13 MBytes  26.2 Mbits/sec    0    470 KBytes       
[  5]   3.00-4.00   sec  3.37 MBytes  28.3 Mbits/sec    0    470 KBytes       
[  5]   4.00-5.00   sec  3.31 MBytes  27.8 Mbits/sec    0    470 KBytes       
[  5]   5.00-6.00   sec  3.31 MBytes  27.8 Mbits/sec    0    470 KBytes       
[  5]   6.00-7.00   sec  3.31 MBytes  27.8 Mbits/sec    0    470 KBytes       
[  5]   7.00-8.00   sec  2.76 MBytes  23.1 Mbits/sec    0    470 KBytes       
[  5]   8.00-9.00   sec  3.31 MBytes  27.8 Mbits/sec    0    470 KBytes       
[  5]   9.00-10.00  sec  2.76 MBytes  23.1 Mbits/sec    0    470 KBytes       
- - - - - - - - - - - - - - - - - - - - - - - - -
[ ID] Interval           Transfer     Bitrate         Retr
[  5]   0.00-10.00  sec  32.6 MBytes  27.4 Mbits/sec    0             sender
[  5]   0.00-10.14  sec  32.0 MBytes  26.4 Mbits/sec                  receiver

During the test, top consistently showed 0% idle CPU load, with the load being approximately 51% sys and 49% sirq.

The commands in use were

iperf3 -s

on the WDR3600 and

iperf -c [IP address of WDR3600]

on the client.

Posted by Uli Köhler in Networking, Wireguard

How to install wireguard_watchdog on OpenWRT

Run this on your OpenWRT router to automatically re-resolve DNS names for peers.

/usr/bin/wireguard_watchdog is automatically installed with the standard wireguard package, so you only need to enable it to run every minute:

echo '* * * * * /usr/bin/wireguard_watchdog' >> /etc/crontabs/root

Source: This commit message.

Posted by Uli Köhler in Wireguard

How to install Wireguard on OpenWRT

Install using

opkg update
opkg install luci-proto-wireguard


Posted by Uli Köhler in Networking, Wireguard

How to check if WireGuard client/peer is connected?

You can use wg show to check if a client is connected:

interface: Computer
  public key: X6NJW+IznvItD3B5TseUasRPjPzF0PkM5+GaLIjdBG4=
  private key: (hidden)
  listening port: 19628

peer: H3KaL/X94984cLDNWFsM4Hx6Rs/Ku0bW2ECkDUn7wFw=
  endpoint: 10.9.1.108:19628
  allowed ips: 10.217.59.2/32
  latest handshake: 27 seconds ago
  transfer: 13.19 MiB received, 12.70 MiB sent
  persistent keepalive: every 1 minute

Look for this line:

latest handshake: 27 seconds ago

If it’s less than two minutes old, the client is connected.

If the latest handshake line is missing entirely, the peer has never connected successfully!

If in doubt, you can often ping the client to verify. It depends on the client configuration and possibly firewall settings if it will answer the ping but it never hurts to try.

Posted by Uli Köhler in Networking, Wireguard

ESP32 Wireguard example with HTTP access over Wireguard (PlatformIO)

In this example we will use Wireguard-ESP32-Arduino in order to make HTTP requests over Wireguard on the ESP32.

[env:esp32-gateway]
platform = espressif32
board = esp32-gateway
framework = arduino
monitor_speed = 115200
lib_deps =
    ciniml/WireGuard-ESP32@^0.1.5
#include <WiFi.h>
#include <WireGuard-ESP32.h>

// WiFi configuration --- UPDATE this configuration for your WiFi AP
char ssid[] = "MyWifiESSID";
char password[] = "my-wifi-password";

// WireGuard configuration --- UPDATE this configuration from JSON
char private_key[] = "gH2YqDa+St6x5eFhomVQDwtV1F0YMQd3HtOElPkZgVY=";
IPAddress local_ip(10, 217, 59, 2);
char public_key[] = "X6NJW+IznvItD3B5TseUasRPjPzF0PkM5+GaLIjdBG4=";
char endpoint_address[] = "192.168.178.133"; // IP of Wireguard endpoint to connect to.
int endpoint_port = 19628;

static WireGuard wg;

void setup()
{
    Serial.begin(115200);
    Serial.println("Connecting to the AP...");
    WiFi.begin(ssid, password);
    while( !WiFi.isConnected() ) {
        delay(100);
    }
    Serial.println(WiFi.localIP());
    Serial.println("Adjusting system time...");
    configTime(9 * 60 * 60, 0, "ntp.jst.mfeed.ad.jp", "ntp.nict.jp", "time.google.com");

    Serial.println("Connected. Initializing WireGuard...");
    wg.begin(
        local_ip,
        private_key,
        endpoint_address,
        public_key,
        endpoint_port);
}

void loop()
{
    WiFiClient client;

    /**
     * Connect to
     * python3 -m http.server
     */
    if( !client.connect("10.217.59.1", 8000) ) {
        Serial.println("Failed to connect...");
        delay(1000);
        return;
    } else { // Client connected successfully. Send dummy HTTP request.
        client.write("GET /wireguard-test HTTP/1.1\r\n");
        client.write("Host: wireguard.test.com\r\n");
        client.write("\r\n\r\n");
    }

}

Remember to replace 192.168.238.133 by the IP address of the computer your ESP32 should connect to (i.e. the computer running WireGuard). You also need to enter the correct Wifi credentials.

On the computer, deploy this WireGuard config:

[Interface]
# Name = Computer
PrivateKey = ONj6Iefel47uMKtWRCSMLan2UC5eW3Fj9Gsy9bqcyEc=
Address = 10.217.59.1/24
ListenPort = 19628

[Peer]
# Name = ESP32
PublicKey = H3KaL/X94984cLDNWFsM4Hx6Rs/Ku0bW2ECkDUn7wFw=
AllowedIPs = 10.217.59.2/32
PersistentKeepalive = 60

which is auto-generated by the following GuardMyWire config:

{
    "rules": {
        "Node": {
            "connect_to": ["*"],
            "keepalive": 60
        }
    },
    "peers": [
        {
            "name": "Computer",
            "endpoint": "192.168.178.233:19628",
            "addresses": [
                "10.217.59.1/24"
            ],
            "type": "Node",
            "interface_name": "wg0"
        }, {
            "name": "ESP32",
            "addresses": [
                "10.217.59.2/24"
            ],
            "type": "Node",
            "interface_name": "wg0"
        }
    ]
}

Enable this config and start a Python HTTP server to receive the requests using

python3 -m http.server

Now flash the firmware on the ESP32.

Using wg show you should see the ESP connecting:

interface: Computer
  public key: X6NJW+IznvItD3B5TseUasRPjPzF0PkM5+GaLIjdBG4=
  private key: (hidden)
  listening port: 19628

peer: H3KaL/X94984cLDNWFsM4Hx6Rs/Ku0bW2ECkDUn7wFw=
  endpoint: 10.9.1.108:19628
  allowed ips: 10.217.59.2/32
  latest handshake: 5 seconds ago
  transfer: 11.71 MiB received, 10.43 MiB sent
  persistent keepalive: every 1 minute

Look for the

latest handshake: 5 seconds ago

line.

On the shell running python3 -m http.server you should see the dummy HTTP requests:

10.217.59.2 - - [31/Dec/2021 02:36:48] "GET /wireguard-test HTTP/1.1" 404 -
10.217.59.2 - - [31/Dec/2021 02:36:48] code 404, message File not found
10.217.59.2 - - [31/Dec/2021 02:36:48] "GET /wireguard-test HTTP/1.1" 404 -
10.217.59.2 - - [31/Dec/2021 02:36:48] code 404, message File not found
10.217.59.2 - - [31/Dec/2021 02:36:48] "GET /wireguard-test HTTP/1.1" 404 -
10.217.59.2 - - [31/Dec/2021 02:36:48] code 404, message File not found
Posted by Uli Köhler in ESP8266/ESP32, PlatformIO, Wireguard

How to update WireGuard peer endpoint address using DNS on MikroTik RouterOS

Update 2022-12-30: Updated code, now uses variables

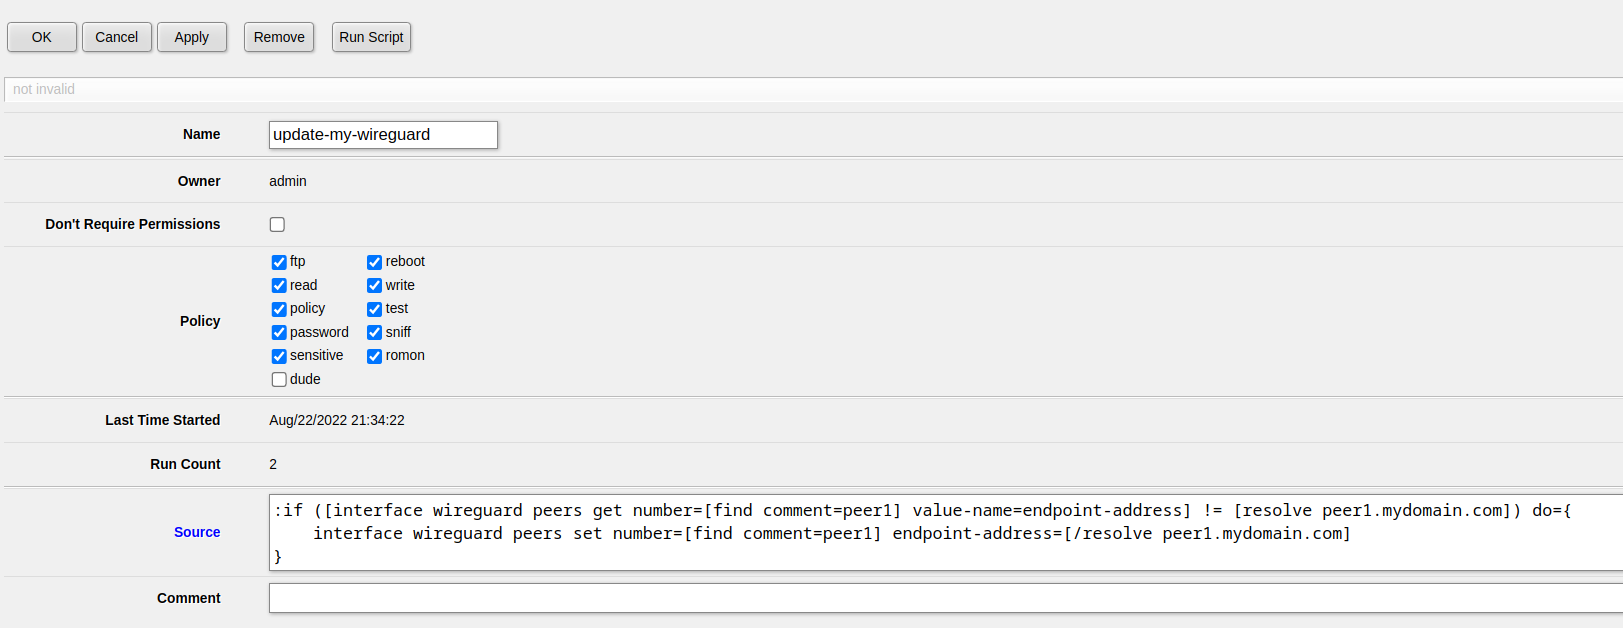
Assuming your peer comment is peer1 and the correct endpoint DNS record is peer1.mydomain.com, you can use this RouterOS script to update the endpoint based on the DNS record:

:local PEERCOMMENT 
:local DOMAIN 

:set PEERCOMMENT "peer1"
:set DOMAIN "peer1.mydomain.com"

:if ([interface wireguard peers get number=[find comment=$PEERCOMMENT] value-name=endpoint-address] != [/resolve $DOMAIN]) do={
    interface wireguard peers set number=[find comment=$PEERCOMMENT] endpoint-address=[/resolve $DOMAIN]
}

Modify the variables to suit your Wireguard config: Set PEERCOMMENT to the comment of the peer that should be updated and set DOMAIN to the DNS domain name that should be used to update the peer’s IP address

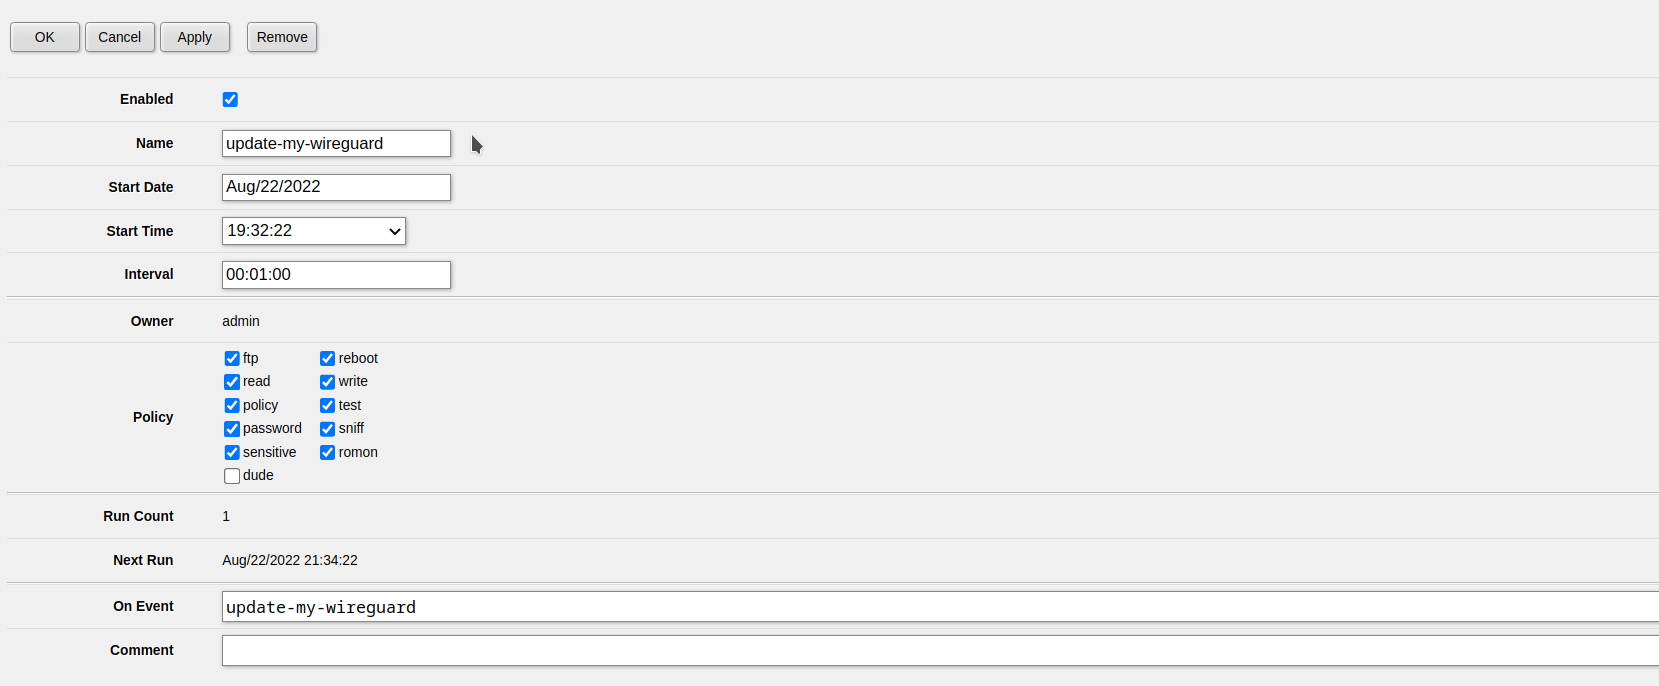
After that, add it as a new script in System -> Scripts, then add a Scheduler to run the script e.g. every 30 seconds under System -> Scheduler

Script settings

Scheduler settings

Related posts which might make the process easier to understand:

Posted by Uli Köhler in MikroTik, Wireguard

How to check if WireGuard Peer endpoint address equals DNS record using RouterOS scripting on MikroTik

Assuming your peer comment is peer1 and the correct endpoint DNS record is peer1.mydomain.com:

([interface wireguard peers get number=[find comment=peer1] value-name=endpoint-address] = [resolve peer1.mydomain.com])

This will return true if the peer endpoint is the same as the DNS record.

Example

[admin@CoreSwitch01] > :put ([interface wireguard peers get number=[find comment=peer1] value-name=endpoint-address] = [resolve peer1.mydomain.com])
true
Posted by Uli Köhler in MikroTik, Wireguard

RouterOS scripting: How to get Wireguard peer endpoint address on MikroTik

We assume that the peer you want to find info about has comment=peer1.mydomain.com. Use

Use

interface wireguard peers get number=[find comment=peer1.mydomain.com] value-name=endpoint-address

or use :put [...] to print the value:

:put [interface wireguard peers get number=[find comment=peer1.mydomain.com] value-name=endpoint-address]

Example

[admin@CoreSwitch01] > :put [interface wireguard peers get number=[find comment=peer1.mydomain.com] value-name=endpoint-address]
12.245.102.141


Posted by Uli Köhler in MikroTik, Wireguard

How to automatically re-resolve DNS in Wireguard on Linux

When installing wireguard-tools on Linux, it includes a script called reresolve-dns.sh. This will take care of automatically re-resolving.

According to its documentation, you should run it every 30 seconds or so.

So we can just create a systemd timer to run it every 30 seconds.

Easy way

Use our script

wget -qO- https://techoverflow.net/scripts/install-wireguard-reresolve-dns.sh | sudo bash /dev/stdin

Now you need to enable it for each relevant interface separately, for example for wg0:

systemctl enable --now [email protected]

Hard way

Do manually what our script does.

Create /etc/systemd/system/[email protected]:

[Unit]
Description=wg-reresolve-dns@

[Service]
Type=oneshot
ExecStart=/usr/share/doc/wireguard-tools/examples/reresolve-dns/reresolve-dns.sh %i

Create /etc/systemd/system/[email protected]:

[Unit]
Description=wg-reresolve-dns@ timer
[Timer]
Unit=wg-reresolve-dns@%i.service
OnCalendar=*-*-* *:*:00,30
Persistent=true
[Install]
WantedBy=timers.target

Now you need to enable it for each relevant interface separately, for example for wg0:

systemctl enable --now [email protected]
Posted by Uli Köhler in Networking, systemd, VPN, Wireguard

Who is client and who is server in Wireguard?

Wireguard doesn’t really use the concept of client and server the same way OpenVPN does. A wireguard interface does not have a fixed role as client or server – think about it like this:

  • A wireguard connection is a link between two peers
  • One wireguard interface can host one or many connections

For a single connection:

  • connection can be considered a client if it knows a fixed endpoint (IP address or hostname) to connect to, i.e. if you have Endpoint set in your wireguard config like this:
    Endpoint = vpn.mydomain.com:31265

    client will take the initiative and send packets to the server without having received any packet from the server beforehand – just like in classical VPNs.

  • connection can be considered a server if it doesn’t have an Endpoint set to connect to. A server will learn which IP address to send packets to once a client has completed the handshake. If a client IP address changes, the server will learn the new IP address as soon as it receives a validated packet from the client.

Most real-world wireguard connections have one client and one server. There are exceptions to this, namely if both endpoints have a static IP address or fixed host name, so both wireguard instances always know which IP address or hostname to send packets to.

Posted by Uli Köhler in Networking, VPN, Wireguard

What to look for in “wg show” output?

This is an example wg show output:

interface: MyVPN
  public key: xJ+A//t9RbOU4ISIr61tsZwc8SPLbLONXhknnU1QvBQ=
  private key: (hidden)
  listening port: 12073

peer: xgmml6wPoe9auL5oGhqScQXLByfrI/1xq3sOJzYaNhE=
  endpoint: 77.55.81.22:23711
  allowed ips: 10.178.212.1/32, 10.39.24.0/24
  latest handshake: 37 seconds ago
  transfer: 948 B received, 1.40 KiB sent
  persistent keepalive: every 30 seconds

This is what I look for:

  • Is the desired wireguard interface present? If not, this indicates that either the computer doesn’t even try to start the interface (e.g. because autostart is not enabled) or starting it fails, for example because the route is already defined
  • Are the desired peers listed? If not, this is always a configuration error
  • Is persistent keepalive enabled? Without persistent keepalive, you will not be able to properly debug Wireguard because no packets will be sent unless some traffic is going through the interface. Therefore, I strongly recommend to always enable persistent keepalive even if you plan to disable it later!
  • Is latest handshake listed and recent? Not being able to handshake with a remote peer typically indic-ates either a network problem or a configuration problem, but in some cases it’s also a system-related problem:
    • System problems: Is wireguard interface on the local & remote side up & configured?
    • Networking problems: Port not forwarded to destination machine, TCP port instead of UDP port forwarded, local or remote internet access is firewalled, incorrect port given, incorrect IP address or hostname given, DynDNS hostname not updated, Wireguard tries to access IPv6 address but only IPv4 port is forwarded properly (check using host)
    • Wireguard configuration problem: Does the remote peer use the correct private key that matches the public key in the local configuration? Does the remote configuration have listed the local public key as peer at all? Does the local configuration have the correct private key that matches the public key listed in the remote config? Does the peer public key match the endpoint (if specified) or maybe the key doesn’t match the endpoint?
  • transfer should show >0 bytes received and sent! This is typically equivalent to the latest handshake debugging method. Bytes being sent but no bytes being received typically indicates that the Wireguard interface is trying to perform an handshake but does not get any reply back.

Also see my WireguardConfig project which makes this kind of configuration much easier

Posted by Uli Köhler in Networking, VPN, Wireguard

Install & autostart Wireguard config on Ubuntu or Debian

We will assume that you already have a wireguard config file, e.g. MyVPN.conf

  1. Copy MyVPN.conf to /etc/wireguard/MyVPN.conf:
    sudo cp MyVPN.conf /etc/wireguard/MyVPN.conf
  2. Start & enable (i.e. autostart) service:
    sudo systemctl enable --now wg-quick@MyVPN
  3. Check if it works using
    sudo wg show

Example wg-show output

interface: MyVPN
  public key: xJ+A//t9RbOU4ISIr61tsZwc8SPLbLONXhknnU1QvBQ=
  private key: (hidden)
  listening port: 12073

peer: xgmml6wPoe9auL5oGhqScQXLByfrI/1xq3sOJzYaNhE=
  endpoint: 77.55.81.22:23711
  allowed ips: 10.178.212.1/32, 10.39.24.0/24
  latest handshake: 37 seconds ago
  transfer: 948 B received, 1.40 KiB sent
  persistent keepalive: every 30 seconds


Posted by Uli Köhler in Networking, VPN, Wireguard

What does WireGuard AllowedIPs actually do?

Wireguard’s allowed_ips field does two different things. Let’s consider the following WireGuard config (generated by the WireguardConfig Site2Site example):

[Interface]
# Name = office1.mydomain.org
PrivateKey = ......
Address = 10.82.85.1/24
ListenPort = 19628

[Peer]
# Name = office2.mydomain.org
PublicKey = ...
AllowedIPs = 10.82.85.2/32, 192.168.200.0/24
PersistentKeepalive = 60

We can see that for the peer office2.mydomain.org the AllowedIPs field is set to 10.82.85.2/32, 192.168.200.0/24.

AllowedIPs does two things:

  • It adds a route to the given networks, i.e. packets addressed to 10.82.85.2/32 or to 192.168.200.0/24 will be routed through the WireGuard interface to that peer
  • It will allow packets with the source IPs 10.82.85.2/32 or 192.168.200.0/24 to be routed from the given peer on the WireGuard interface

Note especially the second point. Any packet from the given peer with a source IP address which is not listed in AllowedIPs will be discarded! While this does not replace a firewall, it serves a an integral part of Wireguard’s security model.

Posted by Uli Köhler in VPN, Wireguard

How to migrate from OpenVPN to Wireguard for Site-to-Site VPNs

The following diagram will assist you in transitioning your VPNs from OpenVPN to Wireguard.

Many users have difficulties in grasping the allowed_ips concept, even though it’s mostly similar to OpenVPN’s route and the architecture where no. In most usecases, you can consider any WireGuard instance with ListenPort = ... to be a server and any WireGuard instance with Endpoint = ... defined for a given peer as client.

Diagram source

The WireGuard config is available as WireguardConfig example Site2Site.json

Posted by Uli Köhler in OpenVPN, VPN, Wireguard

How to autostart Wireguard using systemd (wg-quick)

If you’ve added a wg-quick config, e.g. /etc/wireguard/wg0.conf, you can enable autostarting it on system boot using systemd:

sudo systemctl enable --now wg-quick@wg0

If you have started Wireguard with this config manually before, you need to shut it down first or systemd will not be able to start it !

Posted by Uli Köhler in Networking, systemd, Wireguard

Real-world data on CRS309-1G-8S+ RouterOS Wireguard throughput

Also see Wireguard bandwidth performance of the MikroTik CRS326-24G-2S+

We tested the throughput of the new Wireguard functionality MikroTik CRS309-1G-8S+ running on RouterOS 7.1beta6.

Our test setup consists of a Desktop PC with 1GBase-T connection and a virtualized server on XCP-NG, attached with a 10GB shared connection, both running Ubuntu. Note that the L2 switching infrastructure (consisting only of MikroTik CRS3xx and CRS610 switching with complete hardware offloading) is ignored here because due to 100% hardware offloading to the marvelous Marvell switch chips it has orders of magnitude higher performance compared to any L3 function, hence it will only have minimal impact only the overall performance.

Wireguard was being used without preshared keys. Hitherto, it is unknown to us whether PSKs will have an impact on throughput.

The command on the Desktop was

dd if=/dev/urandom bs=100M | netcat -v 10.185.244.199 2222

whereas the command on the server was

netcat -vvnlp 2222 > /dev/null

As we expected with an uncompressed protocol like Wireguard, there is no difference if you pipe the data from /dev/urandom as opposed to /dev/zero.

Scenario: Routing from Wireguard to local routed VLAN

With IP firewall

The Desktop was connected to the CRS309-1G-8S+ using Wireguard. The virtual server was connected to the CRS309 as default gateway within a separate VLAN that was designed to be routed. The CRS309 L3 hardware offloading capability was disabled.

The IP firewall contained 8 simple accept and fasttrack rules. All the WireGuard traffic only matched the last (8th) rule and was accepted. It has not been tested whether fasttracking the Wireguard connection would increase performance

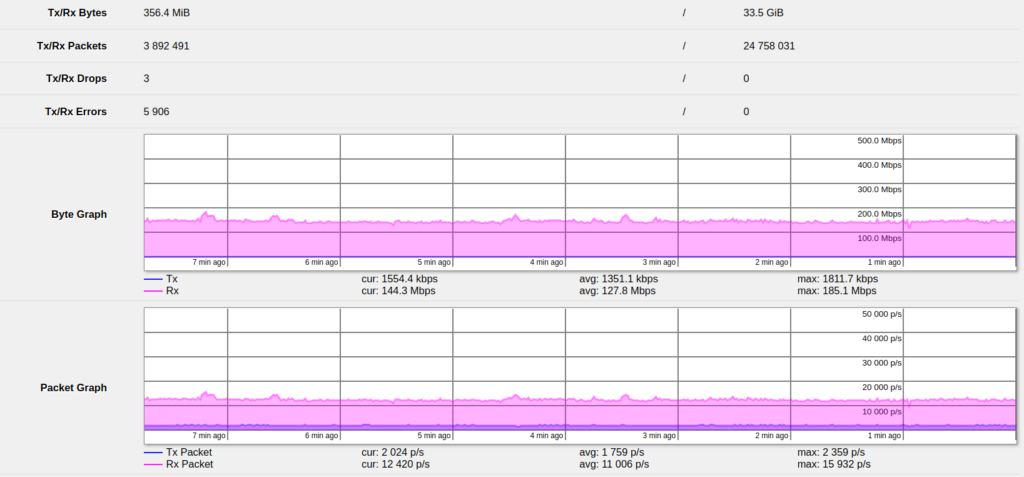
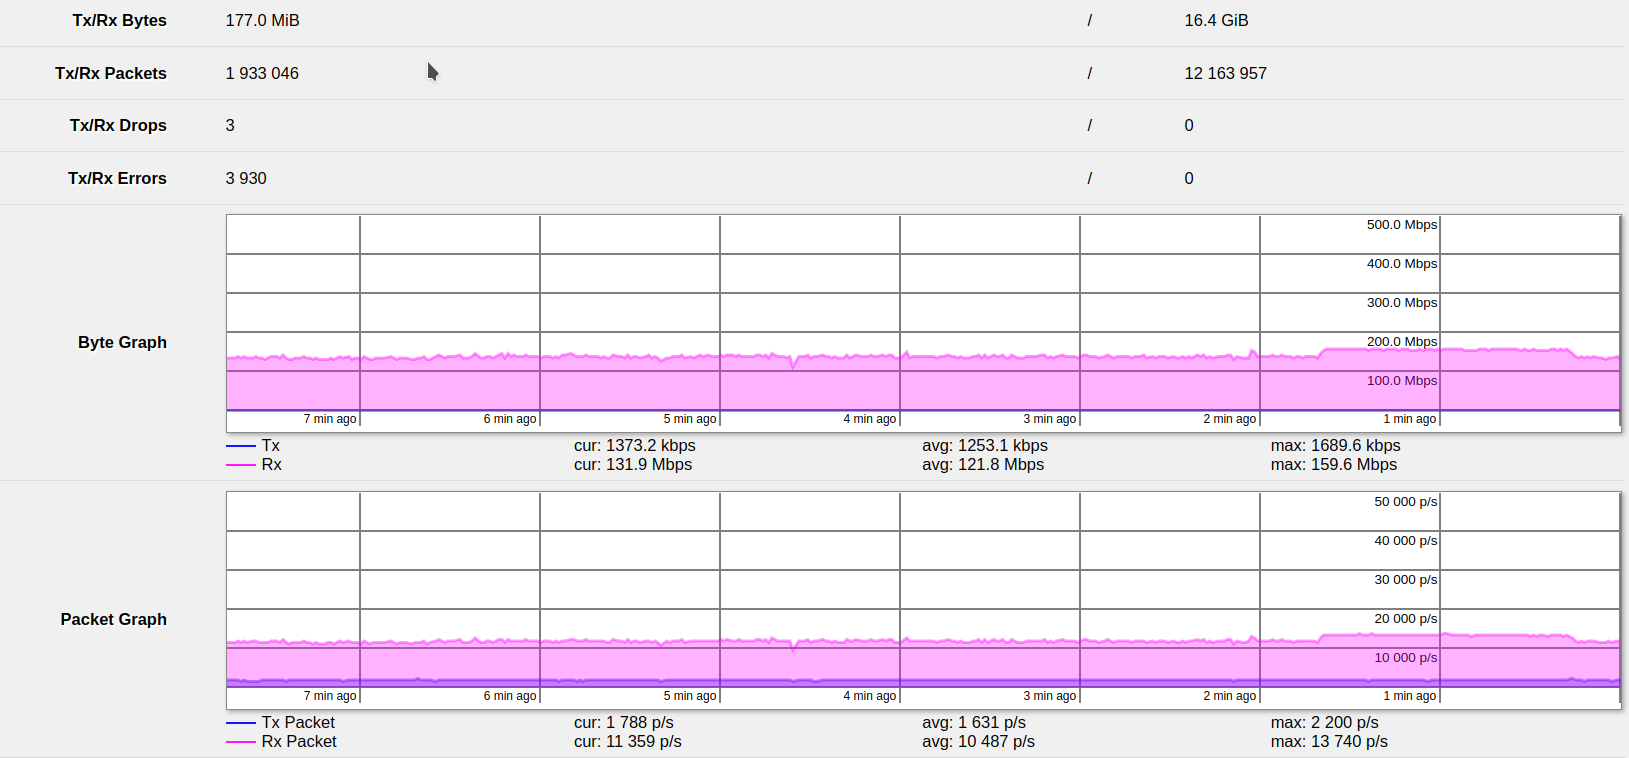
The throughput results showed a steady rate of 131 Mbit/s (unidirectional, bidirectional not tested), but up to 160 Mbit/s. It is unknown what caused the increase in speed, but it’s possible that additional traffic was L3-forwarded over the switch during the test.

Without IP firewall

The same test was repeated with the IP firewall being disabled in the Bridge Settings.

As expected, disabling additional IP firewall processing caused the throughput to increase, but only by a small margin. The typical speed was around 160 Mbit/s (unidirectional), with peaks up to 185 Mbit/s.

Conclusion

It should be pretty obvious that the CRS309-1G-S+ outperforms most conventional VPN solutions when using Wireguard. For a street price of ~175€, it is not only an awesome switch, but also doubles as a more than adequate Wireguard router for most practical applications.

Reliablity considerations

Note that at the moment of writing this article, Wireguard is only available in the RouterOS 7.1beta6 firmware, which is not yet considered stable. While I have not experienced any problems that have affected reliability in any way, if you run a network where it hurts if it fails, you should consider using alternative solutions in the meantime.

Posted by Uli Köhler in MikroTik, Networking, VPN, Wireguard

Wireguard bandwidth performance of the MikroTik CRS326-24G-2S+

Also see Real-world data on CRS309-1G-8S+ RouterOS Wireguard throughput

We tested the new Wireguard functionality MikroTik CRS326-24G-2S+ running on RouterOS 7.1beta6.

Our test setup consists of a Desktop PC with 1GBase-T connection and a virtualized server on XCP-NG, attached with a 10GB shared connection, both running Ubuntu. Note that the L2 switching infrastructure (consisting only of MikroTik CRS3xx and CRS610 switching with complete hardware offloading) is ignored here because due to 100% hardware offloading to the marvelous Marvell switch chips it has orders of magnitude higher performance compared to any L3 function, hence it will only have minimal impact only the overall performance.

Wireguard was being used without preshared keys. Hitherto, it is unknown to us whether PSKs will have an impact on throughput.

Scenario: Routing between two wireguard VPNs

Both the Desktop and the server were connected to two different Wireguard interfaces on the CRS326-24G-2S+.

The CRS326 routed between those interfaces. The virtualized server ran a netcat server while the Desktop ran the wireguard client. IP firewall was disabled during this test, but the switch still had to L3 forward the packets.

Throughput results

The effective throughput of L3 forwarding, doing one Wireguard decryption and one WireGuard encryption operation (both without PSK) is 108.1 Mbit/s (unidirectional. Bidirectional has not been tested)

This is an awesome result, considering that the CRS326-24G-2S+ is only ~120€ street price and is an awesome switch. But it seems like Wireguard is capable of making a high performance VPN router from just a managed MikroTik switch.

Reliablity considerations

Note that at the moment of writing this article, Wireguard is only available in the RouterOS 7.1beta6 firmware, which is not yet considered stable. While I have not experienced any problems that have affected reliability in any way, if you run a network where it hurts if it fails, you should consider using alternative solutions in the meantime.

Posted by Uli Köhler in MikroTik, Networking, VPN, Wireguard

Best practice for installing & autostarting OpenVPN client/server configurations on Ubuntu

This post details my systemd-based setup for installing and activating OpenVPN client or server configs on Ubuntu. It might also work for other Linux distributions that are based on systemd..

First, place the OpenVPN config (usually a .ovpn file, but it can also be a .conf file) in /etc/openvpnYou need to change the filename extension to .conf.ovpn won’t work. Furthermore, ensure that there are no spaces in the filename.

In this example, our original OpenVPN config will be called techoverflow.ovpn, hence it needs to be copied to /etc/openvpn/techoverflow.conf!

Now we can enable (i.e. autostart on boot – but not start immediately) the config using

sudo systemctl enable openvpn@techoverflow

For techoverflow.conf you need to systemctl enableopenvpn@techoverflow whereas for a hypothetical foo.conf you would need to systemctl enable openvpn@foo.

Now we can start the VPN config – i.e. run it immediately using

sudo systemctl start openvpn@techoverflow

Now your VPN client or server is running – or is it? We shall check the logs using

journalctl -xfu openvpn@techoverflow

In order to manually restart the VPN client or server use

sudo systemctl restart openvpn@techoverflow

and similarly run this to stop the VPN client or server:

sudo systemctl stop openvpn@techoverflow

In order to show if the instance is running – i.e. show its status, use

sudo systemctl status openvpn@techoverflow

Example output for an OpenVPN client:

[email protected] - OpenVPN connection to techoverflow
     Loaded: loaded (/lib/systemd/system/[email protected]; enabled; vendor preset: enabled)
     Active: active (running) since Sun 2020-11-29 03:37:52 CET; 953ms ago
       Docs: man:openvpn(8)
             https://community.openvpn.net/openvpn/wiki/Openvpn24ManPage
             https://community.openvpn.net/openvpn/wiki/HOWTO
   Main PID: 4123809 (openvpn)
     Status: "Pre-connection initialization successful"
      Tasks: 1 (limit: 18689)
     Memory: 1.3M
     CGroup: /system.slice/system-openvpn.slice/[email protected]
             └─4123809 /usr/sbin/openvpn --daemon ovpn-techoverflow --status /run/openvpn/techoverflow.status 10 --cd /etc/openvpn --script-security 2 --config /etc/ope>

Nov 29 03:37:52 localgrid systemd[1]: Starting OpenVPN connection to techoverflow...
Nov 29 03:37:52 localgrid ovpn-techoverflow[4123809]: OpenVPN 2.4.7 x86_64-pc-linux-gnu [SSL (OpenSSL)] [LZO] [LZ4] [EPOLL] [PKCS11] [MH/PKTINFO] [AEAD] built on Sep >
Nov 29 03:37:52 localgrid ovpn-techoverflow[4123809]: library versions: OpenSSL 1.1.1f  31 Mar 2020, LZO 2.10
Nov 29 03:37:52 localgrid systemd[1]: Started OpenVPN connection to techoverflow.
Nov 29 03:37:52 localgrid ovpn-techoverflow[4123809]: TCP/UDP: Preserving recently used remote address: [AF_INET]83.135.163.227:19011
Nov 29 03:37:52 localgrid ovpn-techoverflow[4123809]: UDPv4 link local (bound): [AF_INET][undef]:1194
Nov 29 03:37:52 localgrid ovpn-techoverflow[4123809]: UDPv4 link remote: [AF_INET]83.135.163.22:19011
Nov 29 03:37:53 localgrid ovpn-techoverflow[4123809]: [nas-vpn.haar.techoverflow.net] Peer Connection Initiated with [AF_INET]83.135.163.227:19011


Posted by Uli Köhler in Linux, VPN