Programming languages

How to replace host part of IPv6 address using Python

In our previous post Bitwise operation with IPv6 addresses and networks in Python we showed how to perform bitwise operations in Python using the ipaddress module. In this post we will use this previous work to replace just the host part of an IPv6 address, leaving the network part as-is – in other words, we will combine two IPv6 addresses together using a configurable network prefix length.

import ipaddress

def bitwise_and_ipv6(addr1, addr2):
    result_int = int.from_bytes(addr1.packed, byteorder="big") & int.from_bytes(addr2.packed, byteorder="big")
    return ipaddress.IPv6Address(result_int.to_bytes(16, byteorder="big"))

def bitwise_or_ipv6(addr1, addr2):
    result_int = int.from_bytes(addr1.packed, byteorder="big") | int.from_bytes(addr2.packed, byteorder="big")
    return ipaddress.IPv6Address(result_int.to_bytes(16, byteorder="big"))

def bitwise_xor_ipv6(addr1, addr2):
    result_int = int.from_bytes(addr1.packed, byteorder="big") ^ int.from_bytes(addr2.packed, byteorder="big")
    return ipaddress.IPv6Address(result_int.to_bytes(16, byteorder="big"))

def replace_ipv6_host_part(net_addr, host_addr, netmask_length=64):
    # Compute bitmasks
    prefix_network = ipaddress.IPv6Network(f"::/{netmask_length}")
    hostmask = prefix_network.hostmask # ffff:ffff:ffff:ffff:: for /64
    netmask = prefix_network.netmask # ::ffff:ffff:ffff:ffff for /64
    # Compute address
    net_part = bitwise_and_ipv6(net_addr, netmask)
    host_part = bitwise_and_ipv6(host_addr, hostmask)
    # Put together resulting IP
    return bitwise_or_ipv6(net_part, host_part)

# Usage example:
# IP address from which we take the network part ("prefix")
net_addr = ipaddress.IPv6Address("2a01:c22:6f71:9f00:8ce6:2eff:fe60:cc69")
# IP address from which we take the host part (suffix)
host_addr = ipaddress.IPv6Address("::dead:babe:cafe:0000")
print(replace_ipv6_host_part(net_addr, host_addr))

This prints

IPv6Address('2a01:c22:6f71:9f00:dead:babe:cafe:0')
 

Posted by Uli Köhler in Networking, Python

How to add preprocessor build flags in PlatformIO

In order to define a preprocessor build flag in PlatformIO, add it to build_flags in platformio.ini, prefixing it with -D:

build_flags = -DQUICKSPI_DEBUG_WRITES

or, in order to define it to a specific value, use

build_flags = -DQUICKSPI_DEBUG_WRITES=1


Posted by Uli Köhler in C/C++, PlatformIO

How to add FreeRTOS task (“thread”) to any PlatformIO project

Most PlatformIO default configurations already have FreeRTOS enabled – they just don’t use it.

In order to start a new FreeRTOS “thread” (called task in FreeRTOS-speak), first add these includes:

#include <freertos/FreeRTOS.h>
#include <freertos/task.h>

Now add the task function and handle:

TaskHandle_t myTaskHandle;
void MyTask( void * parameter )
{
    for(;;)
    {
       // TODO Task code goes here
    }
    // if you ever exit the loop, this is here to clean up the resources
    vTaskDelete( NULL );
}

then start the task using this code once, for example in your main function:

// Start MyTask thread
xTaskCreate(
    MyTask, // Task function
    "MyTask", // Name
    10000, // Stack size
    NULL, // Parameter
    1, // Priority
    &myTaskHandle);

Also see our new post on how to use xTaskCreateStatic() to use statically allocated instead of dynamically allocated stack memory for the task: FreeRTOS task with static stack memory (xTaskCreateStatic) example

Posted by Uli Köhler in C/C++, Electronics, Embedded, FreeRTOS, PlatformIO

How to read 8-bit I2C register using Arduino Wire library: A minimal example

The following code demonstrates how to read a register that is 1 byte (8 bits) long over I2C. It will work with almost all I2C devices like EEPROMs, ADCs and others, provided you have the correct. Note that some devices like the LAN9303 have a slightly different addressing scheme or other peculiarities. In my opinion, it’s most efficient to just try out the standard way of reading a register and start from there.

Note that this code does not implement error handling for the sake of simplicity. Additionally, we wait for data using delay() instead of Wire.available(). This is a minimal example so it creates minimal confusion for the reader. We will provide a full example with error handling in a followup post.

const uint8_t SLAVE_I2C_ADDRESS = 0b1010;
const uint16_t SLAVE_I2C_REGISTER_ADDRESS = 0x50;

Wire.beginTransmission(SLAVE_I2C_ADDRESS);
Wire.write(SLAVE_I2C_REGISTER_ADDRESS);
Wire.endTransmission();
Wire.requestFrom(SLAVE_I2C_ADDRESS, 1); // This register is 8 bits = 1 byte long
delay(2); // Wait for data to be available
// Read directly into an uint8_t
uint8_t buf = (uint8_t)Wire.read();
// Print register value
Serial.printf("Register value: %02x\r\n", buf);

Also see:

Posted by Uli Köhler in Arduino, C/C++, Electronics, Embedded, PlatformIO

How to read 16-bit I2C register using Arduino Wire library: A minimal example

The following code demonstrates how to read a register that is 2 bytes (16 bits) long over I2C. It will work with almost all I2C devices like EEPROMs, ADCs and others, provided you have the correct. Note that some devices like the LAN9303 have a slightly different addressing scheme or other peculiarities. In my opinion, it’s most efficient to just try out the standard way of reading a register and start from there.

Note that this code does not implement error handling for the sake of simplicity. Additionally, we wait for data using delay() instead of Wire.available(). This is a minimal example so it creates minimal confusion for the reader. We will provide a full example with error handling in a followup post.

Option 1: Reading the register into an uint16_t (recommended)

const uint8_t SLAVE_I2C_ADDRESS = 0b1010;
const uint16_t SLAVE_I2C_REGISTER_ADDRESS = 0x50;

Wire.beginTransmission(SLAVE_I2C_ADDRESS);
Wire.write(SLAVE_I2C_REGISTER_ADDRESS);
Wire.endTransmission();
Wire.requestFrom(SLAVE_I2C_ADDRESS, 2); // This register is 16 bits = 2 bytes long
delay(5); // Wait for data to be available
// Read directly into an uint32_t
uint16_t buf;
Wire.readBytes((uint8_t*)&buf, 2);
// Print register value
Serial.printf("Register value: %04x\r\n", __builtin_bswap16(buf));

For an explanation on why we need __builtin_bswap16(), see How to print 16-bit uint16_t as four hex digits in Arduino

Option 2: Reading the register into an uint8_t array

const uint8_t SLAVE_I2C_ADDRESS = 0b1010;
const uint16_t SLAVE_I2C_REGISTER_ADDRESS = 0x50;

Wire.beginTransmission(SLAVE_I2C_ADDRESS);
Wire.write(SLAVE_I2C_REGISTER_ADDRESS);
Wire.endTransmission();
Wire.requestFrom(SLAVE_I2C_ADDRESS, 2); // This register is 16 bits = 2 bytes long
delay(5); // Wait for data to be available
// Read into a 2-byte buffer
uint8_t buf[2];
Wire.readBytes(buf, 2);
// Print register value
Serial.printf("Register value: %02x%02x\r\n", buf[0], buf[1]);

Also see:

Posted by Uli Köhler in Arduino, C/C++, Electronics, Embedded, PlatformIO

How to read 32-bit I2C register using Arduino Wire library: A minimal example

The following code demonstrates how to read a register that is 4 bytes (32 bits) long over I2C. It will work with almost all I2C devices like EEPROMs, ADCs and others, provided you have the correct. Note that some devices like the LAN9303 have a slightly different addressing scheme or other peculiarities. In my opinion, it’s most efficient to just try out the standard way of reading a register and start from there.

Note that this code does not implement error handling for the sake of simplicity. Additionally, we wait for data using delay() instead of Wire.available(). This is a minimal example so it creates minimal confusion for the reader. We will provide a full example with error handling in a followup post.

Option 1: Reading the register into an uint32_t (recommended)

const uint8_t SLAVE_I2C_ADDRESS = 0b1010;
const uint16_t SLAVE_I2C_REGISTER_ADDRESS = 0x50;

Wire.beginTransmission(SLAVE_I2C_ADDRESS);
Wire.write(SLAVE_I2C_REGISTER_ADDRESS);
Wire.endTransmission();
Wire.requestFrom(SLAVE_I2C_ADDRESS, 4); // This register is 32 bits = 4 bytes long
delay(5); // Wait for data to be available
// Read directly into an uint32_t
uint32_t buf;
size_t actually_read = Wire.readBytes((uint8_t*)&buf, 4);
// Print register value
Serial.printf("Register value: %08lx\r\n", __builtin_bswap32(buf));

For an explanation on why we need __builtin_bswap32(), see How to print 32-bit uint32_t as eight hex digits in Arduino

Option 2: Reading the register into an uint8_t array

const uint8_t SLAVE_I2C_ADDRESS = 0b1010;
const uint16_t SLAVE_I2C_REGISTER_ADDRESS = 0x50;

Wire.beginTransmission(SLAVE_I2C_ADDRESS);
Wire.write(SLAVE_I2C_REGISTER_ADDRESS);
Wire.endTransmission();
Wire.requestFrom(SLAVE_I2C_ADDRESS, 4); // This register is 32 bits = 4 bytes long
delay(5); // Wait for data to be available
// Read into a 4-byte buffer
uint8_t buf[4];
size_t actually_read = Wire.readBytes(buf, 4);
// Print register value
Serial.printf("Register value: %02x%02x%02x%02x\r\n", buf[0], buf[1], buf[2], buf[3]);

Also see:

Posted by Uli Köhler in Arduino, C/C++, Electronics, Embedded, PlatformIO

How to access LAN9303 registers over I2C using Arduino / PlatformIO

The LAN9303 has some peculiarities when accessing its registers. This post will not cover indirect register access but only access to the registers which are directly accessible over I2C. Note that the prerequisite for this is to configure the LAN9303 into a mode where management over the I2C slave interface is enabled. See How to get the LAN9303 into I2C managed mode for more info on how to do that.

The main point to take away is that you do not write the register offset from the datasheet (such as 0x50 for the Chip ID and revision register) in the I2C address byte but the address divided by 4 (0x50 >> 2 == 0x14). This is evidenced by figure 8-8 from the datasheet, copyright Microchip, listing the address byte as A[9:2] as opposed to the standard A[7:0]:


Example on how to access the register at offset 0x50 (Chip ID and revision register) in Arduino using the Wire library:

const uint8_t LAN9303_I2C_ADDRESS = 0b1010;
const uint16_t LAN9303_CHIPID_REV_Register = 0x50;

Wire.beginTransmission(LAN9303_I2C_ADDRESS);
Wire.write(LAN9303_CHIPID_REV_Register >> 2);
Wire.endTransmission();
Wire.requestFrom(LAN9303_I2C_ADDRESS, 4); // This register is 32 bits = 4 bytes long
delay(5); // Wait for data to be available

// Read directly into an uint8_t
uint32_t buf;
size_t actually_read = Wire.readBytes((uint8_t*)&buf, 4);
// Check if we have received all 4 bytes
if(actually_read != 4) {
    Serial.println("Did not read enough bytes");
}

// Print register value
Serial.printf("LAN9303 Chip ID and revision: %08lx\r\n", __builtin_bswap32(buf));

This will print

LAN9303 Chip ID and revision: 93030001

in other words: Chip ID = 0x9303, revision = 0x0001


Posted by Uli Köhler in Arduino, C/C++, Electronics, Embedded, Networking, PlatformIO

Teensy 4.x Quadrature Encoder minimal example in PlatformIO/Arduino

This example uses PlatformIO and the Teensy-4.x-Quad-Encoder-Library to implement a hardware quadrature encoder on pins 0 and 1. Remember that the teensy will be destroyed if you use 5V encoder signals. You can only use 3.3V signals!

#include <Arduino.h>
#include <QuadEncoder.h>

QuadEncoder encoder(1, 0, 1, 0);

void setup() {
    Serial.begin(115200);
    encoder.setInitConfig();
    encoder.init();
}

void loop() {
    int32_t position = encoder.read();
    // Compute position in mm and print it
    constexpr float mm_per_count = 0.0012;
    float mm = position * mm_per_count;
    Serial.printf("Position: %+3.4f (count %ld)\r\n", mm, position);
    // Print every 50ms
    delay(50);
}
[env:teensy41]
platform = teensy
board = teensy41
framework = arduino
monitor_speed = 115200
lib_deps =
    git+https://github.com/mjs513/Teensy-4.x-Quad-Encoder-Library


Posted by Uli Köhler in C/C++, Electronics, Embedded, PlatformIO, Teensy

How to use HAL_GPIO_Init() in modern C++ (STM32)

In modern C++, you can directly initialize structs like a GPIO_InitTypeDef, making the code much prettier and less prone to errors. The following example configures PA8 of a STM32 in alternate function 1 mode (TIM1 output).

GPIO_InitTypeDef pinInit = {
  .Pin = GPIO_PIN_8,
  .Mode = GPIO_MODE_AF_PP,
  .Pull = GPIO_NOPULL,
  .Speed = GPIO_SPEED_FREQ_VERY_HIGH,
  .Alternate = GPIO_AF1_TIM1
};
HAL_GPIO_Init(GPIOA, &pinInit);

As opposed to the old, much more verbose way of doing that:

GPIO_InitTypeDef pinInit;
pinInit.Pin = GPIO_PIN_8;
pinInit.Mode = GPIO_MODE_AF_PP;
pinInit.Pull = GPIO_NOPULL;
pinInit.Speed = GPIO_SPEED_FREQ_VERY_HIGH;
pinInit.Alternate = GPIO_AF1_TIM1;
HAL_GPIO_Init(GPIOA, &pinInit);


Posted by Uli Köhler in C/C++, Electronics, STM32

How to compute SHA hash of local file in Javascript using SubtleCrypto API

The following example uses the SubtleCrypto API to compute the SHA-256 hash of a file that is selected in a file input. The checksum is computed entirely on the client side, the file does not need to be uploaded to a server at all.

This code has been verified to generate the same checksum as if running sha256sum on the command line.

Full example

You can download this file, save it as index.html and open it in the browser. Then select a file and check the develper

<html>
<body>
    <input type="file" id="myfile" onchange="onMyfileChange(this)" />

    <script src="https://unpkg.com/[email protected]/dist/jszip.js" type="text/javascript"></script>
    <script type="text/javascript">
        function onMyfileChange(fileInput) {
            if(fileInput.files[0] == undefined) {
                return ;
            }

            var filename = fileInput.files[0].name;
            // var filesize = fileInput.files[0].size;
            var reader = new FileReader();
            reader.onload = function(ev) {
                console.log("File", filename, ":");
                // 
                crypto.subtle.digest('SHA-256', ev.target.result).then(hashBuffer => {
                    // Convert hex to hash, see https://developer.mozilla.org/en-US/docs/Web/API/SubtleCrypto/digest#converting_a_digest_to_a_hex_string
                    const hashArray = Array.from(new Uint8Array(hashBuffer));
                    const hashHex = hashArray.map(b => b.toString(16).padStart(2, '0')).join(''); // convert bytes to hex string
                    console.log(hashHex);
                }).catch(ex => console.error(ex));
            };
            reader.onerror = function(err) {
                console.error("Failed to read file", err);
            }
            reader.readAsArrayBuffer(fileInput.files[0]);
        }
    </script>
</body>
</html>
Posted by Uli Köhler in Javascript

How to use ESP32 as USB-to-UART converter in PlatformIO

The ESP32 can easily be used as USB-to-UART converter. Note that the ESP32 does not feature an USB interface by itself and ESP32 boards with an onboard USB connector just use an USB-to-UART converter (this is a separate chip on the board). Hence, from the ESP32 perspective, it

You can map UART TX and RX to any GPIO pin on the ESP32. While there are very, very slight performance advantages to using a set of predefined pins, this does not really matter in practice. In this example, we will use pin GPIO2 for UART RX and pin GPIO4 for UART TX.

Basically, the code is just copying bytes between Serial2 and Serial (connected to USB):

// Copy bytes incoming via PC serial
while (Serial.available() > 0) {
  Serial2.write(Serial.read());
}
// Copy bytes incoming via UART serial
while (Serial2.available() > 0) {
  Serial.write(Serial2.read());
}

Full example

#include <Arduino.h>

#define UART_RX_PIN 2 // GPIO2
#define UART_TX_PIN 4 // GPIO4

void setup() {
  // Serial connects to the computer
  Serial.begin(115200);
  // Serial2 is the hardware UART port that connects to external circuitry
  Serial2.begin(115200, SERIAL_8N1,
                UART_RX_PIN,
                UART_TX_PIN);
}

void loop() {
  // Copy byte incoming via PC serial
  while (Serial.available() > 0) {
    Serial2.write(Serial.read());
  }
  // Copy bytes incoming via UART serial
  while (Serial2.available() > 0) {
    Serial.write(Serial2.read());
  }
}

Regarding platformio.ini, we just need to set the monitor_speed to match the value in Serial.begin(115200);:

[env:nodemcu-32s]
platform = espressif32
board = nodemcu-32s
framework = arduino
monitor_speed = 115200


Posted by Uli Köhler in C/C++, Electronics, ESP8266/ESP32, PlatformIO

How to get page HTML source code in Puppeteer

In order to get the current page HTML source code (i.e. not the source code received from the server, but the currently loaded source code including Javascript modifications), use

await page.content()

Full example based on Puppeteer minimal example:

// Minimal puppeteer get page HTML source code example
const puppeteer = require('puppeteer');
(async () => {
  const browser = await puppeteer.launch();
  const page = await browser.newPage();
  await page.goto('https://techoverflow.net', {waitUntil: 'domcontentloaded'});
  // Wait for 5 seconds
  console.log(await page.content());
  // Take screenshot
  await browser.close();
})();


Posted by Uli Köhler in Javascript, NodeJS, Puppeteer

How to sleep for X seconds in Puppeteer

In order to sleep for 5 seconds, use

await page.waitForTimeout(5000);

Full example based on Puppeteer minimal example:

// Minimal puppeteer example
const puppeteer = require('puppeteer');
(async () => {
  const browser = await puppeteer.launch();
  const page = await browser.newPage();
  await page.goto('https://techoverflow.net', {waitUntil: 'domcontentloaded'});
  // Wait for 5 seconds
  await page.waitForTimeout(5000);
  // Take screenshot
  await page.screenshot({path: 'screenshot.png'});
  await browser.close();
})();


Posted by Uli Köhler in Javascript, NodeJS, Puppeteer

Implementing STM32 DFU bootloader firmware upgrade in Marlin using M997

Marlin implements the M997 command which is intended to switch the mainboard into a firmware upgrade mode.

All STM32 variants have an integrated (hard-coded – so no need to flash it yourself) bootloader that is notoriously difficult to active.

However, Marlin implements M997 on the STM32 as just a reboot:

void flashFirmware(const int16_t) { HAL_reboot(); }

This only works if you are using a custom bootloader on your board – however, it does not use the STM32 integrated bootloader.

The following code was tested on the STM32F446 (BigTreeTech Octopus V1) but should work on any STM32 variant. It is based on previous work by Dave Hyland on StackOverflow. Replace the default flashFirmware() function in Marlin/src/HAL/STM32/HAL.cpp

void flashFirmware(const int16_t) {
    HAL_RCC_DeInit();
    HAL_DeInit();

    __HAL_REMAPMEMORY_SYSTEMFLASH();

    // arm-none-eabi-gcc 4.9.0 does not correctly inline this
    // MSP function, so we write it out explicitly here.
    //__set_MSP(*((uint32_t*) 0x00000000));
    __ASM volatile ("movs r3, #0\nldr r3, [r3, #0]\nMSR msp, r3\n" : : : "r3", "sp");

    ((void (*)(void)) *((uint32_t*) 0x00000004))();

    // This will never be executed
    HAL_reboot();
}

Note that we left a HAL_reboot() call as a safeguard at the end, just in case the previous calls fail.

On my BigTreeTech Octopus V1 (STM32F446), by using this code, you can successfully enter the integrated DFU bootloader.

Also see our previous posts on how to use the STM32 in DFU bootloader mode:

Posted by Uli Köhler in 3D printing, C/C++, STM32

How to install NodeJS 18.x LTS on Ubuntu in 1 minute

Run these shell commands on your Ubuntu computer to install NodeJS 18.x:

sudo apt -y install curl
curl -sL https://deb.nodesource.com/setup_18.x | sudo -E bash -
sudo apt-get install -y nodejs

Instead of setup_18.x you can also choose other versions like setup_16.x. However, using this method, you can’t install multiple versions of NodeJS in parallel.

Source: Official nodesource documentation

Posted by Uli Köhler in Linux, NodeJS

How to fix python ipaddress.IPv6Address AddressValueError: Unexpected ‘/’ in ‘…/64’

Problem:

When trying to parse an IPv6 network address in Python using code like

import ipaddress
ipaddress.IPv6Network("2a01:c23:c0bb:d00:8ce6:2eff:fe60:cc69/64")

you see an error message like

---------------------------------------------------------------------------
AddressValueError                         Traceback (most recent call last)
/tmp/ipykernel_154945/2602627019.py in <module>
----> 1 ipaddress.IPv6Address("2a01:c23:c0bb:d00:8ce6:2eff:fe60:cc69/64")

/usr/lib/python3.8/ipaddress.py in __init__(self, address)
   1836         addr_str = str(address)
   1837         if '/' in addr_str:
-> 1838             raise AddressValueError("Unexpected '/' in %r" % address)
   1839         self._ip = self._ip_int_from_string(addr_str)
   1840 

AddressValueError: Unexpected '/' in '2a01:c23:c0bb:d00:8ce6:2eff:fe60:cc69/64'

Solution 1: Remove the CIDR netmask (/64)

By just removing the slash and the part after it (the CIDR netmask).

Solution 1: Maybe you should use IPv6Network instead of IPv6Address

If you intend to parse the network, use ipaddress.IPv6Network but remember that this will discard all host bits. If you want to use IPv6Address or IPv6Network really depends on what you want to do with it – if you want to refer to a specific host, you almost always want to use IPv6Address.

import ipaddress
ipaddress.IPv6Network("2a01:c23:c0bb:d00:8ce6:2eff:fe60:cc69/64", strict=False)

Note that strict=False is added in order to prevent an exception due to host bits being set – see How to fix Python ipaddress.IPv6Network ValueError: … has host bits set

Posted by Uli Köhler in Networking, Python

How to fix Python ipaddress.IPv6Network ValueError: … has host bits set

Problem:

When trying to parse an IPv6 network address in Python using code like

import ipaddress
ipaddress.IPv6Network("2a01:c23:c0bb:d00:8ce6:2eff:fe60:cc69/64")

you see an error message like

---------------------------------------------------------------------------
ValueError                                Traceback (most recent call last)
/tmp/ipykernel_154945/1312927855.py in <module>
      1 import ipaddress
----> 2 ipaddress.IPv6Network("2a01:c23:c0bb:d00:8ce6:2eff:fe60:cc69/64")

/usr/lib/python3.8/ipaddress.py in __init__(self, address, strict)
   2106         if packed & int(self.netmask) != packed:
   2107             if strict:
-> 2108                 raise ValueError('%s has host bits set' % self)
   2109             else:
   2110                 self.network_address = IPv6Address(packed &

ValueError: 2a01:c23:c0bb:d00:8ce6:2eff:fe60:cc69/64 has host bits set

Solution 1: Maybe you should use IPv6Address instead of IPv6Network

If you intend to parse the address and don’t care about the network, use ipaddress.IPv6Address but remember that the CIDR mask (e.g. /64)  needs to be removed. If you want to use IPv6Address or IPv6Network really depends on what you want to do with it – if you want to refer to a specific host, you almost always want to use IPv6Address.

import ipaddress
ipaddress.IPv6Address("2a01:c23:c0bb:d00:8ce6:2eff:fe60:cc69")

Solution 2: Use strict=False to let IPv6Network discard the host bits:

strict=False basically ignores this error

import ipaddress
ipaddress.IPv6Network("2a01:c23:c0bb:d00:8ce6:2eff:fe60:cc69/64", strict=False)

Note that the result will be

IPv6Network('2a01:c23:c0bb:d00::/64')

so the information in the host bits will be lost!

Solution 2: Remove the host bits manually

Since the host bits will be discarded anyway, you can just specify the IPv6 network with the correct netmask:

import ipaddress
ipaddress.IPv6Network("2a01:c23:c0bb:d00::/64")


Posted by Uli Köhler in Networking, Python

How to fix Pronterface/Printrun UnicodeDecodeError: ‘utf-8’ codec can’t decode byte … in position …: invalid continuation byte

Problem:

When starting Pronterface / Printrun on Linux using pronterfaceprintrunpython3 pronterface.py or similar, you see an error message like

Traceback (most recent call last):
  File "pronterface.py", line 62, in <module>
    app = PronterApp(False)
  File "/home/uli/dev/tools/Printrun/printrun/pronterface.py", line 2464, in __init__
    self.mainwindow = PronterWindow(self)
  File "/home/uli/dev/tools/Printrun/printrun/pronterface.py", line 170, in __init__
    self.parse_cmdline(sys.argv[1:])
  File "/home/uli/dev/tools/Printrun/printrun/pronsole.py", line 786, in parse_cmdline
    self.process_cmdline_arguments(args)
  File "/home/uli/dev/tools/Printrun/printrun/pronterface.py", line 1031, in process_cmdline_arguments
    pronsole.pronsole.process_cmdline_arguments(self, args)
  File "/home/uli/dev/tools/Printrun/printrun/pronsole.py", line 769, in process_cmdline_arguments
    self.load_default_rc()
  File "/home/uli/dev/tools/Printrun/printrun/pronsole.py", line 664, in load_default_rc
    self.load_rc(config)
  File "/home/uli/dev/tools/Printrun/printrun/pronsole.py", line 632, in load_rc
    for rc_cmd in rc:
  File "/usr/lib/python3.8/codecs.py", line 714, in __next__
    return next(self.reader)
  File "/usr/lib/python3.8/codecs.py", line 645, in __next__
    line = self.readline()
  File "/usr/lib/python3.8/codecs.py", line 558, in readline
    data = self.read(readsize, firstline=True)
  File "/usr/lib/python3.8/codecs.py", line 504, in read
    newchars, decodedbytes = self.decode(data, self.errors)
UnicodeDecodeError: 'utf-8' codec can't decode byte 0xd3 in position 4: invalid continuation byte

Solution

When you see this error message, typically your pronsolerc is corrupted. In order to remove it,

rm -rf ~/.config/Printrun
Posted by Uli Köhler in 3D printing, Python

How to center-align all columns in pandas XLSX export

In our previous post How to center-align column in pandas XLSX export we showed how to center-align one specific column in a XLSX export.

In this post, we’ll show how to center all columns in a pandas DataFrame XLSX export. Note that the variants with and without index shown here differ only in the column index computation. Pandas automatically centers the index column, so we don’t need to do that explicitly.

For export with index

# Center all columns
for column_idx in range(len(df.columns)):
    for cell in sheet[openpyxl.utils.cell.get_column_letter(column_idx + 1)]:
        cell.alignment = Alignment(horizontal="center")

For export without index

# Center all columns
for column_idx in range(len(df.columns)):
    for cell in sheet[openpyxl.utils.cell.get_column_letter(column_idx + 1)]:
        cell.alignment = Alignment(horizontal="center")

Full example:

import pandas as pd
import openpyxl.utils.cell
from openpyxl.styles.alignment import Alignment

df = pd.DataFrame([
    {"a": 1.0},
    {"a": 2.0},
    {"a": 3.0},
    {"a": 4.0},
    {"a": 5.0},
])
with pd.ExcelWriter("out.xlsx", engine="openpyxl") as writer:
    sheet_name = "Bool"
    # Export DataFrame content
    df.to_excel(writer, sheet_name=sheet_name)
    # Align to center
    sheet = writer.sheets[sheet_name]
    # Center all columns
    for column_idx in range(len(df.columns) + 1):
        for cell in sheet[openpyxl.utils.cell.get_column_letter(column_idx + 1)]:
            cell.alignment = Alignment(horizontal="center")

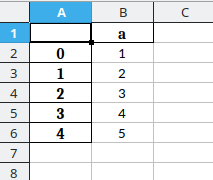
The table will look like this with the centering enabled:

whereas the table is right-aligned with only the title centered by Pandas with the centering code disabled: – Note that the index column is centered automatica

Posted by Uli Köhler in OpenPyXL, pandas, Python

How to center-align column in pandas XLSX export

Note: Want to align all columns in the export? See our followup post How to center-align all columns in pandas XLSX export

When exporting a DataFrame in pandas, often you want to center a column in order to make the resulting table visually more appealing.

In this post we’ll show how to do this using the openpyxl engine.

If you want to center column B, add this code within the pd.ExcelWriter with: block:

for cell in sheet["B"]:
    cell.alignment = Alignment(horizontal="center")

Full example:

import pandas as pd
from openpyxl.styles.alignment import Alignment

df = pd.DataFrame([
    {"a": 1.0},
    {"a": 2.0},
    {"a": 3.0},
    {"a": 4.0},
    {"a": 5.0},
])
with pd.ExcelWriter("out.xlsx", engine="openpyxl") as writer:
    sheet_name = "Bool"
    # Export DataFrame content
    df.to_excel(writer, sheet_name=sheet_name)
    # Align to center
    sheet = writer.sheets[sheet_name]
    # Align every cell in column "B" horizontally
    for cell in sheet["B"]:
        cell.alignment = Alignment(horizontal="center")

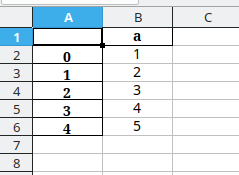
The table will look like this with the centering enabled:

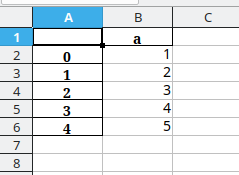
whereas the table is right-aligned with only the title centered by Pandas with the centering code disabled:

Posted by Uli Köhler in OpenPyXL, pandas, Python