Python

How to fix Python ipaddress.IPv6Network ValueError: … has host bits set

Problem:

When trying to parse an IPv6 network address in Python using code like

import ipaddress
ipaddress.IPv6Network("2a01:c23:c0bb:d00:8ce6:2eff:fe60:cc69/64")

you see an error message like

---------------------------------------------------------------------------
ValueError                                Traceback (most recent call last)
/tmp/ipykernel_154945/1312927855.py in <module>
      1 import ipaddress
----> 2 ipaddress.IPv6Network("2a01:c23:c0bb:d00:8ce6:2eff:fe60:cc69/64")

/usr/lib/python3.8/ipaddress.py in __init__(self, address, strict)
   2106         if packed & int(self.netmask) != packed:
   2107             if strict:
-> 2108                 raise ValueError('%s has host bits set' % self)
   2109             else:
   2110                 self.network_address = IPv6Address(packed &

ValueError: 2a01:c23:c0bb:d00:8ce6:2eff:fe60:cc69/64 has host bits set

Solution 1: Maybe you should use IPv6Address instead of IPv6Network

If you intend to parse the address and don’t care about the network, use ipaddress.IPv6Address but remember that the CIDR mask (e.g. /64)  needs to be removed. If you want to use IPv6Address or IPv6Network really depends on what you want to do with it – if you want to refer to a specific host, you almost always want to use IPv6Address.

import ipaddress
ipaddress.IPv6Address("2a01:c23:c0bb:d00:8ce6:2eff:fe60:cc69")

Solution 2: Use strict=False to let IPv6Network discard the host bits:

strict=False basically ignores this error

import ipaddress
ipaddress.IPv6Network("2a01:c23:c0bb:d00:8ce6:2eff:fe60:cc69/64", strict=False)

Note that the result will be

IPv6Network('2a01:c23:c0bb:d00::/64')

so the information in the host bits will be lost!

Solution 2: Remove the host bits manually

Since the host bits will be discarded anyway, you can just specify the IPv6 network with the correct netmask:

import ipaddress
ipaddress.IPv6Network("2a01:c23:c0bb:d00::/64")
 

Posted by Uli Köhler in Networking, Python

How to fix Pronterface/Printrun UnicodeDecodeError: ‘utf-8’ codec can’t decode byte … in position …: invalid continuation byte

Problem:

When starting Pronterface / Printrun on Linux using pronterfaceprintrunpython3 pronterface.py or similar, you see an error message like

Traceback (most recent call last):
  File "pronterface.py", line 62, in <module>
    app = PronterApp(False)
  File "/home/uli/dev/tools/Printrun/printrun/pronterface.py", line 2464, in __init__
    self.mainwindow = PronterWindow(self)
  File "/home/uli/dev/tools/Printrun/printrun/pronterface.py", line 170, in __init__
    self.parse_cmdline(sys.argv[1:])
  File "/home/uli/dev/tools/Printrun/printrun/pronsole.py", line 786, in parse_cmdline
    self.process_cmdline_arguments(args)
  File "/home/uli/dev/tools/Printrun/printrun/pronterface.py", line 1031, in process_cmdline_arguments
    pronsole.pronsole.process_cmdline_arguments(self, args)
  File "/home/uli/dev/tools/Printrun/printrun/pronsole.py", line 769, in process_cmdline_arguments
    self.load_default_rc()
  File "/home/uli/dev/tools/Printrun/printrun/pronsole.py", line 664, in load_default_rc
    self.load_rc(config)
  File "/home/uli/dev/tools/Printrun/printrun/pronsole.py", line 632, in load_rc
    for rc_cmd in rc:
  File "/usr/lib/python3.8/codecs.py", line 714, in __next__
    return next(self.reader)
  File "/usr/lib/python3.8/codecs.py", line 645, in __next__
    line = self.readline()
  File "/usr/lib/python3.8/codecs.py", line 558, in readline
    data = self.read(readsize, firstline=True)
  File "/usr/lib/python3.8/codecs.py", line 504, in read
    newchars, decodedbytes = self.decode(data, self.errors)
UnicodeDecodeError: 'utf-8' codec can't decode byte 0xd3 in position 4: invalid continuation byte

Solution

When you see this error message, typically your pronsolerc is corrupted. In order to remove it,

rm -rf ~/.config/Printrun
Posted by Uli Köhler in 3D printing, Python

How to center-align all columns in pandas XLSX export

In our previous post How to center-align column in pandas XLSX export we showed how to center-align one specific column in a XLSX export.

In this post, we’ll show how to center all columns in a pandas DataFrame XLSX export. Note that the variants with and without index shown here differ only in the column index computation. Pandas automatically centers the index column, so we don’t need to do that explicitly.

For export with index

# Center all columns
for column_idx in range(len(df.columns)):
    for cell in sheet[openpyxl.utils.cell.get_column_letter(column_idx + 1)]:
        cell.alignment = Alignment(horizontal="center")

For export without index

# Center all columns
for column_idx in range(len(df.columns)):
    for cell in sheet[openpyxl.utils.cell.get_column_letter(column_idx + 1)]:
        cell.alignment = Alignment(horizontal="center")

Full example:

import pandas as pd
import openpyxl.utils.cell
from openpyxl.styles.alignment import Alignment

df = pd.DataFrame([
    {"a": 1.0},
    {"a": 2.0},
    {"a": 3.0},
    {"a": 4.0},
    {"a": 5.0},
])
with pd.ExcelWriter("out.xlsx", engine="openpyxl") as writer:
    sheet_name = "Bool"
    # Export DataFrame content
    df.to_excel(writer, sheet_name=sheet_name)
    # Align to center
    sheet = writer.sheets[sheet_name]
    # Center all columns
    for column_idx in range(len(df.columns) + 1):
        for cell in sheet[openpyxl.utils.cell.get_column_letter(column_idx + 1)]:
            cell.alignment = Alignment(horizontal="center")

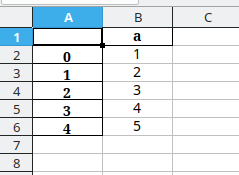
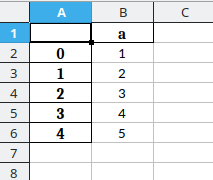
The table will look like this with the centering enabled:

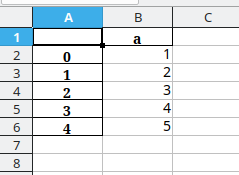
whereas the table is right-aligned with only the title centered by Pandas with the centering code disabled: – Note that the index column is centered automatica

Posted by Uli Köhler in OpenPyXL, pandas, Python

How to center-align column in pandas XLSX export

Note: Want to align all columns in the export? See our followup post How to center-align all columns in pandas XLSX export

When exporting a DataFrame in pandas, often you want to center a column in order to make the resulting table visually more appealing.

In this post we’ll show how to do this using the openpyxl engine.

If you want to center column B, add this code within the pd.ExcelWriter with: block:

for cell in sheet["B"]:
    cell.alignment = Alignment(horizontal="center")

Full example:

import pandas as pd
from openpyxl.styles.alignment import Alignment

df = pd.DataFrame([
    {"a": 1.0},
    {"a": 2.0},
    {"a": 3.0},
    {"a": 4.0},
    {"a": 5.0},
])
with pd.ExcelWriter("out.xlsx", engine="openpyxl") as writer:
    sheet_name = "Bool"
    # Export DataFrame content
    df.to_excel(writer, sheet_name=sheet_name)
    # Align to center
    sheet = writer.sheets[sheet_name]
    # Align every cell in column "B" horizontally
    for cell in sheet["B"]:
        cell.alignment = Alignment(horizontal="center")

The table will look like this with the centering enabled:

whereas the table is right-aligned with only the title centered by Pandas with the centering code disabled:

Posted by Uli Köhler in OpenPyXL, pandas, Python

How center text horizontally using Alignment in OpenPyXL

Based on our previous OpenPyXL minimal XLSX write example, this code will generate a XLSX with a number in cell A1 that is right-aligned automatically:

from openpyxl import Workbook
wb = Workbook()
sheet = wb["Sheet"] # This sheet is created by default
# Add content to sheet
sheet["A1"] = 4.5
sheet["A1"].alignment = Alignment(horizontal="center")
# Save
wb.save("openpyxl-test.xlsx")

How to add centered alignment

In order to align the cell horizontally, we just need to

from openpyxl.styles.alignment import Alignment

sheet["A1"].alignment = Alignment(horizontal="center")

Full example

from openpyxl import Workbook
from openpyxl.styles.alignment import Alignment
wb = Workbook()
sheet = wb["Sheet"] # This sheet is created by default
# Add content to sheet
sheet["A1"] = 4.5
sheet["A1"].alignment = Alignment(horizontal="center")
# Save
wb.save("openpyxl-test.xlsx")

This will look like this:

Posted by Uli Köhler in OpenPyXL, Python

Pandas XLSX export with background color based on cell value

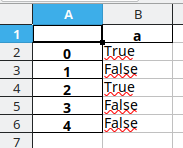
This example script uses openpyxl to set a cell’s background color to red for False cells or to green for True cells. Note that we convert the boolean values to "True"or "False" strings based on the method we outlined in our previous post How to write Pandas bool column as True/False instead of 1/0 to XLSX. For more details on how to just set the background color in OpenPyXL, see our post on How to set cell background color in OpenPyXL.

import pandas as pd
from openpyxl.styles import PatternFill

df = pd.DataFrame([
    {"a": True},
    {"a": False},
    {"a": True},
    {"a": False},
    {"a": False},
])
df["a"] = df["a"].map({True: "True", False: "False"})
with pd.ExcelWriter("out.xlsx", engine="openpyxl") as writer:
    sheet_name = "Bool"
    # Export DataFrame content
    df.to_excel(writer, sheet_name=sheet_name)
    # Set backgrund colors depending on cell values
    sheet = writer.sheets[sheet_name]
    for cell, in sheet[f'B2:B{len(df) + 1}']: # Skip header row, process as many rows as there are DataFrames
        value = df["a"].iloc[cell.row - 2] # value is "True" or "False"
        cell.fill = PatternFill("solid", start_color=("5cb800" if value == "True" else 'ff2800'))

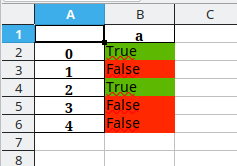
The output from this script looks like this:

Posted by Uli Köhler in OpenPyXL, Python

How to get OpenPyXL column letter by index

If you want to access OpenPyXL columns using indices instead of letters, use

import openpyxl.utils.cell

openpyxl.utils.cell.get_column_letter(idx)

Note that idx is 1-based: index 0 is not a valid argument & index 1 yields column name A 

For example:

openpyxl.utils.cell.get_column_letter(3) # returns "C"


Posted by Uli Köhler in OpenPyXL, Python

How to set cell background color in OpenPyXL

In order to set a cell’s background color in OpenPyXL, use PatternFill with fill_type="solid" and start_color="your_desired_color"  and no end_color. The following example will set a cell’s background to green:

sheet["A1"].fill = PatternFill("solid", start_color="5cb800")

Full example based on our OpenPyXL minimal XLSX write example

from openpyxl import Workbook
wb = Workbook()
sheet = wb["Sheet"] # This sheet is created by default
# Add content to sheet
sheet["A1"] = "This is cell A1"
sheet["A1"].fill = PatternFill("solid", start_color="5cb800")
# Save
wb.save("openpyxl-test.xlsx")

Posted by Uli Köhler in OpenPyXL, Python

OpenPyXL minimal XLSX write example

This serves a minimal example of how to write an XLSX file using OpenPyXL:

from openpyxl import Workbook
wb = Workbook()
sheet = wb["Sheet"] # This sheet is created by default
# Add content to sheet
sheet["A1"] = "This is cell A1"
# Save
wb.save("openpyxl-test.xlsx")

Posted by Uli Köhler in OpenPyXL, Python

How to write Pandas bool column as True/False instead of 1/0 to XLSX

Problem:

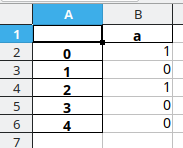
When writing a pandas XLSX, bool-type columns are shown are 0 for False or 1 for True.

df = pd.DataFrame([
    {"a": True},
    {"a": False},
    {"a": True},
    {"a": False},
    {"a": False},
])

with pd.ExcelWriter("out.xlsx", engine="xlsxwriter") as writer:
    df.to_excel(writer)

Solution:

Map the column to a string column with your desired value before exporting:

df["a"] = df["a"].map({True: "True", False: "False"})

Full example code:

df = pd.DataFrame([
    {"a": True},
    {"a": False},
    {"a": True},
    {"a": False},
    {"a": False},
])
df["a"] = df["a"].map({True: "True", False: "False"})
with pd.ExcelWriter("out.xlsx", engine="xlsxwriter") as writer:
    df.to_excel(writer)


Posted by Uli Köhler in pandas, Python

How to create pandas pd.DataFrame from list of dicts

You can create a pandas pd.DataFrame from a list of dicts (lst) using the pd.DataFrame(lst) constructor.

a = {"x": 1, "y": 2}
b = {"x": 3, "y": 2}
c = {"x": 6, "y": 9}
df = pd.DataFrame([a,b,c])

df will look like this:

Posted by Uli Köhler in pandas, Python

How to fix error: cannot find the python “fuse” module; please install it

Problem:

When running bup fuse, you see this error message

error: cannot find the python "fuse" module; please install it

Solution:

On Ubuntu or other debian-based systems, just install the package using apt:

sudo apt -y install python3-fuse

Otherwise, install it using pip:

sudo pip3 install fuse-python
Posted by Uli Köhler in Python

PySerial minimal request-reply example

This example sends the M119 (print endstop status) command to an attached 3D printer and prints the response in a loop

#!/usr/bin/env python3
import serial
ser = serial.Serial("/dev/ttyACM0")

try:
    while True:
        ser.write(b"M119\n")
        response = ser.read_until(b"ok\n")
        print(response.decode("utf-8"))
finally:
    ser.close()

Example output (in a loop):

Reporting endstop status
x_max: open
y_max: TRIGGERED
z_max: TRIGGERED
ok


Posted by Uli Köhler in 3D printing, Embedded, Python

How to fix Python ModuleNotFoundError: No module named ‘usb’ / usb.util

Problem:

When running a Python script, you see an error message like

Traceback (most recent call last):
  File "./dfuse-tool.py", line 2, in <module>
    import dfuse
  File "/home/uli/dev/tools/dfuse-tool/dfuse/__init__.py", line 1, in <module>
    from dfuse.DfuDevice import DfuDevice
  File "/home/uli/dev/tools/dfuse-tool/dfuse/DfuDevice.py", line 1, in <module>
    import usb.util
ModuleNotFoundError: No module named 'usb'

Solution:

You need to install PyUSB using

sudo pip3 install pyusb
Posted by Uli Köhler in Electronics, Python

How to make video from Matplotlib plots

First, you need to ensure that your plots are saved all with the same name pattern containing the frame number (starting at 1) which must be padded with zeros! For example, your plot should be named myplot_000001.png or myplot_0123. This can be done using, for example, using

fig.savefig(f'myplots/myplot_{timestep:06d}.png')

06d pads the number (in the timestep variable) up to 6 digits in total.

Now, use ffmpeg like this to create the video:

ffmpeg -f image2 -framerate 25 -i myplots/myplot_%06d.png -vcodec libx264 -crf 22 video.mp4


Posted by Uli Köhler in Data science, Python

How to autoscale matplotlib X&Y axis after set_data() call

After calling set_data() or set_ydata() in matplotlib the axis scale is not updated automatically. Use

ax.relim()
ax.autoscale_view(True,True,True)

to update both the X and the Y scale.

Full example:

line.set_data(x, y)
# Autoscale view
ax.relim()
ax.autoscale_view(True,True,True)
# Redraw
figure.canvas.draw()
figure.canvas.flush_events()


Posted by Uli Köhler in Python

How to fix pip cartopy error: “geos_c.h: No such file or directory”

Problem:

When trying to install cartopy on Linux using e.g. sudo pip3 install cartopy, you see an error message like

lib/cartopy/trace.cpp:633:10: fatal error: geos_c.h: Datei oder Verzeichnis nicht gefunden                                                                                                 
  633 | #include "geos_c.h"                                                                                                                                                                
      |          ^~~~~~~~~~                                                                                                                                                                
compilation terminated.                                                                                                                                                                    
setup.py:117: UserWarning: Unable to determine GEOS version. Ensure you have 3.3.3 or later installed, or installation may fail.

Solution:

Install libgeos-dev using

sudo apt -y install libgeos-dev


Posted by Uli Köhler in Cartopy, Python

How I fixed Python OSError: [Errno 99] Cannot assign requested address

Problem:

When binding a socket, you see an error message like

Traceback (most recent call last):
  File "run.py", line 91, in <module>
    server = start_server(loop, ('192.168.1.100', 8080))
  File "run.py", line 86, in start_server
    transport, server = loop.run_until_complete(t)
  File "/usr/lib/python3.8/asyncio/base_events.py", line 616, in run_until_complete
    return future.result()
  File "/usr/lib/python3.8/asyncio/base_events.py", line 1332, in create_datagram_endpoint
    raise exceptions[0]
  File "/usr/lib/python3.8/asyncio/base_events.py", line 1316, in create_datagram_endpoint
    sock.bind(local_address)
OSError: [Errno 99] Cannot assign requested address

Solution:

In my case, the issue was that I was trying to bind the specific IP address 192.168.1.100 but the computer running the script did not have said IP address configured on any interface.

server = start_server(loop, ('192.168.1.100', 8080))

so I needed to change the bind IP address to either 0.0.0.0 to listen to ANY IP address or I needed to change 192.168.1.100 to the IP address of the host computer I am running the script on.

Docker container [Errno 99] Cannot assign requested address

Note that for Docker containers, either you need to run them in network_mode: host to use the host’s network systemd, or you need to bind to the container’s IP address. You can not bind to the host’s IP address from the contaienr unless using network_mode: host! But you can forward the ports from the host, binding to a specific IP address.

Posted by Uli Köhler in Python

Python raw TCP client minimal example & cheatsheet

import socket

try:
    # Initialize socket
    sock = socket.socket(socket.AF_INET, socket.SOCK_STREAM)
    sock.connect(("192.168.238.1", 12345))
    
    # Example: Send
    sock.send(b"abc123abc")

    # Example: Receive with timeout
    sock.settimeout(0.1)
    data = sock.recv(2048)
finally:
    sock.close()


Posted by Uli Köhler in Networking, Python