How to read ESP32 NVS value into std::string

In our previous post, we discussed How to get the length / size of NVS value on ESP32. Based on that, we can read a NVS value into a std::string.

Strategy

  1. Determine size of value in NVS
  2. Allocate temporary buffer of the determined size
  3. Read value from NVS into temporary buffer
  4. Create std::string from value
  5. Cleanup temporary buffer

Utility function to read NVS value as std::string

In case the key does not exist in NVS, this function will return the empty string ("").

#include <nvs.h>
#include <string>

std::string ReadNVSValueAsStdString(nvs_handle_t nvs, const char* key) {
    /**
     * Strategy:
     *  1. Determine size of value in NVS
     *  2. Allocate temporary buffer of determined size
     *  3. Read value from NVS into temporary buffer
     *  4. Create std::string from value
     *  5. Cleanup
     */
    // Step 1: Get size of key
    esp_err_t err;
    size_t value_size = 0;
    if((err = nvs_get_str(nvs, _key.c_str(), nullptr, &value_size)) != ESP_OK) {
        if(err == ESP_ERR_NVS_NOT_FOUND) {
            // Not found, no error
            return "";
        } else {
            printf("Failed to get size of NVS key %s: %s\r\n", key, esp_err_to_name(err));
            return;
        }
    }
    // Step 2: Allocate temporary buffer to read from
    char* buf = (char*)malloc(value_size);
    // Step 3: Read value into temporary buffer.
    esp_err_t err;
    if((err = nvs_get_str(nvs, _key.c_str(), buf, &value_size)) != ESP_OK) {
        // "Doesn't exist" has already been handled before, so this is an actual error.
        // We assume that the value did not change between reading the size (step 1) and now.
        // In case that assumption is value, this will fail with ESP_ERR_NVS_INVALID_LENGTH.
        // This is extremely unlikely in all usage scenarios, however.
        printf("Failed to read NVS key %s: %s\r\n", key, esp_err_to_name(err));
        free(buf);
        return "";
    }
    // Step 4: Make string
    std::string value = std::string(buf, value_size);
    // Step 5: cleanup
    free(buf);
    
    return value;
}

Usage example

This assumes that you have setup myNvs as we have shown in our previous post How to initialize NVS on ESP32

std::string value = ReadNVSValueAsStdString(myNvs, "MyKey");

C++17 optimizations

Starting from C++17, you can possibly create a std::string directly instead of using the temporary buffer, since there is an overload of .data() that returns a non-const pointer – so you can write directly to the std::string‘s buffer.

However, since my PlatformIO-based toolchain currently doesn’t support that, I have not written that code yet.
Posted by Uli Köhler in C/C++, ESP8266/ESP32

How to get length / size of NVS value on ESP32

You can find the size of a value stored in ESP32 NVS by running nvs_get_blob() with length set to a pointer to a variable with content 0, and out_value set to nullptrnvs_get_str() works as well, the only difference is the type of the out_value argument, which does not matter at all.

It’s easier to understand if you look at this example function:

size_t NVSGetSize(nvs_handle_t nvs, const char* key) {
    esp_err_t err;
    size_t valueSize = 0;
    if((err = nvs_get_str(nvs, key, nullptr, &valueSize)) != ESP_OK) {
        if(err == ESP_ERR_NVS_NOT_FOUND) {
            // Not found, no error
            return 0;
        } else {
             // Actual error, log & return 0
            printf("Failed to get size of NVS key %s: %s\r\n", key, esp_err_to_name(err));
            return 0;
        }
    }
    return valueSize;
}

Usage example

This assumes that you have setup myNvs as we have shown in our previous post How to initialize NVS on ESP32

size_t myKeySize = NVSGetSize(myNvs, "MyKey");


Posted by Uli Köhler in ESP8266/ESP32

How to fix C/C++ ‘size_t’ does not name a type

Problem:

When compiling your C or C++ program. you see the following error message:

src/main.cpp:4:11: error: 'size_t' does not name a type
 size_t mySize = 32;

Solution:

In the file where the error occurs (in our example, that would be src/main.cpp), add the following line at or near the top. It must be added before the line where size_t is first used, and usually you would add that line after the last existing #include statements:

#include <stddef.h>

After adding that line, the error should be gone. Possibly you need to add said line to other files as well, so carefully check any compiler error messages if the error re-appears in other files.

Posted by Uli Köhler in C/C++, GCC errors

How to write string (const char*) to ESP32 NVS

Also see: How to read string (const char*) from ESP32 NVS

You can use this utility function to write a string (const char*) into the NVS:

bool _NVS_WriteString(nvs_handle_t nvs, const char* key, const char* value) {
    esp_err_t err;
    if((err = nvs_set_str(nvs, key, value)) != ESP_OK) {
        Serial.printf("Failed to write NVS key %s: %s\r\n", key, esp_err_to_name(err));
        return false;
    }
    return true;
}

Usage example

This example is based on How to initialize NVS on ESP32. Most importantly, it assumes you have already initialized the NVS and myNVS exists and is valid.

char mySerialNo[128] = {0};

_NVS_WriteString(myNVS, "SerialNo", "0000001");

This will write the value 0000001 to the NVS with key SerialNo

Note that NVS strings are length-delimited (as in: The length is stored in the NVS) and not neccessarily NUL-terminated. This code does not store the NUL terminator in NVS.

Posted by Uli Köhler in ESP8266/ESP32

How to read string (const char*) from ESP32 NVS

Also see: How to write string (const char*) to ESP32 NVS


You can use this utility function to read a string:

bool _NVS_ReadString(nvs_handle_t nvs, const char* key, char* value, size_t maxSize) {
    esp_err_t err;
    if((err = nvs_get_str(nvs, key, value, &maxSize)) != ESP_OK) {
        Serial.printf("Failed to read NVS key %s: %s\r\n", key, esp_err_to_name(err));
        return false;
    }
    return true;
}

Usage example

This example is based on How to initialize NVS on ESP32. Most importantly, it assumes you have already initialized the NVS and myNVS exists and is valid.

char mySerialNo[128] = {0};

_NVS_ReadString(myNVS, "SerialNo", mySerialNo, 128-1);

This will read the NVS entry with key SerialNo into the buffer mySerialNo. Note that we are using 128-1 as size, even though the buffer has a size of 128. This is to ensure that there is ALWAYS a terminating NUL character at the last value of the buffer.

Note that NVS strings are length-delimited (as in: The length is stored in the NVS) and not neccessarily NUL-terminated. I recommend to not store the NUL terminator in the NVS.

Posted by Uli Köhler in ESP8266/ESP32

How to initialize NVS on ESP32

First, include the ESP32 NVS library using:

#include <nvs.h>

Globally, declare

nvs_handle_t myNVS = 0;

Then you can

void InitNVS() {
    esp_err_t err;
    if((err = nvs_open("MyLabel", NVS_READWRITE, &myNVS)) != ESP_OK) {
        Serial.printf("Failed to open NVS: %s\r\n", esp_err_to_name(err));
        return;
    }
}

You can choose MyLabel arbitrarily, as long as the string isn’t too long. My recommendation is to choose a unique identifier for your application.

Posted by Uli Köhler in ESP8266/ESP32

How to add extra include directory to PlatformIO project

In platformio.ini, add the following build flags:

build_flags = -I../my-extra-include-dir

By using this method, you can also add multiple include directories:

build_flags = -I../my-first-include-dir -I../my-second-include-dir

All paths are relative to the directory where platformio.ini resides in.

Posted by Uli Köhler in PlatformIO

How to fix NanoPB MyProtocol.proto: Option “(nanopb)” unknown.

Problem:

When trying to compile a project using NanoPB, you see a warning like

MyProtocol.proto:11:27: Option "(nanopb)" unknown. Ensure that your proto definition file imports the proto which defines the option.

Solution:

At the top of the .proto file mentioned in the warning message, just after syntax = "proto3"; add the following line:

import "nanopb.proto";

After that, the error should be gone.

Posted by Uli Köhler in NanoPB

How to fix PlatformIO ValueError: Invalid simple block ‘^0.4.6.4’

Problem:

You want to build your PlatformIO project which has library dependency like

lib_deps =
    nanopb/Nanopb@^0.4.6.4

but you see an error message like

Error: Traceback (most recent call last):
  File "/home/uli/.platformio/penv/lib/python3.10/site-packages/platformio/__main__.py", line 102, in main
    cli()  # pylint: disable=no-value-for-parameter
  File "/home/uli/.platformio/penv/lib/python3.10/site-packages/click/core.py", line 1130, in __call__
    return self.main(*args, **kwargs)
  File "/home/uli/.platformio/penv/lib/python3.10/site-packages/click/core.py", line 1055, in main
    rv = self.invoke(ctx)
  File "/home/uli/.platformio/penv/lib/python3.10/site-packages/platformio/cli.py", line 71, in invoke
    return super().invoke(ctx)
  File "/home/uli/.platformio/penv/lib/python3.10/site-packages/click/core.py", line 1657, in invoke
    return _process_result(sub_ctx.command.invoke(sub_ctx))
  File "/home/uli/.platformio/penv/lib/python3.10/site-packages/click/core.py", line 1404, in invoke
    return ctx.invoke(self.callback, **ctx.params)
  File "/home/uli/.platformio/penv/lib/python3.10/site-packages/click/core.py", line 760, in invoke
    return __callback(*args, **kwargs)
  File "/home/uli/.platformio/penv/lib/python3.10/site-packages/click/decorators.py", line 26, in new_func
    return f(get_current_context(), *args, **kwargs)
  File "/home/uli/.platformio/penv/lib/python3.10/site-packages/platformio/run/cli.py", line 144, in cli
    process_env(
  File "/home/uli/.platformio/penv/lib/python3.10/site-packages/platformio/run/cli.py", line 201, in process_env
    result = {"env": name, "duration": time(), "succeeded": ep.process()}
  File "/home/uli/.platformio/penv/lib/python3.10/site-packages/platformio/run/processor.py", line 83, in process
    install_project_env_dependencies(
  File "/home/uli/.platformio/penv/lib/python3.10/site-packages/platformio/package/commands/install.py", line 132, in install_project_env_dependencies
    _install_project_env_libraries(project_env, options),
  File "/home/uli/.platformio/penv/lib/python3.10/site-packages/platformio/package/commands/install.py", line 241, in _install_project_env_libraries
    spec = PackageSpec(library)
  File "/home/uli/.platformio/penv/lib/python3.10/site-packages/platformio/package/meta.py", line 184, in __init__
    self._parse(self.raw)
  File "/home/uli/.platformio/penv/lib/python3.10/site-packages/platformio/package/meta.py", line 291, in _parse
    raw = parser(raw)
  File "/home/uli/.platformio/penv/lib/python3.10/site-packages/platformio/package/meta.py", line 316, in _parse_requirements
    self.requirements = tokens[1].strip()
  File "/home/uli/.platformio/penv/lib/python3.10/site-packages/platformio/package/meta.py", line 231, in requirements
    else semantic_version.SimpleSpec(str(value))
  File "/home/uli/.platformio/penv/lib/python3.10/site-packages/semantic_version/base.py", line 647, in __init__
    self.clause = self._parse_to_clause(expression)
  File "/home/uli/.platformio/penv/lib/python3.10/site-packages/semantic_version/base.py", line 1043, in _parse_to_clause
    return cls.Parser.parse(expression)
  File "/home/uli/.platformio/penv/lib/python3.10/site-packages/semantic_version/base.py", line 1063, in parse
    raise ValueError("Invalid simple block %r" % block)
ValueError: Invalid simple block '^0.4.6.4'

Solution:

You are using the library version 0.4.6.4 but the library version specifier does not support versions with 4 levels (a.b.c.d) – the correct version specifier is just using the first three digits: a.b.c. In our example, this would be

lib_deps =
  nanopb/Nanopb@^0.4.6

After that, you have to delete your .pio directory in the project folder in order to fix the issue:

rm -rf .pio

When that is done, rebuild and the issue will be gone.

Posted by Uli Köhler in ESP8266/ESP32, NanoPB, PlatformIO

How to link Angular project dist directory to PlatformIO SPIFFS data directory

For tips how to make the Angular build small enough to fit into the SPIFFS image, see How to make Angular work with ESP32 SPIFFS / ESPAsyncWebserver

When you are building a PlatformIO image, you can easily make the dist/[project_name] directory from the Angular project directory appear in the SPIFFS image by using a symlink.

My config tells the server to serve from the www subdirectory.

server.serveStatic("/", SPIFFS, "/www/").setDefaultFile("index.html");

Therefore, we first need to create the data directory in the same directory where platformio.ini is located:

mkdir data

Now we can create a symlink from the angular dist directory to data/www, for example:

ln -s ../MyUI/dist/myui data/www

PlatformIO will automatically handle the symlink, if the directory exists.

Posted by Uli Köhler in Angular, ESP8266/ESP32, PlatformIO

How to make Angular work with ESP32 SPIFFS / ESPAsyncWebserver

The main issue when using Angular web UIs is that the resulting files get too large, hence building the filesystem image will fail with SPIFFS_write error(-10001): File system is full.

Using these tips, I could get an Angular PrimeNG app to fit into a 4MB flash ESP32 module without any custom partition table and without any other crazy hacks! Even the fonts & PrimeNG icons fit into the SPIFFS easily, with a total of only 380 kB of the approximately 1.5 MB being consumed.

File compression

The number one most important tip is that you can just gzip -9 the files from the angular dist directory and ESPAsyncWebserver will automatically handle decompressing them!

This is my platformio.ini:

[env:esp32dev]
platform = espressif32
platform_packages = framework-arduinoespressif32 @ https://github.com/espressif/arduino-esp32.git#2.0.3
board = esp32dev
framework = arduino
board_build.filesystem = littlefs
lib_deps =
    esphome/AsyncTCP-esphome@^1.2.2
    esphome/ESPAsyncWebServer-esphome@^2.1.0
    [email protected]
upload_speed = 460800
monitor_speed = 115200

This is my angular build script:

#!/bin/sh
ng build --aot --build-optimizer --optimization --progress --output-hashing none
gzip -9 dist/**/*

This is where I tell ESPAsyncWebserver (note that you should use the esphome fork) to serve files statically:

server.serveStatic("/", SPIFFS, "/www/").setDefaultFile("index.html");

Other tips

In order to make your life easier managing the data directory with both Angular files and other files, see How to link Angular project dist directory to PlatformIO SPIFFS data directory

You can use purgecss but compression works so well that it isn’t really worth both the risk of accidentally removing some CSS rules which you manually need to whitelist. Before discovering how well compression worked, I started to manually remove CSS rules from the PrimeNG theme file. This worked fine, but the SPIFFS still wasn’t small enough.

Often you can save space by deleting.

For example, primeicons.svg and primeicons.ttf are two different formats with the same content. Note that some (especially older, and some mobile) browsers don’t support all formats, hence it’s rather risky to remove them if you need to support multiple platforms.

Posted by Uli Köhler in Angular, ESP8266/ESP32, PlatformIO

How to fix SPIFFS_write error(-10001): File system is full.

Are you using Angular and seeing this error message? See How to make Angular work with ESP32 SPIFFS / ESPAsyncWebserver

The error message

SPIFFS_write error(-10001): File system is full.

should be mostly self-explanatory:

The files you are trying to put into the image exceed the maximum size of the filesystem image.

There are two possible solutions:

  • Decrease the size of the files, either by minifying files where this is possible, or removing some files altogether.
  • Increase the allowable size of the filesystem image e.g. by using a ESP32 module with more flash (e.g. 8MB instead of 4MB), and/or using a partition table with a larger file partition.
Posted by Uli Köhler in ESP8266/ESP32, PlatformIO

How to remove hash from Angular “ng build” filenames

Angular generates filenames like Inter-Light.27083fa6375bb9ef.woff2 in the dist folder when building for production using ng build.

These hashes have the purpose of preventing the files from being cached, so if you remove the hash, you will need to find some other way of preventing caching

You can disable the hashes by using

--output-hashing none

as an argument to ng build.

Full ng build example:

ng build --aot --build-optimizer --optimization --progress --output-hashing none


Posted by Uli Köhler in Angular

How to fix SPIFFS_write error(-10010): unknown

Problem:

When trying to build a SPIFFS image, you see an error message like

SPIFFS_write error(-10010): unknown
error adding file!
Error for adding content from www!
/www/Inter-Light.27083fa6375bb9ef.woff2

Solution:

SPIFFS_write error(-10010): unknown means that the filename is too long. SPIFFS only supports filenames with a maximum of 32 characters.

In our example, Inter-Light.27083fa6375bb9ef.woff2 is 32 characters long.

Hence, the solution is to shorten the filename of every file with a filename (including extension) of 32+ characters.

Posted by Uli Köhler in Embedded, ESP8266/ESP32, PlatformIO

How to check if value exists in ArduinoJSON

Option 1: Use containsKey()

if(doc.containsKey("speed")) {
    float value = doc["speed"];
} else {
    // Speed does not exist
}

Option 2: Use default values

// If doc["speed"] does not exist, speed will be NaN
float speed = doc["speed"] | nanf(nullptr);
if(speed != nanf(nullptr)) {
   // TODO do something with speed
}


Posted by Uli Köhler in Arduino, Embedded

How to use optional type in Angular / TypeScript

If you have a variable called ws of type WebSocket, you can not assign null or undefined to that variable

In order to make a variable that is either of the given type or undefined, use the following syntax:

ws?: WebSocket = undefined;


Posted by Uli Köhler in Angular, Javascript

How to fix ESPAsyncWebserver undefined reference to `SHA1Init’

Problem:

When using ESPAsyncWebserver with websockets, you see the following error messages while linking:

Linking .pio/build/esp32dev/firmware.elf
/home/uli/.platformio/packages/[email protected]+2021r2-patch3/bin/../lib/gcc/xtensa-esp32-elf/8.4.0/../../../../xtensa-esp32-elf/bin/ld: .pio/build/esp32dev/lib67a/libESP Async WebServer.a(AsyncWebSocket.cpp.o):(.literal._ZN22AsyncWebSocketResponseC2ERK6StringP14AsyncWebSocket+0x10): undefined reference to `SHA1Init'
/home/uli/.platformio/packages/[email protected]+2021r2-patch3/bin/../lib/gcc/xtensa-esp32-elf/8.4.0/../../../../xtensa-esp32-elf/bin/ld: .pio/build/esp32dev/lib67a/libESP Async WebServer.a(AsyncWebSocket.cpp.o):(.literal._ZN22AsyncWebSocketResponseC2ERK6StringP14AsyncWebSocket+0x18): undefined reference to `SHA1Update'
/home/uli/.platformio/packages/[email protected]+2021r2-patch3/bin/../lib/gcc/xtensa-esp32-elf/8.4.0/../../../../xtensa-esp32-elf/bin/ld: .pio/build/esp32dev/lib67a/libESP Async WebServer.a(AsyncWebSocket.cpp.o):(.literal._ZN22AsyncWebSocketResponseC2ERK6StringP14AsyncWebSocket+0x1c): undefined reference to `SHA1Final'
/home/uli/.platformio/packages/[email protected]+2021r2-patch3/bin/../lib/gcc/xtensa-esp32-elf/8.4.0/../../../../xtensa-esp32-elf/bin/ld: .pio/build/esp32dev/lib67a/libESP Async WebServer.a(AsyncWebSocket.cpp.o): in function `AsyncWebSocketResponse::AsyncWebSocketResponse(String const&, AsyncWebSocket*)':
/home/uli/dev/My-Firmware/.pio/libdeps/esp32dev/ESP Async WebServer/src/AsyncWebSocket.cpp:1269: undefined reference to `SHA1Init'
/home/uli/.platformio/packages/[email protected]+2021r2-patch3/bin/../lib/gcc/xtensa-esp32-elf/8.4.0/../../../../xtensa-esp32-elf/bin/ld: /home/uli/dev/My-Firmware/.pio/libdeps/esp32dev/ESP Async WebServer/src/AsyncWebSocket.cpp:1270: undefined reference to `SHA1Update'
/home/uli/.platformio/packages/[email protected]+2021r2-patch3/bin/../lib/gcc/xtensa-esp32-elf/8.4.0/../../../../xtensa-esp32-elf/bin/ld: /home/uli/dev/My-Firmware/.pio/libdeps/esp32dev/ESP Async WebServer/src/AsyncWebSocket.cpp:1271: undefined reference to `SHA1Final'
/home/uli/.platformio/packages/[email protected]+2021r2-patch3/bin/../lib/gcc/xtensa-esp32-elf/8.4.0/../../../../xtensa-esp32-elf/bin/ld: .pio/build/esp32dev/lib67a/libESP Async WebServer.a(WebAuthentication.cpp.o):(.literal._ZL6getMD5PhtPc+0x4): undefined reference to `mbedtls_md5_starts'
/home/uli/.platformio/packages/[email protected]+2021r2-patch3/bin/../lib/gcc/xtensa-esp32-elf/8.4.0/../../../../xtensa-esp32-elf/bin/ld: .pio/build/esp32dev/lib67a/libESP Async WebServer.a(WebAuthentication.cpp.o): in function `getMD5(unsigned char*, unsigned short, char*)':
/home/uli/dev/My-Firmware/.pio/libdeps/esp32dev/ESP Async WebServer/src/WebAuthentication.cpp:73: undefined reference to `mbedtls_md5_starts'

Solution:

This is a bug in the ESPAsyncWebserver official library, which is not regularly maintained. But you can use use the esphome fork of ESPAsyncWebserver and their fork of AsyncTCP instead.

In platformio.ini, instead of

lib_deps =
    ESP Async [email protected]

use the esphome fork and AsyncTCP:

lib_deps =
    esphome/AsyncTCP-esphome@^1.2.2
    esphome/ESPAsyncWebServer-esphome@^2.1.0

After that, try to build / upload, the linking errors should be gone.

Full platformio.ini example

[env:esp32dev]
platform = espressif32
platform_packages = framework-arduinoespressif32 @ https://github.com/espressif/arduino-esp32.git#2.0.3
board = esp32dev
framework = arduino
lib_deps =
    esphome/AsyncTCP-esphome@^1.2.2
    esphome/ESPAsyncWebServer-esphome@^2.1.0
    [email protected]
upload_speed = 460800
monitor_speed = 115200


Posted by Uli Köhler in Embedded, ESP8266/ESP32, PlatformIO

How to compute Ethernet CRC32 on ESP32 (0x04C11DB7)

The ESP32 ROM provides functionality for calculating CRC8, CRC16 & CRC32 checksums, but that functionality is poorly documented.

By educated trial and error and comparing with Arduino_CRC32 (which implements the Ethernet CRC32 algorithm with polynomial 0x04C11DB7 based on the pyCRC library) I found out how to compute the CRC32 checksum using the Ethernet polynomial.

First, include crc.h:

#include <esp32/rom/crc.h>

Now given a buffer with length length, use this code:

uint32_t romCRC = (~crc32_le((uint32_t)~(0xffffffff), (const uint8_t*)buffer, length))^0xffffffff;

Complete example code

This PlatformIO/Arduino code compares the result of the ESP32 ROM CRC32 functiolity by printing out both results on the serial port.

#include <Arduino.h>
#include <esp32/rom/crc.h>
#include <Arduino_CRC32.h>

void setup() {
    Serial.begin(115200);
}

void loop() {
    const char* data = "ABCDEFGHIJ";
  
    // Compute using ESP32 ROM CRC library
    uint32_t romCRC = (~crc32_le((uint32_t)~(0xffffffff), (const uint8_t*)data, 8))^0xffffffFF;

    // Compute using Arduino_CRC32 library (based on pyCRC)
    Arduino_CRC32 crc32;
    uint32_t libCRC = crc32.calc((uint8_t const *)data, 8);

    // Print out btoh v
    char crcBytes[4];
    memcpy(crcBytes, &romCRC, sizeof(uint32_t));
    Serial.printf("ROM CRC: %02X %02X %02X %02X\n", crcBytes[0], crcBytes[1], crcBytes[2], crcBytes[3]);

    memcpy(crcBytes, &libCRC, sizeof(uint32_t));
    Serial.printf("Lib CRC: %02X %02X %02X %02X\n", crcBytes[0], crcBytes[1], crcBytes[2], crcBytes[3]);
    Serial.println("\n");
    delay(500);
}
[env:esp32dev]
platform = espressif32
platform_packages = framework-arduinoespressif32 @ https://github.com/espressif/arduino-esp32.git#2.0.3
board = esp32dev
framework = arduino
monitor_speed = 115200
lib_deps =
    arduino-libraries/Arduino_CRC32@^1.0.0

Example output:

ROM CRC: 1C B6 DC 68
Lib CRC: 1C B6 DC 68


Posted by Uli Köhler in Arduino, ESP8266/ESP32

How to turn DL3021 off via SCPI/LXI

In order to turn off the DL3021 electronic load (as in: disable any constant current/resistance/voltage/power function) via LXI, run the following command:

:SOURCE:INPUT:STATE Off

PyVISA example

For more info, see PyVISA Rigol DL3021 via LXI (TCP SCPI) example

#!/usr/bin/env python3

rm = pyvisa.ResourceManager()
inst = rm.open_resource("TCPIP0::192.168.178.112::INSTR")
# Query if instrument is present
# Prints e.g. "RIGOL TECHNOLOGIES,DL3021,DL3A204800938,00.01.05.00.01"
print(inst.query("*IDN?"))

# Turn electronic load off
inst.write(":SOURCE:INPUT:STATE Off")


Posted by Uli Köhler in Analog, Electronics, Networking, Python

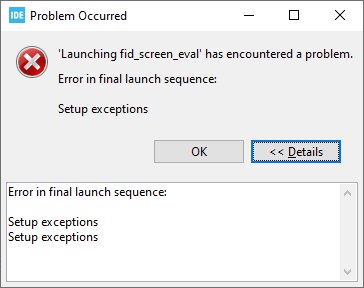
How to fix STM32CubeIDE: Error in final lauch sequence – Setup exceptions (debugger)

Problem:

While trying to start the STM32CubeIDE debugger, you see the following error message just after clicking Continue :

Error in final launch sequence

Setup exceptions
Setup exceptions

Solution:

This error occurs because you clicked Continue too early. The flashing process was still underway when you clicked Continue. Therefore, the solution is to wait until the stack trace shows main() and only then click Continue.

Posted by Uli Köhler in STM32
This website uses cookies to improve your experience. We'll assume you're ok with this, but you can opt-out if you wish. Cookie settingsACCEPTPrivacy &amp; Cookies Policy