How to connect to OpenStage 40 using SSH

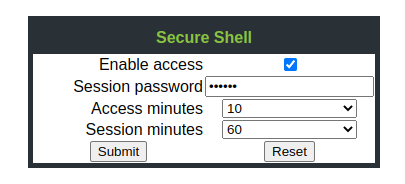
First, enable SSH access on the webinterface:

Admin pages -> Maintenance -> Secure Shell

Enter a random password, choose other settings as shown.

Click submit. At this stage, choosing to ssh [email protected] would lead to the following error message:

Unable to negotiate with 192.168.178.243 port 22: no matching key exchange method found. Their offer: diffie-hellman-group1-sha1,diffie-hellman-group14-sha1,[email protected]

Therefore we have to use the following command:

ssh -oKexAlgorithms=+diffie-hellman-group1-sha1 [email protected]


Posted by Uli Köhler in Networking

How to fix OpenStage 40 ERR_SSL_VERSION_OR_CIPHER_MISMATCH

Problem:

When trying to access your OpenStage 40 IP phone using Chrome or Firefox, you see the following error message:

ERR_SSL_VERSION_OR_CIPHER_MISMATCH

Solution:

This is because your OpenStage firmware currently does not support a recent TLS version.

You can easily resolve this by using an old browser that does not block old TLS versions.

Just download Firefox 50.0.2 portable from (Linux version) https://releases.mozilla.org/pub/firefox/releases/50.0.2/linux-x86_64/en-US/ , download the .tar.bz2 from the link, untar it using tar xjvf *.tar.bz2cd firefox and run it portably with autoupdate disabled using

mkdir -p profile && ./firefox -profile $PWD/profile
Posted by Uli Köhler in Linux, Networking

Python Cloudflare DNS A record create or update example

This is based on our previous post Python Cloudflare DNS A record update example but also creates the record if it doesn’t exist.

#!/usr/bin/env python3
import CloudFlare
import argparse
import sys

if __name__ == "__main__":
    parser = argparse.ArgumentParser()
    parser.add_argument("-e", "--email", required=True, help="The Cloudflare login email to use")
    parser.add_argument("-n", "--hostname", required=True, help="The hostname to update, e.g. mydyndns.mydomain.com")
    parser.add_argument("-k", "--api-key", required=True, help="The Cloudflare global API key to use. NOTE: Domain-specific API tokens will NOT work!")
    parser.add_argument("-i", "--ip-address", required=True, help="Which IP address to update the record to")
    parser.add_argument("-t", "--ttl", default=60, type=int, help="The TTL of the records in seconds (or 1 for auto)")
    args = parser.parse_args()

    # Initialize Cloudflare API client
    cf = CloudFlare.CloudFlare(
        email=args.email,
        token=args.api_key
    )
    # Get zone ID (for the domain). This is why we need the API key and the domain API token won't be sufficient
    zone = ".".join(args.hostname.split(".")[-2:]) # domain = test.mydomain.com => zone = mydomain.com
    zones = cf.zones.get(params={"name": zone})
    if len(zones) == 0:
        print(f"Could not find CloudFlare zone {zone}, please check domain {args.hostname}")
        sys.exit(2)
    zone_id = zones[0]["id"]

    # Fetch existing A record
    a_records = cf.zones.dns_records.get(zone_id, params={"name": args.hostname, "type": "A"})
    if len(a_records): # Have an existing record
        print("Found existing record, updating...")
        a_record = a_records[0]
        # Update record & save to cloudflare
        a_record["content"] = args.ip_address
        cf.zones.dns_records.put(zone_id, a_record["id"], data=a_record)
    else: # No existing record. Create !
        print("Record doesn't existing, creating new record...")
        a_record = {}
        a_record["type"] = "A"
        a_record["name"] = args.hostname
        a_record["ttl"] = args.ttl # 1 == auto
        a_record["content"] = args.ip_address
        cf.zones.dns_records.post(zone_id, data=a_record)

Usage example:

./update-dns.py --api-key ... --email [email protected] --ttl 300 --ip 1.2.3.4 --hostname mysubdomain.domain.com


Posted by Uli Köhler in Networking, Python

How to create systemd service timer that runs Nextcloud cron.php in 10 seconds

This post shows you a really quick method to create a systemd timer that runs cron.php on dockerized nextcloud (using docker-compose). We created a script that automatically creates a systemd timer and related service to run cron.php hourly using the command from our previous post How to run Nextcloud cron in a docker-compose based setup:


In order to run our autoinstall script, run:

wget -qO- https://techoverflow.net/scripts/install-nextcloud-cron.sh | sudo bash /dev/stdin

from the directory where docker-compose.yml is located. Note that the script will use the directory name as a name for the service and timer that is created. For example, running the script in /var/lib/nextcloud-mydomain will cause nextcloud-mydomain-cron to be used a service name.

Example output from the script:

Creating systemd service... /etc/systemd/system/nextcloud-mydomain-cron.service
Creating systemd timer... /etc/systemd/system/nextcloud-mydomain-cron.timer
Enabling & starting nextcloud-mydomain-cron.timer
Created symlink /etc/systemd/system/timers.target.wants/nextcloud-mydomain-cron.timer → /etc/systemd/system/nextcloud-mydomain-cron.timer.

The script will create /etc/systemd/systemd/nextcloud-mydomain-cron.service containing the specification on what exactly to run:

[Unit]
Description=nextcloud-mydomain-cron

[Service]
Type=oneshot
ExecStart=/usr/bin/docker-compose exec -T -u www-data nextcloud php cron.php
WorkingDirectory=/var/opt/nextcloud-mydomain

and /etc/systemd/systemd/nextcloud-mydomain-cron.timer containing the logic when the .service is started:

[Unit]
Description=nextcloud-mydomain-cron

[Timer]
OnCalendar=hourly
Persistent=true

[Install]
WantedBy=timers.target

and will automatically start and enable the timer. This means: no further steps are needed after running this script!

In order to show the current status of the service, use e.g.

sudo systemctl status nextcloud-mydomain-cron.timer

Example output:

● nextcloud-mydomain-cron.timer - nextcloud-mydomain-cron
     Loaded: loaded (/etc/systemd/system/nextcloud-mydomain-cron.timer; enabled; vendor preset: disabled)
     Active: active (waiting) since Fri 2022-04-01 00:33:48 UTC; 6min ago
    Trigger: Fri 2022-04-01 01:00:00 UTC; 19min left
   Triggers: ● nextcloud-mydomain-cron.service

Apr 01 00:33:48 CoreOS systemd[1]: Started nextcloud-mydomain-cron.

In the

Trigger: Fri 2020-12-11 00:00:00 CET; 20h left

line you can see when the service will be run next. By default, the script generates tasks that run OnCalendar=daily, which means the service will be run on 00:00:00 every day. Checkout the systemd.time manpage for further information on the syntax you can use to specify other timeframes.

In order to run the backup immediately (it will still run daily after doing this), do

sudo systemctl start nextcloud-mydomain-cron.service

(note that you need to run systemctl start on the .service! Running systemctl start on the .timer will only enable the timer and not run the service immediately).

In order to view the logs, use

sudo journalctl -xfu nextcloud-mydomain-cron.service

(just like above, you need to run journalctl -xfu on the .service, not on the .timer).

In order to disable automatic backups, use e.g.

sudo systemctl disable nextcloud-mydomain-cron.timer

Source code:

#!/bin/bash
# Create a systemd service & timer that runs cron.php on dockerized nextcloud
# by Uli Köhler - https://techoverflow.net
# Licensed as CC0 1.0 Universal
export SERVICENAME=$(basename $(pwd))-cron

export SERVICEFILE=/etc/systemd/system/${SERVICENAME}.service
export TIMERFILE=/etc/systemd/system/${SERVICENAME}.timer

echo "Creating systemd service... $SERVICEFILE"
sudo cat >$SERVICEFILE <<EOF
[Unit]
Description=$SERVICENAME

[Service]
Type=oneshot
ExecStart=$(which docker-compose) exec -T -u www-data nextcloud php cron.php
WorkingDirectory=$(pwd)
EOF

echo "Creating systemd timer... $TIMERFILE"
sudo cat >$TIMERFILE <<EOF
[Unit]
Description=$SERVICENAME

[Timer]
OnCalendar=hourly
Persistent=true

[Install]
WantedBy=timers.target
EOF

echo "Enabling & starting $SERVICENAME.timer"
sudo systemctl enable $SERVICENAME.timer
sudo systemctl start $SERVICENAME.timer
 

Posted by Uli Köhler in Docker, Linux, Nextcloud

Matplotlib: How to format temperature in degrees Celsius (°C)

Based on our previous post on Matplotlib custom SI-prefix unit tick formatters, this is a simple snippet which you can use to format the Y axis of your matplotlib plots:

import matplotlib.ticker as mtick
from matplotlib import pyplot as plt

def format_celsius(value, pos=None):
    return f'{value:.1f} °C'

plt.gca().yaxis.set_major_formatter(mtick.FuncFormatter(format_celsius))

Posted by Uli Köhler in Python

How to run Nextcloud cron in a docker-compose based setup

Run this command in the directory where docker-compose.yml is located in order to run the Nextcloud cron job:

docker-compose exec -u www-data nextcloud php cron.php


Posted by Uli Köhler in Docker

How to S3 concepts relate to standard filesystem concepts: Access keys, objects, …

The following mapping is often useful

  • Objects are essentially files
  • Object keys are filenames
  • An Access Key is essentially a username used for access to the S3 storage
  • A Secret Key is essentially a password for a given access key = username
  • Prefixes are folders
  • region is conceptually a fileserver although in practice it consists of multiple servers linked together
Posted by Uli Köhler in S3

How to sort files on S3 by timestamp in filename using boto3 & Python

Let’s assume we have backup objects in an S3 directory like:

production-backup-2022-03-29_14-40-16.xz
production-backup-2022-03-29_14-50-16.xz
production-backup-2022-03-29_15-00-03.xz
production-backup-2022-03-29_15-10-04.xz
production-backup-2022-03-29_15-20-06.xz
production-backup-2022-03-29_15-30-06.xz
production-backup-2022-03-29_15-40-00.xz
production-backup-2022-03-29_15-50-07.xz
production-backup-2022-03-29_16-00-06.xz
production-backup-2022-03-29_16-10-12.xz
production-backup-2022-03-29_16-20-18.xz
production-backup-2022-03-29_16-30-18.xz
production-backup-2022-03-29_16-40-00.xz
production-backup-2022-03-29_16-50-09.xz
production-backup-2022-03-29_17-00-18.xz
production-backup-2022-03-29_17-10-13.xz
production-backup-2022-03-29_17-20-18.xz
production-backup-2022-03-29_17-30-18.xz
production-backup-2022-03-29_17-40-06.xz
production-backup-2022-03-29_17-50-21.xz
production-backup-2022-03-29_18-00-06.xz

And we want to identify the newest one. Often in these situations, you can’t really rely on modification timestamps as these can change when syncing old files or when changing folder structures or names.

Hence the best way is to rely on the timestamp from the filename as a reference point. The date timestamp we’re using here is based on our post How to generate filename containing date & time on the command line ; if you’re using a different object key format, you might need to adjust the date_regex accordingly.

The following example script iterates all objects within a specific S3 folder, sorting them by the timestamp from the filename and choses the latest one, downloading it from S3 to the local filesystem.

This script is based on a few of our previous posts, including:

#!/usr/bin/env python3
import boto3
import re
import os.path
from collections import namedtuple
from datetime import datetime

# Create connection to Wasabi / S3
s3 = boto3.resource('s3',
    endpoint_url = 'https://minio.mydomain.com',
    aws_access_key_id = 'my-access-key',
    aws_secret_access_key = 'my-password'
)

# Get bucket object
backups = s3.Bucket('mfwh-backup')

date_regex = re.compile(r"(?P<year>\d{4})-(?P<month>\d{2})-(?P<day>\d{2})_(?P<hour>\d{2})-(?P<minute>\d{2})-(?P<second>\d{2})")

DatedObject =  namedtuple("DatedObject", ["Date", "Object"])
entries = []
# Iterate over objects in bucket
for obj in backups.objects.filter(Prefix="production/"):
    date_match = date_regex.search(obj.key)
    # Ignore other files (without date stamp) if any
    if date_match is None:
        continue
    dt = datetime(year=int(date_match.group("year")), month=int(date_match.group("month")),
        day=int(date_match.group("day")), hour=int(date_match.group("hour")), minute=int(date_match.group("minute")),
        second=int(date_match.group("second")))
    entries.append(DatedObject(dt, obj))
# Sort entries by date
entries.sort(key=lambda entry: entry.Date)

newest_date, newest_obj = entries[-1]
#print(f"Downloading {newest_obj.key} from {newest_date.isoformat()}")
filename = os.path.basename(newest_obj.key)

with open(filename, "wb") as outfile:
    backups.download_fileobj(newest_obj.key, outfile)

# Print filename for automation purposes
print(filename)
Posted by Uli Köhler in S3

How to reboot Netcup vServer using Python & SCP WSDL API

#!/usr/bin/env python3
from zeep import Client
import argparse

if __name__ == "__main__":
    parser = argparse.ArgumentParser()
    parser.add_argument("-u", "--user", required=True, help="The Netcup SCP username. This is typically an integer like 92752")
    parser.add_argument("-p", "--password", required=True, help="The Netcup SCP webservice password. This is NOT the SCP login password")
    parser.add_argument("-v", "--vserver", required=True, help="The name of the vServer, like v2201261246567246578")
    args = parser.parse_args()

    client = Client('https://www.servercontrolpanel.de/WSEndUser?wsdl')

    print(client.service.vServerReset(args.user, args.password, args.vserver))

Call like this:

./restart-netcup-vserver.py --user 92752 --password su4ahK8ocu --vserver v2201261246567246578


Posted by Uli Köhler in Python

Python Cloudflare DNS A record update example

This script updates a DNS A record (IPv4 address) using the Cloudflare Python API. It expects the A record to be present already.

Also see Python Cloudflare DNS A record create or update example for a variant of this script which creates the record if it doesn’t exist already.

#!/usr/bin/env python3
import CloudFlare
import argparse
import sys

if __name__ == "__main__":
    parser = argparse.ArgumentParser()
    parser.add_argument("-e", "--email", required=True, help="The Cloudflare login email to use")
    parser.add_argument("-n", "--hostname", required=True, help="The hostname to update, e.g. mydyndns.mydomain.com")
    parser.add_argument("-k", "--api-key", required=True, help="The Cloudflare global API key to use. NOTE: Domain-specific API tokens will NOT work!")
    parser.add_argument("-i", "--ip-address", required=True, help="Which IP address to update the record to")
    parser.add_argument("-t", "--ttl", default=60, type=int, help="The TTL of the records in seconds (or 1 for auto)")
    args = parser.parse_args()

    # Initialize Cloudflare API client
    cf = CloudFlare.CloudFlare(
        email=args.email,
        token=args.api_key
    )
    # Get zone ID (for the domain). This is why we need the API key and the domain API token won't be sufficient
    zone = ".".join(args.hostname.split(".")[-2:]) # domain = test.mydomain.com => zone = mydomain.com
    zones = cf.zones.get(params={"name": zone})
    if len(zones) == 0:
        print(f"Could not find CloudFlare zone {zone}, please check domain {args.hostname}")
        sys.exit(2)
    zone_id = zones[0]["id"]

    # Fetch existing A record
    a_record = cf.zones.dns_records.get(zone_id, params={"name": args.hostname, "type": "A"})[0]

    # Update record & save to cloudflare
    a_record["ttl"] = args.ttl # 1 == auto
    a_record["content"] = args.ip_address
    cf.zones.dns_records.put(zone_id, a_record["id"], data=a_record)

Usage example:

./update-dns.py --api-key ... --email [email protected] --ttl 300 --ip 1.2.3.4 --hostname mysubdomain.domain.com


Posted by Uli Köhler in Networking, Python

How iterate all documents in MongoDB collection using pymongo

This example will connect to the MongoDB running at localhost (on the default port 27017) without any username or password and open the database named mydb (also see Python MongoDB minimal connect example using pymongo), open the collection mycollectionand iterate all the documents in said collection, printing each document.

from pymongo import MongoClient
client = MongoClient("mongodb://localhost")
db = client["mydb"]
mycollection = db["mycollection"]

for doc in mycollection.find():
    print(doc)

This will print, for example,

{'_id': 123, 'name': 'John', 'phone': '+123456789'}


Posted by Uli Köhler in Databases, MongoDB

How to list MongoDB collection names in Python using pymongo

This example will connect to the MongoDB running at localhost (on the default port 27017) without any username or password and open the database named mydb (also see Python MongoDB minimal connect example using pymongo) and list all the collection names in mydb:

from pymongo import MongoClient
client = MongoClient("mongodb://localhost")
db = client["mydb"]

print(db.list_collection_names())

This will print, for example,

['people', 'salaries']


Posted by Uli Köhler in Databases, MongoDB

Python MongoDB minimal connect example using pymongo

This example will connect to the MongoDB running at localhost (on the default port 27017) without any username or password and open the database named mydb

from pymongo import MongoClient
client = MongoClient("mongodb://localhost")
db = client["mydb"]


Posted by Uli Köhler in Databases, MongoDB

A working Traefik & docker-compose minio setup with console

Note: I have not updated this config to use the xl or xl-single storage backends, hence the version is locked at RELEASE.2022-10-24T18-35-07Z

The following config works by using two domains: minio.mydomain.com and console.minio.mydomain.com.

For the basic Traefik setup this is based on, see Simple Traefik docker-compose setup with Lets Encrypt Cloudflare DNS-01 & TLS-ALPN-01 & HTTP-01 challenges. Regarding this setup, the important part is to enabled the docker autodiscovery and defining the certificate resolve (we’re using the ALPN resolver).

Be sure to choose a random MINIO_ROOT_PASSWORD!

version: '3.5'
services:
   minio:
       image: quay.io/minio/minio:RELEASE.2022-10-24T18-35-07Z
       command: server --console-address ":9001" /data
       volumes:
          - ./data:/data
          - ./config:/root/.minio
       environment:
          - MINIO_ROOT_USER=minioadmin
          - MINIO_ROOT_PASSWORD=uikui5choRith0ZieV2zohN5aish5r
          - MINIO_DOMAIN=minio.mydomain.com
          - MINIO_SERVER_URL=https://minio.mydomain.com
          - MINIO_BROWSER_REDIRECT_URL=https://console.minio.mydomain.com
       labels:
          - "traefik.enable=true"
          # Console
          - "traefik.http.routers.minio-console.rule=Host(`console.minio.mydomain.com`)"
          - "traefik.http.routers.minio-console.entrypoints=websecure"
          - "traefik.http.routers.minio-console.tls.certresolver=alpn"
          - "traefik.http.routers.minio-console.service=minio-console"
          - "traefik.http.services.minio-console.loadbalancer.server.port=9001"
          # APi
          - "traefik.http.routers.minio.rule=Host(`minio.mydomain.com`)"
          - "traefik.http.routers.minio.entrypoints=websecure"
          - "traefik.http.routers.minio.tls.certresolver=alpn"
          - "traefik.http.routers.minio.service=minio"
          - "traefik.http.services.minio.loadbalancer.server.port=9000"


Posted by Uli Köhler in Container, Docker, S3, Traefik

How to view MinIO request logs for debugging

Use the minio client mc like this:

mc admin trace myminio

where myminio is an alias (URL + access key + secret key) which you can setup using mc alias ....

This will show output like

2022-03-27T18:22:22:000 [403 Forbidden] s3.GetObject minio.mydomain.com/api/v1/login 95.114.116.235    5.488ms      ↑ 273 B ↓ 634 B
2022-03-27T18:22:23:000 [403 Forbidden] s3.ListObjectsV1 minio.mydomain.com/login 95.114.116.235    3.677ms      ↑ 320 B ↓ 584 B
2022-03-27T18:24:19:000 [200 OK] s3.GetBucketLocation minio.mydomain.com/mybucket/?location=  192.168.192.2     6.089ms      ↑ 211 B ↓ 444 B
2022-03-27T18:24:19:000 [200 OK] s3.GetBucketLocation minio.mydomain.com/mybucket/?location=  192.168.192.2     256µs       ↑ 211 B ↓ 444 B
2022-03-27T18:24:19:000 [200 OK] s3.GetBucketLocation minio.mydomain.com/mybucket/?location=  192.168.192.2     251µs       ↑ 211 B ↓ 444 B
2022-03-27T18:24:19:000 [200 OK] s3.GetBucketVersioning minio.mydomain.com/mybucket/?versioning=  192.168.192.2     407µs       ↑ 211 B ↓ 414 B
2022-03-27T18:24:19:000 [404 Not Found] s3.GetBucketObjectLockConfig minio.mydomain.com/mybucket/?object-lock=  192.168.192.2     519µs       ↑ 211 B ↓ 663 B
2022-03-27T18:24:19:000 [200 OK] s3.GetBucketLocation minio.mydomain.com/mybucket/?location=  192.168.192.2     269µs       ↑ 211 B ↓ 444 B
2022-03-27T18:24:19:000 [404 Not Found] s3.GetBucketPolicy minio.mydomain.com/mybucket/?policy=  192.168.192.2     223µs       ↑ 211 B ↓ 621 B
2022-03-27T18:24:19:000 [404 Not Found] s3.GetBucketTagging minio.mydomain.com/mybucket/?tagging=  192.168.192.2     284µs       ↑ 211 B ↓ 608 B
2022-03-27T18:24:19:000 [200 OK] s3.ListObjectsV2 minio.mydomain.com/mybucket/?delimiter=%2F&encoding-type=url&fetch-owner=true&list-type=2&prefix=  192.168.192.2     516.96ms     ↑ 211 B ↓ 1.7 KiB
2022-03-27T18:24:20:000 [200 OK] s3.GetBucketLocation minio.mydomain.com/mybucket/?location=  192.168.192.2     270µs       ↑ 211 B ↓ 444 B
2022-03-27T18:24:20:000 [200 OK] s3.ListObjectsV2 minio.mydomain.com/mybucket/?delimiter=%2F&encoding-type=url&fetch-owner=true&list-type=2&prefix=  192.168.192.2     45.061ms

If you want even more verbose output, use

mc admin trace -v myminio

This will log the entire HTTP request:

minio.mydomain.com [REQUEST s3.GetBucketLocation] [2022-03-27T18:25:20:000] [Client IP: 192.168.192.2]
minio.mydomain.com GET /mybucket/?location=
minio.mydomain.com Proto: HTTP/1.1
minio.mydomain.com Host: minio.mydomain.com
minio.mydomain.com X-Forwarded-Host: minio.mydomain.com
minio.mydomain.com X-Amz-Content-Sha256: UNSIGNED-PAYLOAD
minio.mydomain.com X-Amz-Date: 20220327T162520Z
minio.mydomain.com X-Forwarded-Port: 443
minio.mydomain.com X-Forwarded-Proto: https
minio.mydomain.com X-Forwarded-Server: MyVM
minio.mydomain.com Authorization: AWS4-HMAC-SHA256 Credential=GFAHJAODMI71TXAFCXZW/20220327/us-east-1/s3/aws4_request, SignedHeaders=host;x-amz-content-sha256;x-amz-date;x-amz-security-token, Signature=e1edcc3fb0d2130573f7f6633f9f9130810ee0cebcff3359312084c168f2d428
minio.mydomain.com User-Agent: MinIO (linux; amd64) minio-go/v7.0.23
minio.mydomain.com Content-Length: 0
minio.mydomain.com X-Amz-Security-Token: eyJhbGciOiJIUzUxMiIsInR5cCI6IkpXVCJ9.eyJhY2Nlc3NLZXkiOiJHRkFISkFPRE1JNzFUWEFGQ1haVyIsImV4cCI6MTY0ODQwMTQ0OSwicGFyZW50IjoibWluaW9hZG1pbiJ9.ZiuFcseCRRHOmxFs6j6H6nePV6kt9qBnOJESMCIZ-XiPaQrPm5kMlYHGR2zHOfAxf5EUAX3cN8CFbw9BBAQ-2g
minio.mydomain.com Accept-Encoding: gzip
minio.mydomain.com X-Forwarded-For: 192.168.192.2
minio.mydomain.com X-Real-Ip: 192.168.192.2
minio.mydomain.com 
minio.mydomain.com [RESPONSE] [2022-03-27T18:25:20:000] [ Duration 2.771ms  ↑ 211 B  ↓ 444 B ]
minio.mydomain.com 200 OK
minio.mydomain.com X-Amz-Request-Id: 16E04989FD22A42E
minio.mydomain.com X-Xss-Protection: 1; mode=block
minio.mydomain.com Accept-Ranges: bytes
minio.mydomain.com Content-Length: 128
minio.mydomain.com Content-Security-Policy: block-all-mixed-content
minio.mydomain.com Content-Type: application/xml
minio.mydomain.com Vary: Origin,Accept-Encoding
minio.mydomain.com Server: MinIO
minio.mydomain.com Strict-Transport-Security: max-age=31536000; includeSubDomains
minio.mydomain.com X-Content-Type-Options: nosniff
minio.mydomain.com <?xml version="1.0" encoding="UTF-8"?>
<LocationConstraint xmlns="http://s3.amazonaws.com/doc/2006-03-01/"></LocationConstraint>


Posted by Uli Köhler in S3

How to fix Traefik Could not define the service name for the router: too many services

Problem:

Traefik does not load some of your services and you see an error message like the following one:

traefik_1  | time="2022-03-27T15:22:05Z" level=error msg="Could not define the service name for the router: too many services" routerName=myapp providerName=docker

with a docker label config with multiple routers like this:

labels:
    - "traefik.enable=true"
    - "traefik.http.routers.myapp-console.rule=Host(`console.myapp.mydomain.com`)"
    - "traefik.http.routers.myapp-console.entrypoints=websecure"
    - "traefik.http.routers.myapp-console.tls.certresolver=alpn"
    - "traefik.http.services.myapp-console.loadbalancer.server.port=9001"
    #
    - "traefik.http.routers.myapp.rule=Host(`myapp.mydomain.com`)"
    - "traefik.http.routers.myapp.entrypoints=websecure"
    - "traefik.http.routers.myapp.tls.certresolver=cloudflare-techoverflow"
    - "traefik.http.routers.myapp.tls.domains[0].main=mydomain.com"
    - "traefik.http.routers.myapp.tls.domains[0].sans=*.mydomain.com"
    - "traefik.http.services.myapp.loadbalancer.server.port=9000"

Solution:

The basic issue here is that you have multiple routers defined for a single docker container and Traefik does not know which http.services belongs to which http.routers!

In order to fix this, explicitly tell traefik for each router what service it should use like this:

- "traefik.http.routers.myapp-console.service=myapp-console"

Full example:

labels:
    - "traefik.enable=true"
    - "traefik.http.routers.myapp-console.rule=Host(`console.myapp.mydomain.com`)"
    - "traefik.http.routers.myapp-console.entrypoints=websecure"
    - "traefik.http.routers.myapp-console.tls.certresolver=alpn"
    - "traefik.http.routers.myapp-console.service=myapp-console"
    - "traefik.http.services.myapp-console.loadbalancer.server.port=9001"
    #
    - "traefik.http.routers.myapp.rule=Host(`myapp.mydomain.com`)"
    - "traefik.http.routers.myapp.entrypoints=websecure"
    - "traefik.http.routers.myapp.tls.certresolver=cloudflare-techoverflow"
    - "traefik.http.routers.myapp.tls.domains[0].main=mydomain.com"
    - "traefik.http.routers.myapp.tls.domains[0].sans=*.mydomain.com"
    - "traefik.http.routers.myapp.service=myapp"
    - "traefik.http.services.myapp.loadbalancer.server.port=9000"


Posted by Uli Köhler in Container, Docker, Networking, Traefik

Traefik TOML config for frontend and /api backend

The following Traefik .toml config files work by redirecting /api requests to the backend server running on localhost:61913 while redirecting any request besides /api to the frontend running on localhost:17029. You can simply define the frontend rule as

rule = "Host(`myapp.mydomain.com`)"

and the backend rule as

rule = "Host(`myapp.mydomain.com`) && PathPrefix(`/api`)"

since the longest matching route will win.

See our poist Simple Traefik docker-compose setup with Lets Encrypt Cloudflare DNS-01 & TLS-ALPN-01 & HTTP-01 challenges for our basic Traefik config, which also defines the alpn certificate resolver. With this config, place both the myapp-frontend.toml and myapp-backend.toml in the config directory.

Frontend config

# Host
[http.routers.myapp-frontend]
rule = "Host(`myapp.mydomain.com`)"
service = "myapp-frontend"

# Backend
[http.services]
[http.services.myapp-frontend.loadBalancer]
[[http.services.myapp-frontend.loadBalancer.servers]]
url = "http://127.0.0.1:17029/"

# Certificates
[http.routers.myapp-frontend.tls]
certresolver = "alpn"

Backend Traefik config

# Host
[http.routers.myapp-backend]
rule = "Host(`myapp.mydomain.com`) && PathPrefix(`/api`)"
service = "myapp-backend"

# Backend
[http.services]
[http.services.myapp-backend.loadBalancer]
[[http.services.myapp-backend.loadBalancer.servers]]
url = "http://127.0.0.1:61913/"

# Certificates
[http.routers.myapp-backend.tls]
certresolver = "alpn"


Posted by Uli Köhler in Networking, Traefik

How to run systemd timer every ten minutes

The syntax to run a systemd timer every ten minutes is:

OnCalendar=*-*-* *:00,10,20,30,40,50:00

i.e. run it on the first second (:00) of every 10th minute (00,10,20,30,40,50).

Posted by Uli Köhler in systemd

How to use git current branch in bash scripts

# Branch is, for example, "main"
export branch=$(git branch --show-current)
Posted by Uli Köhler in git, Linux, Version management

Traefik docker container labels for custom port & ALPN certificate

See our previous post Simple Traefik docker-compose setup with Lets Encrypt Cloudflare DNS-01 & TLS-ALPN-01 & HTTP-01 challenges for the general config we’re using to deploy Traefik. This includes the configuration of the alpn certificate resolver.

If you want to automatically connect Traefik to your docker container on a specific port running on the docker container (17029 in this example), use labels like

    labels:
        - "traefik.enable=true"
        - "traefik.http.routers.my-webservice.rule=Host(`subdomain.mydomain.com`)"
        - "traefik.http.routers.my-webservice.entrypoints=websecure"
        - "traefik.http.routers.my-webservice.tls.certresolver=alpn"
        - "traefik.http.services.my-webservice.loadbalancer.server.port=17029"


Posted by Uli Köhler in Traefik
This website uses cookies to improve your experience. We'll assume you're ok with this, but you can opt-out if you wish. Cookie settingsACCEPTPrivacy &amp; Cookies Policy