How to autotune Marlin Hotend/Extruder PID parameters

In order to autotune the extruder E0 hotend in Marlin, use

M303E0C3S210

where:

  • M303: Autotune PID
  • E0 tune extruder E0 (this is the only extruder on single-extruder printers)
  • C5: Perform 5 cycles (one cycle: heat up to the specified temperature, then cool down to room temperature)
  • S210: Tune at a temperature of 210°C

I always recommend to tune at whatever temperature you use most (e.g. if you want to print mostly PLA at 185°C, use S185 instead of S210 in the command). Tuning at the correct temperature will increase the accuracy of the system.

Regarding the number of cycles, C3 = 3 cycles is mostly for quick tuning. Since heating up and cooling down takes a long time, but doing many cycles increases the accuracy of the tuning. Typical values are:

  • C1: Tuning mostly just for testing, for example if you have modified your extruder hardware
  • C3: Really quick tuning
  • C5: “Standard” tuning
  • C8: Thorough tuning
Posted by Uli Köhler in 3D printing, Electronics

Where to enable extruder-temperature controlled fans in Marlin?

In order to enable a fan in Marlin that is controlled automatically based on the extruder temperature (read: If the extruder is hot, turn on the fan), open Configuration_adv.h and look for the Extruder cooling fans section and set for example E0_AUTO_FAN_PIN to whatever pin you want to be automatically controlled.

/**
 * Extruder cooling fans
 *
 * Extruder auto fans automatically turn on when their extruders'
 * temperatures go above EXTRUDER_AUTO_FAN_TEMPERATURE.
 *
 * Your board's pins file specifies the recommended pins. Override those here
 * or set to -1 to disable completely.
 *
 * Multiple extruders can be assigned to the same pin in which case
 * the fan will turn on when any selected extruder is above the threshold.
 */
#define E0_AUTO_FAN_PIN PA_8
#define E1_AUTO_FAN_PIN -1
#define E2_AUTO_FAN_PIN -1
#define E3_AUTO_FAN_PIN -1
#define E4_AUTO_FAN_PIN -1
#define E5_AUTO_FAN_PIN -1
#define E6_AUTO_FAN_PIN -1
#define E7_AUTO_FAN_PIN -1
#define CHAMBER_AUTO_FAN_PIN -1
#define COOLER_AUTO_FAN_PIN -1
#define COOLER_FAN_PIN -1


Posted by Uli Köhler in 3D printing, Electronics

How to turn first fan on in Marlin using G-Code

Use this G-Code to turn the first fan on

M106P0S255

Use this G-Code to turn the first fan off

M106P0S0


Posted by Uli Köhler in 3D printing, Electronics

How to fix Pronterface/Printrun UnicodeDecodeError: ‘utf-8’ codec can’t decode byte … in position …: invalid continuation byte

Problem:

When starting Pronterface / Printrun on Linux using pronterfaceprintrunpython3 pronterface.py or similar, you see an error message like

Traceback (most recent call last):
  File "pronterface.py", line 62, in <module>
    app = PronterApp(False)
  File "/home/uli/dev/tools/Printrun/printrun/pronterface.py", line 2464, in __init__
    self.mainwindow = PronterWindow(self)
  File "/home/uli/dev/tools/Printrun/printrun/pronterface.py", line 170, in __init__
    self.parse_cmdline(sys.argv[1:])
  File "/home/uli/dev/tools/Printrun/printrun/pronsole.py", line 786, in parse_cmdline
    self.process_cmdline_arguments(args)
  File "/home/uli/dev/tools/Printrun/printrun/pronterface.py", line 1031, in process_cmdline_arguments
    pronsole.pronsole.process_cmdline_arguments(self, args)
  File "/home/uli/dev/tools/Printrun/printrun/pronsole.py", line 769, in process_cmdline_arguments
    self.load_default_rc()
  File "/home/uli/dev/tools/Printrun/printrun/pronsole.py", line 664, in load_default_rc
    self.load_rc(config)
  File "/home/uli/dev/tools/Printrun/printrun/pronsole.py", line 632, in load_rc
    for rc_cmd in rc:
  File "/usr/lib/python3.8/codecs.py", line 714, in __next__
    return next(self.reader)
  File "/usr/lib/python3.8/codecs.py", line 645, in __next__
    line = self.readline()
  File "/usr/lib/python3.8/codecs.py", line 558, in readline
    data = self.read(readsize, firstline=True)
  File "/usr/lib/python3.8/codecs.py", line 504, in read
    newchars, decodedbytes = self.decode(data, self.errors)
UnicodeDecodeError: 'utf-8' codec can't decode byte 0xd3 in position 4: invalid continuation byte

Solution

When you see this error message, typically your pronsolerc is corrupted. In order to remove it,

rm -rf ~/.config/Printrun
Posted by Uli Köhler in 3D printing, Python

How to disable Marlin cold extrusion prevention via G-Code

If you want to test your extruder, you can disable cold extrusion prevention using M302:

M302 P1

Re-enable with

M302 P0

Set the temperature (and enable) using

M302 P0 S170

In order to report the current status, run

M302

Example output if disabled:

echo:Cold extrudes are disabled (min temp 170C)

Example output if enabled:

echo:Cold extrudes are enabled (min temp 170C)

Whatever you configure will not persist after reboot. In case you want to save the settings to EEPROM in order to persist after reboot, run

M500
Posted by Uli Köhler in 3D printing, Electronics

How to check SSL/TLS certificate expiry using openssl

Use the following command to check the expiry date of a SSL/TLS certificate. This command also includes SNI (server name indication)

echo | openssl s_client -connect techoverflow.net:443 2>&1 | sed --quiet '/-BEGIN CERTIFICATE-/,/-END CERTIFICATE-/p' | openssl x509 -noout -text | grep --after 2 Validity

Remember to replace both instances of techoverflow.net by the domain name to test!

Example output:

Validity
    Not Before: Aug 18 00:00:00 2021 GMT
    Not After : Aug 17 23:59:59 2022 GMT


Posted by Uli Köhler in Linux, Networking

How to center-align all columns in pandas XLSX export

In our previous post How to center-align column in pandas XLSX export we showed how to center-align one specific column in a XLSX export.

In this post, we’ll show how to center all columns in a pandas DataFrame XLSX export. Note that the variants with and without index shown here differ only in the column index computation. Pandas automatically centers the index column, so we don’t need to do that explicitly.

For export with index

# Center all columns
for column_idx in range(len(df.columns)):
    for cell in sheet[openpyxl.utils.cell.get_column_letter(column_idx + 1)]:
        cell.alignment = Alignment(horizontal="center")

For export without index

# Center all columns
for column_idx in range(len(df.columns)):
    for cell in sheet[openpyxl.utils.cell.get_column_letter(column_idx + 1)]:
        cell.alignment = Alignment(horizontal="center")

Full example:

import pandas as pd
import openpyxl.utils.cell
from openpyxl.styles.alignment import Alignment

df = pd.DataFrame([
    {"a": 1.0},
    {"a": 2.0},
    {"a": 3.0},
    {"a": 4.0},
    {"a": 5.0},
])
with pd.ExcelWriter("out.xlsx", engine="openpyxl") as writer:
    sheet_name = "Bool"
    # Export DataFrame content
    df.to_excel(writer, sheet_name=sheet_name)
    # Align to center
    sheet = writer.sheets[sheet_name]
    # Center all columns
    for column_idx in range(len(df.columns) + 1):
        for cell in sheet[openpyxl.utils.cell.get_column_letter(column_idx + 1)]:
            cell.alignment = Alignment(horizontal="center")

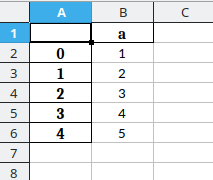
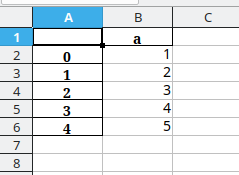
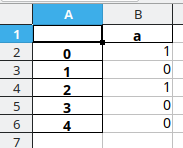
The table will look like this with the centering enabled:

whereas the table is right-aligned with only the title centered by Pandas with the centering code disabled: – Note that the index column is centered automatica

Posted by Uli Köhler in OpenPyXL, pandas, Python

How to center-align column in pandas XLSX export

Note: Want to align all columns in the export? See our followup post How to center-align all columns in pandas XLSX export

When exporting a DataFrame in pandas, often you want to center a column in order to make the resulting table visually more appealing.

In this post we’ll show how to do this using the openpyxl engine.

If you want to center column B, add this code within the pd.ExcelWriter with: block:

for cell in sheet["B"]:
    cell.alignment = Alignment(horizontal="center")

Full example:

import pandas as pd
from openpyxl.styles.alignment import Alignment

df = pd.DataFrame([
    {"a": 1.0},
    {"a": 2.0},
    {"a": 3.0},
    {"a": 4.0},
    {"a": 5.0},
])
with pd.ExcelWriter("out.xlsx", engine="openpyxl") as writer:
    sheet_name = "Bool"
    # Export DataFrame content
    df.to_excel(writer, sheet_name=sheet_name)
    # Align to center
    sheet = writer.sheets[sheet_name]
    # Align every cell in column "B" horizontally
    for cell in sheet["B"]:
        cell.alignment = Alignment(horizontal="center")

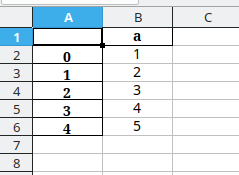
The table will look like this with the centering enabled:

whereas the table is right-aligned with only the title centered by Pandas with the centering code disabled:

Posted by Uli Köhler in OpenPyXL, pandas, Python

How center text horizontally using Alignment in OpenPyXL

Based on our previous OpenPyXL minimal XLSX write example, this code will generate a XLSX with a number in cell A1 that is right-aligned automatically:

from openpyxl import Workbook
wb = Workbook()
sheet = wb["Sheet"] # This sheet is created by default
# Add content to sheet
sheet["A1"] = 4.5
sheet["A1"].alignment = Alignment(horizontal="center")
# Save
wb.save("openpyxl-test.xlsx")

How to add centered alignment

In order to align the cell horizontally, we just need to

from openpyxl.styles.alignment import Alignment

sheet["A1"].alignment = Alignment(horizontal="center")

Full example

from openpyxl import Workbook
from openpyxl.styles.alignment import Alignment
wb = Workbook()
sheet = wb["Sheet"] # This sheet is created by default
# Add content to sheet
sheet["A1"] = 4.5
sheet["A1"].alignment = Alignment(horizontal="center")
# Save
wb.save("openpyxl-test.xlsx")

This will look like this:

Posted by Uli Köhler in OpenPyXL, Python

Pandas XLSX export with background color based on cell value

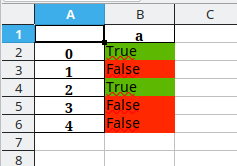
This example script uses openpyxl to set a cell’s background color to red for False cells or to green for True cells. Note that we convert the boolean values to "True"or "False" strings based on the method we outlined in our previous post How to write Pandas bool column as True/False instead of 1/0 to XLSX. For more details on how to just set the background color in OpenPyXL, see our post on How to set cell background color in OpenPyXL.

import pandas as pd
from openpyxl.styles import PatternFill

df = pd.DataFrame([
    {"a": True},
    {"a": False},
    {"a": True},
    {"a": False},
    {"a": False},
])
df["a"] = df["a"].map({True: "True", False: "False"})
with pd.ExcelWriter("out.xlsx", engine="openpyxl") as writer:
    sheet_name = "Bool"
    # Export DataFrame content
    df.to_excel(writer, sheet_name=sheet_name)
    # Set backgrund colors depending on cell values
    sheet = writer.sheets[sheet_name]
    for cell, in sheet[f'B2:B{len(df) + 1}']: # Skip header row, process as many rows as there are DataFrames
        value = df["a"].iloc[cell.row - 2] # value is "True" or "False"
        cell.fill = PatternFill("solid", start_color=("5cb800" if value == "True" else 'ff2800'))

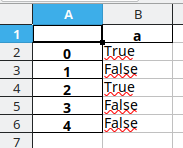
The output from this script looks like this:

Posted by Uli Köhler in OpenPyXL, Python

How to get OpenPyXL column letter by index

If you want to access OpenPyXL columns using indices instead of letters, use

import openpyxl.utils.cell

openpyxl.utils.cell.get_column_letter(idx)

Note that idx is 1-based: index 0 is not a valid argument & index 1 yields column name A 

For example:

openpyxl.utils.cell.get_column_letter(3) # returns "C"


Posted by Uli Köhler in OpenPyXL, Python

How to set cell background color in OpenPyXL

In order to set a cell’s background color in OpenPyXL, use PatternFill with fill_type="solid" and start_color="your_desired_color"  and no end_color. The following example will set a cell’s background to green:

sheet["A1"].fill = PatternFill("solid", start_color="5cb800")

Full example based on our OpenPyXL minimal XLSX write example

from openpyxl import Workbook
wb = Workbook()
sheet = wb["Sheet"] # This sheet is created by default
# Add content to sheet
sheet["A1"] = "This is cell A1"
sheet["A1"].fill = PatternFill("solid", start_color="5cb800")
# Save
wb.save("openpyxl-test.xlsx")

Posted by Uli Köhler in OpenPyXL, Python

OpenPyXL minimal XLSX write example

This serves a minimal example of how to write an XLSX file using OpenPyXL:

from openpyxl import Workbook
wb = Workbook()
sheet = wb["Sheet"] # This sheet is created by default
# Add content to sheet
sheet["A1"] = "This is cell A1"
# Save
wb.save("openpyxl-test.xlsx")

Posted by Uli Köhler in OpenPyXL, Python

How to write Pandas bool column as True/False instead of 1/0 to XLSX

Problem:

When writing a pandas XLSX, bool-type columns are shown are 0 for False or 1 for True.

df = pd.DataFrame([
    {"a": True},
    {"a": False},
    {"a": True},
    {"a": False},
    {"a": False},
])

with pd.ExcelWriter("out.xlsx", engine="xlsxwriter") as writer:
    df.to_excel(writer)

Solution:

Map the column to a string column with your desired value before exporting:

df["a"] = df["a"].map({True: "True", False: "False"})

Full example code:

df = pd.DataFrame([
    {"a": True},
    {"a": False},
    {"a": True},
    {"a": False},
    {"a": False},
])
df["a"] = df["a"].map({True: "True", False: "False"})
with pd.ExcelWriter("out.xlsx", engine="xlsxwriter") as writer:
    df.to_excel(writer)


Posted by Uli Köhler in pandas, Python

How to implement 1MHz interrupt in PlatformIO / Arduino on STM32

In our previous post Minimal STM32 HardwareTimer PlatformIO / Arduino timer interrupt blink example we showed how to use HardwareTimer to blink the onboard LED of our STM32F407 board using a timer interrupt.

In this post, we’ll provide an example of how to use HardwareTimer and have a really fast interrupt which runs at 1 MHz – in other words: one million times per second.

#include <Arduino.h>

HardwareTimer timer(TIM1);
bool ledOn = false;

void OnTimer1Interrupt() {
    ledOn = !ledOn;
    digitalWrite(PC13, ledOn ? HIGH : LOW);
}

void setup() {
    pinMode(PC13, OUTPUT);
    // Configure timer
    timer.setPrescaleFactor(21); // Set prescaler to 21 => timer frequency = 168/21 = 8 MHz (from prediv'd by 1 clocksource of 168 MHz)
    timer.setOverflow(8); // Set ARR to 8 => timer frequency = 1 MHz
    timer.attachInterrupt(OnTimer1Interrupt);
    timer.refresh(); // Make register changes take effect
    timer.resume(); // Start timre
}

void loop() {
}

Note that when running such a quick interrupt, you can’t do all too much within the interrupt before the next time the interrupt will run.

Posted by Uli Köhler in C/C++, PlatformIO, STM32

Minimal STM32 HardwareTimer PlatformIO / Arduino timer interrupt blink example

This is a minimal example of using timer interrupts on PlatformIO / Arduino using HardwareTimer (which is a part of the PlatformIO STM32 Arduino installation – no need to install a library). Tested on the Olimex E407 board. It will run on almost any STM32 processor but you might need to adjust PC13 to the PIN connected to the LED. The example will blink the LED once per second.

#include <Arduino.h>

HardwareTimer timer(TIM1);
bool ledOn = false;

void OnTimer1Interrupt() {
    ledOn = !ledOn;
    digitalWrite(PC13, ledOn ? HIGH : LOW);
}

void setup() {
    pinMode(PC13, OUTPUT);
    // Configure timer
    timer.setPrescaleFactor(2564); // Set prescaler to 2564 => timer frequency = 168MHz/2564 = 65522 Hz (from prediv'd by 1 clocksource of 168 MHz)
    timer.setOverflow(32761); // Set overflow to 32761 => timer frequency = 65522 Hz / 32761 = 2 Hz
    timer.attachInterrupt(OnTimer1Interrupt);
    timer.refresh(); // Make register changes take effect
    timer.resume(); // Start
}

void loop() {
}


Posted by Uli Köhler in PlatformIO, STM32

How to use STM32 _Msk and _Pos definitions to read and write registers

The STM32 HAL contains definitions like TIM_CR1_CKD_Msk or TIM_CR1_CKD_Pos which you can use to make it easier to read or write parts of a register.

Reading a part of a register

uint32_t ckd = (TIM1->CR1 & TIM_CR1_CKD_Msk) >> TIM_CR1_CKD_Pos;

Writing a part of a register

uint32_t new_ckd_value = TIM_CLOCKDIVISION_DIV4; // example
TIM1->CR1 &= TIM_CR1_CKD_Msk; // Clear bits
TIM1->CR1 |= new_ckd_value << TIM_CR1_CKD_Pos; // Set bits


Posted by Uli Köhler in C/C++, STM32

How to fix PlatformIO “Start debugging” doing nothing

Problem:

When you click on Start debugging, press F5 or click on the debug start triangle in PlatformIO

the firmware builds but then nothing happens:

Linking .pio/build/olimex_e407/firmware.elf
Checking size .pio/build/olimex_e407/firmware.elf
Advanced Memory Usage is available via "PlatformIO Home > Project Inspect"
RAM:   [          ]   0.7% (used 936 bytes from 131072 bytes)
Flash: [          ]   1.7% (used 18064 bytes from 1048576 bytes)
Building .pio/build/olimex_e407/firmware.bin
======================================================================== [SUCCESS] Took 2.72 seconds ========================================================================

Solution:

You need to specify a debug_tool in platformio.ini. For STM32 processors, a typical choice is

debug_tool = stlink

A list of options for debug_tool is available here.

Note that you can NOT debug many boards via the USB port. You can not debug boards attached via serial-to-USB converter (like many Arduino boards). Your board need to have a proper debugger on-board (like an stlink which is integrated on many STM32 eval boards) or you need to use an external debugger.

Posted by Uli Köhler in PlatformIO, STM32

Minimal STM32 TimerInterrupt_Generic PlatformIO / Arduino timer interrupt blink example

Note: If you need more flexibility, see Minimal STM32 HardwareTimer PlatformIO / Arduino timer interrupt blink example where we show how to use HardwareTimer instead of TimerInterrupt_Generic. Note that TimerInterrupt_Generic uses HardwareTimer internally.

This is a minimal example of using timer interrupts on PlatformIO / Arduino using the TimerInterrupt_Generic library which runs on the Olimex E407. It will run on almost any STM32 processor but you might need to adjust PC13 to the PIN connected to the LED. The example will blink the LED once per second.

#include <Arduino.h>
#include <TimerInterrupt_Generic.h>

STM32Timer tim1(TIM1);
bool ledOn = false;

void OnTimer1Interrupt() {
    ledOn = !ledOn;
    digitalWrite(PC13, ledOn ? LOW : HIGH);
}

void setup() {
    pinMode(PC13, OUTPUT);
    // Enable TIM4
    
    tim1.attachInterruptInterval(500000, OnTimer1Interrupt);
}

void loop() {
}

Now add

lib_deps =
     khoih.prog/TimerInterrupt_Generic @ ^1.7.0

to your platformio.ini. My full platformio.ini looks like this:

[env:olimex_e407]
platform = ststm32
board = olimex_e407
framework = arduino
lib_deps =
     khoih.prog/TimerInterrupt_Generic @ ^1.7.0


Posted by Uli Köhler in PlatformIO, STM32

PlatformIO Olimex E407 Arduino LED blink example

This code will make the Olimex E407 LED blink.

#include <Arduino.h>

void setup() {
    pinMode(PC13, OUTPUT);
}

void loop() {
    digitalWrite(PC13, LOW);
    delay(500);
    digitalWrite(PC13, HIGH);
    delay(500);
}


Posted by Uli Köhler in PlatformIO, STM32
This website uses cookies to improve your experience. We'll assume you're ok with this, but you can opt-out if you wish. Cookie settingsACCEPTPrivacy &amp; Cookies Policy