Arduino

How to find out if Arduino framework is used using the preprocessor (PlatformIO)

You can use How to print all preprocessor flags in PlatformIO to print preprocessor flags. Note that these include the flags #defined in #includes such as Arduino.h. You can remove everything from main.cpp, however, so only the flags defined by the build environment are visible.

The Arduino-related flags are

#define ARDUINO_VARIANT "esp32"
#define ARDUINO_ARCH_ESP32 1
#define ARDUINO_PARTITION_default 1
#define ARDUINO 10812
#define ARDUINO_ESP32_DEV 1
#define ARDUINO_BOARD "Espressif ESP32 Dev Module"

So if you want a platform-independent check for Arduino, use

#ifdef ARDUINO
  // Arduino code goes here
#else
  // Non-Arduino code goes here
#else


Posted by Uli Köhler in Arduino

ESP32-S3 multiple frequency PWM output using the LEDC driver

This Arduino/PlatformIO firmware outputs 50% duty cycle PWM at different frequencies on multiple pins using the LEDC PWM driver, utilizing all four timers:

  • 10 kHz on GPIO10
  • 100 kHz on GPIO11
  • 500 kHz on GPIO12
  • 1 MHz on GPIO13
#include <Arduino.h>
#include <driver/ledc.h>

void setup() {

  ledc_timer_config_t ledc_timer1 = {
      .speed_mode       = LEDC_LOW_SPEED_MODE,
      .duty_resolution  = LEDC_TIMER_1_BIT,
      .timer_num        = LEDC_TIMER_0,
      .freq_hz          = 10000,
      .clk_cfg          = LEDC_AUTO_CLK
  };
  ESP_ERROR_CHECK(ledc_timer_config(&ledc_timer1));

  ledc_timer_config_t ledc_timer2 = {
      .speed_mode       = LEDC_LOW_SPEED_MODE,
      .duty_resolution  = LEDC_TIMER_1_BIT,
      .timer_num        = LEDC_TIMER_1,
      .freq_hz          = 100000,
      .clk_cfg          = LEDC_AUTO_CLK
  };
  ESP_ERROR_CHECK(ledc_timer_config(&ledc_timer2));

  ledc_timer_config_t ledc_timer3 = {
      .speed_mode       = LEDC_LOW_SPEED_MODE,
      .duty_resolution  = LEDC_TIMER_1_BIT,
      .timer_num        = LEDC_TIMER_2,
      .freq_hz          = 500000,
      .clk_cfg          = LEDC_AUTO_CLK
  };
  ESP_ERROR_CHECK(ledc_timer_config(&ledc_timer3));

  ledc_timer_config_t ledc_timer4 = {
      .speed_mode       = LEDC_LOW_SPEED_MODE,
      .duty_resolution  = LEDC_TIMER_1_BIT,
      .timer_num        = LEDC_TIMER_3,
      .freq_hz          = 1000000,
      .clk_cfg          = LEDC_AUTO_CLK
  };
  ESP_ERROR_CHECK(ledc_timer_config(&ledc_timer4));


  /**
   * @brief Configure LEDC output channels
   */

  ledc_channel_config_t ledc1 = {
      .gpio_num       = GPIO_NUM_10,
      .speed_mode     = LEDC_LOW_SPEED_MODE,
      .channel        = LEDC_CHANNEL_0,
      .intr_type      = LEDC_INTR_DISABLE,
      .timer_sel      = LEDC_TIMER_0,
      .duty           = 1, // Set duty to 50%
      .hpoint         = 0
  };
  ESP_ERROR_CHECK(ledc_channel_config(&ledc1));

  ledc_channel_config_t ledc2 = {
      .gpio_num       = GPIO_NUM_11,
      .speed_mode     = LEDC_LOW_SPEED_MODE,
      .channel        = LEDC_CHANNEL_1,
      .intr_type      = LEDC_INTR_DISABLE,
      .timer_sel      = LEDC_TIMER_1,
      .duty           = 1, // Set duty to 50%
      .hpoint         = 0
  };
  ESP_ERROR_CHECK(ledc_channel_config(&ledc2));

  ledc_channel_config_t ledc3 = {
      .gpio_num       = GPIO_NUM_12,
      .speed_mode     = LEDC_LOW_SPEED_MODE,
      .channel        = LEDC_CHANNEL_2,
      .intr_type      = LEDC_INTR_DISABLE,
      .timer_sel      = LEDC_TIMER_2,
      .duty           = 1, // Set duty to 50%
      .hpoint         = 0
  };
  ESP_ERROR_CHECK(ledc_channel_config(&ledc3));

  ledc_channel_config_t ledc4 = {
      .gpio_num       = GPIO_NUM_13,
      .speed_mode     = LEDC_LOW_SPEED_MODE,
      .channel        = LEDC_CHANNEL_3,
      .intr_type      = LEDC_INTR_DISABLE,
      .timer_sel      = LEDC_TIMER_3,
      .duty           = 1, // Set duty to 50%
      .hpoint         = 0
  };
  ESP_ERROR_CHECK(ledc_channel_config(&ledc4));

}

void loop() {
  // Nothing to do here
  delay(1000);
}

GPIO10

GPIO11

GPIO12

GPIO13

Posted by Uli Köhler in Arduino, ESP8266/ESP32, PlatformIO

How to fix Arduino / PlatformIO undefined reference to `loop()’

Problem:

While trying to compile your Arduino or PlatformIO project, you see an error message such as
/home/uli/.platformio/packages/[email protected]+2021r2-patch5/bin/../lib/gcc/xtensa-esp32-elf/8.4.0/../../../../xtensa-esp32-elf/bin/ld: .pio/build/esp32dev/libFrameworkArduino.a(main.cpp.o):(.literal._Z8loopTaskPv+0x8): undefined reference to `loop()'

Solution:

You have not declared a loop() function in your source code. Open main.cpp or your .ino source code file and start with the following (empty) loop() function which does nothing:
void loop() {
    // Nothing to do here since HTTPServer
    // is running in a separate thread
    delay(1000);
}
After you’ve added any void loop() { /* ... */} function to your sourcecode try to build/upload again and the error message should have disappeared.
If you want, you can also add code such as to print a message to the serial port every time the loop is run:
void loop() {
    // Nothing to do here since HTTPServer
    // is running in a separate thread
    Serial.println("Hello world!");
    delay(1000);
}


Posted by Uli Köhler in Arduino, C/C++, PlatformIO

How to use C++17 / C++23 with PlatformIO using ESP32 / Arduino

Problem:

By default, PlatformIO uses -std=gnu++11 as a compiler flag but you want to use C++17 or C++23 features.

If you just use

build_flags = -std=gnu++17

this will lead to g++ being called with g++ ... -std=gnu++17 ... -std=gnu++11 ... compiler flags. The latter one – gnu++11 i.e. C++11 will take precedence.

Solution:

In order to activate C++17, use

build_flags = -std=gnu++17
build_unflags = -std=gnu++11

In order to activate C++23 (not fully implemented yet in G++), you currently need to use -std=gnu++2a:

build_flags = -std=gnu++2a
build_unflags = -std=gnu++11


Posted by Uli Köhler in Arduino, ESP8266/ESP32, PlatformIO

Dynamic short pulse generator using Arduino Mega2560 with serial control

This is a simplified version of our hybrid static/dynamic pulse generator. On the Arduino Mega2560 platform, it allows generating pulses from 750ns up to almost arbitrary lengths (limited only by the integer width) with a resolution of approx. 437.5ns

In order to control the pulse width, open a serial interface and type + to increase the pulse width or - to decrease the pulse width.

#include <Arduino.h>
#include <avr/io.h>
#include <ArduinoJson.h>

const int pulseAPin = 11;

#define PORT11 PORTB
#define PIN11 5
#define PIN11_MASK (1 << PIN11)

int pulseLength = 0;

/**
 * Pulse the output pin, for very short pulses.
 */
void PulseDynamic(int n) {
    cli();
    PORT11 |= PIN11_MASK;
    // Dynamic for loop
    for (;n >= 0; n--) {
        _NOP();
    }
    PORT11 &= ~PIN11_MASK;
    sei();
}

void setup()
{
    Serial.begin(115200);
    Serial.setTimeout(25);

    pinMode(pulseAPin, OUTPUT);
    pinMode(LED_BUILTIN, OUTPUT);
}

void loop()
{
    PulseDynamic(pulseLength);
    // Process serial
    while(Serial.available() > 0) {
        int c = Serial.read();
        if(c == '+') {
            pulseLength++;
            Serial.println(pulseLength);
        } else if(c == '-') {
            pulseLength--;
            if(pulseLength < 0) {pulseLength = 0;}
            Serial.println(pulseLength);
        }
    }
    delay(50);
}


Posted by Uli Köhler in Arduino, C/C++

Hybrid static/dynamic Arduino Mega2560 single channel short pulse generator

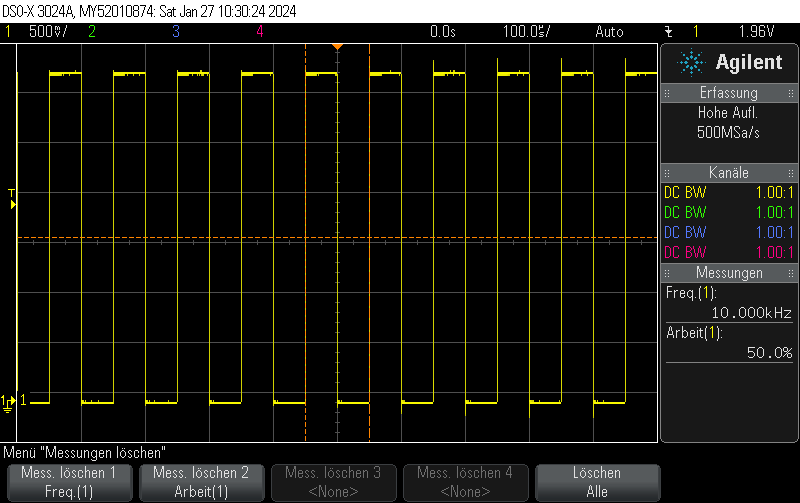
This pulse generator firmware uses methods discussed e.g. in Short pulse generation with Arduino Uno Part 4: NOP for loops to generate both dynamic (for loops of NOP instructions) and static (template-based automatically unrolled) in a combined manner so you can select more or less any pulse width using a high resolution.

It doesn’t work 100% since there are still some pulse width jumps. However, it is still useful for many microsecond 5V pulse generation applications and might also be a useful technology demonstrator for hybrid static/dynamic pulsers using optimized integer template loop unrolling approaches.

In order to control the pulse width, open a serial interface and type + to increase the pulse width or - to decrease the pulse width.

This might work on Arduino Unos as well but my Uno had a broken serial interface chip so I used a ATMega2560 board.

// License: CC0 1.0 Universal
// By Uli Köhler (techoverflow.net)
#include <Arduino.h>
#include <avr/io.h>
#include <ArduinoJson.h>

#define PORT13 PORTB
#define PIN13 7
#define PIN13_MASK (1 << PIN13)

#define PORT11 PORTB
#define PIN11 5
#define PIN11_MASK (1 << PIN11)

int pulseLength = 1;

using PulseFunc = void (*)(int);

// Function pointer to void(int)
PulseFunc pulser = nullptr;
int pulserParam = 0; // Pre-computed parameter for the pulser function

void DoNothingPulser(int _) {
}

/**
 * Pulse the output pin, for very short pulses.
 * Will ONLY perform static (optimized) NOPs.
 * Will NOT perform dynamic (slower) NOP cycles
 * 
 * Hence, this function does not have any overhead from for loops.
 */
template<int nNOPs>
void PulseStatic(int _) {
    cli();
    PORT11 |= PIN11_MASK;
    // Static for loop (optimized out - template-driven)
    // Force unrolling of the loop
    // NOTE: Compiler will only unroll for n < 8
    for (int i = 0; i < min(nNOPs, 6); i++) {
        _NOP();
    }
    if(nNOPs > 6) {
        for (int i = 0; i < nNOPs - 6; i++) {
            _NOP();
        }
    }
    PORT11 &= ~PIN11_MASK;
    sei();
}

/**
 * Pulse the output pin, for very short pulses.
 * Will perform static (optimized) NOPs and
 * also dynamic (slower) NOP cycles
 */
template<int nNOPs>
void PulseDynamic(int dynamicNOPs) {
    cli();
    PORT11 |= PIN11_MASK;
    // Dynamic for loop (NOT optimized out - template-driven)
    for (int i = 0; i < dynamicNOPs; i++)
    {
        _NOP();
    }
    // Static for loop (optimized out - template-driven)
    // Force unrolling of the loop
    // NOTE: Compiler will only unroll for n < 8
    for (int i = 0; i < min(nNOPs, 6); i++) {
        _NOP();
    }
    if(nNOPs > 6) {
        for (int i = 0; i < nNOPs - 6; i++) {
            _NOP();
        }
    }
    PORT11 &= ~PIN11_MASK;
    sei();
}

PulseFunc staticPulsers[] = {
    DoNothingPulser,
    &PulseStatic<0>, // 0 NOPs
    &PulseStatic<1>, // 1 NOPs ...
    &PulseStatic<2>,
    &PulseStatic<3>,
    &PulseStatic<4>,
    &PulseStatic<5>,
    &PulseStatic<6>,
    &PulseStatic<7>,
    &PulseStatic<8>,
    &PulseStatic<9>,
    &PulseStatic<10>,
    &PulseStatic<11>
};

PulseFunc dynamicPulsers[] = {
    &PulseDynamic<0>,
    &PulseDynamic<1>,
    &PulseDynamic<2>,
    &PulseDynamic<3>,
    &PulseDynamic<4>,
    &PulseDynamic<5>,
    &PulseDynamic<6>,
    &PulseDynamic<7>,
    &PulseDynamic<8>,
    &PulseDynamic<9>,
    &PulseDynamic<10>,
    &PulseDynamic<11>
};

constexpr int A = 7;
constexpr int B = 6;

void ReconfigurePulse() {
    // Very short pulses are performed using only static
    if(pulseLength < A) {
        pulser = staticPulsers[pulseLength];
    } else {
        pulser = dynamicPulsers[(pulseLength - A) % B];
        pulserParam = (pulseLength - A) / B;
    }
}

void setup()
{
    Serial.begin(115200);
    Serial.setTimeout(25);

    ReconfigurePulse(); // with default pulseLength

    pinMode(11, OUTPUT);
    pinMode(LED_BUILTIN, OUTPUT);
}

void loop()
{
    pulser(pulserParam);
    Serial.println(pulseLength);
    //ProcessSerialInput();
    // Wait until 50ms has passed since start
    while(Serial.available() > 0) {
        int c = Serial.read();
        if(c == '+') {
            pulseLength++;
            ReconfigurePulse();
        } else if(c == '-') {
            pulseLength--;
            if(pulseLength < 0) {pulseLength = 0;}
            ReconfigurePulse();
        }
    }
    delay(50);
}


Posted by Uli Köhler in Arduino, C/C++

Install Teensyduino on Debian

Don’t use the Arduino package offered through the Software App in Debian. Install the one offered by official site arduino.cc. The Teensyduino installer will not recognize the distribution package install.

Arduino Install:

  1. Get your flavor of the Arduino software: https://www.arduino.cc/en/Main/Software
  2. Download, extract and install. Be aware that the extraction location will be the application location.

Teensyduino Install:

  1. Go to: https://www.pjrc.com/teensy/td_download.html
  2. Download the Linux udev rules (link at the top of the download page) and copy the file to /etc/udev/rules.d.
    sudo cp 00-teensy.rules /etc/udev/rules.d/
  3. Download and extract one of Arduino’s Linux packages.
  4. Run the installer by adding execute permission and then execute it. chmod 755 TeensyduinoInstall.linux64
    ./TeensyduinoInstall.linux64
Posted by Tobias Gutmann in Arduino