docker-compose exec nextcloud chown -vR www-data:www-data /var/www/html
docker-compose exec nextcloud chown -vR www-data:www-data /var/www/html
While trying to update Nextcloud using the command line (e.g. SSH) using a command like
php updater/updater.phar
you see an error message containing PHP Fatal error: Allowed memory size of ... bytes exhausted such as this one:
[✔] Check for expected files
[✔] Check for write permissions
[✔] Create backup
[✔] Downloading
[ ] Verify integrity ...PHP Fatal error:  Allowed memory size of 134217728 bytes exhausted (tried to allocate 155061456 bytes) in phar:///owncloud.mydomain.com/updater/updater.phar/lib/Updater.php on line 637
First, try to adjust the memory limit in your webhosting panel or php.ini. If this is not possible – such as for my hoster, which has different settings for the FastCGI PHP as opposed to the command line (CLI) PHP, you can manually set the memory limit using
php -d memory_limit=512M updater/updater.phar
While trying to update Nextcloud using the command line (e.g. SSH) using a command like
php updater/updater.phar
you see the following error message:
Nextcloud Updater - version: v20.0.0beta4-11-g68fa0d4

Step 5 is currently in process. Please call this command later.
No matter if the step that appears to be currently in progress is Step 3, Step 5 or any other step, the solution is always the same: Reset the update by deleting the data/updater-occ[random-string] folder.
Recommended: If you are paranoid about losing data, just rename the directory:
mv data/updater-occ* ../DELETEME-updater
Not recommended: You can also just delete the directory
rm -rf data/updater-occ*
This post shows you a really quick method to create a systemd timer that runs cron.php on dockerized nextcloud (using docker-compose). We created a script that automatically creates a systemd timer and related service to run cron.php hourly using the command from our previous post How to run Nextcloud cron in a docker-compose based setup:
In order to run our autoinstall script, run:
wget -qO- https://techoverflow.net/scripts/install-nextcloud-cron.sh | sudo bash /dev/stdin
from the directory where docker-compose.yml is located. Note that the script will use the directory name as a name for the service and timer that is created. For example, running the script in /var/lib/nextcloud-mydomain will cause nextcloud-mydomain-cron to be used a service name.
Example output from the script:
Creating systemd service... /etc/systemd/system/nextcloud-mydomain-cron.service
Creating systemd timer... /etc/systemd/system/nextcloud-mydomain-cron.timer
Enabling & starting nextcloud-mydomain-cron.timer
Created symlink /etc/systemd/system/timers.target.wants/nextcloud-mydomain-cron.timer → /etc/systemd/system/nextcloud-mydomain-cron.timer.
The script will create /etc/systemd/systemd/nextcloud-mydomain-cron.service containing the specification on what exactly to run:
[Unit]
Description=nextcloud-mydomain-cron

[Service]
Type=oneshot
ExecStart=/usr/bin/docker-compose exec -T -u www-data nextcloud php cron.php
WorkingDirectory=/var/opt/nextcloud-mydomain
and /etc/systemd/systemd/nextcloud-mydomain-cron.timer containing the logic when the .service is started:
[Unit]
Description=nextcloud-mydomain-cron

[Timer]
OnCalendar=hourly
Persistent=true

[Install]
WantedBy=timers.target
and will automatically start and enable the timer. This means: no further steps are needed after running this script!
In order to show the current status of the service, use e.g.
sudo systemctl status nextcloud-mydomain-cron.timer
● nextcloud-mydomain-cron.timer - nextcloud-mydomain-cron
     Loaded: loaded (/etc/systemd/system/nextcloud-mydomain-cron.timer; enabled; vendor preset: disabled)
     Active: active (waiting) since Fri 2022-04-01 00:33:48 UTC; 6min ago
    Trigger: Fri 2022-04-01 01:00:00 UTC; 19min left
   Triggers: ● nextcloud-mydomain-cron.service

Apr 01 00:33:48 CoreOS systemd[1]: Started nextcloud-mydomain-cron.
In the
Trigger: Fri 2020-12-11 00:00:00 CET; 20h left
line you can see when the service will be run next. By default, the script generates tasks that run OnCalendar=daily, which means the service will be run on 00:00:00 every day. Checkout the systemd.time manpage for further information on the syntax you can use to specify other timeframes.
In order to run the backup immediately (it will still run daily after doing this), do
sudo systemctl start nextcloud-mydomain-cron.service
(note that you need to run systemctl start on the .service! Running systemctl start on the .timer will only enable the timer and not run the service immediately).
In order to view the logs, use
sudo journalctl -xfu nextcloud-mydomain-cron.service
(just like above, you need to run journalctl -xfu on the .service, not on the .timer).
In order to disable automatic backups, use e.g.
sudo systemctl disable nextcloud-mydomain-cron.timer
#!/bin/bash
# Create a systemd service & timer that runs cron.php on dockerized nextcloud
# by Uli Köhler - https://techoverflow.net
# Licensed as CC0 1.0 Universal
export SERVICENAME=$(basename $(pwd))-cron

export SERVICEFILE=/etc/systemd/system/${SERVICENAME}.service
export TIMERFILE=/etc/systemd/system/${SERVICENAME}.timer

echo "Creating systemd service... $SERVICEFILE"
sudo cat >$SERVICEFILE <<EOF
[Unit]
Description=$SERVICENAME

[Service]
Type=oneshot
ExecStart=$(which docker-compose) exec -T -u www-data nextcloud php cron.php
WorkingDirectory=$(pwd)
EOF

echo "Creating systemd timer... $TIMERFILE"
sudo cat >$TIMERFILE <<EOF
[Unit]
Description=$SERVICENAME

[Timer]
OnCalendar=hourly
Persistent=true

[Install]
WantedBy=timers.target
EOF

echo "Enabling & starting $SERVICENAME.timer"
sudo systemctl enable $SERVICENAME.timer
sudo systemctl start $SERVICENAME.timer
In our previous post How to run Collabora office for Nextcloud using docker-compose we investigated how to configure your Collabora office server using docker-compose.yml.
If you want to use multiple domains, you need to change this line in .env:
COLLABORA_DOMAIN=collabora.mydomain.com
to
aliasgroup1=https://nextcloud.mydomain.com:443,https://nextcloud.myseconddomain.com:443
If you want to use multiple domains, you need to change this line in .env:
COLLABORA_DOMAIN=collabora.mydomain.com
By reading the source code I found out that COLLABORA_DOMAIN is interpreted as a regular expression. Therefore you can use a (...|...|...) syntax.
COLLABORA_DOMAIN=(nextcloud.mydomain.com|nextcloud.myseconddomain.com)
After that, restart collabora.
Create this docker-compose.yml, e.g. in /opt/collabora-mydomain:
version: '3'
services:
  code:
    image: collabora/code:latest
    restart: always
    environment:
      - password=${COLLABORA_PASSWORD}
      - username=${COLLABORA_USERNAME}
      - domain=${COLLABORA_DOMAIN}
      - extra_params=--o:ssl.enable=true
    ports:
      - 9980:9980
Now create this .env with the configuration. You need to change the password and the domain!
COLLABORA_USERNAME=admin
COLLABORA_PASSWORD=veecheit0Phophiesh1fahPah0Wue3
COLLABORA_DOMAIN=collabora.mydomain.com
Now you can create a systemd service to autostart by using our script from Create a systemd service for your docker-compose project in 10 seconds.
Run from inside your directory (e.g. /opt/collabora-mydomain)
curl -fsSL https://techoverflow.net/scripts/create-docker-compose-service.sh | sudo bash /dev/stdin
Now you need to configure your reverse proxy to point to port 9980. Here’s an example nginx config:
server {
    server_name collabora.mydomain.com;

    access_log /var/log/nginx/collabora.mydomain.com.access_log;
    error_log /var/log/nginx/collabora.mydomain.com.error_log info;

    location / {
        proxy_pass https://127.0.0.1:9980;
        proxy_http_version 1.1;
        proxy_read_timeout 3600s;
        proxy_set_header Upgrade $http_upgrade;
        proxy_set_header Connection "Upgrade";
        proxy_set_header Host            $host;
        proxy_set_header X-Forwarded-For $remote_addr;
        proxy_set_header X-Forwarded-Proto $scheme;
        add_header X-Frontend-Host $host;
        add_header Strict-Transport-Security "max-age=31536000; includeSubDomains" always;
    }

    listen [::]:80; # managed by Certbot
}
Now open your browser and open collabora.mydomain.com. If collabora is running correctly, you should see:
OK
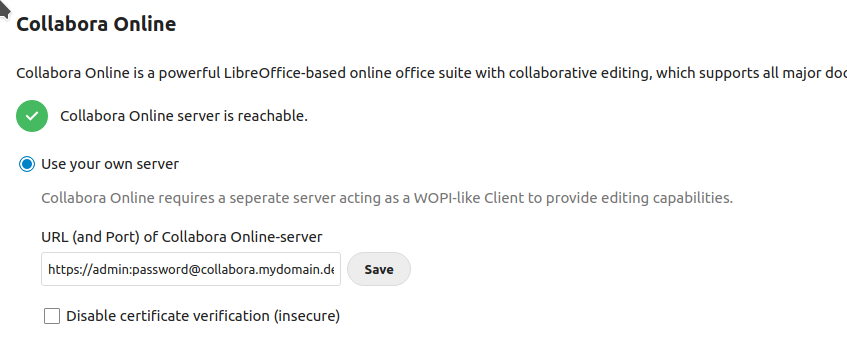
In Nextcloud, goto https://nextcloud.mydomain.com/settings/admin/richdocuments and set the
https://admin:[email protected]
Ensure to use your custom password from .env and your custom domain!
Click Save and you should see Collabora Online server is reachable:
For docker-compose based Nextcloud installations, this is the command to run the cron job manually:
docker-compose exec -u www-data nextcloud php cron.php
You need to run this from the directory where docker-compose.yml is located.
Your Nextcloud CLI client fails for some files (upload or download) with an error message like this
"Server replied "413 Request Entity Too Large" to "PUT https://example.com/remote.php/dav/uploads/username/XXXXXXXX/YYYYYY" (skipped due to earlier error, trying again in 6 hour(s))
PATH/TO/FILE.bmp
The nextcloud CLI client nextcloudcmd stores the sync SQLite database in ~/.local/share/nextcloudcmd/._sync_############.db where ############ is a hex code. If you have multiple such files in ~/.local/share/nextcloudcmd, try out this procedure for each of them:
While nextcloudcmd is not running, use the SQLite3 command line tool to open the database, for example:
sqlite3 ~/.local/share/nextcloudcmd/._sync_bf15278da518.db
Then run this SQL command:
DELETE FROM 'blacklist';
and exit using Ctrl-D. Now try re-running nextcloudcmd, it should immediately retry syncing the file.
When upgrading your Nextcloud instance, you see an error message like
Migration step 'OCA\Files\Migration\Version11301Date20191205150729' is unknown
This error occurs because you just copied over multiple versions of the apps directory, which resulted in
First, make a backup of your apps directory (located inside your Nextcloud folder).
Then delete your current apps directory and replace it by the apps directory from the new version of Nextcloud you want to upgrade to.
After that, retry the upgrade.
In reverse-proxy setups forwarding requests to OnlyOffice like our reference setup there you might encounter issues like
Refused to frame 'http://onlyoffice.mydomain.com/' because it violates the following Content Security Policy directive: "frame-src https://onlyoffice.mydomain.com/".
Just add
proxy_set_header X-Forwarded-Proto $scheme;
directly after your proxy_pass clause in your nginx config, then run sudo service nginx reload.
The reason for this issue is that OnlyOffice thinks it’s being loaded using HTTP, but the Nextcloud page prevents insecure content from being loaded.
Using a proxy other than nginx? Just ensure that every proxied request (i.e. every request directed towards the OnlyOffice instance) has the X-Forwarded-Proto header set to the protocol of the original request – which should be https.
When trying to connect using the Nextcloud client, during the Flow v2 authorization step where you open a page in the browser to authorize the client, you see an error message in the JS console like
Refused to send form data to 'http://nextcloud.mydomain.com/login/v2/grant' because it violates the following Content Security Policy directive: "form-action 'self'".
Add
'overwriteprotocol' => 'https',
after this line:
'version' => '18.0.0.10',
in your nextcloud/config/config.php.
Recently my Nextcloud 16 instance (running via PHP 7.2 FPM on Nginx) return HTTP status 500 (internal server error) when trying to access it.
Analyzin the webserver log revealed this error message:
FastCGI sent in stderr: "PHP message: PHP Fatal error: Class OC\Authentication\Token\PublicKeyToken contains 1 abstract method and must therefore be declared abstract or implement the remaining methods (OC\Authentication\Token\IToken::setExpires) in /var/sites/nextcloud.mydomain.com/lib/private/Authentication/Token/PublicKeyToken.php on line 47" while reading response header from upstream, client: 2003:ea:b747:ee00:7491:f492:480:57a9, server: nextcloud.mydomain.com, request: "PROPFIND /remote.php/dav/files/admin/ HTTP/1.1", upstream: "fastcgi://unix:/var/run/php/php7.2-fpm.sock:", host: "nextcloud.mydomain.com"
After some research, I found out that – at least in my case – the issue could be fixed by flushing the PHP opcache:
sudo service php7.2-fpm reload
After that, nextcloud started to work properly again.