The default password for MEBx is
admin
The default password for MEBx is
admin
I bought a cheap game controller on Amazon:

However, from reading the manual it was completely unclear how to pair it with my laptop or my smartphone, so I figured it out myself.
Press the button between the sticks and the button left of the touch pad. Press both buttons together for 5-10 seconds.
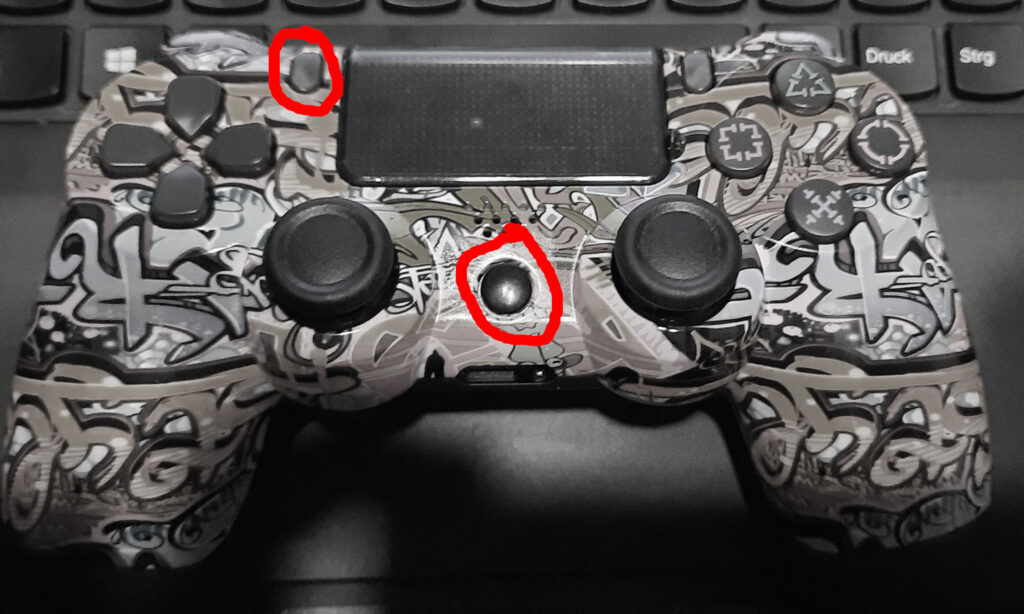
Press those buttons until the LED on the controller starts blinking with the following pattern: Blink-Blink-Pause ... Blink-Blink-Pause
If the LED on the back side doesn’t blink at all or just blinks shortly, charge the game controller using the microUSB port on the back side.
Once the LEDs blink wit the Blink-Blink-Pause pattern, the controller is ready to be paired. Open up the Bluetooth settings on your Laptop or Smartphone and connect to the gamepad.
At least for my devices, I need to re-pair the device every time I restart the computer. In order to do this, remove the gamepad from the list of paired devices on your computer / smartphone. Then, bring the gamepad into pairing mode using the method described above and pair it again.
So far I couldn’t find a reliable method of keeping the device connected or paired, but re-pairing it on every use is sufficiently easy.
Calculate the volume of a tube by its length and diameter using this online calculator – formula included.
Use this command to connect to your Marlin-based 3D printer:
picocom -b 115200 /dev/ttyUSB0 --imap lfcrlf --echo
This command might also work for firmwares other than Marlin.
On some boards the USB port is called /dev/ttyACM0 instead of /dev/ttyUSB0. In this case, use
picocom -b 115200 /dev/ttyACM0 --imap lfcrlf --echo
By default, picocom uses character maps that cause the newlines not to be shown correctly. --imap lfcrlf maps line feeds sent by the printer to CR + LF on the terminal. --echo enables local echo, enabling you to see what you are typing.
If you have been looking desperately for a working CMake example for the SDCC compiler for STM8 microcontrollers here’s my take on it:
cmake_minimum_required(VERSION 3.2)

set(CMAKE_C_OUTPUT_EXTENSION ".rel")
set(CMAKE_C_COMPILER sdcc)
set(CMAKE_SYSTEM_NAME Generic) # No linux target etc

# Prevent default configuration
set(CMAKE_C_FLAGS_INIT "")
set(CMAKE_EXE_LINKER_FLAGS_INIT "")

project(STM8Blink C)
SET(CMAKE_C_FLAGS "-mstm8 --std-c99")
add_executable(main.ihx main.c)

# Flash targets
add_custom_target(flash ALL COMMAND stm8flash -c stlink -p stm8s105c6 -w main.ihx)
This will build main.ihx from main.c. main.ihx is a Intel Hex file which can be directly flashed using stm8flash.
The last lines setup make flash ; you might need to use the correct microcontroller (stm8s105c6 in this example, run stm8flash -l to show supported devices) and the correct flash adapter (stlink, stlinkv2, stlinkv21, stlinkv3 or espstlink).
The setup example shown here is for the STM8S eval board.
I suppose it can be easily modified for other microcontrollers, but I haven’t tried that so far.
On your Acer Aspire 5 A515-52(G) you can access the BIOS / UEFI menu by pressing F2 repeatedly during and immediately after the Acer logo is displayed.
On my Acer Aspire A515-52-51EL Secure Boot is enabled by default.
When accessing the BIOS/UEFI by pressing the F2 key during boot, the Secure Boot option is [Enabled] and greyed out so I couldn’t change it.
In order to change it you need to temporarily set a supervisor password in the BIOS.
Go to the Security page and navigate to Set Supervisor Password.
Press enter. This will show a prompt to set a supervisor password.
Important: DO NOT use a hard-to-remember password here! I recommend using abc123 as a password and writing it down just in case. If you forget your supervisor password you WILL BRICK YOUR MACHINE! This password will only be used temporarily so you DO NOT want to use a secure password!
Enter the password, press return, enter the password again and press return again. On the top of the page, Supervisor password is should now read Set.
Now go to the Boot tab where you can now disable Secure Boot.
Warning: DO NOT SKIP THE NEXT STEP!
Now we will unset the supervisor password. Go to the Security tab again, go to Set Supervisor Password and press return.
Enter the password you used before (e.g. abc123), then press enter. In the Enter new password and Confirm New Password fields, DO NOT ENTER ANY PASSWORD! Just press return two times.
Double-check that Supervisor password is now read Clear. This means that we un-set our supervisor password.
Important: If Supervisor password is does not read Clear, repeat the last step to ensure there is no supervisor password set.
Now go to Exit, select Exit Saving Changes and press return. Select Yes and press Enter.
Even though we have unset the supervisor password, secure boot will stay disabled.