nginx

How to actually turn off nginx logs entirely

If you’re using statements in your nginx config such as

access_log off;
error_log off;

this will not actually turn off the logging. it will just write the logs to /usr/share/nginx/off.

In order to actually turn off logging, use

access_log /dev/null;
error_log /dev/null;


Posted by Uli Köhler in nginx

How to fix Netbox nginx Invalid HTTP_HOST header: ‘localhost:13031’. You may need to add ‘localhost’ to ALLOWED_HOSTS.

Problem:

When trying to operate netbox behind an nginx reverse proxy, you see the following log messages:

netbox          | Invalid HTTP_HOST header: 'localhost:13031'. You may need to add 'localhost' to ALLOWED_HOSTS.
netbox          | Bad Request: /

Solution:

Set the Host header in the proxied requests using

proxy_set_header X-Real-IP $remote_addr;
proxy_set_header X-Forwarded-Proto $scheme;      
proxy_set_header X-Forwarded-Host $server_name;

in order to tell Netbox which host was originally requested (else, it will assume localhost).

The following location config works fine with Netbox:

location / {
    proxy_pass http://localhost:13031/;
    proxy_http_version 1.1;
    proxy_set_header Upgrade $http_upgrade;
    proxy_set_header Connection "Upgrade";
    proxy_set_header X-Real-IP $remote_addr;
    proxy_set_header X-Forwarded-Proto $scheme;      
    proxy_set_header X-Forwarded-Host $server_name;
    proxy_redirect default;
}

Full config example

server {
    server_name  netbox.mydomain.com;

    location / {
        proxy_pass http://localhost:13031/;
        proxy_http_version 1.1;
        proxy_set_header Upgrade $http_upgrade;
        proxy_set_header Connection "Upgrade";
        proxy_set_header X-Real-IP $remote_addr;
        proxy_set_header X-Forwarded-Proto $scheme;      
        proxy_set_header X-Forwarded-Host $server_name;
        proxy_redirect default;
    }

    listen [::]:443 ssl; # managed by Certbot
    ssl_certificate /etc/letsencrypt/live/mydomain.com/fullchain.pem; # managed by Certbot
    ssl_certificate_key /etc/letsencrypt/live/mydomain.com/privkey.pem; # managed by Certbot
    include /etc/letsencrypt/options-ssl-nginx.conf; # managed by Certbot


}
server {
    if ($host = netbox.mydomain.com) {
        return 301 https://$host$request_uri;
    } # managed by Certbot

    server_name  netbox.mydomain.com;

    listen [::]:80; # managed by Certbot
    return 404; # managed by Certbot
}


Posted by Uli Köhler in Networking, nginx

How to configure nginx for static Angular UIs

In order to make Angular UIs work with nginx, you have to load index.html for any URL where you would otherwise return 404 in order to allow routing to work:

location / {
  try_files $uri $uri$args $uri$args/ /index.html;
}

Full example for default site with API:

server {
        listen 80 default_server;
        listen [::]:80 default_server;

        root /var/www/html;

        index index.html;

        server_name MyServer;

        location / {
          try_files $uri $uri$args $uri$args/ /index.html;
        }

        location /api {
                proxy_pass http://localhost:8080;
        }
}


Posted by Uli Köhler in nginx

nginx FritzBox webinterface reverse proxy

The following nginx config allows remote access to a local FritzBox over VPN etc. You explicitly need to set the Host header to fritz.box in the proxied request – else, the FritzBox will reject the request as part of its rebind protection.

server {
        listen 80 default_server;

        access_log off;
        error_log  off;
        location / {
            proxy_pass http://192.168.241.1;
            proxy_set_header X-Real-IP $remote_addr;
            proxy_set_header Host 'fritz.box';
        }
}

On most linux distributions such as Debian or Ubuntu, install nginx using sudo apt -y install nginx or similar and place our config file as /etc/nginx/sites-enabled/default.

Posted by Uli Köhler in Networking, nginx

How to set X-Forwarded-Proto header in nginx

Directly after any proxy_pass line add

proxy_set_header X-Forwarded-Proto $scheme;

Typically X-Forwarded-Proto is used together with X-Forwarded-Host like this:

proxy_set_header X-Forwarded-Host $host;
proxy_set_header X-Forwarded-Proto $scheme;


Posted by Uli Köhler in Networking, nginx, Wordpress

Headscale nginx reverse proxy config

Reverse proxying headscale using nginx is extremly simple. You don’t need any special config.

Here is my config with Let’s Encrypt enabled (part of the config is auto-generated using certbot --nginx).

Ensure to set the port (27896) to match the one mapped to the Headscale port.

server {
    server_name  headscale.mydomain.com;

    location / {
        proxy_pass http://localhost:27896/;
        proxy_http_version 1.1;
        proxy_set_header Upgrade $http_upgrade;
        proxy_set_header Connection "Upgrade";
        proxy_redirect http:// https://;
        proxy_buffering off;
        proxy_set_header X-Real-IP $remote_addr;
        proxy_set_header X-Forwarded-For $proxy_add_x_forwarded_for;
        proxy_set_header X-Forwarded-Proto $http_x_forwarded_proto;
        add_header Strict-Transport-Security "max-age=15552000; includeSubDomains" always;
    }

    listen [::]:443 ssl; # managed by Certbot
    ssl_certificate /etc/letsencrypt/live/mydomain-wildcard/fullchain.pem; # managed by Certbot
    ssl_certificate_key /etc/letsencrypt/live/mydomain-wildcard/privkey.pem; # managed by Certbot
    include /etc/letsencrypt/options-ssl-nginx.conf; # managed by Certbot


}
server {
    if ($host = headscale.mydomain.com) {
        return 301 https://$host$request_uri;
    } # managed by Certbot

    server_name  headscale.mydomain.com;

    listen [::]:80; # managed by Certbot
    return 404; # managed by Certbot
}

The proxy_… upgrade stuff is for proxying websockets. I have no idea if it’s required or not because I have not tried, but it doesn’t really hurt to keep in in there.

Posted by Uli Köhler in Headscale, Networking, nginx

How to replace string in reverse proxy HTTP request using Lua & nginx

You can use access_by_lua_block in order to replace arbitrary strings in an nginx request. Note: This will replace in the request to the reverse proxy, not in the response from the reverse proxy. See How to replace HTTP response data in nginx using lua for a Lua-based approach on how to replace a string in the response.

access_by_lua_block {
    ngx.req.read_body()
    local body = ngx.req.get_body_data()
    if body then
        body = ngx.re.gsub(body, "string_to_replace", "string_by_which_to_replace")
    end
    ngx.req.set_body_data(body)
}

This is typically used in a location {} block so you can just replace when a specific set of URLs is accessed:

location /config {
   proxy_pass http://127.0.0.1:12345/;
    proxy_set_header X-Forwarded-For $remote_addr;

    access_by_lua_block {
       ngx.req.read_body()
       local body = ngx.req.get_body_data()
       if body then
            body = ngx.re.gsub(body, "myvar", "myothervar")
       end
       ngx.req.set_body_data(body)
    }
}


Posted by Uli Köhler in nginx

How to replace HTTP response data in nginx using lua

This is an example of how to use body_filter_by_lua_block to replace parts of the response by a string. Note that since it’s a Lua feature, you’ll be able to use arbitrary code when modifying the body, including network requests, parsing etc. Note: This will replace in the response send to the client, not in the request sent to the the reverse proxy. See How to replace string in reverse proxy HTTP request using Lua & nginx for a Lua-based approach on how to replace a string in the request.

header_filter_by_lua_block { ngx.header.content_length = nil }
body_filter_by_lua_block {
        local body = ngx.arg[1]
        if body then
                body = ngx.re.gsub(body, "string_to_replace", "string_by_which_to_replace")
        end
        ngx.arg[1] = body
}

This is typically used in a location {} block to only replace strings for specific sets of URLs:

location /config {
   proxy_pass http://127.0.0.1:12345/;
    proxy_set_header X-Forwarded-For $remote_addr;
    proxy_set_header Host meet.techoverflow.net;

    header_filter_by_lua_block { ngx.header.content_length = nil }
    body_filter_by_lua_block {
            local body = ngx.arg[1]
            if body then
                    body = ngx.re.gsub(body, "myvar", "myothervar")
            end
            ngx.arg[1] = body
    }
}


Posted by Uli Köhler in nginx

How to allow your EtherPad to be included in IFrames using nginx

In our previous post A modern Docker-Compose config for Etherpad using nginx as reverse proxy we showed how to create a simple, reliable Etherpad installation.

However, if you want to include Etherpads on external websites, you’ll see connection refused errors like

Refused to display 'https://etherpad.nemeon.eu/p/Test123' in a frame because it set 'X-Frame-Options' to 'sameorigin'.

and the Etherpad iframe won’t load.

In order to fix this, we’ll add a line to the nginx config in . Using this approach, you’ll need to list all the domains that are allowed to include the Etherpad (https://gather.town in this example).

The line to add is

add_header "X-Frame-Options" "Allow-From https://gather.town";

which needs to be added inside the location / { ... } block. Full example for the location / block:

location / {
    proxy_pass http://localhost:17201/;
    proxy_http_version 1.1;
    proxy_set_header Upgrade $http_upgrade;
    proxy_set_header Connection "Upgrade";
    proxy_redirect default;
    add_header "X-Frame-Options" "Allow-From https://gather.town";
}

Full nginx config example:

server {
    server_name  etherpad.mydomain.de;
    access_log off;
    error_log /var/log/nginx/etherpad.mydomain.de-error.log;

    location / {
        proxy_pass http://localhost:17201/;
        proxy_http_version 1.1;
        proxy_set_header Upgrade $http_upgrade;
        proxy_set_header Connection "Upgrade";
        proxy_redirect default;
        add_header "X-Frame-Options" "Allow-From https://gather.town";
    }

    listen [::]:443 ssl; # managed by Certbot
    ssl_certificate /etc/letsencrypt/live/etherpad.mydomain.de/fullchain.pem; # managed by Certbot
    ssl_certificate_key /etc/letsencrypt/live/etherpad.mydomain.de/privkey.pem; # managed by Certbot
    include /etc/letsencrypt/options-ssl-nginx.conf; # managed by Certbot

}

server {
    if ($host = etherpad.mydomain.de) {
        return 301 https://$host$request_uri;
    } # managed by Certbot


    listen [::]:80; # managed by Certbot
    server_name  etherpad.mydomain.de;
    return 404; # managed by Certbot
}

How it works

The etherpad backend, which is reverse-proxied inside nginx, will add a X-Frame-Options: sameorigin header, effectively disallowing iframes from other domains. Using the add_header clause, nginx will overwrite this value with Allow-From https://gather.town. The browser will only see Allow-From https://gather.town, allowing iframe inclusion from the listed domains.

Posted by Uli Köhler in Networking, nginx

A modern Docker-Compose config for Etherpad using nginx as reverse proxy

This is the configuration I use to run my etherpad installations behind nginx:

docker-compose.yml

version: "3.5"
services:
  etherpad:
    image: etherpad/etherpad:latest
    environment:
      - TITLE=My Etherpad
      - DEFAULT_PAD_TEXT=My Etherpad
      - ADMIN_PASSWORD=${ETHERPAD_ADMIN_PASSWORD}
      - ADMIN_USER=admin
      - DB_TYPE=mysql
      - DB_HOST=mariadb
      - DB_PORT=3306
      - DB_USER=etherpad
      - DB_PASS=${MARIADB_PASSWORD}
      - DB_NAME=etherpad
      - DB_CHARSET=utf8mb4
      - API_KEY=${ETHERPAD_API_KEY}
      - SESSION_REQUIRED=false
    ports:
      - "17201:9001"
    depends_on:
      - mariadb

  mariadb:
    image: mariadb:latest
    environment:
      - MYSQL_ROOT_PASSWORD=${MARIADB_ROOT_PASSWORD}
      - MYSQL_DATABASE=etherpad
      - MYSQL_USER=etherpad
      - MYSQL_PASSWORD=${MARIADB_PASSWORD}
    volumes:
      - './mariadb_data:/var/lib/mysql'
    command: ['mysqld', '--character-set-server=utf8mb4', '--collation-server=utf8mb4_unicode_ci']
    healthcheck:
      test: mysqladmin -p${MARIADB_ROOT_PASSWORD} ping -h localhost
      interval: 20s
      start_period: 10s
      timeout: 10s
      retries: 3

.env

Remember to replace the passwords with your own random passwords !

MARIADB_ROOT_PASSWORD=ue9zahb8Poh1oeMieyaeFaicheecaz
MARIADB_PASSWORD=dieQuoghiu6sao9aiphei7eiquael5
ETHERPAD_API_KEY=een4Chohdiedohzaich0ega5thung6
ETHERPAD_ADMIN_PASSWORD=ahNee3OhR6aiCootaiy7uBui3rooco

nginx config

server {
    server_name  etherpad.mydomain.de;
    access_log off;
    error_log /var/log/nginx/etherpad.mydomain.de-error.log;

    location / {
        proxy_pass http://localhost:17201/;
        proxy_http_version 1.1;
        proxy_set_header Upgrade $http_upgrade;
        proxy_set_header Connection "Upgrade";
        proxy_redirect default;
    }

    listen [::]:443 ssl; # managed by Certbot
    ssl_certificate /etc/letsencrypt/live/etherpad.mydomain.de/fullchain.pem; # managed by Certbot
    ssl_certificate_key /etc/letsencrypt/live/etherpad.mydomain.de/privkey.pem; # managed by Certbot
    include /etc/letsencrypt/options-ssl-nginx.conf; # managed by Certbot

}

server {
    if ($host = etherpad.mydomain.de) {
        return 301 https://$host$request_uri;
    } # managed by Certbot


    listen [::]:80; # managed by Certbot
    server_name  etherpad.mydomain.de;
    return 404; # managed by Certbot
}

How to autostart

Our post Create a systemd service for your docker-compose project in 10 seconds provides an extremely quick and easy-to-use one-liner to create and autostart a systemd service running docker-compose for your etherpad instance.

How to backup

This will be detailed in a future blogpost.

Posted by Uli Köhler in Container, Docker, nginx

nginx redirect to output of command

You can use the lua plugin (sudo apt -y install libnginx-mod-http-lua) in order to use this technique to redirect to an URL that is the output of a command line command:

location = /myurl {
    access_by_lua_block  {
        local process = io.popen("curl -fsSL http://mydomain.com/file-which-contains-an-URL.txt", "r")
        local output = process:read('*a')
        process:close()
        ngx.redirect(output)
    }
}

By default, this redirects using the status code 302 (temporary redirect – not cached). In case you want a 301 (moved permanently) instead, use

ngx.redirect(output, 301)


Posted by Uli Köhler in nginx

How to setup OnlyOffice using docker-compose & nginx

Prerequisite: Install docker and docker-compose

For example, follow our guide How to install docker and docker-compose on Ubuntu in 30 seconds

Step 1: Create docker-compose.yml

Create the directory where we’ll install OnlyOffice using

sudo mkdir /var/lib/onlyoffice

and then edit the docker-compose configuration using e.g.

sudo nano /var/lib/onlyoffice/docker-compose.yml

and copy and paste this content

version: '3'
services:
  onlyoffice-documentserver:
    image: onlyoffice/documentserver:latest
    restart: always
    environment:
      - JWT_ENABLED=true
      - JWT_SECRET=ahSaTh4waeKe4zoocohngaihaub5pu
    ports:
      - 2291:80
    volumes:
      - ./onlyoffice/data:/var/www/onlyoffice/Data
      - ./onlyoffice/lib:/var/lib/onlyoffice
      - ./onlyoffice/logs:/var/log/onlyoffice
      - ./onlyoffice/db:/var/lib/postgresql

Now add your custom password in JWT_SECRET=... ! Don’t forget this step, or anyone can use your OnlyOffice server ! I’m using pwgen 30 to generate a new random password (install using sudo apt -y install pwgen).

Step 2: Setup systemd service

Create the service using sudo nano /etc/systemd/system/onlyoffice.service:

[Unit]
Description=OnlyOffice server
Requires=docker.service
After=docker.service

[Service]
Restart=always
User=root
Group=docker
# Shutdown container (if running) when unit is stopped
ExecStartPre=/usr/local/bin/docker-compose -f /var/lib/onlyoffice/docker-compose.yml down -v
# Start container when unit is started
ExecStart=/usr/local/bin/docker-compose -f /var/lib/onlyoffice/docker-compose.yml up
# Stop container when unit is stopped
ExecStop=/usr/local/bin/docker-compose -f /var/lib/onlyoffice/docker-compose.yml down -v

[Install]
WantedBy=multi-user.target

Now enable & start the service using

sudo systemctl enable onlyoffice
sudo systemctl start onlyoffice

Step 3:  Create nginx reverse proxy configuration

Note that we mapped OnlyOffice’s port 80 to port 2291. In case you’re not using nginx as reverse proxy, you need to manually configure your reverse proxy to pass requests to port 2291.

server {
    server_name onlyoffice.mydomain.org;

    access_log /var/log/nginx/onlyoffice.access_log;
    error_log /var/log/nginx/onlyoffice.error_log info;

    location / {
        proxy_pass http://127.0.0.1:2291;
        proxy_http_version 1.1;
        proxy_read_timeout 3600s;
        proxy_set_header Upgrade $http_upgrade;
        proxy_set_header Connection "Upgrade";
        proxy_set_header Host            $host;
        proxy_set_header X-Forwarded-For $remote_addr;
        proxy_set_header X-Forwarded-Proto $scheme;
        add_header X-Frontend-Host $host;
        # Uncomment this line and reload once you have setup TLS for that domain !
        # add_header Strict-Transport-Security "max-age=31536000; includeSubDomains" always;
    }

    listen 80;
}

Now test if your nginx config works using nginx -t and reload using service nginx reload.

Now I recommend to setup Let’s Encrypt for your domain so that your OnlyOffice instance will only be accessed using an encrypted connecting (sudo certbot --nginx, see other guides if you don’t know how to do that).

Once certbot asks you whether to redirect, choose option 2 – Redirect to HTTPS.

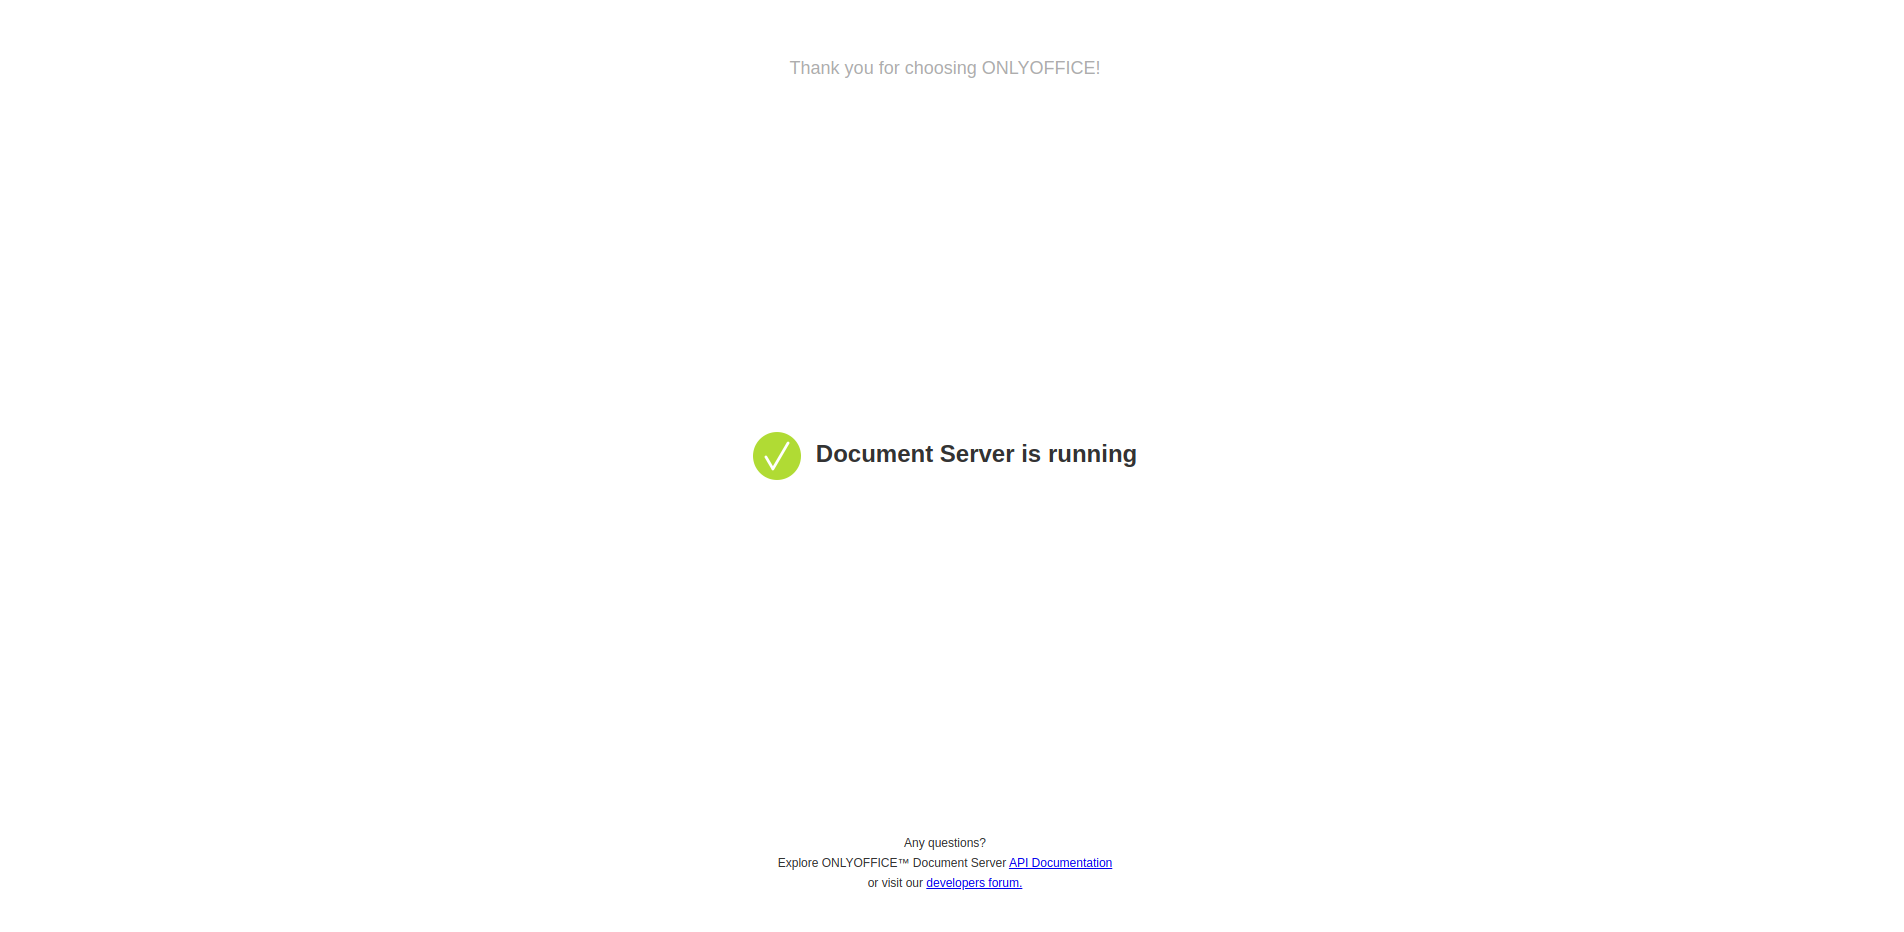
Step 4: Test OnlyOffice

If your installation worked, you should see a screen like this:

If not, try checking the logs using

sudo journalctl -xu onlyoffice

(Optional) Step 5: Configure NextCloud to use OnlyOffice

If you are running NextCloud, go to Settings => ONLYOFFICE and enter your domain and the JWT_SECRET you created before:

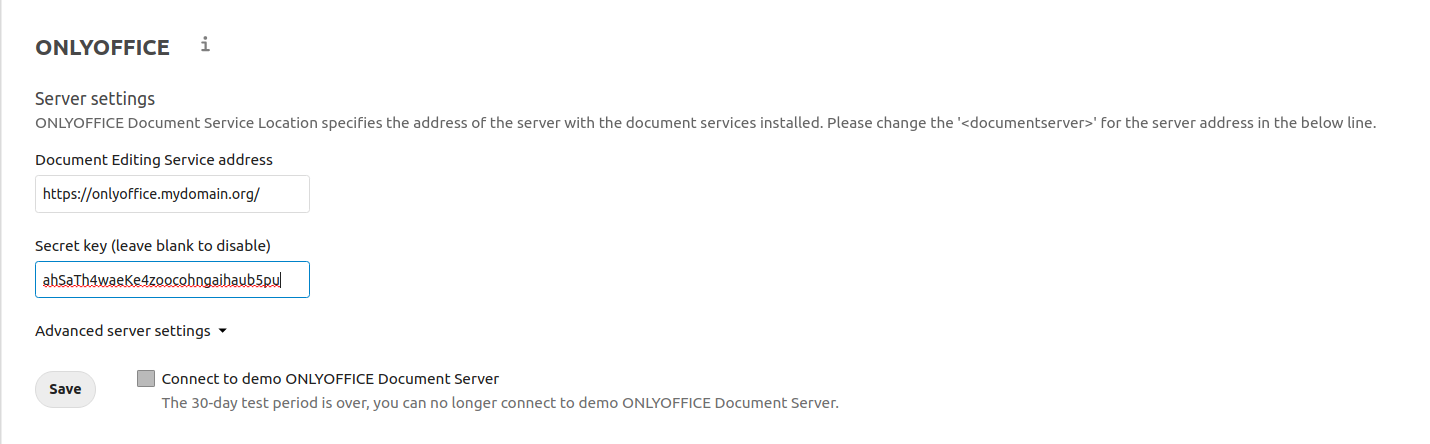
Ensure that Connect to demo ONLYOFFICE Document Server is unchecked and click Save.

Nextcloud will tell you at the top right if it has been able to connect to your OnlyOffice instance successfully:

  • Settings successfully updated means that NextCloud is now connected to OnlyOffice
  • Invalid token means that your password / secret key does not match
  • Other messages typically mean that your OnlyOffice is not running or that you haven’t entered the correct domain or protocol. I recommend to only use https:// – use http:// for testing only and don’t forget to revert back to https:// once you have found the issue.
Posted by Uli Köhler in Container, Docker, Linux, nginx

How to fix NextCloud OnlyOffice MixedContent or ‘Refused to frame ‘http://…’ because it violates the following Content Security Policy directive: “frame-src https://…”.

Problem:

In reverse-proxy setups  forwarding requests to OnlyOffice like our reference setup there you might encounter issues like

Refused to frame 'http://onlyoffice.mydomain.com/' because it violates the following Content Security Policy directive: "frame-src https://onlyoffice.mydomain.com/".

Solution:

Just add

proxy_set_header X-Forwarded-Proto $scheme;

directly after your proxy_pass clause in your nginx config, then run sudo service nginx reload.

The reason for this issue is that OnlyOffice thinks it’s being loaded using HTTP, but the Nextcloud page prevents insecure content from being loaded.

Using a proxy other than nginx? Just ensure that every proxied request (i.e. every request directed towards the OnlyOffice instance) has the X-Forwarded-Proto header set to the protocol of the original request – which should be https.

Posted by Uli Köhler in Nextcloud, nginx

How to setup OnlyOffice using docker-compose, systemd and nginx

In this setup we show how to setup OnlyOffice using nginx as a reverse proxy, docker-compose to run and configure the OnlyOffice image and systemd to automatically start and restart the OnlyOffice instance. Running it in a reverse proxy configuration allows you to have other domains listening on the same IP address and have a central management of Let’s Encrypt SSL certificates.

We will setup the instance in /opt/onlyoffice on port 2291.

Save this file as /opt/onlyoffice/docker-compose.yml and don’t forget to change JWT_SECRET to a random password!

version: '3'
services:
  onlyoffice-documentserver:
    image: onlyoffice/documentserver:latest
    restart: always
    environment:
      - JWT_ENABLED=true
      - JWT_SECRET=Shei9AifuZ4ze7udahG2seb3aa6ool
    ports:
      - 2291:80
    volumes:
      - ./onlyoffice/data:/var/www/onlyoffice/Data
      - ./onlyoffice/lib:/var/lib/onlyoffice
      - ./onlyoffice/logs:/var/log/onlyoffice
      - ./onlyoffice/db:/var/lib/postgresql

Now we can create the systemd service. I created it using TechOverflow’s docker-compose systemd .service generator. Save it in /etc/systemd/system/OnlyOffice.service:

[Unit]
Description=OnlyOffice
Requires=docker.service
After=docker.service

[Service]
Restart=always
User=root
Group=docker
# Shutdown container (if running) when unit is stopped
ExecStartPre=/usr/local/bin/docker-compose -f /opt/onlyoffice/docker-compose.yml down
# Start container when unit is started
ExecStart=/usr/local/bin/docker-compose -f /opt/onlyoffice/docker-compose.yml up
# Stop container when unit is stopped
ExecStop=/usr/local/bin/docker-compose -f /opt/onlyoffice/docker-compose.yml down

[Install]
WantedBy=multi-user.target

Now we can enable & start the service using

sudo systemctl enable OnlyOffice.service
sudo systemctl start OnlyOffice.service

Now let’s create the nginx config in /etc/nginx/sites-enabled/OnlyOffice.conf. Obviously, you’ll have to modify at least the

 server {
    server_name onlyoffice.mydomain.com;

    access_log /var/log/nginx/onlyoffice.access_log;
    error_log /var/log/nginx/onlyoffice.error_log info;

    location / {
        proxy_pass http://127.0.0.1:2291;
        proxy_http_version 1.1;
        proxy_read_timeout 3600s;
        proxy_set_header Upgrade $http_upgrade;
        proxy_set_header Connection "Upgrade";
        proxy_set_header Host $host;
        proxy_set_header X-Forwarded-For $remote_addr;
        proxy_set_header X-Forwarded-Proto $scheme;
        add_header X-Frontend-Host $host;
    }

    listen 80;
}

Check the validity of the nginx config using

sudo nginx -t

and unless it fails, reload nginx using

sudo service nginx reload

Now I recommend to use certbot to enable TLS encryption on your domain. You should be familiar with these steps already ; my approach is to sudo apt -y install python-certbot-nginx, then certbot --nginx --staging to first obtain a staging certificate to avoid being blocked if there are any issues and after you have obtained the staging certificate use certbot --nginx and Renew & replace cert. After that, run sudo service nginx reload and check if you domain works with HTTPS. You should always choose redirection to HTTPS if certbot asks you.

Posted by Uli Köhler in Docker, nginx

Auto-generate nginx forwarding configs using this script

A major hassle for me when setting up lots of docker-based services on a machine is to setup the individual nginx configs to forward the domains to the correct services.

TechOverflow provides a simple way to automatically generate nginx configs for a single domain to configure port forwarding to a specific port.

wget -qO- https://techoverflow.net/scripts/generate-nginx-docker-config.sh | sudo bash /dev/stdin service.mydomain.com 1234

Note: This script was tested on Ubuntu 18.04 and is regularly used by myself and others. However, if used incorrectly or in case there is a major bug, it might damage your webserver configuration, so be sure to be prepared to fix any issues that might arise. This script is provided without any warranty, expressed or implied.

Remember to replace service.mydomain.com by your domain and 1234 by the local port your docker service is listening to.

The script will generate /etc/nginx/sites-enabled/[domain].conf.

Run

sudo nginx -t

to check if the config syntax is OK, and only if that succeeds, run

sudo service nginx reload

Now your domain should be online and I recommend running

sudo certbot --nginx


Posted by Uli Köhler in nginx

How to fix nginx FastCGI error ‘upstream sent too big header while reading response header from upstream’

Problem:

You’re getting 502 Bad gateway errors in your nginx + FastCGI (PHP) setup. You see error messages like

2020/01/28 11:58:19 [error] 9728#9728: *1 upstream sent too big header while reading response header from upstream, client: 2001:16b8:2681:7600:bc28:b49d:3318:e9c4, server: techoverflow.net, request: "GET /category/calculators/ HTTP/2.0", upstream: "fastcgi://unix:/var/run/php/php7.2-fpm.sock:", host: "techoverflow.net", referrer: "https://techoverflow.net/?s=calcul"

in your error log.

Solution:

You need to increase your FastCGI buffers by adding

fastcgi_buffers 32 256k;
fastcgi_buffer_size 512k;

next to every instance of fastcgi_pass in your nginx config and then restarting nginx:

sudo service nginx restart

Note that the values for the buffer sizes listed in this example are just recommendations and might be adjusted up or down depending on your requirements – however, these values tend to work well for modern server hardware (although many administrators tend to use smaller buffers).

Posted by Uli Köhler in nginx

How to set Access-Control-Allow-Origin * in nginx

To allow access from all origins, use

add_header 'Access-Control-Allow-Origin' '*' always;

You might want to add

add_header 'Access-Control-Allow-Methods' 'GET, POST, OPTIONS';

as well.

Posted by Uli Köhler in nginx

How to make your own ‘get my current IP address’ server using only nginx

Note: In some configurations, this returns e.g. ::ffff:1.2.3.4 for IPv4 requests and I did not resolve this yet

This nginx config will return the user’s IP address to the user. Note that it won’t work behind a reverse proxy, it actually needs to listen on port 80 and/or 443 of the IP address of the domain it is served as.

location = /api/get-my-ip {
    add_header 'Access-Control-Allow-Origin' '*' always;
    add_header 'Access-Control-Allow-Methods' 'GET, OPTIONS';
    add_header 'Content-Type' 'text/plain charset=UTF-8';
    return 200 '$remote_addr';
}

This is a JSON-returning variant:

location = /api/get-my-ip-json {
    add_header 'Access-Control-Allow-Origin' '*' always;
    add_header 'Access-Control-Allow-Methods' 'GET, OPTIONS';
    add_header 'Content-Type' 'text/plain charset=UTF-8';
    return 200 '{"ip": "$remote_addr"}';
}

This configuration is available online, for free, at techoverflow.net: See How to get your current IPv4 address using wget and How to get your current IPv6 address using wget

Posted by Uli Köhler in Networking, nginx

How to fix nginx rewrite redirect causing certbot verification errors

When using a redirection to a new domain using rewrite in my nginx config, I had issues with Let’s Encrypt not being able to verify the domain ownership when using certbot --nginx.

My redirect statement was

location / {
    rewrite ^/$ https://newdomain.com permanent;
    rewrite ^/(.*)$ https://newdomain.com/$1 permanent;
}

I was able to fix the issue by instead using this redirect statement:

location / {
     return 301 https://newdomain.com$request_uri;
}

After using this, I was able to use certbot --nginx without any issues.

Posted by Uli Köhler in nginx

How to redirect to a new domain using nginx

In order to redirect to a different domain using nginx, use this snippet inside your server {...} block:

location / {
     return 301 https://newdomain.com$request_uri;
}

Full example:

server {
    server_name old.domain;
    listen 80;

    location / {
         return 301 https://techoverflow.net$request_uri;
    }
}
Posted by Uli Köhler in nginx