By default, Tasmota reports the sensor readings such as smart plug energy only every 5 minutes (300 seconds). In order to report them every 10 seconds, run this via the web UI console:
TelePeriod 10
By default, Tasmota reports the sensor readings such as smart plug energy only every 5 minutes (300 seconds). In order to report them every 10 seconds, run this via the web UI console:
TelePeriod 10
First, upgrade your Tasmota to the latest firmware. For me, only firmware 10.1.0+ worked with Home-Assistant MQTT autodiscovery.
Then, configure your MQTT server and username/password using the webinterface.
After that, open the console in the webinterface and enter
SetOption19 1
and press return. Now reboot Tasmota using the webinterface.
Due to limited flash size issues, always use the .bin.gz if the current Tasmota is at least version 8.2 (older versions do not support the .gz format!)
When trying to do a Tasmota firmware upgrade on the Nous A1T, you see this error message:
Upload Failed
Upload buffer miscompare
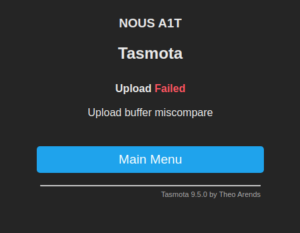
This issue occurs because in the default configuration there is not enough flash space to flash the firmware.
However, this is easy to fix: First, flash the tasmota-minimal.bin.gz firmware, then flash the regular tasmota.bin.gz firmware using the webinterface of the minimal firmware.
Download link for the minimal firmware
Download link for the regular firmware
After that, upgrades will work just fine.
When Homeassistant shows you 403: forbidden instead of the login prompt, the most likely cause is that your user got banned due to too many failed login attempts.
Edit configuration.yaml and set
login_attempts_threshold: 100
from the default 5, which should unban you. You might also need to configure the trusted_proxies to contain the IP of a reverse proxy server (typically running on 127.0.0.1). If that does not help, disable the IP ban entirely. This is a complete configuration.yml http section that works:
http:
  use_x_forwarded_for: true
  trusted_proxies:
  - 127.0.0.1
  ip_ban_enabled: false
  login_attempts_threshold: 500
When starting up HomeAssistant, e.g. using docker-compose up, you see this error message:
homeassistant    | 2021-12-27 19:55:46 WARNING (Recorder) [homeassistant.components.recorder.util] The system could not validate that the sqlite3 database at //config/home-assistant_v2.db was shutdown cleanly
homeassistant    | 2021-12-27 19:55:47 ERROR (Thread-3) [homeassistant.components.mqtt] Unable to connect to the MQTT broker: Connection Refused: not authorised.
homeassistant    | 2021-12-27 19:55:47 WARNING (Thread-3) [homeassistant.components.mqtt] Disconnected from MQTT server 127.0.0.1:1883 (5)
homeassistant    | 2021-12-27 19:55:48 ERROR (Thread-3) [homeassistant.components.mqtt] Unable to connect to the MQTT broker: Connection Refused: not authorised.
h
Your configuration.yml does not have the correct username and/or password for your MQTT server.
This is an example section that works if the MQTT server has the correct user:
mqtt:
  broker: "127.0.0.1"
  username: "homeassistant"
  password: "ep2ooy8di3avohn1Ahm6eegheiResh"
Also check if the MQTT server such as Mosquitto has the correct user with the correct password.
First, create a directory where HomeAssistant will reside. I use /opt/homeassistant.
Create docker-compose.yml:
version: '3.5'
services:
  homeassistant:
    container_name: homeassistant
    restart: unless-stopped
    image: ghcr.io/home-assistant/home-assistant:stable
    network_mode: host
    privileged: true
    environment:
      - TZ=Europe/Berlin
    volumes:
      - ./homeassistant_config:/config
    depends_on:
      - mosquitto
  mosquitto:
    image: eclipse-mosquitto
    network_mode: host
    volumes:
      - ./mosquitto_conf:/mosquitto/config
      - ./mosquitto_data:/mosquitto/data
      - ./mosquitto_log:/mosquitto/log
Now start homeassistant so it creates the default config files:
docker-compose up
Once you see
homeassistant | [services.d] done.
Press Ctrl+C to abort.
Now we’ll create the Mosquitto MQTT server config file in mosquitto_conf/mosquitto.conf:
persistence true
persistence_location /mosquitto/data/
log_dest file /mosquitto/log/mosquitto.log

listener 1883
## Authentication ##
allow_anonymous false
password_file /mosquitto/config/mosquitto.passwd
Now create the mosquitto password file and fix the permissions using
touch mosquitto_conf/mosquitto.passwd
chown -R 1883:1883 mosquitto_conf
We can now start create the homeassistant mosquitto user using
docker-compose run mosquitto mosquitto_passwd -c /mosquitto/config/mosquitto.passwd homeassistant
Enter a random password that will be used for the homeassistant user
Now we can edit the homeassistant config homeassistant_config/configuration.yml. This is my config – ensure to insert the random MQTT password we used before instead of ep2ooy8di3avohn1Ahm6eegheiResh:
# Configure a default setup of Home Assistant (frontend, api, etc)
default_config:

http:
  use_x_forwarded_for: true
  trusted_proxies:
  - 127.0.0.1
  ip_ban_enabled: true
  login_attempts_threshold: 5

mqtt:
  broker: "127.0.0.1"
  username: "homeassistant"
  password: "ep2ooy8di3avohn1Ahm6eegheiResh"

# Text to speech
tts:
  - platform: google_translate

group: !include groups.yaml
automation: !include automations.yaml
script: !include scripts.yaml
scene: !include scenes.yaml
Now we can start the server using
docker-compose up
You can also use our script to generate a systemd service to autostart the docker-compose config on boot:
curl -fsSL https://techoverflow.net/scripts/create-docker-compose-service.sh | sudo bash /dev/stdin
Now login to the web interface on port 8123 and configure your HomeAssistant!
The following setting in configuration.yml connects to a local mosquitto MQTT broker using username and password:
mqtt:
  broker: "127.0.0.1"
  username: "homeassistant"
  password: "iraughij3Phoh7ne9Aoxingi2eimoo"
configuration.yml:default_config: http: use_x_forwarded_for: true trusted_proxies: - 127.0.0.1 ip_ban_enabled: true login_attempts_threshold: 5 mqtt: broker: "127.0.0.1" username: "homeassistant" password: "iraughij3Phoh7ne9Aoxingi2eimoo" # Text to speech tts: - platform: google_translate group: !include groups.yaml automation: !include automations.yaml script: !include scripts.yaml scene: !include scenes.yaml
When running home-assistant (using docker or other methods) behind a reverse proxy such as nginx, you see 400: Bad request response codes and the following error message appears in the HomeAssistant logs:
homeassistant | 2021-11-25 03:03:59 ERROR (MainThread) [homeassistant.components.http.forwarded] A request from a reverse proxy was received from 127.0.0.1, but your HTTP integration is not set-up for reverse proxies
Edit config/configuration.yaml and add:
http:
  use_x_forwarded_for: true
  trusted_proxies:
  - 127.0.0.1
  ip_ban_enabled: true
  login_attempts_threshold: 5
just below the default_config: line, adding a newline in between. If your reverse proxy is running on another host, replace 127.0.0.1 by the IP address of that host.
configuration.yml example:# Configure a default setup of Home Assistant (frontend, api, etc) default_config: http: use_x_forwarded_for: true trusted_proxies: - 127.0.0.1 ip_ban_enabled: true login_attempts_threshold: 5 # Text to speech tts: - platform: google_translate group: !include groups.yaml automation: !include automations.yaml script: !include scripts.yaml scene: !include scenes.yaml
Now restart home-assistant and your reverse proxy should work fine.
Your Docker container running home-assistant always exits immediately after starting up, with the log being similar to this:
$ docker-compose up
Recreating homeassistant ... done
Attaching to homeassistant
homeassistant    | [s6-init] making user provided files available at /var/run/s6/etc...exited 0.
homeassistant    | [s6-init] ensuring user provided files have correct perms...exited 0.
homeassistant    | [fix-attrs.d] applying ownership & permissions fixes...
homeassistant    | [fix-attrs.d] done.
homeassistant    | [cont-init.d] executing container initialization scripts...
homeassistant    | [cont-init.d] done.
homeassistant    | [services.d] starting services
homeassistant    | [services.d] done.
homeassistant    | [finish] process exit code 256
homeassistant    | [finish] process received signal 15
homeassistant    | [cont-finish.d] executing container finish scripts...
homeassistant    | [cont-finish.d] done.
homeassistant    | [s6-finish] waiting for services.
homeassistant    | [s6-finish] sending all processes the TERM signal.
homeassistant    | [s6-finish] sending all processes the KILL signal and exiting.
homeassistant exited with code 0
You need to start the container with --privileged=true if using docker directly to start up the service, or use privileged: true if using docker-compose.
Here’s an example of a working docker-compose.yml file:
version: '3.5'
services:
  homeassistant:
    container_name: homeassistant
    restart: unless-stopped
    image: ghcr.io/home-assistant/home-assistant:stable
    network_mode: host
    privileged: true
    environment:
      - TZ=Europe/Berlin
    volumes:
      - ./config:/config
https://techoverflow.net/wp-admin/post-new.php#category-all