Teensy

Teensy 4.x timer interrupt example using TimerTree

void myTimerInterrupt() {
  // TODO Your code goes here
  // The following functions may be useful here:
  // Timer3.start(); // Start counting & clear counter
  // Timer3.stop(); // => stop counting but do not clear counter
  // Timer3.restart(); // => clear counter
  // Timer3.resume(); // => Start, without clearing counter
}

void setup()
{
  Timer3.initialize(20000);
  Timer3.attachInterrupt(myTimerInterrupt);
  Timer3.start();
}


Posted by Uli Köhler in Arduino, Electronics, Embedded, Teensy

Teensy 4.1 Arduino external interrupt (pin interrupt) minimal example

In setup(), use

attachInterrupt(digitalPinToInterrupt(23), myInterrupt, RISING);

to configure the interrupt on Teensy Pin 23 on the RISING edge.

Add this function, which will be called during the interrupt:

void myInterrupt() {
  // Your code goes here
}


Posted by Uli Köhler in Electronics, Teensy

Teensy 4.x Quadrature Encoder minimal example in PlatformIO/Arduino

This example uses PlatformIO and the Teensy-4.x-Quad-Encoder-Library to implement a hardware quadrature encoder on pins 0 and 1. Remember that the teensy will be destroyed if you use 5V encoder signals. You can only use 3.3V signals!

#include <Arduino.h>
#include <QuadEncoder.h>

QuadEncoder encoder(1, 0, 1, 0);

void setup() {
    Serial.begin(115200);
    encoder.setInitConfig();
    encoder.init();
}

void loop() {
    int32_t position = encoder.read();
    // Compute position in mm and print it
    constexpr float mm_per_count = 0.0012;
    float mm = position * mm_per_count;
    Serial.printf("Position: %+3.4f (count %ld)\r\n", mm, position);
    // Print every 50ms
    delay(50);
}
[env:teensy41]
platform = teensy
board = teensy41
framework = arduino
monitor_speed = 115200
lib_deps =
    git+https://github.com/mjs513/Teensy-4.x-Quad-Encoder-Library


Posted by Uli Köhler in C/C++, Electronics, Embedded, PlatformIO, Teensy

Which pins on the Teensy 4.1 are 5V-tolerant?

None of the Teensy 4.1 IO pins are 5V tolerant. You can not connect any 5V signals to any of those pins, doing so will severely damage the hardware. You always need to use some kind of level shifter when connecting 5V signals to the Teensy.

Posted by Uli Köhler in Electronics, Teensy

How to use FlexPWM NanoEdge Placer on the Teensy 4

You can not use the NanoEdge placer block on the Teensy 4.0 / Teensy 4.1 because the NanoEdge placer hardware unit is not built into the i.MX RT1062 processor the Teensy uses.

Source: Teensy Forums

Posted by Uli Köhler in Electronics, Teensy

Does the i.MX RT1060 / Teensy 4.x support Bit-Banding?

The i.MX RT1060 is a Cortex M7 microcontroller. Cortex M7 microcontrollers do not support bitbanding. Hence, the i.MX RT106x series (including the Teensy 4.0 and 4.1 boards) do not support bitbanding. See this ARM forum post for more details.

Posted by Uli Köhler in Electronics, Embedded, Teensy

How to enable Teensy 4.x GPT timer in free running mode

In this example, we’ll use direct register access to enable the GPT1 timer module at 8 MHz counter frequency in free-running mode. Free-running mode means that the timer will just roll over once it has reached 0xFFFFFFFF (maximum 32 bit value).

How to configure the timer

CCM_CCGR1 |= CCM_CCGR1_GPT1_BUS(CCM_CCGR_ON); // Enable clock to GPT1 module
GPT1_CR = 0; // Disable for configuration
GPT1_PR = 3 - 1; // Prescale 24 MHz clock by 3 => 8 MHz
GPT1_CR = GPT_CR_EN /* Enable timer */
  | GPT_CR_CLKSRC(1) /* 24 MHz peripheral clock as clock source */
  | GPT_CR_FRR /* Free-Run, do not reset */;

Full example

This example works in PlatformIO without any external libraries, but you need to set monitor_speed = 115200 in platformio.ini so the serial port is read at the correct speed.

#include <Arduino.h>

void setup()
{
    // Setup USB serial port so we can print the timer value
    Serial.begin(115200);

    // Enable timer    
    CCM_CCGR1 |= CCM_CCGR1_GPT1_BUS(CCM_CCGR_ON); // Enable clock to GPT1 module
    GPT1_CR = 0; // Disable for configuration
    GPT1_PR = 3 - 1; // Prescale 24 MHz clock by 3 => 8 MHz
    GPT1_CR = GPT_CR_EN /* Enable timer */
      | GPT_CR_CLKSRC(1) /* 24 MHz peripheral clock as clock source */
      | GPT_CR_FRR /* Free-Run, do not reset */;
}

void loop()
{
    // Print the timer count every ~100 ms
    Serial.println(GPT1_CNT);
    delay(100);
}
 

Posted by Uli Köhler in Electronics, Embedded, Teensy

Teensy 4.1 interrupts at multi-MHz speed using TeensyTimerTool

As shown in our example Teensy 4.1 PlatformIO 2MHz Timer interrupt GPIO output you can use TeensyTimerTool to generate multi-MHz timer interrupts. In our experiments, we could generate GPIO-toggling interrupts up to 4 MHz:

The trick here is to use std::chrono time literals. The TeensyTimerTools PeriodicTimer example only shows us how to use microsecond resolution:

t1.begin(callback, 250'000); // 250ms

but we can simply use 250ns to obtain nanosecond resolution:

t1.begin(callback, 250ns);

Here’s our observation what works and what doesn’t:

  • Multi-MHz GPIO-toggling interrupts as shown in our example only work on GPT1 and GPT2, they do NOT work on PIT and TMRx. We did not investigate the precise reasoning behind this, and there might also be ways to
  • As usual, the interrupt must only contain a small number of instructions. We’re using digitalWriteFast(), but using direct register access would be even faster.
Posted by Uli Köhler in Electronics, Embedded, PlatformIO, Teensy

Teensy 4.1 PlatformIO 2MHz Timer interrupt GPIO output

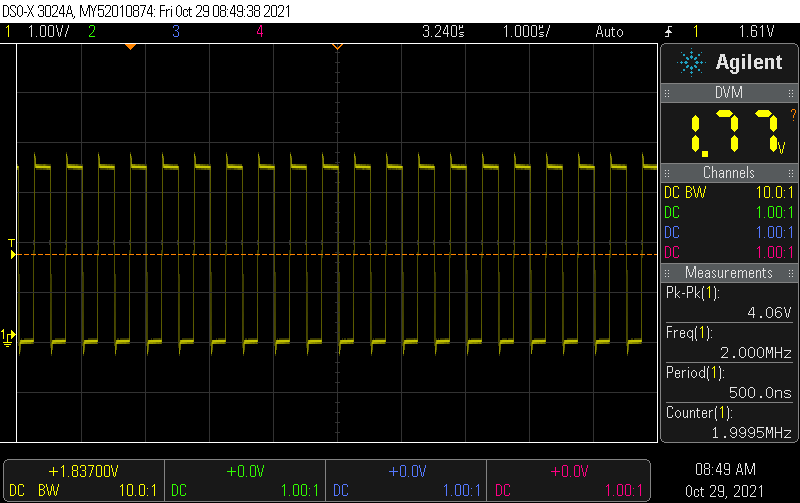
The following PlatformIO example uses TeensyTimerTool on the Teensy 4.1 to run a simple GPIO toggle interrupt at 4 MHz interrupt frequency (i.e. the interrupt is being run 4 million times each second), resulting in a 2 MHz GPIO output:

#include <Arduino.h>
#include <TeensyTimerTool.h>
using namespace TeensyTimerTool;

PeriodicTimer t1(GPT2);

void callback() // toggle the LED
{
    digitalWriteFast(33, !digitalReadFast(33));
}

void setup()
{
    t1.begin(callback, 250ns);

    pinMode(33, OUTPUT);
}

void loop()
{
}

platformio.ini:

[env:teensy41]
platform = teensy
board = teensy41
framework = arduino
lib_deps = luni64/TeensyTimerTool @ ^0.3.5

The 2MHz output looks like this on the oscilloscope:

Posted by Uli Köhler in PlatformIO, Teensy