Technologies

Jupyter adjustment widgets with plus and minus buttons

First, define get and set functions:

# Basic examples for get and set value functions

def get_value(): # will only be used to get the initial value
    return httpx.get(f"http://{ip}/api/get-value").json()["value"]

def set_value(value):
    httpx.get(f"http://{ip}/api/set-value?nedge={value}")


import ipywidgets as widgets
from IPython.display import display

# Step 2: Define the widget components
value_display = widgets.IntText(value=get_value(), description='Value:', disabled=False)
plus_button = widgets.Button(description='+')
minus_button = widgets.Button(description='-')

def on_value_change(change):
    set_value(change['new'])
    
value_display.observe(on_value_change, names='value')

# Step 4: Define the update functions
def on_plus_button_clicked(b):
    value_display.value += 1

def on_minus_button_clicked(b):
    value_display.value -= 1

# Step 5: Bind the update functions to the buttons
plus_button.on_click(on_plus_button_clicked)
minus_button.on_click(on_minus_button_clicked)

# Step 6: Display the widgets
widgets_layout = widgets
display(value_display, plus_button, minus_button)


Posted by Uli Köhler in Jupyter, Python

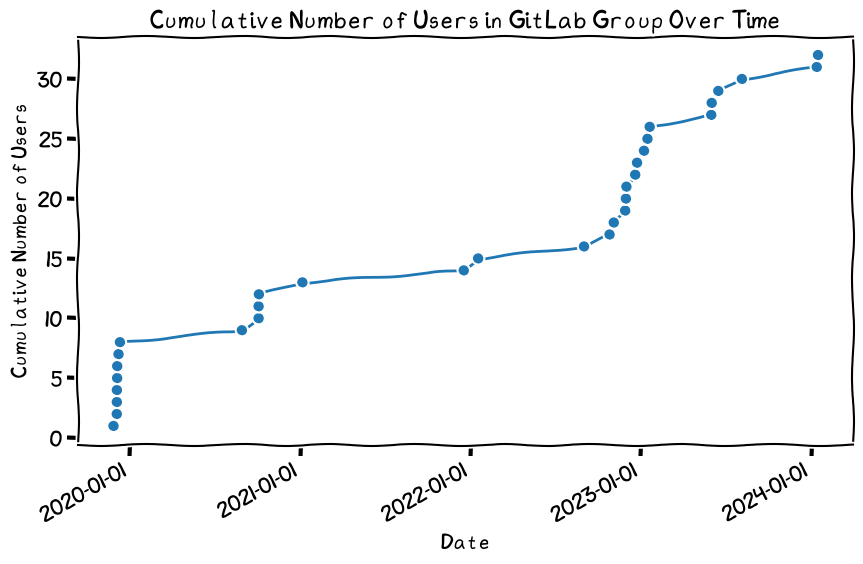
How to plot cumulative Gitlab group members using matplotlib

This is based on my previous post to find the group ID by group name.

import matplotlib.pyplot as plt
import matplotlib.dates as mdates
from datetime import datetime
import gitlab

def plot_cumulative_members(members):
    # Convert date strings to datetime objects and sort
    dates = sorted([datetime.strptime(member["access_granted_date"], '%Y-%m-%dT%H:%M:%S.%fZ') for member in members])

    # Calculate cumulative count
    cumulative_count = range(1, len(dates) + 1)

    # Plotting
    plt.figure(figsize=(10, 6))
    plt.plot(dates, cumulative_count, marker='o')
    plt.title('Cumulative Number of Users in GitLab Group Over Time')
    plt.xlabel('Date')
    plt.ylabel('Cumulative Number of Users')
    plt.grid(True)
    plt.gca().xaxis.set_major_formatter(mdates.DateFormatter('%Y-%m-%d'))
    plt.gca().xaxis.set_major_locator(mdates.YearLocator())
    plt.gcf().autofmt_xdate()  # Rotation
    plt.show()

group_id = get_gitlab_group_id("Protectors of the Footprint Realm", 'glpat-...')
members = get_group_members(group_id, 'glpat-...')
with plt.xkcd():
    plot_cumulative_members(members)

Posted by Uli Köhler in GitLab, Python

How to find Gitlab group ID using Gitlab API via python-gitlab

pip install python-gitlab
import gitlab

def get_gitlab_group_id(group_name, access_token):
    # Initialize a GitLab instance with your private token
    gl = gitlab.Gitlab('https://gitlab.com', private_token=access_token)

    # Search for groups by name
    groups = gl.groups.list(search=group_name)
    for group in groups:
        if group.name == group_name or group.path == group_name:
            return group.id

    raise ValueError("Group not found")

# Usage example
group_id = get_gitlab_group_id("Protectors of the Footprint Realm", 'glpat-yykIsrTg6RyKcFAvd2os')

group_id will be an integer, for example 6604163

Posted by Uli Köhler in GitLab, Python

How to generate random strings that look like Gitlab access tokens

import secrets
import string

def generate_gitlab_access_token(length=20):
    characters = string.ascii_letters + string.digits + '_'
    token = ''.join(secrets.choice(characters) for _ in range(length))
    return f'glpat-{token}'

# Example usage:
access_token = generate_gitlab_access_token()
print(access_token)

Example output:

glpat-yykIsrTg6RyKcFAvd2os


Posted by Uli Köhler in GitLab, Python

Jupyter widget notebook with two sliders, making a HTTP POST request on change

This extended version of Jupyter Widget notebook with interactive IntSlider making a HTTP POST request features two sliders instead of one.

import ipywidgets as widgets
import httpx
from IPython.display import display
# Define the slider widget
delaySlider = widgets.IntSlider(
    value=450,  # Initial value
    min=0,    # Minimum value
    max=2000,    # Maximum value
    step=1,  # Step size
    description='Delay:'
)
lengthSlider = widgets.IntSlider(
    value=20*10,  # Initial value
    min=0,    # Minimum value
    max=40*10,    # Maximum value
    step=1,  # Step size
    description='Length:'
)
# Define a function to handle slider changes
def on_slider_change(change):
    # Define the API URL with the slider value
    httpx.post("http://10.1.2.3/api/configure", json={"channels":[{
        "channel": 0,
        "delay": delaySlider.value,
        "length": lengthSlider.value,
    }]})
# Attach the slider change handler to the slider widget
delaySlider.observe(on_slider_change, names='value')
lengthSlider.observe(on_slider_change, names='value')
# Display the slider widget in the notebook
display(widgets.Box(children=[delaySlider, lengthSlider]))


Posted by Uli Köhler in Jupyter, Python

Jupyter Widget notebook with interactive IntSlider making a HTTP POST request

This Jupyter notebook displays an IntSlider and makes a HTTP POST request with JSON body on every change using the httpx library.

import ipywidgets as widgets
import httpx
from IPython.display import display
# Define the slider widget
slider = widgets.IntSlider(
    value=450,  # Initial value
    min=0,    # Minimum value
    max=2000,    # Maximum value
    step=1,  # Step size
    description='Value:'
)
# Define a function to handle slider changes
def on_slider_change(change):
    slider_value = change['new']
    # Define the API URL with the slider value
    httpx.post("http://10.1.2.3/api/configure", json={"delay": slider_value})
# Attach the slider change handler to the slider widget
slider.observe(on_slider_change, names='value')
# Display the slider widget in the notebook
display(slider)


Posted by Uli Köhler in Jupyter, Python

Syncthing docker-compose setup using Traefik as reverse proxy with HTTP basic auth

This setup uses a docker-compose based syncthing setup and Traefik as reverse proxy. HTTP basic auth is used to prevent unauthorized access to the syncthing web UI. Alternatively, you can use the built-in password protection.

See Simple Traefik docker-compose setup with Lets Encrypt Cloudflare DNS-01 & TLS-ALPN-01 & HTTP-01 challenges for my HTTPS setup for Traefik.

version: "3"
services:
  syncthing:
    image: syncthing/syncthing
    hostname: Syncthing-Myserver
    environment:
      - PUID=1000
      - PGID=1000
    volumes:
      - ./syncthing_data:/var/syncthing
    ports: # NOTE: 8384 not forwarded, this is handled by traefik
      - "22000:22000"
      - "21027:21027/udp"
    restart: unless-stopped
    labels:
      - "traefik.enable=true"
      - "traefik.http.routers.syncthing.rule=Host(`syncthing.myserver.net`)"
      - "traefik.http.routers.syncthing.entrypoints=websecure"
      - "traefik.http.routers.syncthing.tls.certresolver=cloudflare"
      - "traefik.http.routers.syncthing.tls.domains[0].main=myserver.net"
      - "traefik.http.routers.syncthing.tls.domains[0].sans=*.myserver.net"
      - "traefik.http.services.syncthing.loadbalancer.server.port=8384"
      - "traefik.http.routers.syncthing.middlewares=syncthing-auth"
      # Auth (this is shared with the server). NOTE: generate with "htpasswd -n admin" and REPLACE EVERY "$" by "$$" IN THE OUTPUT!
      - "traefik.http.middlewares.syncthing-auth.basicauth.users=admin:$$apr1$$ehr8oqEZ$$tHoOVLG19oHdUe81IeePo1
"


Posted by Uli Köhler in Docker, Traefik

Jupyter ipywidgets slider making a HTTP request on change

The following Jupyter cell uses ipywidgets to display a slider from 0.0 … 1.0 and, on change, will submit a HTTP request to http://10.1.2.3.4/api/set-power?power=[slider value].

import ipywidgets as widgets
import requests
from IPython.display import display

# Define the slider widget
slider = widgets.FloatSlider(
    value=0.5,  # Initial value
    min=0.0,    # Minimum value
    max=1.0,    # Maximum value
    step=0.01,  # Step size
    description='Slider:'
)

# Define a function to handle slider changes
def on_slider_change(change):
    slider_value = change['new']
    # Define the API URL with the slider value
    api_url = f'http://10.1.2.3.4/api/set-power?power={slider_value}'
    print(api_url)
    
    # Make the HTTP request
    try:
        response = requests.get(api_url)
        response.raise_for_status()  # Raise an exception for HTTP errors
        print(f'Successfully set power to {slider_value}')
    except requests.exceptions.RequestException as e:
        print(f'Error: {e}')

# Attach the slider change handler to the slider widget
slider.observe(on_slider_change, names='value')

# Display the slider widget in the notebook
display(slider)


Posted by Uli Köhler in Jupyter, Python

How to fix unixODBC “Can’t open lib ‘postgresql’: file not found” on Linux

Problem:

When you try to connect to a PostgreSQL database using a ODBC application such as KiCAD (database library connection), you see the following error message:

[unixODBC][Driver Manager]Can't open lib 'postgresql' : file not found

Solution:

First, install the ODBC PostgreSQL driver adapter:

sudo apt -y install odbc-postgresql

Using that driver, you would typically use a driver setting such as

Driver={PostgreSQL Unicode}


Posted by Uli Köhler in Databases, KiCAD, Linux

KiCAD PostgreSQL database connection string example

This has been tested on Linux with sudo apt -y install odbc-postgresql:

Driver={PostgreSQL Unicode};Server=127.0.0.1;Port=5432;Username=kicad;Password=abc123;Database=kicad;


Posted by Uli Köhler in Databases, KiCAD

How to fix slow “bup fuse” file copy using “bup restore”

If you are using bup fuse to mount a bup repo and then try to cp -r a directory from it you might have notice

bup restore is much much faster than using bup fuse. In my usecase with about 32k files of total size 1.3GB to restore, bup fuse took more than 2 hours, whereas bup restore was finished in under a minute.

Here’s an example

BUP_DIR=/tmp/my-website.bup/ bup restore wordpress/2023-08-01-000044/wordpress

Don’t know which path to enter here? Use bup ls to find out. Start at the top:

BUP_DIR=/tmp/my-website.bup/ bup ls

and then continue downwards the hierarchy until you’ve reached the folder you intend to restore:

BUP_DIR=/tmp/my-website.bup/ bup ls wordpress/
BUP_DIR=/tmp/my-website.bup/ bup ls wordpress/2023-08-01-000044
BUP_DIR=/tmp/my-website.bup/ bup ls wordpress/2023-08-01-000044/wordpress


Posted by Uli Köhler in bup

C++ S3 GetObject minimal streaming example using minio-cpp

#include <client.h>
#include <iostream>

using std::cout, std::endl;

int main(int argc, char* argv[]) {
  // Create S3 base URL.
  minio::s3::BaseUrl base_url("minio.mydomain.com");

  // Create credential provider.
  minio::creds::StaticProvider provider(
      "my-access-key", "my-secret-key");

  // Create S3 client.
  minio::s3::Client client(base_url, &provider);
  std::string bucket_name = "my-bucket";

  // Build arguments object
  minio::s3::GetObjectArgs args;
  args.bucket = bucket_name;
  args.object = "my-object.txt";
  args.datafunc = [](minio::http::DataFunctionArgs args) -> bool {
    // This function will be called for every data chunk of the object
    cout << args.datachunk;
    return true;
  };

  // Perform the request (calling datafunc for every chunk)
  minio::s3::GetObjectResponse resp = client.GetObject(args);
  // Handle error (if any)
  if (resp) {
    cout << endl // end line after file content
         << "data of my-object is received successfully" << endl;
  } else {
    cout << "Error during GetObject(): " << resp.Error().String() << endl;
  }

  return EXIT_SUCCESS;
}


Posted by Uli Köhler in C/C++, S3

C++ S3 ListObjects minimal example using minio-cpp

#include <client.h>

int main(int argc, char* argv[]) {
  // Create S3 base URL.
  minio::s3::BaseUrl base_url("minio.mydomain.com");

  // Create credential provider.
  minio::creds::StaticProvider provider(
      "my_access_key", "my_secret_key");

  // Create S3 client.
  minio::s3::Client client(base_url, &provider);
  std::string bucket_name = "my-bucket";

  minio::s3::ListObjectsArgs args;
  args.bucket = bucket_name;
  // Optional prefix filter
  args.prefix = "folder/";

  minio::s3::ListObjectsResult result = client.ListObjects(args);
  for (; result; result++) {
      minio::s3::Item item = *result;
      if (!item) {
        throw std::runtime_error("Error during ListObjects(): " + item.Error().String());
      }
      std::cout << item.name << std::endl;
  }

  return EXIT_SUCCESS;
}


Posted by Uli Köhler in C/C++, S3

Where to find Windows KVM drivers ISO

You can download a ISO containing Windows KVM guest drivers on the fedora repository.

Posted by Uli Köhler in Virtualization

XenOrchestra default username/password credentials

The default username/password for XenOrchestra are:

Posted by Uli Köhler in Virtualization

How to fix boto3 upload_fileobj TypeError: Strings must be encoded before hashing

Problem:

You are trying to use boto3′ upload_fileobj() to upload a file to S3 storage using code such as

# Create connection to Wasabi / S3
s3 = boto3.resource('s3',
    endpoint_url = 'https://minio.mydomin.com',
    aws_access_key_id = 'ACCESS_KEY',
    aws_secret_access_key = 'SECRET_KEY'
)
# Get bucket object
my_bucket = s3.Bucket('my-bucket')
# Upload string to file
with open("testtext.txt", "r") as f:
    my_bucket.upload_fileobj(f, "test.txt")

But when you try to run it, you see the following stacktrace:

Traceback (most recent call last):
  File "/home/uli/dev/MyProject/put.py", line 13, in <module>
    my_bucket.upload_fileobj(f, "test.txt")
  File "/usr/local/lib/python3.10/dist-packages/boto3/s3/inject.py", line 678, in bucket_upload_fileobj
    return self.meta.client.upload_fileobj(
  File "/usr/local/lib/python3.10/dist-packages/boto3/s3/inject.py", line 636, in upload_fileobj
    return future.result()
  File "/usr/local/lib/python3.10/dist-packages/s3transfer/futures.py", line 103, in result
    return self._coordinator.result()
  File "/usr/local/lib/python3.10/dist-packages/s3transfer/futures.py", line 266, in result
    raise self._exception
  File "/usr/local/lib/python3.10/dist-packages/s3transfer/tasks.py", line 139, in __call__
    return self._execute_main(kwargs)
  File "/usr/local/lib/python3.10/dist-packages/s3transfer/tasks.py", line 162, in _execute_main
    return_value = self._main(**kwargs)
  File "/usr/local/lib/python3.10/dist-packages/s3transfer/upload.py", line 758, in _main
    client.put_object(Bucket=bucket, Key=key, Body=body, **extra_args)
  File "/usr/local/lib/python3.10/dist-packages/botocore/client.py", line 530, in _api_call
    return self._make_api_call(operation_name, kwargs)
  File "/usr/local/lib/python3.10/dist-packages/botocore/client.py", line 933, in _make_api_call
    handler, event_response = self.meta.events.emit_until_response(
  File "/usr/local/lib/python3.10/dist-packages/botocore/hooks.py", line 416, in emit_until_response
    return self._emitter.emit_until_response(aliased_event_name, **kwargs)
  File "/usr/local/lib/python3.10/dist-packages/botocore/hooks.py", line 271, in emit_until_response
    responses = self._emit(event_name, kwargs, stop_on_response=True)
  File "/usr/local/lib/python3.10/dist-packages/botocore/hooks.py", line 239, in _emit
    response = handler(**kwargs)
  File "/usr/local/lib/python3.10/dist-packages/botocore/utils.py", line 3088, in conditionally_calculate_md5
    md5_digest = calculate_md5(body, **kwargs)
  File "/usr/local/lib/python3.10/dist-packages/botocore/utils.py", line 3055, in calculate_md5
    binary_md5 = _calculate_md5_from_file(body)
  File "/usr/local/lib/python3.10/dist-packages/botocore/utils.py", line 3068, in _calculate_md5_from_file
    md5.update(chunk)
TypeError: Strings must be encoded before hashing

Solution:

You need to open the file in binary mode  ("rb") . Instead of

with open("testtext.txt", "r") as f:

use

with open("testtext.txt", "rb") as f:

This will fix the issue.

Posted by Uli Köhler in Python, S3

Example of a AWS4 canonical request & string-to-sign

This canonical request has been extracted via boto3 source code modification.

HEAD
/my-bucket/folder/example-object.txt

host:minio.mydomain.com
x-amz-content-sha256:e3b0c44298fc1c149afbf4c8996fb92427ae41e4649b934ca495991b7852b855
x-amz-date:20230608T220550Z

host;x-amz-content-sha256;x-amz-date
e3b0c44298fc1c149afbf4c8996fb92427ae41e4649b934ca495991b7852b855

The corresponding string-to-sign is

AWS4-HMAC-SHA256
20230608T220550Z
20230608/us-east-1/s3/aws4_request
e2d4be537009ba634ecc7a2717df2d74e612c63d31cf4bd8cb94eaf43be3665b

Note that the checksum of the string-to-sign does not match since some details of the canonical request have been modified.

Posted by Uli Köhler in S3

How to make S3 HeadObject request using boto3

import boto3

# Create connection to S3
s3 = boto3.client('s3',
    endpoint_url = 'https://minio.mydomain.com',
    aws_access_key_id = 'VO5APZH2B2KS75GWORFQ',
    aws_secret_access_key = 'IBVCAVULO2CQTOQEE6VQ'
)

s3.head_object(
    Bucket='my-bucket',
    Key='folder/example-object.txt'
)


Posted by Uli Köhler in Python, S3

How to verify AWS Signature Version 4 implementations

You can use the Python botocore package which is a dependency of the boto3 AWS client in order to verify if your implementation produces correct HMAC signatures for a given string-to-sign.

In order to do this, we’ll use a fixed AmzDate i.e. timestamp and fixed (but random) access keys. The string to sign is also some random-ish string. The only thing that matters is that none of the random strings are empty and all values are the same for the verification path using botocore as they are for your own implementation.

After that, compare the output from the botocore implementation with your own custom implementation. While you might want to check your implementation with different values, in practice it works (maybe except for rare corner cases) if it works correctly for one string.

Verifying the outpt

from botocore.auth import SigV4Auth
from collections import namedtuple

# Data structures for isolated testing
Credentials = namedtuple('Credentials', ['access_key', 'secret_key'])
Request = namedtuple('Request', ['context'])

amzDate = "20130524T000000Z" # Fixed date for testing
signer = SigV4Auth(Credentials(
    access_key="GBWZ45MPRGGMO2JILBXA",
    secret_key="346NO6UJCAMHLHX4SMFA"
), "s3", "global")
signature = signer.signature("ThisStringWillBeSigned", Request(
    context={"timestamp": amzDate}
))
print(signature)

With the values given in this script, the output is

3be60989db53028ca485b46a07df9287a1731df74a234ea247a99febb7c2eb31

Verifying intermediary results

If the global result matches, you’re already finished. There is typically no need to check the intermediary results and input strings.

The SigV4Auth.signature() function doesn’t provide any way of accessing the intermediary results. However, we can just copy its source code to obtain the  relevant intermediaries and print those as hex:

secret_key="346NO6UJCAMHLHX4SMFA"
datestamp = "20130524"
region_name = "global"
service_name = "s3"
string_to_sign = "ThisStringWillBeSigned"

sign_input =  (f"AWS4{secret_key}").encode(), datestamp
k_date = signer._sign(*sign_input)
k_region = signer._sign(k_date, region_name)
k_service = signer._sign(k_region, service_name)
k_signing = signer._sign(k_service, 'aws4_request')
sign_result = signer._sign(k_signing, string_to_sign, hex=True)

print("Sign input: ", sign_input)
print("k_date: ", k_date.hex(), "of length: ", len(k_date))
print("k_region: ", k_region.hex(), "of length: ", len(k_region))
print("k_service: ", k_service.hex(), "of length: ", len(k_service))
print("k_signing: ", k_signing.hex(), "of length: ", len(k_signing))
print("sign_result: ", sign_result)

This prints:

Sign input:  (b'AWS4346NO6UJCAMHLHX4SMFA', '20130524')
k_date:  a788ed61da3106091ac303738fe248c3d391e851858d9b048d3fddf0494cac61 of length:  32
k_region:  90331d205578b73aeaf4ef9082cbb704111d29364dcae4d4405ddfefc4e6a8b0 of length:  32
k_service:  a0b2fb2efe1977349c647d28e86d373aaa67ca9f452c15c7cfbdb9a4fabd685b of length:  32
k_signing:  e02df2af0ce8890816c931c8e72168921f5f481dfbcaf92a35324b65fc322865 of length:  32
sign_result:  3be60989db53028ca485b46a07df9287a1731df74a234ea247a99febb7c2eb31


Posted by Uli Köhler in Python, S3

How to generate random AWS-like access key / secret key in Python

Typically, AWS access keys have a length of 20 characters from the following set: ABCDEFGHIJKLMNOPQRSTUVWXYZ234567 (also called uppercase base32 encoding)

The following Python code can be used to generate random AWS-like access keys & secret keys:

import base64
import secrets

def generate_random_base32_key(length=20):
    """
    Generate a random uppercase base32 string of the given length.
    """
    bytes_length = (length * 5) // 8
    random_bytes = secrets.token_bytes(bytes_length)
    base32_string = base64.b32encode(random_bytes).decode()[:length]
    return base32_string.upper()

# Usage example
random_access_key = generate_random_base32_key(20)
print(random_access_key)

Example output:

  • IBVCAVULO2CQTOQEE6VQ
  • 5ONXKHGNV3ILTX3BGJGA
  • 2B4QYQ2RFGWK2LSON4YQ
  • VO5APZH2B2KS75GWORFQ
  • SXCBFBDXLUNCJMCFM2SQ
Posted by Uli Köhler in Python, S3