You can download a ISO containing Windows KVM guest drivers on the fedora repository.
26
Jun
2023
You can download a ISO containing Windows KVM guest drivers on the fedora repository.
The default username/password for XenOrchestra are:
[email protected]adminUse the following command to install a VirtualBox extension pack on a server or other headless machine:
sudo vboxmanage extpack install [filename]
for example
sudo vboxmanage extpack install Oracle_VM_VirtualBox_Extension_Pack-7.0.8.vbox-extpack
The following sequence allows you to enter the UEFI setup and set the screen size. It does not work for VMs running BIOS!
F2 repeatedly until you see the UEFI setup screen: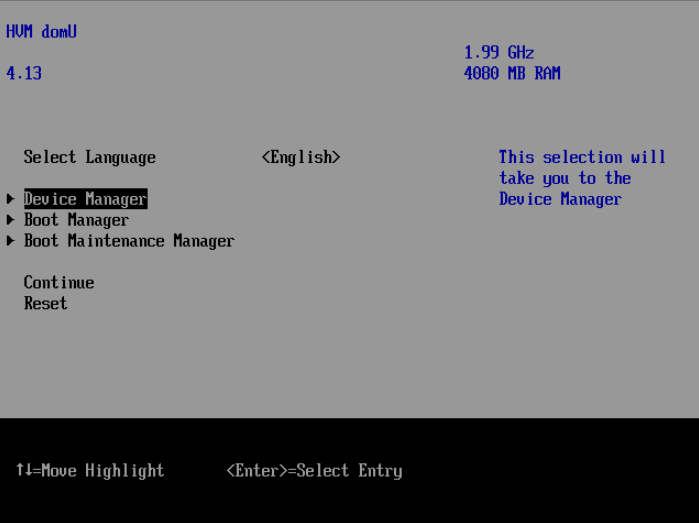
Device Manager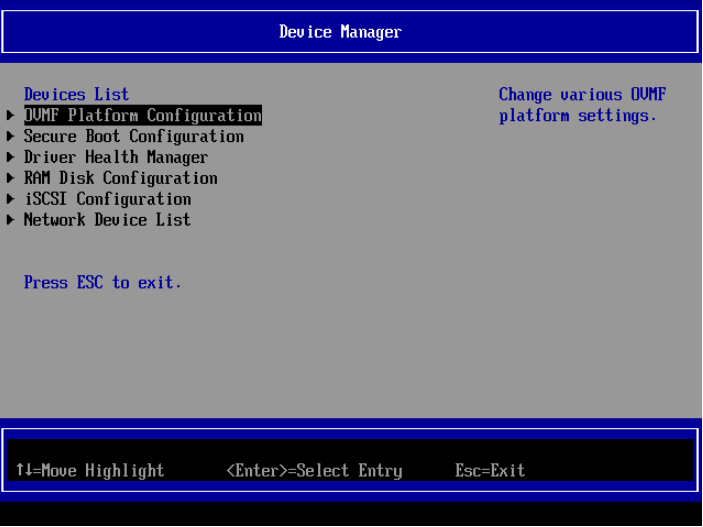
OVMF Platform Configuration and select the screen resolution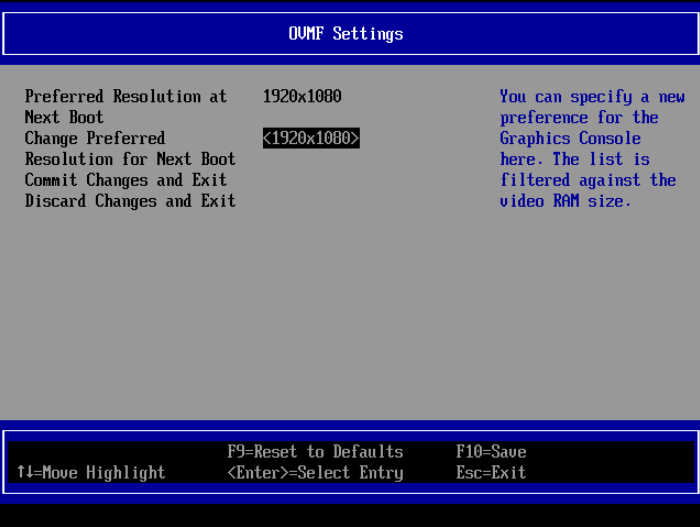
ESC and select Y to save the changes. Continue pressing ESC until you are at the start screen.Reset and wait for the OS to boot. You need to select Reset because the change will only be effective after the next complete reboot.
This post shows you how to disable the XCP-NG windows update device on the command line. This prevents automatic installation of the Citrix drivers, enabling manual install of a custom version.
Note that you can easily disable the Windows update PCIe device in XenOrchestra using a single click, but not in XCP-NG center!
Prerequisite: Shut down the VM in question – usually you need to disable the device before installing Windows!
First, get the UUID of the VM usinjg
xe vm-list
which will output, for each virtual machine, something like:
uuid ( RO)           : 98002b8d-070f-9638-071c-be7e6c82f6a3
     name-label ( RW): CoreOS
    power-state ( RO): running
From that, copy the UUID such as 98002b8d-070f-9638-071c-be7e6c82f6a3.
Now run:
xe vm-param-set uuid=YOURUUID has-vendor-device=false
for example,
xe vm-param-set uuid=98002b8d-070f-9638-071c-be7e6c82f6a3 has-vendor-device=false
Now you can startup your VM with the driver installation PCIe device being disabled.
Based on Simple XenOrchestra setup using docker-compose, this extension of our config from that post features Traefik container labels. For the Traefik configuration, see for example our previous post Simple Traefik docker-compose setup with Lets Encrypt Cloudflare DNS-01 & TLS-ALPN-01 & HTTP-01 challenges
This setup uses a Wildcard certificate but you can also use a non-wildcard cert (e.g. if you don’t have access to the DNS for the DNS01 challenge) by just deleting both traefik.http.routers.xenorchestra.tls.domains... lines and selecting a suitable resolver.
version: '3'
services:
    xen-orchestra:
        restart: unless-stopped
        image: ronivay/xen-orchestra:latest
        container_name: xen-orchestra
        network_mode: host
        stop_grace_period: 1m
        environment:
            - HTTP_PORT=1780
        cap_add:
          - SYS_ADMIN
        security_opt:
          - apparmor:unconfined
        volumes:
          - ./xo-data:/var/lib/xo-server
          - ./redis-data:/var/lib/redis
        labels:
          - "traefik.enable=true"
          - "traefik.http.routers.xenorchestra.rule=Host(`xenorchestra.mydomain.com`)"
          - "traefik.http.routers.xenorchestra.entrypoints=websecure"
          - "traefik.http.routers.xenorchestra.tls.certresolver=cloudflare"
          - "traefik.http.routers.xenorchestra.tls.domains[0].main=mydomain.com"
          - "traefik.http.routers.xenorchestra.tls.domains[0].sans=*.mydomain.com"
          - "traefik.http.services.xenorchestra.loadbalancer.server.port=1780"
You can now login with the default credentials: [email protected] and password admin
By installing tailscale on XCP-NG hosts, you can provide easier access to your virtualization host using VPN.
Run the following commands via SSH as root on the XCP-NG host:
sudo yum-config-manager --add-repo https://pkgs.tailscale.com/stable/centos/7/tailscale.repo
sudo yum -y install tailscale
and enable & start the tailscale daemon tailscaled:
systemctl enable --now tailscaled
On Ubuntu 22.04, this package is not available any more and the best way to install it that is known to me at the moment is to use the guest tools ISO.
Install the package using
sudo apt -y install xe-guest-utilities
Now reboot, which will automatically start the management agent service:
sudo reboot
Also see this variant with Traefik reverse proxy config: XenOrchestra docker-compose setup with Traefik labels
Create a directory such as /opt/xenorchestra and create docker-compose.yml:
version: '3'
services:
    xen-orchestra:
        restart: unless-stopped
        image: ronivay/xen-orchestra:latest
        container_name: xen-orchestra
        network_mode: host
        stop_grace_period: 1m
        environment:
          - HTTP_PORT=1780
        cap_add:
          - SYS_ADMIN
        security_opt:
          - apparmor:unconfined
        volumes:
          - ./xo-data:/var/lib/xo-server
          - ./redis-data:/var/lib/redis
You can choose any HTTP port you want using HTTP_PORT=1780. In this case, we opted for using network_mode: host to bypass the docker networking, since XenOrchestra seems to work better with full network access instead of the container having an own IP.
Now you can use our script from Create a systemd service for your docker-compose project in 10 seconds to automatically start XenOrchestra on boot (and start it immediately):
curl -fsSL https://techoverflow.net/scripts/create-docker-compose-service.sh | sudo bash /dev/stdin
Now access https://<IP of controller>:1780 (or your custom HTTP port) to get started with the XO setup.
For many xe commands on XCP-NG you have to use a host-uuid=... parameter.
In order to find out your Host UUID, use
xe host-list
Example:
[03:19 virt01-xcpng ~]# xe host-list
uuid ( RO)                : 71739b18-2999-4794-a024-87d5d26215d1
          name-label ( RW): virt01-xcpng
    name-description ( RW): Default install
In this example, the Host UUID of the only host is 71739b18-2999-4794-a024-87d5d26215d1.
Using CoreOS? See this post instead!
First, insert the guest-tools.iso supplied with XCP-NG into the DVD drive of the virtual machine.
Then run these commands. Note that this will reboot the machine after it finished
sudo mount -o ro /dev/sr0 /mnt/
cd /mnt/Linux
sudo ./install.sh -n
sudo reboot
After the VM reboots, XCP-NG should detect the management agent.
Please eject the guest tools medium from the machine after the reboot! Sometimes unneccessarily mounted media cause issues.
This is the Ignition config that I use to bring up my Fedora CoreOS instance on a VM on my XCP-NG server:
{
  "ignition": {
    "version": "3.2.0"
  },
  "passwd": {
    "users": [
      {
        "groups": [
          "sudo",
          "docker"
        ],
        "name": "uli",
        "sshAuthorizedKeys": [
          "ssh-rsa AAAAB3NzaC1yc2EAAAADAQABAAAAgQDpvDSxIwnyMCFtIPRQmPUV6hh9lBJUR0Yo7ki+0Vxs+kcCHGjtcgDzcaHginj1zvy7nGwmcuGi5w83eKoANjK5CzpFT4vJeiXqtGllh0w+B5s6tbSsD0Wv3SC9Xc4NihjVjLU5gEyYmfs/sTpiow225Al9UVYeg1SzFr1I3oSSuw== sample@host"
        ]
      }
    ]
  },
  "storage": {
    "files": [
      {
        "path": "/etc/hostname",
        "contents": {
          "source": "data:,coreos-test%0A"
        },
        "mode": 420
      },
      {
        "path": "/etc/profile.d/systemd-pager.sh",
        "contents": {
          "source": "data:,%23%20Tell%20systemd%20to%20not%20use%20a%20pager%20when%20printing%20information%0Aexport%20SYSTEMD_PAGER%3Dcat%0A"
        },
        "mode": 420
      },
      {
        "path": "/etc/sysctl.d/20-silence-audit.conf",
        "contents": {
          "source": "data:,%23%20Raise%20console%20message%20logging%20level%20from%20DEBUG%20(7)%20to%20WARNING%20(4)%0A%23%20to%20hide%20audit%20messages%20from%20the%20interactive%20console%0Akernel.printk%3D4"
        },
        "mode": 420
      }
    ]
  },
  "systemd": {
    "units": [
      {
        "enabled": true,
        "name": "docker.service"
      },
      {
        "enabled": true,
        "name": "containerd.service"
      },
      {
        "dropins": [
          {
            "contents": "[Service]\n# Override Execstart in main unit\nExecStart=\n# Add new Execstart with `-` prefix to ignore failure\nExecStart=-/usr/sbin/agetty --autologin core --noclear %I $TERM\nTTYVTDisallocate=no\n",
            "name": "autologin-core.conf"
          }
        ],
        "name": "[email protected]"
      }
    ]
  }
}
Which is build from this YAML:
variant: fcos
version: 1.2.0
passwd:
  users:
    - name: uli
      groups:
        - "sudo"
        - "docker"
      ssh_authorized_keys:
        - "ssh-rsa AAAAB3NzaC1yc2EAAAADAQABAAAAgQDpvDSxIwnyMCFtIPRQmPUV6hh9lBJUR0Yo7ki+0Vxs+kcCHGjtcgDzcaHginj1zvy7nGwmcuGi5w83eKoANjK5CzpFT4vJeiXqtGllh0w+B5s6tbSsD0Wv3SC9Xc4NihjVjLU5gEyYmfs/sTpiow225Al9UVYeg1SzFr1I3oSSuw== sample@computer"

systemd:
  units:
    - name: docker.service
      enabled: true

    - name: containerd.service
      enabled: true
    - name: [email protected]
      dropins:
      - name: autologin-core.conf
        contents: |
          [Service]
          # Override Execstart in main unit
          ExecStart=
          # Add new Execstart with `-` prefix to ignore failure
          ExecStart=-/usr/sbin/agetty --autologin core --noclear %I $TERM
          TTYVTDisallocate=no
storage:
  files:
    - path: /etc/hostname
      mode: 0644
      contents:
        inline: |
          coreos-test
    - path: /etc/profile.d/systemd-pager.sh
      mode: 0644
      contents:
        inline: |
          # Tell systemd to not use a pager when printing information
          export SYSTEMD_PAGER=cat
    - path: /etc/sysctl.d/20-silence-audit.conf
      mode: 0644
      contents:
        inline: |
          # Raise console message logging level from DEBUG (7) to WARNING (4)
          # to hide audit messages from the interactive console
          kernel.printk=4
using
fcct --pretty --strict ignition.yml --output ignition.ign
or TechOverflow’s online transpiler tool.
Install using:
sudo coreos-installer install /dev/xvda --copy-network --ignition-url https://mydomain.com/ignition.ign
Features:
Important note: While installing the Xen utilities using the CD ISO still works, it is outdated and you should prefer installing it using the rpm package. See our post Fedora CoreOS: How to install Xen/XCP-NG guest utilities using rpm-ostree
First, insert the guest-tools.iso supplied with XCP-NG into the DVD drive of the virtual machine.
Then run this sequence of commands to install. Note that this will reboot the CoreOS instance!
curl -fsSL https://techoverflow.net/scripts/install-xenutils-coreos.sh | sudo bash /dev/stdin
This will run the following script:
sudo mount -o ro /dev/sr0 /mnt
sudo rpm-ostree install /mnt/Linux/*.x86_64.rpm
sudo cp -f /mnt/Linux/xen-vcpu-hotplug.rules /etc/udev/rules.d/
sudo cp -f /mnt/Linux/xe-linux-distribution.service /etc/systemd/system/
sudo sed 's/share\/oem\/xs/sbin/g' -i /etc/systemd/system/xe-linux-distribution.service
sudo systemctl daemon-reload
sudo systemctl enable /etc/systemd/system/xe-linux-distribution.service
sudo umount /mnt
sudo systemctl reboot
After rebooting the VM, XCP-NG should detect the management agent.
Based on work by steniofilho on the Fedora Forum.
Please eject the guest tools medium from the machine after the reboot! Sometimes unneccessarily mounted media cause issues.
In order to list VMs on the command line, login to XCP-NG using SSH and run this command:
xe vm-list
Example output:
[16:51 virt01-xcpng ~]# xe vm-list
uuid ( RO)           : 56dc99f2-c617-f7a9-5712-a4c9df54229a
     name-label ( RW): VM 1
    power-state ( RO): running


uuid ( RO)           : 268d56ab-9672-0f45-69ae-efbc88380b21
     name-label ( RW): VM2
    power-state ( RO): running


uuid ( RO)           : 9b1a771f-fb84-8108-8e01-6dac0f957b19
     name-label ( RW): My VM 3
    power-state ( RO): running
When creating a CoreOS container on your XCP-NG host, XCP-NG center or XenOrchestra tells you
Cloud config: Error on getting the default coreOS cloud template
with the error message
XENAPI_MISSING_PLUGIN(xscontainer)
This is a XenServer/XCP-ng error
Log into the host’s console as root using SSH or the console in XCP-NG center or XenOrchestra and run
yum install xscontainer
After that, reload the page (F5) you use to create your container. No host restart is required.
Note that if you have multiple hosts, you need to yum install xscontainer for each host individually.
To download files, use
lxc file pull <container name>/<path>/<filename> <target directory>
To download directories, use
lxc file pull --recursive <container name>/<path>/<filename> <target directory>
Download /root/myfile.txt from mycontainer to the current directory (.):
lxc file pull mycontainer/root/myfile.txt .
Download /root/mydirectory from mycontainer to the current directory (.):
lxc file pull -r mycontainer/root/mydirectory .
You know you can launch an Ubuntu LXC container using
lxc launch ubuntu:18.04 myvm
Now you want to launch a Debian VM using
lxc launch debian:jessie myvm
but you only get this error message:
Error: The remote "debian" doesn't exist
The debian images are (by default) available from the images remote, not the debian remote, so you need to use this:
lxc launch images:debian/jessie myvm
You want to launch some lxd container using lxc launch […] but instead you get the following error message:
Failed container creation: No storage pool found. Please create a new storage pool.
You need to initialize lxd before using it:
lxd init
When it asks you about the backend
Name of the storage backend to use (btrfs, dir, lvm) [default=btrfs]:
choosing the default option (btrfs) means that you’ll have to use a dedicated block device (or a dedicated preallocated file image) for storage. While this is more efficient if you run many containers at a time, I recommend to choose the dir backend for the default storage pool, because that option will be easiest to configure and will not occupy as much space on your hard drive.
See Storage management in lxd for more more details, including different options for storage pools in case you need a more advanced setup.