export https_proxy=http://10.1.2.3:8080/
export http_proxy=http://10.1.2.3:8080/
opkg update
export https_proxy=http://10.1.2.3:8080/ export http_proxy=http://10.1.2.3:8080/
opkg update
Prices according to my own research end of september 2023. Prices may vary – check for yourself.
Note: Quoted pricing is for standard image captchas, without any high usage discounts. The recaptcha pricing varies much more
If you don’t need that many captchas, note the minimum payment!
1.39$/1k + 47% nighttime worker compensation outside their working hours, minimum payment around 7$0.7$/1k, minimum payment around 11.50$, 50 free if verified via SMS0.59$/1k, minimum payment around 7$0.65$/1k, minimum payment around 10$0.146$/1k but only if you use up the entire budget within a month. Probably best suited for extreme power users.3.99$/1k, minimum payment (starter package) around 12$
Generally, I always recommend going with metal-shielded RJ45 ports since those tend not to break as often.
If you want to buy more than, say, 10pcs, you can check out LCSC’s Ethernet Connectors / Modular Connectors lineup. The very good prices compensate for the shipping fee even when buying only medium quantities.
Note that it’s easy to mix up models with and without magnetics at the moment as there is no suitable filter. It’s easiest to just look at the length of the connector – RJ45 connectors without magnetics are almost cubic in size (i.e. length in the direction where you insert the connector is equal to the width) whereas connectors with magnetics are much longer. Nevertheless, always check the datasheet.
Some examples:
0,89€/pc @ 100pcs0,69€/pc @ 100pcs0.80€/pc @ 100pcs0.11€/pc @100pcs0.14€/pc @ 100pcs0.22€/pc @ 100pcsThis example uses the routeros library from PyPI (GitHub) to access the MikroTik API and extract the system identity.
#!/usr/bin/env python3
from routeros import login

routeros = login('admin', 'abc123abc', '192.168.88.1')

output = routeros('/system/identity/print')
# Extract the one identity string from the list of dictionaries
print(output[0]['name'])
In our previous example Netmiko MikroTik RouterOS minimal example we showed how to login to a RouterOS device using netmikoand password-based login.
#!/usr/bin/env python3
from netmiko import ConnectHandler
import os.path
mikrotik = {
    'device_type': 'mikrotik_routeros',
    'host':   '192.168.88.1',
    'username': 'admin',
    'key_file': os.path.expanduser("~/.ssh/id_mikrotik"),
}
with ConnectHandler(**mikrotik) as mikrotik_connection:
    print(mikrotik_connection.send_command(f'/system/identity/print', cmd_verify=False))
name: MySwitch01
You can use this code, for example, in a custom packet handler function.
#include <lwip/prot/ethernet.h>

eth_hdr* hdr = reinterpret_cast<eth_hdr*>(buffer);
auto srcMAC = hdr->src.addr;
auto dstMAC = hdr->dest.addr;

Serial.printf("Received packet: Packet of length %d\n", len);
Serial.printf("    Src MAC: %02X:%02X:%02X:%02X:%02X:%02X\n", srcMAC[0], srcMAC[1], srcMAC[2], srcMAC[3], srcMAC[4], srcMAC[5]);
Serial.printf("    Dst MAC: %02X:%02X:%02X:%02X:%02X:%02X\n", dstMAC[0], dstMAC[1], dstMAC[2], dstMAC[3], dstMAC[4], dstMAC[5]);
Serial.printf("    Our MAC: %02X:%02X:%02X:%02X:%02X:%02X\n", ourEthernetMAC[0], ourEthernetMAC[1], ourEthernetMAC[2], ourEthernetMAC[3], ourEthernetMAC[4], ourEthernetMAC[5]);
The Ethernet packet header is parsed in ethernet_input() in lwip/src/netif/ethernet.c:
By default, esp-idf or the Arduino framework handles incoming Ethernet packets using the
static esp_err_t eth_input_to_netif(esp_eth_handle_t eth_handle, uint8_t *buffer, uint32_t length, void *priv);
function in components/esp_eth/src/esp_eth_netif_glue.c which (besides calling just calls the exported functionesp_netif_receive():
static esp_err_t eth_input_to_netif(esp_eth_handle_t eth_handle, uint8_t *buffer, uint32_t length, void *priv)
{
    return esp_netif_receive((esp_netif_t *)priv, buffer, length, NULL);
}
The function esp_netif_receive() is declared in esp_netif.h and implemented in esp_netif_lwip.c.
This function will call esp_netif->lwip_input_fn(...) on the packet, which will in turn call the interface-type specific .input_fn(...), which is one of
or for wrapped interfaces:
esp_netif_lwip_slip_inputesp_netif_lwip_ppp_inputThe following Typescript example allows you to “ping” an IP address or host name not using ICMP but using TCP connection to a given port. If the TCP connection is accepted, the ping is resolved as true. If no connection can be established, it is returned as false. In any case, no data is exchanged and the connection is closed immediately after establishing it.
import { Socket } from "net";

/**
 * Basic TCP ping that returns true if the connection is successful, false if it fails
 * The socket is closed after the connection attempt, no data is exchanged.
 */
export function TCPConnectPing(ipAddress, timeout=5000, port=80): Promise<boolean> {
    return new Promise((resolve) => {
      const socket = new Socket();
      let connected = false;

      // Set a timeout for the connection attempt
      const timer = setTimeout(() => {
        if (!connected) {
          socket.destroy();
          resolve(false); // Connection timed out
        }
      }, timeout);

      socket.connect(port, ipAddress, () => {
        clearTimeout(timer);
        connected = true;
        socket.destroy();
        resolve(true); // Connection successful
      });

      socket.on('error', (error) => {
        clearTimeout(timer);
        if (!connected) {
          resolve(false); // Connection failed due to error
        }
      });
    });
  }
The following script will download the VirtualHere USB server for the x86_64 called vhusbd.service.
#!/bin/bash
# This script installs and enables/starts the VirtualHere USB server
wget -O /usr/bin/vhusbd https://www.virtualhere.com/sites/default/files/usbserver/vhusbdx86_64
chmod a+x /usr/bin/vhusbd

cat >/etc/systemd/system/vhusbd.service <<EOF
[Unit]
Description=vhusbd
After=network-online.target

[Service]
Restart=always
User=root
Group=root
ExecStart=/usr/bin/vhusbd

[Install]
WantedBy=multi-user.target
EOF

# Enable and start service
systemctl enable --now vhusbd.service
This post showcases how to cross-compile boost for OpenWRT. We’ll use the Teltonika RUTX10 SDK which is already pre-configured with the relevant OpenWRT settings for that router.
The prerequisite for this is that you have:
We assume the SDK is located in ~/rutos-ipq40xx-rutx-gpl.
First, you need to consider that many boost libraries are header-only libraries. For those libraries, you don’t need to compile boost, but it might still be easier to prepare a complete boost folder for installation.
First, download boost and unpack it. Now run
./bootstrap.sh
to compile bjam.
Now, open project-config.jam inside the boost folder and add the following line at the top of the file:
using gcc : openwrt : arm-openwrt-linux-muslgnueabi-g++ ;
Now, inside the boost folder, run the following bash script:
export STAGING_DIR=~/rutos-ipq40xx-rutx-gpl/staging_dir
export TOOLCHAIN=${STAGING_DIR}/toolchain-arm_cortex-a7+neon-vfpv4_gcc-8.4.0_musl_eabi
export CC=${TOOLCHAIN}/bin/arm-openwrt-linux-muslgnueabi-gcc
export CPP=${TOOLCHAIN}/bin/arm-openwrt-linux-muslgnueabi-g++
export PATH=$PATH:${TOOLCHAIN}/bin/

# Insert at the top of project-config.jam
# using gcc : openwrt : arm-openwrt-linux-muslgnueabi-g++ ;

rm -rf ~/boost_rutx10
mkdir -p ~/boost_rutx10/
./b2 --prefix=$HOME/boost_rutx10 install toolset=gcc-openwrt -sNO_COMPRESSION=1
Now, boost is installed in ~/boost_rutx10, which has include and lib subdirectories.
./scripts/feeds update -a
make -i
Yes, RouterOS 7.9+ supports certificates with secp384r1 keys.
RouterOS versions before 7.9 possibly also support secp384r1 certificates but I have no older RouterOS available for testing at the moment.
This example builds on our previous posts NodeJS Mikrotik API minimal example and MikroTik RouterOS: How to power-cycle PoE using the terminal.
The following code will print the PoE status on Port ether5 on the given MikroTik device using the MikroTik API.
import * as MikroNode from 'mikrotik' ;

const host = "192.168.88.1";
const username = "admin";
const password = "admin1234"; // Hope that's not your real password ;)

const connection = MikroNode.getConnection(host, username, password, {
    closeOnDone : true
});

connection.getConnectPromise().then(function(conn) {
    conn.getCommandPromise(['/interface/ethernet/poe/print', '?name=ether5']).then(values => {
        console.log(values);
    }, reason => {
        console.log('Error while running command: ' + JSON.stringify(reason));
    });
}).catch(reason =>  {
    console.log('Error while connecting: ' + JSON.stringify(reason));
});[
{
'.id': '*5',
name: 'ether5',
'poe-out': 'forced-on',
'poe-priority': '10',
'poe-lldp-enabled': 'false',
'power-cycle-ping-enabled': 'false',
'power-cycle-interval': 'none',
'.about': 'poe-out status: power_reset'
}
]
If the PoE is currently being power-cycled, this will print:
[
  {
    '.id': '*5',
    name: 'ether5',
    'poe-out': 'forced-on',
    'poe-priority': '10',
    'poe-lldp-enabled': 'false',
    'power-cycle-ping-enabled': 'false',
    'power-cycle-interval': 'none',
    '.about': 'poe-out status: power_reset'
  }
]
/interface/ethernet/poe/power-cycle ether-MyAccessPoint duration=5
This is an example of access the Mikrotik API using NodeJS and the mikrotik package.
First, install the package
npm i --save mikrotik
Also, in order to enable import statement, set
"type": "module"
in package.json.
import * as MikroNode from 'mikrotik' ;

const host = "10.56.23.4";
const username = "admin";
const password = "N@CdVTz8y@D$KwVS5TTo"; // Hope that's not your real password ;)

const  connection = MikroNode.getConnection(host, username, password, {
    closeOnDone : true
});

connection.getConnectPromise().then(function(conn) {
    conn.getCommandPromise('/ip/address/print').then(addresses => {
        for(const address of addresses) {
            console.info(`Address: ${address.address} on ${address.interface}`);
        }
    }, reason => {
        console.log('Error while running command: ' + JSON.stringify(reason));
    });
}).catch(reason =>  {
    console.log('Error while connecting: ' + JSON.stringify(reason));
});
This will output, for example:
Address: 192.168.88.1/24 on bridge
Address: 10.1.2.3/24 on bridge
In case of bad username/password credentials, it will print:
Error while connecting: {"errors":[{"category":"","message":"invalid user name or password (6)"}],"channelId":"login","channel":{"id":"login","running":true,"closing":true,"closed":true,"clearEvents":false,"saveBuffer":true,"closeOnDone":false,"lastCommand":["/login","=name=admin","=password=admin1234",".tag=login"],"_events":{},"_eventsCount":0}}
The default credentials for the Joplin note app are:
Source: Server README on Github
You are trying to add a new IPv6 pool with settings such as
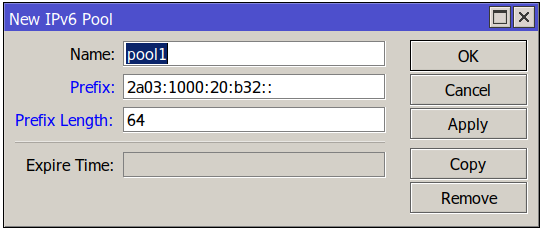
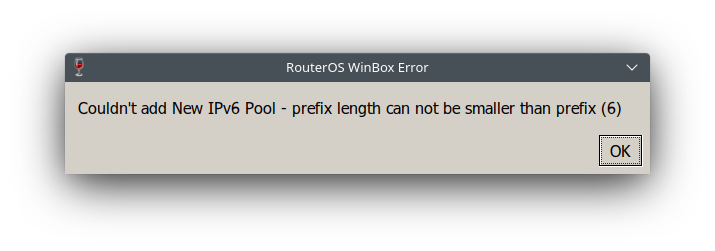
But when you click OK, you see an error message Couldn't add new IPv6 Pool - prefix length cannot be smaller than prefix (6)
You need to add the prefix length – e.g. /64 to the Prefix field as well:
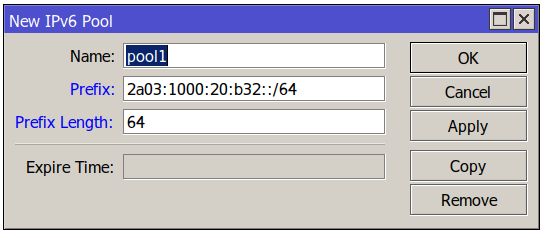
Now click OK or apply and the error will disappear.
Important note: You might want to use a different Prefix Length here (typically it is smaller than the e.g. /64 at the end of the Prefix field so multiple prefixes can be extracted from the given pool.
This one on Wikimedia commons is public domain by @CompanyDude and available as SVG:

By default, mosquitto saves persistence data in mosquitto.db
Source: mosquitto manpage