In our previous post STM32H743 DAC rise/fall time experiments we showed that the STM23H743 has relatively long turn-on / turn-off times of approximately 950 nanoseconds, limiting the generation of fast rectangular signals:

However, there’s a trick how to obtain fall times almost 3 orders of magnitude better for the special case of switching either to full-scale VDD or to GND.
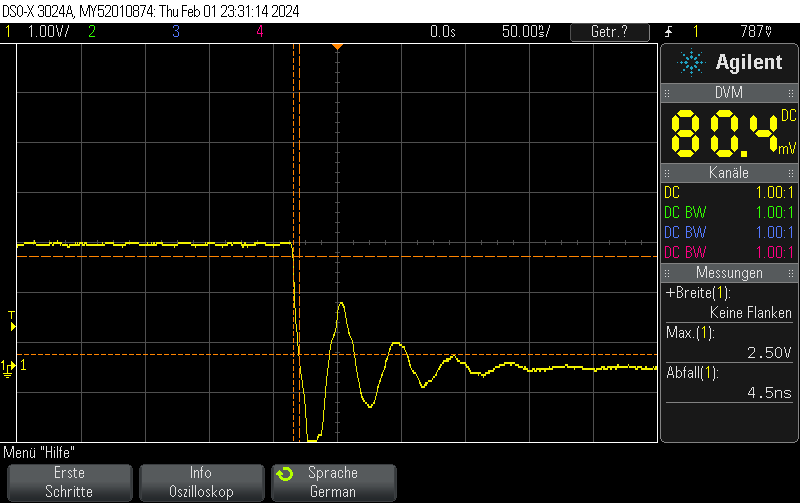
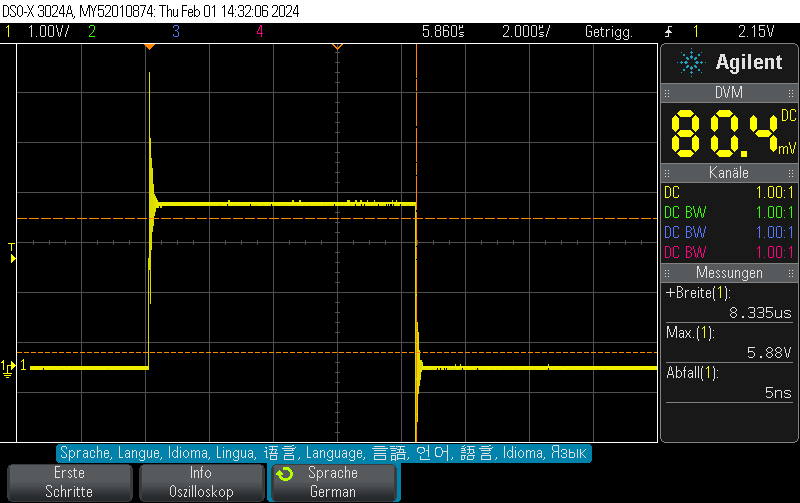
Instead of setting the DAC to the new value, you can just disable the DAC and let the GPIO take care of the rest. This allows for extremely fast fall times of approximately 5ns.
Note that switching the GPIO to digital mode while the DAC is on does not seem to have any effect.
Please note that I didn’t take any care to make the measurement setup immune to the high transients, leading to some oscillation. You should take your own measurements if you have specific requirements.
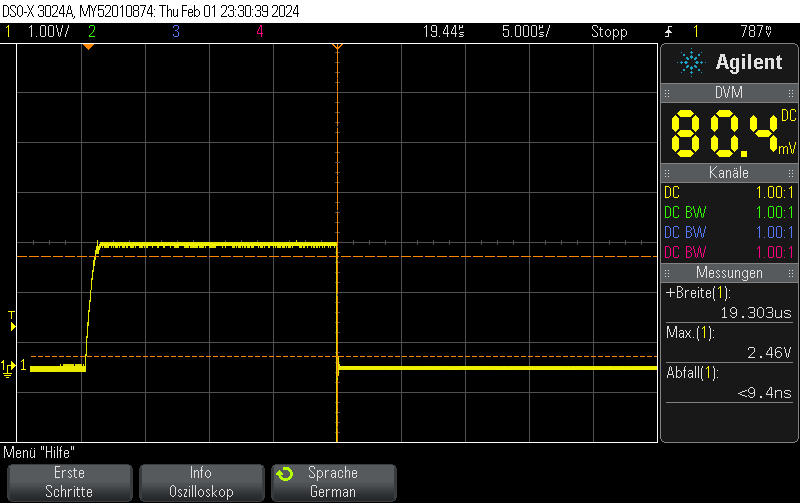
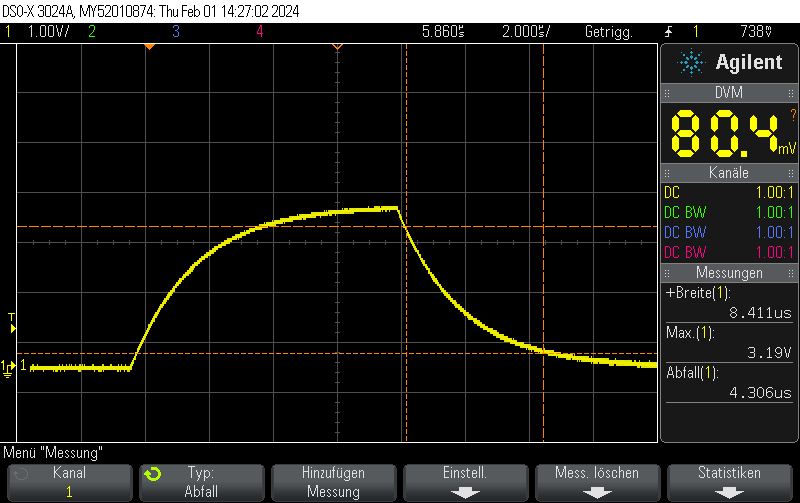
DAC fall time from 3/4 full scale value (3072)
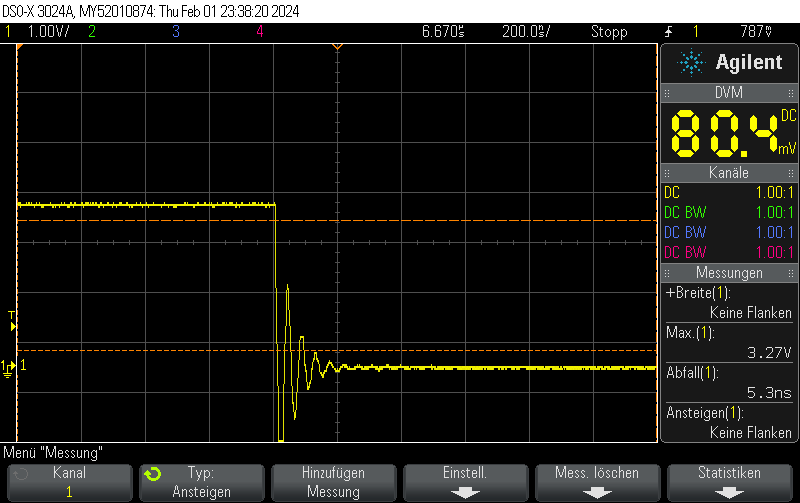
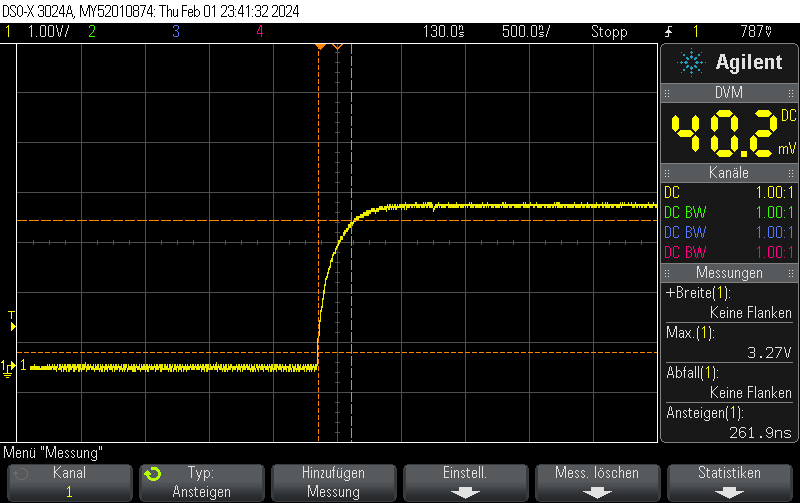
Note that switching on the DAC quickly is outside the scope of this post, but when toggling the DAC enable bit, you can still obtain 250ns rise times pretty easily.
Code example
void Init() {
    DAC_ChannelConfTypeDef sConfig = {0};

    // Initialize DAC
    hdac.Instance = DAC1;
    if (HAL_DAC_Init(&hdac) != HAL_OK)
    {
        // Initialization Error
        __BKPT();
    }

    // Configure DAC channel
    sConfig.DAC_Trigger = DAC_TRIGGER_NONE;  // No trigger, free-running mode
    sConfig.DAC_OutputBuffer = DAC_OUTPUTBUFFER_ENABLE;

    if (HAL_DAC_ConfigChannel(&hdac, &sConfig, DAC_CHANNEL_1) != HAL_OK)
    {
        // Channel configuration Error
        __BKPT();
    }

    // Enable DAC Channel and start the conversion
    if (HAL_DAC_Start(&hdac, DAC_CHANNEL_1) != HAL_OK)
    {
        // Starting Error
        __BKPT();
    }

    // Set DAC to some value, which won't be changed for this example
    if (HAL_DAC_SetValue(&hdac, DAC_CHANNEL_1, DAC_ALIGN_12B_R, 3072) != HAL_OK)
    {
        // Setting DAC value Error
         __BKPT();
    }
}
void Pulse_On() {
// Enable DAC
hdac.Instance->CR |= DAC_CR_EN1;
// Set GPIO to analog mode
GPIO_InitTypeDef GPIO_InitStruct = {0};
GPIO_InitStruct.Pin = GPIO_PIN_4;
GPIO_InitStruct.Mode = GPIO_MODE_ANALOG;
GPIO_InitStruct.Speed = GPIO_SPEED_FREQ_VERY_HIGH;
GPIO_InitStruct.Pull = GPIO_NOPULL;
HAL_GPIO_Init(GPIOA, &GPIO_InitStruct);
}
void Pulse_Off() {
GPIO_InitTypeDef GPIO_InitStruct = {0};
GPIO_InitStruct.Pin = GPIO_PIN_4;
GPIO_InitStruct.Mode = GPIO_MODE_OUTPUT_PP;
GPIO_InitStruct.Speed = GPIO_SPEED_FREQ_VERY_HIGH;
GPIO_InitStruct.Pull = GPIO_NOPULL;
HAL_GPIO_Init(GPIOA, &GPIO_InitStruct);
HAL_GPIO_WritePin(GPIOA, GPIO_PIN_4, GPIO_PIN_RESET);
// Clear EN1 bit of DAC_CR
hdac.Instance->CR &= ~DAC_CR_EN1;
}

 and click