Just use
ESP.restart();
This will immediately reboot the ESP32 controller
Just use
ESP.restart();
This will immediately reboot the ESP32 controller
This example shows how to connect your ESP32 to an existing Wifi network using the Arduino Framework:
#include <Arduino.h>
#include <WiFi.h>

void setup() {
  Serial.begin(115200);
  WiFi.begin("MyWifiNetworkName", "MyWifiPassword");
  while (WiFi.status() != WL_CONNECTED) {
    Serial.println("Wifi connecting...");
    delay(500);
  }
  Serial.println("Wifi connected");
}
void loop() {
  // put your main code here, to run repeatedly:
}
When you see an error message like
Compiling .pio\build\d1_mini\src\main.cpp.o
src\main.cpp:22:11: error: DynamicJsonBuffer is a class from ArduinoJson 5. Please see arduinojson.org/upgrade to learn how to upgrade your program to ArduinoJson version 6
       DynamicJsonBuffer jsonBuffer;
in your PlatformIO or Arduino project using the ArduinoJson library, your code was written for an old version of ArduinoJson.
According to the official ArduinoJson 5 to ArduinoJson 6 migration guide, you need to use DynamicJsonDocument instead. Note that DynamicJsonDocument uses a slightly different API compared to DynamicJsonDocument, hence you might need to adjust more than just changing the class names. But as a first step, replace e.g.
DynamicJsonBuffer json;
by
DynamicJsonDocument json(1024);
While trying to build your project using ArduinoJson, you see an error message like
src\main.cpp:26:12: error: 'ArduinoJson::JsonObject' has no member named 'printTo'
root.printTo(*response);The code you’re using is for an older version of ArduinoJson: It was written for ArduinoJson version 5.x while you’re using ArduinoJson version 6.x. Use serializeJson() instead of root.printTo(*response):
serializeJson(root, *response);
See the official ArduinoJson guide for Migrating from version 5 to 6 for further information on which calls you need to replace.
After I uploaded a broken firmware to my Arduino MKR Zero, it didnt enumerate over USB any more, hence it was not possible to upload a new firmware any more.
However, you can put the Arduino into perpetual bootloader mode by pressing the RESET button twice quickly. In this mode, the Arduino will never attempt to start the broken firmware, so you will be able to upload a new firmware again.
This library provides a schematic symbol for the Arduino MKR zero’s 2.54mm (0.1″) headers. Currently I don’t have the footprint
Download KiCAD schematic library here (ArduinoMKRZero.lib)
This KiCAD library is hereby released into the public domain (CC0 1.0 Universal)
This image shows the Arduino MKR Zero schematic symbol from the library.

I was trying to program my Arduino using an AVRISP MK II programmer, but every time I tried to program it (using avrdude or the Arduino software), I encountered errors like this:
avrdude: stk500v2_command(): command failed
avrdude: stk500v2_program_enable(): bad AVRISPmkII connection status: MOSI fail, RST fail, SCK fail, Target reverse inserted
avrdude: initialization failed, rc=-1
avrdude: AVR device initialized and ready to accept instructions
avrdude: Device signature = 0xb058e2
avrdude: Expected signature for ATmega2560 is 1E 98 01
avrdude: NOTE: "flash" memory has been specified, an erase cycle will be performed
         To disable this feature, specify the -D option.
In my case, the reason for this issue was that there was a shield connected to the SPI bus.
Since the SPI bus on the Arduino is shared with the ICSP header for In-System Programming (ISP), which is the protocol used by external programmers for programming AVR chips, connecting anything else to the SPI bus may cause issues.
Try to disconnect anything from the SPI bus. If the CS (chip select) signal of the extra device on the SPI bus is low, it might interfere with the communication with the AVR chip!
You want to compile an Arduino sketch, but you see an error message like
In file included from sketch/ultralcd.cpp:96:0:
ultralcd_impl_DOGM.h:46:20: error: U8glib.h: No such file or directory
compilation terminated.
exit status 1
U8glib.h: No such file or directory
In Arduino, click on the Tools menu, then click on Manage libraries. Now enter u8glib into the search bar an press Enter.
Scroll down to the U8glib library, hover over it with your mouse and click Install on the bottom right. Now the error should be gone.
You are trying to run the Arduino SigFox first configuration tutorial but when trying to upload the sketch, you get this error message:
SigFox.h: No such file or directory
While you have installed the board libraries and compiler for the SigFox boards, you have not installed the SigFox library itself.
Press Ctrl+Shift+I to open the library manager (you can also open it from the Tools menu).
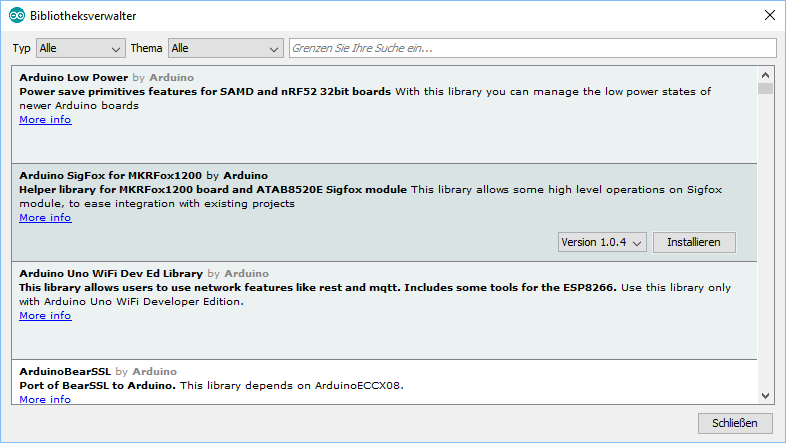
Look for Arduino SigFox for MKRFox1200 by Arduino and click the Install button
Since the SigFox sketches also require the Arduino low power libraries (i.e. you would get the error message ArduinoLowPower.h: No such file or directory), also click the Install button for the Arduino Low Power by Arduino library.
After that, enter RTCZero in the search bar at the top of the library manager and click the Install button for the RTCZero by Arduino library.
After that, retry uploading the sketch.