Networking

Wireshark MikroTik remote packet capture mini-HOWTO

Start Wireshark, in capture settings window enter capture filter

udp port 37008

On MikroTik router, goto Tools / Packet Sniffer and enter the options according to your needs. Make sure Streaming enabled is checked!

A fresh install of Wireshark already has all required plugins enabled, so you can start capturing right away!

Posted by Uli Köhler in Networking

What is the standard username / password for motionEye?

The standard username / password for the motioneye surveillance camera webinterface is username admin with an empty password.

Posted by Uli Köhler in Networking

What SSH username to use for OpenStage 40?

The SSH username is admin. A working command to connect to an OpenStage 40 using SSH is

ssh -oKexAlgorithms=+diffie-hellman-group1-sha1 [email protected]


Posted by Uli Köhler in Networking

How to connect to OpenStage 40 using SSH

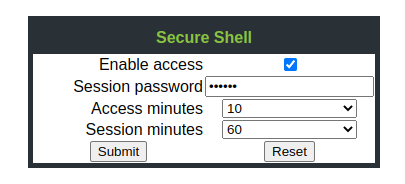
First, enable SSH access on the webinterface:

Admin pages -> Maintenance -> Secure Shell

Enter a random password, choose other settings as shown.

Click submit. At this stage, choosing to ssh [email protected] would lead to the following error message:

Unable to negotiate with 192.168.178.243 port 22: no matching key exchange method found. Their offer: diffie-hellman-group1-sha1,diffie-hellman-group14-sha1,[email protected]

Therefore we have to use the following command:

ssh -oKexAlgorithms=+diffie-hellman-group1-sha1 [email protected]


Posted by Uli Köhler in Networking

How to fix OpenStage 40 ERR_SSL_VERSION_OR_CIPHER_MISMATCH

Problem:

When trying to access your OpenStage 40 IP phone using Chrome or Firefox, you see the following error message:

ERR_SSL_VERSION_OR_CIPHER_MISMATCH

Solution:

This is because your OpenStage firmware currently does not support a recent TLS version.

You can easily resolve this by using an old browser that does not block old TLS versions.

Just download Firefox 50.0.2 portable from (Linux version) https://releases.mozilla.org/pub/firefox/releases/50.0.2/linux-x86_64/en-US/ , download the .tar.bz2 from the link, untar it using tar xjvf *.tar.bz2cd firefox and run it portably with autoupdate disabled using

mkdir -p profile && ./firefox -profile $PWD/profile
Posted by Uli Köhler in Linux, Networking

Python Cloudflare DNS A record create or update example

This is based on our previous post Python Cloudflare DNS A record update example but also creates the record if it doesn’t exist.

#!/usr/bin/env python3
import CloudFlare
import argparse
import sys

if __name__ == "__main__":
    parser = argparse.ArgumentParser()
    parser.add_argument("-e", "--email", required=True, help="The Cloudflare login email to use")
    parser.add_argument("-n", "--hostname", required=True, help="The hostname to update, e.g. mydyndns.mydomain.com")
    parser.add_argument("-k", "--api-key", required=True, help="The Cloudflare global API key to use. NOTE: Domain-specific API tokens will NOT work!")
    parser.add_argument("-i", "--ip-address", required=True, help="Which IP address to update the record to")
    parser.add_argument("-t", "--ttl", default=60, type=int, help="The TTL of the records in seconds (or 1 for auto)")
    args = parser.parse_args()

    # Initialize Cloudflare API client
    cf = CloudFlare.CloudFlare(
        email=args.email,
        token=args.api_key
    )
    # Get zone ID (for the domain). This is why we need the API key and the domain API token won't be sufficient
    zone = ".".join(args.hostname.split(".")[-2:]) # domain = test.mydomain.com => zone = mydomain.com
    zones = cf.zones.get(params={"name": zone})
    if len(zones) == 0:
        print(f"Could not find CloudFlare zone {zone}, please check domain {args.hostname}")
        sys.exit(2)
    zone_id = zones[0]["id"]

    # Fetch existing A record
    a_records = cf.zones.dns_records.get(zone_id, params={"name": args.hostname, "type": "A"})
    if len(a_records): # Have an existing record
        print("Found existing record, updating...")
        a_record = a_records[0]
        # Update record & save to cloudflare
        a_record["content"] = args.ip_address
        cf.zones.dns_records.put(zone_id, a_record["id"], data=a_record)
    else: # No existing record. Create !
        print("Record doesn't existing, creating new record...")
        a_record = {}
        a_record["type"] = "A"
        a_record["name"] = args.hostname
        a_record["ttl"] = args.ttl # 1 == auto
        a_record["content"] = args.ip_address
        cf.zones.dns_records.post(zone_id, data=a_record)

Usage example:

./update-dns.py --api-key ... --email [email protected] --ttl 300 --ip 1.2.3.4 --hostname mysubdomain.domain.com


Posted by Uli Köhler in Networking, Python

Python Cloudflare DNS A record update example

This script updates a DNS A record (IPv4 address) using the Cloudflare Python API. It expects the A record to be present already.

Also see Python Cloudflare DNS A record create or update example for a variant of this script which creates the record if it doesn’t exist already.

#!/usr/bin/env python3
import CloudFlare
import argparse
import sys

if __name__ == "__main__":
    parser = argparse.ArgumentParser()
    parser.add_argument("-e", "--email", required=True, help="The Cloudflare login email to use")
    parser.add_argument("-n", "--hostname", required=True, help="The hostname to update, e.g. mydyndns.mydomain.com")
    parser.add_argument("-k", "--api-key", required=True, help="The Cloudflare global API key to use. NOTE: Domain-specific API tokens will NOT work!")
    parser.add_argument("-i", "--ip-address", required=True, help="Which IP address to update the record to")
    parser.add_argument("-t", "--ttl", default=60, type=int, help="The TTL of the records in seconds (or 1 for auto)")
    args = parser.parse_args()

    # Initialize Cloudflare API client
    cf = CloudFlare.CloudFlare(
        email=args.email,
        token=args.api_key
    )
    # Get zone ID (for the domain). This is why we need the API key and the domain API token won't be sufficient
    zone = ".".join(args.hostname.split(".")[-2:]) # domain = test.mydomain.com => zone = mydomain.com
    zones = cf.zones.get(params={"name": zone})
    if len(zones) == 0:
        print(f"Could not find CloudFlare zone {zone}, please check domain {args.hostname}")
        sys.exit(2)
    zone_id = zones[0]["id"]

    # Fetch existing A record
    a_record = cf.zones.dns_records.get(zone_id, params={"name": args.hostname, "type": "A"})[0]

    # Update record & save to cloudflare
    a_record["ttl"] = args.ttl # 1 == auto
    a_record["content"] = args.ip_address
    cf.zones.dns_records.put(zone_id, a_record["id"], data=a_record)

Usage example:

./update-dns.py --api-key ... --email [email protected] --ttl 300 --ip 1.2.3.4 --hostname mysubdomain.domain.com


Posted by Uli Köhler in Networking, Python

How to fix Traefik Could not define the service name for the router: too many services

Problem:

Traefik does not load some of your services and you see an error message like the following one:

traefik_1  | time="2022-03-27T15:22:05Z" level=error msg="Could not define the service name for the router: too many services" routerName=myapp providerName=docker

with a docker label config with multiple routers like this:

labels:
    - "traefik.enable=true"
    - "traefik.http.routers.myapp-console.rule=Host(`console.myapp.mydomain.com`)"
    - "traefik.http.routers.myapp-console.entrypoints=websecure"
    - "traefik.http.routers.myapp-console.tls.certresolver=alpn"
    - "traefik.http.services.myapp-console.loadbalancer.server.port=9001"
    #
    - "traefik.http.routers.myapp.rule=Host(`myapp.mydomain.com`)"
    - "traefik.http.routers.myapp.entrypoints=websecure"
    - "traefik.http.routers.myapp.tls.certresolver=cloudflare-techoverflow"
    - "traefik.http.routers.myapp.tls.domains[0].main=mydomain.com"
    - "traefik.http.routers.myapp.tls.domains[0].sans=*.mydomain.com"
    - "traefik.http.services.myapp.loadbalancer.server.port=9000"

Solution:

The basic issue here is that you have multiple routers defined for a single docker container and Traefik does not know which http.services belongs to which http.routers!

In order to fix this, explicitly tell traefik for each router what service it should use like this:

- "traefik.http.routers.myapp-console.service=myapp-console"

Full example:

labels:
    - "traefik.enable=true"
    - "traefik.http.routers.myapp-console.rule=Host(`console.myapp.mydomain.com`)"
    - "traefik.http.routers.myapp-console.entrypoints=websecure"
    - "traefik.http.routers.myapp-console.tls.certresolver=alpn"
    - "traefik.http.routers.myapp-console.service=myapp-console"
    - "traefik.http.services.myapp-console.loadbalancer.server.port=9001"
    #
    - "traefik.http.routers.myapp.rule=Host(`myapp.mydomain.com`)"
    - "traefik.http.routers.myapp.entrypoints=websecure"
    - "traefik.http.routers.myapp.tls.certresolver=cloudflare-techoverflow"
    - "traefik.http.routers.myapp.tls.domains[0].main=mydomain.com"
    - "traefik.http.routers.myapp.tls.domains[0].sans=*.mydomain.com"
    - "traefik.http.routers.myapp.service=myapp"
    - "traefik.http.services.myapp.loadbalancer.server.port=9000"


Posted by Uli Köhler in Container, Docker, Networking, Traefik

Traefik TOML config for frontend and /api backend

The following Traefik .toml config files work by redirecting /api requests to the backend server running on localhost:61913 while redirecting any request besides /api to the frontend running on localhost:17029. You can simply define the frontend rule as

rule = "Host(`myapp.mydomain.com`)"

and the backend rule as

rule = "Host(`myapp.mydomain.com`) && PathPrefix(`/api`)"

since the longest matching route will win.

See our poist Simple Traefik docker-compose setup with Lets Encrypt Cloudflare DNS-01 & TLS-ALPN-01 & HTTP-01 challenges for our basic Traefik config, which also defines the alpn certificate resolver. With this config, place both the myapp-frontend.toml and myapp-backend.toml in the config directory.

Frontend config

# Host
[http.routers.myapp-frontend]
rule = "Host(`myapp.mydomain.com`)"
service = "myapp-frontend"

# Backend
[http.services]
[http.services.myapp-frontend.loadBalancer]
[[http.services.myapp-frontend.loadBalancer.servers]]
url = "http://127.0.0.1:17029/"

# Certificates
[http.routers.myapp-frontend.tls]
certresolver = "alpn"

Backend Traefik config

# Host
[http.routers.myapp-backend]
rule = "Host(`myapp.mydomain.com`) && PathPrefix(`/api`)"
service = "myapp-backend"

# Backend
[http.services]
[http.services.myapp-backend.loadBalancer]
[[http.services.myapp-backend.loadBalancer.servers]]
url = "http://127.0.0.1:61913/"

# Certificates
[http.routers.myapp-backend.tls]
certresolver = "alpn"


Posted by Uli Köhler in Networking, Traefik

How to connect Synology NAS to Headscale

First, install the Tailscale App using the Synology Package manager. Don’t try to initialize using the UI since this will only work with the commercial tailscale service, not with headscale.

Then login to the NAS using SSH (I’m using the admin account) and run sudo su to run

You should see the following shell prompt:

ash-4.4#

Now you can initialize tailscale using the tailscale command similar to our previous post How to connect tailscale to headscale server on Linux. In my case, I needed to use the --reset flag in order for the command to work.

tailscale up --reset --login-server https://headscale.mydomain.com --authkey ... --accept-routes

This will login to your server just like the normal (non-synology) tailscale client does.

Posted by Uli Köhler in Headscale, VPN

ufw: How to allow traffic to all ports on specific interface

sudo ufw allow in on tailscale0 to any

This will allow any traffic (including routed traffic, if packet forwarding is enabled) coming from the tailscale0 interface.

Posted by Uli Köhler in Linux, Networking, VPN

How to install tailscale on Ubuntu

In order to instal tailscale, on any Ubuntu version, you can use the official tailscale install command:

sudo apt -y install curl apt-transport-https
curl -fsSL https://tailscale.com/install.sh | sh
Posted by Uli Köhler in Headscale, Raspberry Pi, VPN

How to generate caddy basic auth password using docker-compose

docker-compose run caddy caddy hash-password

then enter the password.

Posted by Uli Köhler in Networking

How to link Paho MQTT C++ binding using CMake

target_link_libraries(myexecutable paho-mqttpp3 paho-mqtt3as ssl crypto)


Posted by Uli Köhler in C/C++, MQTT

Caddyfile for Angular Single Page Application (SPA)

ng build creates a directory of static files. Due to the way Angular works, you need to rewrite every URL that doesn’t exist. For example, /patterns needs to be rewritten to (but not redirected to) /

This Caddyfile serves files statically from /usr/share/caddy and performs the rewrite via try_files:

:80

root * /usr/share/caddy
file_server
try_files {path} /


Posted by Uli Köhler in Networking

Simple Caddyfile to serve /usr/share/caddy statically

This is a simple Caddyfile to serve the /usr/share/caddy folder on port 80.

:80

root * /usr/share/caddy
file_server 
Posted by Uli Köhler in Networking

How to install tailscale on Raspberry Pi

Just use the official install command from the tailscale website:

curl -fsSL https://tailscale.com/install.sh | sh


Posted by Uli Köhler in Headscale, Raspberry Pi, VPN

Headscale nginx reverse proxy config

Reverse proxying headscale using nginx is extremly simple. You don’t need any special config.

Here is my config with Let’s Encrypt enabled (part of the config is auto-generated using certbot --nginx).

Ensure to set the port (27896) to match the one mapped to the Headscale port.

server {
    server_name  headscale.mydomain.com;

    location / {
        proxy_pass http://localhost:27896/;
        proxy_http_version 1.1;
        proxy_set_header Upgrade $http_upgrade;
        proxy_set_header Connection "Upgrade";
        proxy_redirect http:// https://;
        proxy_buffering off;
        proxy_set_header X-Real-IP $remote_addr;
        proxy_set_header X-Forwarded-For $proxy_add_x_forwarded_for;
        proxy_set_header X-Forwarded-Proto $http_x_forwarded_proto;
        add_header Strict-Transport-Security "max-age=15552000; includeSubDomains" always;
    }

    listen [::]:443 ssl; # managed by Certbot
    ssl_certificate /etc/letsencrypt/live/mydomain-wildcard/fullchain.pem; # managed by Certbot
    ssl_certificate_key /etc/letsencrypt/live/mydomain-wildcard/privkey.pem; # managed by Certbot
    include /etc/letsencrypt/options-ssl-nginx.conf; # managed by Certbot


}
server {
    if ($host = headscale.mydomain.com) {
        return 301 https://$host$request_uri;
    } # managed by Certbot

    server_name  headscale.mydomain.com;

    listen [::]:80; # managed by Certbot
    return 404; # managed by Certbot
}

The proxy_… upgrade stuff is for proxying websockets. I have no idea if it’s required or not because I have not tried, but it doesn’t really hurt to keep in in there.

Posted by Uli Köhler in Headscale, Networking, nginx

Headscale docker-compose config with PostgreSQL

This config is intended for larger installations than our sqlite based standard config. It tends to be slightly easier to back up correctly and will be faster for larger workloads. However, it will consume more RAM especially for low-workload installations and you have two docker containers to worry about during maintenance (though they are managed using a single docker-compose instance). I do not recommend using a shared postgres server although this is certainly possible.

First, create a random password using

echo POSTGRES_PASSWORD=$(pwgen 30 1) > .env

The docker-compose.yml looks like this:

version: '3.5'
services:
  headscale:
    image: headscale/headscale:latest
    volumes:
      - ./config:/etc/headscale/
      - ./data:/var/lib/headscale
    ports:
      - 27896:8080
    command: headscale serve
    restart: unless-stopped
    depends_on:
      - postgres
  postgres:
    image: postgres
    restart: unless-stopped
    volumes:
      - ./pg_data:/var/lib/postgresql/data
    environment:
      - POSTGRES_PASSWORD=${POSTGRES_PASSWORD}
      - POSTGRES_DB=headscale
      - POSTGRES_USER=headscale


Now we create the default headscale config:

mkdir -p ./config
curl https://raw.githubusercontent.com/juanfont/headscale/main/config-example.yaml -o ./config/config.yaml

In config/config.yaml we need to make these changes:

Set server URL:

server_url: https://headscale.mydomain.com

Comment out the sqlite database (add # to the front of every line):

# SQLite config
# db_type: sqlite3
# db_path: /var/lib/headscale/db.sqlite

And uncomment and configure postgres:

# Postgres config
db_type: postgres
db_host: postgres
db_port: 5432
db_name: headscale
db_user: headscale
db_pass: ohngooFaciice2hooGoo1Ahvif3ahl

Make sure all of these are uncommented and you copy the password from .env . It is extremely important that you use a unique password here to prevent attacks from unprivileged host processes to the docker containers.

My recommendation is to reverse proxy headscale using traefik or nginx instead of using the builtin Let’s Encrypt / ACME support. This will allow not only sharing the port & IP address with other services, standard services like Traefik and/or nginx are much more well tested regarding exposure to the internet and hence provide a potential security benefit. Additionally, they make it easier to manage certificates in a service-independent manner and provide an additional layer for debugging etc.

You might also configure custom IP address ranges:

ip_prefixes:
  - fd5d:7b60:4742::/48
  - 100.64.0.0/10

but this is optional.

For more info regarding autostart etc, see How to setup headscale server in 5 minutes using docker-compose
Posted by Uli Köhler in Headscale, Networking, VPN

How to create namespace on headscale server

Currently you need to create a namespace using the command line.

If running without a container

headscale namespaces create -n mynamespace

If running using docker-compose:

docker-compose exec headscale headscale namespaces create mynamespace

If successful, this will show

Namespace created
Posted by Uli Köhler in Headscale, Networking, VPN