Programming languages

How to iterate all ISO3166-Alpha2 codes in Python

First install the iso3166 library:

pip install iso3166

Now you can iterate all the alpha2 codes like DE and US like this:

from iso3166 import countries

for alpha2 in [country.alpha2 for country in countries]:
    print(country)

This will print:

AF
AX
AL
DZ
AS
AD
AO
AI
AQ
AG
AR
AM
AW
AU
AT
AZ
BS
BH
BD
BB
BY
BE
BZ
BJ
BM
BT
BO
BQ
BA
BW
BV
BR
IO
BN
BG
BF
BI
KH
CM
CA
CV
KY
CF
TD
CL
CN
CX
CC
CO
KM
CG
CD
CK
CR
CI
HR
CU
CW
CY
CZ
DK
DJ
DM
DO
EC
EG
SV
GQ
ER
EE
ET
FK
FO
FJ
FI
FR
GF
PF
TF
GA
GM
GE
DE
GH
GI
GR
GL
GD
GP
GU
GT
GG
GN
GW
GY
HT
HM
VA
HN
HK
HU
IS
IN
ID
IR
IQ
IE
IM
IL
IT
JM
JP
JE
JO
KZ
KE
KI
KP
KR
XK
KW
KG
LA
LV
LB
LS
LR
LY
LI
LT
LU
MO
MK
MG
MW
MY
MV
ML
MT
MH
MQ
MR
MU
YT
MX
FM
MD
MC
MN
ME
MS
MA
MZ
MM
NA
NR
NP
NL
NC
NZ
NI
NE
NG
NU
NF
MP
NO
OM
PK
PW
PS
PA
PG
PY
PE
PH
PN
PL
PT
PR
QA
RE
RO
RU
RW
BL
SH
KN
LC
MF
PM
VC
WS
SM
ST
SA
SN
RS
SC
SL
SG
SX
SK
SI
SB
SO
ZA
GS
SS
ES
LK
SD
SR
SJ
SZ
SE
CH
SY
TW
TJ
TZ
TH
TL
TG
TK
TO
TT
TN
TR
TM
TC
TV
UG
UA
AE
GB
US
UM
UY
UZ
VU
VE
VN
VG
VI
WF
EH
YE
ZM
ZW


Posted by Uli Köhler in Python

matplotlib: How to easily format y value as percent [%]

When plotting our time series example dataset, this is the resulting plot

This post shows how to easily plot this dataset with an y axis formatted as percent. We will assume that 1.00 maps to 100%. This post is based on our previous work on Matplotlib custom SI-prefix unit tick formatter:

Note that for pandas, you need to first call df.plot() and call set_major_formatter() after that!

import matplotlib.ticker as mtick
df.plot()
plt.gca().yaxis.set_major_formatter(mtick.PercentFormatter(xmax=1.0))

If you instead want 100.0 to map to 100%, just use xmax=100.0:

import matplotlib.ticker as mtick
df.plot()
plt.gca().yaxis.set_major_formatter(mtick.PercentFormatter(xmax=1.0))

Full example

import matplotlib.ticker as mtick

# Load pre-built time series example dataset
df = pd.read_csv("https://datasets.techoverflow.net/timeseries-example.csv", parse_dates=["Timestamp"])
df.set_index("Timestamp", inplace=True)

# Plot with Y axis scaled as percent
df.plot()
plt.gca().yaxis.set_major_formatter(mtick.PercentFormatter(xmax=1.0))


Posted by Uli Köhler in pandas, Python

How to get first column name of pandas DataFrame

df.columns[0]

will return the name of the first column as str.

Posted by Uli Köhler in pandas, Python

How to plot multiple pandas DataFrames in a single graph

If you use code like

df1.plot()
df2.plot()

you will see both DataFrames being plotted each in their separate graphs/plots.

In order to plot both of them in a single plot, use

ax = df1.plot()
df2.plot(ax=ax)
Posted by Uli Köhler in pandas, Python

How to combine two pandas DataFrames with the same index

If you have two pandas DataFrames you want to join where the index in both DataFrames are and you want to obtain a DataFrame where the respective columns are set to NaN if there is no value from the respective DataFrame, this is typically the correct way to do it:

df_compare = pd.concat([df1, df2], axis=1, join='outer')

If you only want to keep values where both DataFrames have some value, use join='outer'

Posted by Uli Köhler in pandas, Python

How to rename a single column of a pandas DataFrame

In our previous post How to replace string in column names in Pandas DataFrame we already covered a generic method of renaming pandas columns by replacing strings.

If you just want to rename a specific column, say, the column is named value and you want to convert it to , use this snippet:

new_df = df.rename(columns=lambda s: "€" if s == "value" else s)

or use inplace=True if you want to modify the original DataFrame:

df.rename(columns=lambda s: "€" if s == "value" else s, inplace=True)


Posted by Uli Köhler in pandas, Python

How to fix pandas AttributeError: module ‘pandas’ has no attribute ‘timedelta’

Problem:

While running your Python code or Jupyter notebook, you see an error message like

---------------------------------------------------------------------------
AttributeError                            Traceback (most recent call last)
/tmp/ipykernel_99995/3617538487.py in <module>
      1 for date in df.index:
----> 2     print(date - pd.timedelta(5, 'years'))

/usr/local/lib/python3.9/dist-packages/pandas/__init__.py in __getattr__(name)
    259         return _SparseArray
    260 
--> 261     raise AttributeError(f"module 'pandas' has no attribute '{name}'")
    262 
    263 

AttributeError: module 'pandas' has no attribute 'timedelta'

Solution:

pandas Timedelta is spelled with a capital T: Timedelta not timedelta.

Posted by Uli Köhler in pandas, Python

How to parse date column in pandas

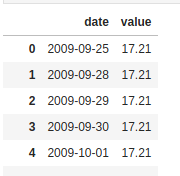
If you have a pandas column containing a date string

df


which is listed as object:

df["date"]

parse it like this:

df["date"] = pd.to_datetime(df["date"])

After which it will be listed as datetime64[ns]:

df["date"]

Posted by Uli Köhler in pandas, Python

Angular: ActivatedRoute minimal example

For this route:

{path: 'my/:id', component: MyDashboardComponent},

this is how you can use it in MyDashboardComponent:

constructor(private route: ActivatedRoute) {
      this.route.params.subscribe(params => {
          console.info(params.id);
      })
}


Posted by Uli Köhler in Angular, Javascript

How to split strings in C++ using boost::algorithm::split() – a minimal example

#include <boost/algorithm/string/split.hpp> // boost::algorithm::split
#include <boost/algorithm/string/classification.hpp> // boost::is_any_of
#include <string>
#include <iostream>
#include <vector>

int main() {
    std::string mystr = "foo-bar-x";
    // Split by "-"
    std::vector<std::string> splitResult;
    boost::algorithm::split(splitResult, mystr, boost::is_any_of("-"));
    // Print results, one line at a time
    // Prints:
    // foo
    // bar
    // x
    for(const std::string& s : splitResult) {
        std::cout << s << std::endl;
    }
}


Posted by Uli Köhler in Boost, C/C++

How to link the boost string algorithms library – which linker flags to use?

You do not need to link the boost::algorithm library. It is a header only library, hence you only need to #include its header files.

For examples, see

Posted by Uli Köhler in Boost, C/C++

How to use boost string algorithm starts_with: A minimal example

#include <boost/algorithm/string/predicate.hpp>
#include <string>
#include <iostream>

int main() {
    std::string mystr = "foobar";
    // Prints "true, false"
    std::cout << std::boolalpha
        << boost::algorithm::starts_with(mystr, "foo") << ", "
        << boost::algorithm::starts_with(mystr, "bar") << std::endl;
}

Also see: How to use boost string algorithm ends_with: A minimal example

Posted by Uli Köhler in Boost, C/C++

How to use boost string algorithm ends_with: A minimal example

#include <boost/algorithm/string/predicate.hpp>
#include <string>
#include <iostream>

int main() {
    std::string mystr = "foobar";
    // Prints "false, true"
    std::cout << std::boolalpha
        << boost::algorithm::ends_with(mystr, "foo") << ", "
        << boost::algorithm::ends_with(mystr, "bar") << std::endl;
}

Also see: How to use boost string algorithm starts_with: A minimal example

Posted by Uli Köhler in Boost, C/C++

What does sdist mean in Python?

sdist means source distribution. It is an archive (usually a .tar.gz) that contains all the source files and related data for a project in a single archive. A source distribution is what is downloaded from the PyPI package registry when you run pip install.

You can create the source distribution (sdist) for a project using

python setup.py sdist


Posted by Uli Köhler in Python

How to fix Python CFFI package not finding include file when running pip install

Problem:

When you install your package locally using python setup.py install, all include files are found and the package installs correctly

However you run pip install, the compiler is missing some include files

Solution:

Most likely, your include file does not end up in the sdist i.e. the source distribution .tar.gz file. In order to include it, create a MANIFEST.in file in the same folder as setup.py in order to tell setuptools what to include in addition to any file directly referenced in setup.py.

In my case, the include files are in the src folder so I add this to MANIFEST.in:

graft src/

Now, to check if that worked, run

python setup.py sdist

which will show you which files are included in the source distribution. Example:

C:\Users\ukoeh\cv_algorithms>python setup.py sdist
running sdist
running egg_info
writing cv_algorithms.egg-info\PKG-INFO
writing dependency_links to cv_algorithms.egg-info\dependency_links.txt
writing requirements to cv_algorithms.egg-info\requires.txt
writing top-level names to cv_algorithms.egg-info\top_level.txt
reading manifest file 'cv_algorithms.egg-info\SOURCES.txt'
reading manifest template 'MANIFEST.in'
adding license file 'LICENSE'
writing manifest file 'cv_algorithms.egg-info\SOURCES.txt'
running check
warning: check: missing meta-data: either (author and author_email) or (maintainer and maintainer_email) should be supplied

creating cv_algorithms-1.0.4
creating cv_algorithms-1.0.4\cv_algorithms
creating cv_algorithms-1.0.4\cv_algorithms.egg-info
creating cv_algorithms-1.0.4\src
creating cv_algorithms-1.0.4\test
copying files to cv_algorithms-1.0.4...
copying LICENSE -> cv_algorithms-1.0.4
copying MANIFEST.in -> cv_algorithms-1.0.4
copying README.md -> cv_algorithms-1.0.4
copying setup.py -> cv_algorithms-1.0.4
copying cv_algorithms\__init__.py -> cv_algorithms-1.0.4\cv_algorithms
copying cv_algorithms\_checks.py -> cv_algorithms-1.0.4\cv_algorithms
copying cv_algorithms\_ffi.py -> cv_algorithms-1.0.4\cv_algorithms
copying cv_algorithms\classification.py -> cv_algorithms-1.0.4\cv_algorithms
copying cv_algorithms\colorspace.py -> cv_algorithms-1.0.4\cv_algorithms
copying cv_algorithms\contours.py -> cv_algorithms-1.0.4\cv_algorithms
copying cv_algorithms\distance.py -> cv_algorithms-1.0.4\cv_algorithms
copying cv_algorithms\grassfire.py -> cv_algorithms-1.0.4\cv_algorithms
copying cv_algorithms\morphology.py -> cv_algorithms-1.0.4\cv_algorithms
copying cv_algorithms\neighbours.py -> cv_algorithms-1.0.4\cv_algorithms
copying cv_algorithms\popcount.py -> cv_algorithms-1.0.4\cv_algorithms
copying cv_algorithms\text.py -> cv_algorithms-1.0.4\cv_algorithms
copying cv_algorithms\thinning.py -> cv_algorithms-1.0.4\cv_algorithms
copying cv_algorithms\utils.py -> cv_algorithms-1.0.4\cv_algorithms
copying cv_algorithms.egg-info\PKG-INFO -> cv_algorithms-1.0.4\cv_algorithms.egg-info
copying cv_algorithms.egg-info\SOURCES.txt -> cv_algorithms-1.0.4\cv_algorithms.egg-info
copying cv_algorithms.egg-info\dependency_links.txt -> cv_algorithms-1.0.4\cv_algorithms.egg-info
copying cv_algorithms.egg-info\not-zip-safe -> cv_algorithms-1.0.4\cv_algorithms.egg-info
copying cv_algorithms.egg-info\requires.txt -> cv_algorithms-1.0.4\cv_algorithms.egg-info
copying cv_algorithms.egg-info\top_level.txt -> cv_algorithms-1.0.4\cv_algorithms.egg-info
copying src\common.hpp -> cv_algorithms-1.0.4\src
copying src\distance.cpp -> cv_algorithms-1.0.4\src
copying src\grassfire.cpp -> cv_algorithms-1.0.4\src
copying src\neighbours.cpp -> cv_algorithms-1.0.4\src
copying src\popcount.cpp -> cv_algorithms-1.0.4\src
copying src\thinning.cpp -> cv_algorithms-1.0.4\src
copying src\windows.cpp -> cv_algorithms-1.0.4\src
copying test\TestColorspace.py -> cv_algorithms-1.0.4\test
copying test\TestContours.py -> cv_algorithms-1.0.4\test
copying test\TestDistance.py -> cv_algorithms-1.0.4\test
copying test\TestGrassfire.py -> cv_algorithms-1.0.4\test
copying test\TestNeighbours.py -> cv_algorithms-1.0.4\test
copying test\TestPopcount.py -> cv_algorithms-1.0.4\test
copying test\TestThinning.py -> cv_algorithms-1.0.4\test
copying test\TestUtils.py -> cv_algorithms-1.0.4\test
copying test\__init__.py -> cv_algorithms-1.0.4\test
Writing cv_algorithms-1.0.4\setup.cfg
Creating tar archive
removing 'cv_algorithms-1.0.4' (and everything under i

After that, you need to re-release your package. See my cv_algorithms project for a complete example.
Posted by Uli Köhler in Python

How to fix Python ModuleNotFoundError: No module named ‘cv2’ on Windows

Problem:

You see an error message like the following one when running some Python code on Windows:

Traceback (most recent call last):
  File "<stdin>", line 1, in <module>
  File "C:\Users\ukoeh\AppData\Local\Packages\PythonSoftwareFoundation.Python.3.9_qbz5n2kfra8p0\LocalCache\local-packages\Python39\site-packages\cv_algorithms\__init__.py", line 5, in <module>
    from .text import *
  File "C:\Users\ukoeh\AppData\Local\Packages\PythonSoftwareFoundation.Python.3.9_qbz5n2kfra8p0\LocalCache\local-packages\Python39\site-packages\cv_algorithms\text.py", line 7, in <module>
    import cv2
ModuleNotFoundError: No module named 'cv2'

Solution:

Install the opencv-python package using

pip install opencv-python

and retry.

Posted by Uli Köhler in Python, Windows

How to fix Python CFFI error LNK2001: unresolved external symbol PyInit__…

Problem:

When trying to install your Python library using a C module on Windows, you see an error message like

LINK : error LNK2001: unresolved external symbol PyInit__cv_algorithms
build\temp.win-amd64-3.6\Release\src_cv_algorithms.cp36-win_amd64.lib : fatal error LNK1120: 1 unresolved externals
error: command 'C:\Program Files (x86)\Microsoft Visual Studio 14.0\VC\BIN\x86_amd64\link.exe' failed with exit status 1120

Solution:

On Windows, CFFI does not properly generate the.

You can easily fix that by adding a template function and including that only on windows: I suggest creating windows.cpp like this:

/**
 * This contains hacks to get the installation on Windows working.
 * This fixes error LNK2001: unresolved external symbol PyInit__cv_algorithms
 */
void PyInit__cv_algorithms(void) { }

Copy & paste the name of the function from the error message! The fix will not work if you use the wrong function name.

Example how to include that file only on Windows:

platform_src = ["src/windows.cpp"] if os.name == 'nt' else []

mod_cv_algorithms = Extension('cv_algorithms._cv_algorithms',
                         sources=['src/main.cpp'] + platform_src)

For a full example, see cv_algorithms where I first implemented this fix.

Posted by Uli Köhler in Python

Paramiko SSH client minimal example: How to connect to SSH server and execute command

This example shows how to use paramiko to connect to [email protected] using the SSH key stored in ~/.ssh/id_ed25519, execute the command ls and print its output. Since paramiko is a pure Python implementation of SSH, this does not require SSH clients to be installed.

import os.path
import paramiko

ssh = paramiko.SSHClient()
ssh.set_missing_host_key_policy(paramiko.AutoAddPolicy())
ssh.connect("192.168.1.112", username="user",
            key_filename=os.path.join(os.path.expanduser('~'), ".ssh", "id_ed25519"))

# Example command:
stdin, stdout, stderr = ssh.exec_command("ls")
output = stdout.read()
print(output)

# Cleanup
ssh.close()


Posted by Uli Köhler in Paramiko, Python

Paramiko: How to execute command and get output as string

Using exec_command() in Paramiko returns a tuple (stdin, stdout, stderr). Most of the time, you just want to read stdout and ignore stdin and stderr. You can get the output the command by using stdout.read()(returns a string) or stdout.readlines() (returns a list of lines).

Example:

stdin, stdout, stderr = ssh.exec_command("ls")
output = stdout.read()
print(output)

Also see our full example: Paramiko SSH client minimal example: How to connect to SSH server and execute command

Posted by Uli Köhler in Paramiko, Python

Paramiko SSH client: How to connect using public key authentication

This example shows how to use paramiko to connect to [email protected] using the SSH key stored in ~/.ssh/id_ed25519 using Python:

import os.path
import paramiko

ssh = paramiko.SSHClient()
ssh.set_missing_host_key_policy(paramiko.AutoAddPolicy())
ssh.connect("192.168.1.112", username="user",
            key_filename=os.path.join(os.path.expanduser('~'), ".ssh", "id_ed25519"))

Also see our full example: Paramiko SSH client minimal example: How to connect to SSH server and execute command

Posted by Uli Köhler in Paramiko, Python