Technologies

How to sleep for X seconds in Puppeteer

In order to sleep for 5 seconds, use

await page.waitForTimeout(5000);

Full example based on Puppeteer minimal example:

// Minimal puppeteer example
const puppeteer = require('puppeteer');
(async () => {
  const browser = await puppeteer.launch();
  const page = await browser.newPage();
  await page.goto('https://techoverflow.net', {waitUntil: 'domcontentloaded'});
  // Wait for 5 seconds
  await page.waitForTimeout(5000);
  // Take screenshot
  await page.screenshot({path: 'screenshot.png'});
  await browser.close();
})();


Posted by Uli Köhler in Javascript, NodeJS, Puppeteer

How to optimize MySQL/MariaDB tables in docker-compose

If your MariaDB / MySQL root password is stored in .env , use this command:

source .env && docker-compose exec mariadb mysqlcheck -uroot -p$MARIADB_ROOT_PASSWORD --auto-repair --optimize --all-databases

You can also directly use the root password in the command:

docker-compose exec mariadb mysqlcheck -uroot -phoox8AiFahuniPaivatoh2iexighee --auto-repair --optimize --all-databases


Posted by Uli Köhler in Container, Databases, Docker

What image / distribution should you use on Oracle Cloud?

I recommend to always use either CentOS or Ubuntu. This way you will be compatible with other hosting providers and cloud vendors. Additionally, there is much more documentation regarding Ubuntu out there than for distributions like Oracle Linux.

Posted by Uli Köhler in Cloud

Oracle Cloud free tier VM.Standard.E2.1.Micro /proc/cpuinfo

processor       : 0
vendor_id       : AuthenticAMD
cpu family      : 23
model           : 1
model name      : AMD EPYC 7551 32-Core Processor
stepping        : 2
microcode       : 0x1000065
cpu MHz         : 1996.246
cache size      : 512 KB
physical id     : 0
siblings        : 2
core id         : 0
cpu cores       : 1
apicid          : 0
initial apicid  : 0
fpu             : yes
fpu_exception   : yes
cpuid level     : 13
wp              : yes
flags           : fpu vme de pse tsc msr pae mce cx8 apic sep mtrr pge mca cmov pat pse36 clflush mmx fxsr sse sse2 ht syscall nx mmxext fxsr_opt pdpe1gb rdtscp lm rep_good nopl cpuid extd_apicid tsc_known_freq pni pclmulqdq ssse3 fma cx16 sse4_1 sse4_2 x2apic movbe popcnt tsc_deadline_timer aes xsave avx f16c rdrand hypervisor lahf_lm cmp_legacy cr8_legacy abm sse4a misalignsse 3dnowprefetch osvw topoext perfctr_core ssbd ibpb vmmcall fsgsbase tsc_adjust bmi1 avx2 smep bmi2 rdseed adx smap clflushopt sha_ni xsaveopt xsavec xgetbv1 xsaves clzero xsaveerptr virt_ssbd arat arch_capabilities
bugs            : sysret_ss_attrs null_seg spectre_v1 spectre_v2 spec_store_bypass
bogomips        : 3992.49
TLB size        : 1024 4K pages
clflush size    : 64
cache_alignment : 64
address sizes   : 40 bits physical, 48 bits virtual
power management:

processor       : 1
vendor_id       : AuthenticAMD
cpu family      : 23
model           : 1
model name      : AMD EPYC 7551 32-Core Processor
stepping        : 2
microcode       : 0x1000065
cpu MHz         : 1996.246
cache size      : 512 KB
physical id     : 0
siblings        : 2
core id         : 0
cpu cores       : 1
apicid          : 1
initial apicid  : 1
fpu             : yes
fpu_exception   : yes
cpuid level     : 13
wp              : yes
flags           : fpu vme de pse tsc msr pae mce cx8 apic sep mtrr pge mca cmov pat pse36 clflush mmx fxsr sse sse2 ht syscall nx mmxext fxsr_opt pdpe1gb rdtscp lm rep_good nopl cpuid extd_apicid tsc_known_freq pni pclmulqdq ssse3 fma cx16 sse4_1 sse4_2 x2apic movbe popcnt tsc_deadline_timer aes xsave avx f16c rdrand hypervisor lahf_lm cmp_legacy cr8_legacy abm sse4a misalignsse 3dnowprefetch osvw topoext perfctr_core ssbd ibpb vmmcall fsgsbase tsc_adjust bmi1 avx2 smep bmi2 rdseed adx smap clflushopt sha_ni xsaveopt xsavec xgetbv1 xsaves clzero xsaveerptr virt_ssbd arat arch_capabilities
bugs            : sysret_ss_attrs null_seg spectre_v1 spectre_v2 spec_store_bypass
bogomips        : 3992.49
TLB size        : 1024 4K pages
clflush size    : 64
cache_alignment : 64
address sizes   : 40 bits physical, 48 bits virtual
power management:


Posted by Uli Köhler in Cloud, Networking

How to disable virtual cloud network firewall on Oracle Cloud

When running VM instances on Oracle Cloud, you might want to use all ports, not just the few ports that are open by default. This post shows how to disable the Virtual Cloud Network firewall altogether. Additionally, you need to configure the instance firewall e.g. via SSH. For Ubuntu, see How to disable instance firewall on Ubuntu on Oracle Cloud.

You need to use firefox to access the UI. It will not work in chrome!

First login to the cloud network dashboard at https://cloud.oracle.com/networking/vcns

Now click the virtual cloud network:

Now click Security lists on the bottom left:


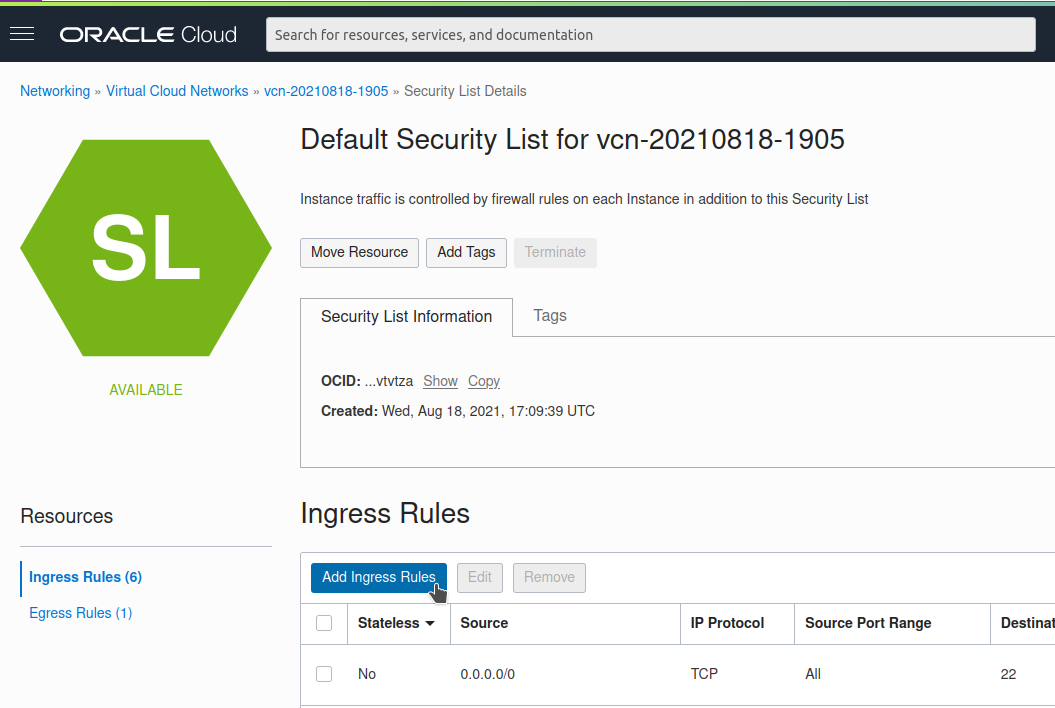
Click the Default security list (which has been automatically created)

Click Add Ingress Rules

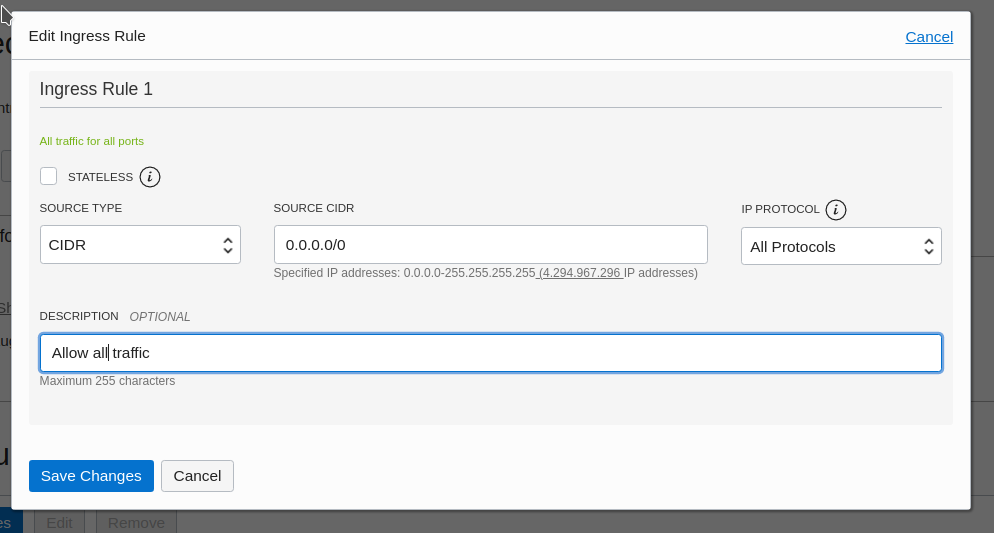
Enter source 0.0.0.0/0 (i.e. all IP addresses) and IP protocol All protocols:

Now click Save changes and don’t forget to configure your instance firewall

Posted by Uli Köhler in Cloud, Networking

How to disable instance firewall on Ubuntu on Oracle Cloud

Note: This describes how to disable the firewall on an Ubuntu instance. You additionally need to configure the cloud network security list! See How to disable virtual cloud network firewall on Oracle Cloud for details!

The Oracle firewall is iptables based. We can disable the Ubuntu instance firewall using

sudo iptables -F
sudo netfilter-persistent save

Explanation:

  • iptables -F: Flush (remove all) iptables rules
  • netfilter-persistent save Save empty ruleset to disk so it will be reloaded on reboot.
Posted by Uli Köhler in Cloud, Networking

How to fix Nextcloud 4047 InnoDB refuses to write tables with ROW_FORMAT=COMPRESSED or KEY_BLOCK_SIZE.

Problem:

When trying to maintenance:repair your Nextcloud instance, e.g. during a utf8mb4 upgrade, you see an error message like

ERROR: An exception occurred while executing a query: SQLSTATE[HY000]: General error: 4047 InnoDB refuses to write tables with ROW_FORMAT=COMPRESSED or KEY_BLOCK_SIZE.

Solution:

You need to turn off innodb-read-only-compressed. I do this by starting my MySQL docker with

--skip-innodb-read-only-compressed

Full command line which worked for me:

--transaction-isolation=READ-COMMITTED --binlog-format=ROW --innodb-file-per-table=1 --skip-innodb-read-only-compressed

Full docker-compose.yml nextcloud section:

nextcloud-db:
  image: mariadb
  command: --transaction-isolation=READ-COMMITTED --binlog-format=ROW --innodb-file-per-table=1 --skip-innodb-read-only-compressed
  restart: always
  volumes:
    - ./nextcloud-db:/var/lib/mysql
  environment:
    - MYSQL_ROOT_PASSWORD=${MYSQL_ROOT_PASSWORD}
    - MYSQL_PASSWORD=${MYSQL_PASSWORD}


Posted by Uli Köhler in Cloud, Databases, Technologies

How to fix elasticsearch.exceptions.RequestError: RequestError(400, ‘resource_already_exists_exception’, ‘index […] already exists’) in Python

Problem:

You want to create an ElasticSearch index in Python using code like

es.indices.create("nodes") # Create an index names "nodes"

but you see the following error message:

Traceback (most recent call last):
  File "estest.py", line 22, in <module>
    es.indices.create("nodes")
  File "/usr/local/lib/python3.8/dist-packages/elasticsearch/client/utils.py", line 168, in _wrapped
    return func(*args, params=params, headers=headers, **kwargs)
  File "/usr/local/lib/python3.8/dist-packages/elasticsearch/client/indices.py", line 123, in create
    return self.transport.perform_request(
  File "/usr/local/lib/python3.8/dist-packages/elasticsearch/transport.py", line 415, in perform_request
    raise e
  File "/usr/local/lib/python3.8/dist-packages/elasticsearch/transport.py", line 381, in perform_request
    status, headers_response, data = connection.perform_request(
  File "/usr/local/lib/python3.8/dist-packages/elasticsearch/connection/http_urllib3.py", line 277, in perform_request
    self._raise_error(response.status, raw_data)
  File "/usr/local/lib/python3.8/dist-packages/elasticsearch/connection/base.py", line 330, in _raise_error
    raise HTTP_EXCEPTIONS.get(status_code, TransportError)(
elasticsearch.exceptions.RequestError: RequestError(400, 'resource_already_exists_exception', 'index [nodes/mXAiBt0wTKK4Y31HpshVbw] already exists')

Solution:

The error message tells you that the index you are trying to create already exists!

The simples solution is to use the code from our post on How to create ElasticSearch index if it doesn’t already exist in Python:

def es_create_index_if_not_exists(es, index):
    """Create the given ElasticSearch index and ignore error if it already exists"""
    try:
        es.indices.create(index)
    except elasticsearch.exceptions.RequestError as ex:
        if ex.error == 'resource_already_exists_exception':
            pass # Index already exists. Ignore.
        else: # Other exception - raise it
            raise ex

and use that function to create your index:

es_create_index_if_not_exists(es, "nodes") # Creates the "nodes" index ; doesn't fail if it already exists


Posted by Uli Köhler in Databases, ElasticSearch, Python

How to create ElasticSearch index if it doesn’t already exist in Python

The following utility will create an index if it doesn’t exist already by ignoring any resource_already_exists_exception

def es_create_index_if_not_exists(es, index):
    """Create the given ElasticSearch index and ignore error if it already exists"""
    try:
        es.indices.create(index)
    except elasticsearch.exceptions.RequestError as ex:
        if ex.error == 'resource_already_exists_exception':
            pass # Index already exists. Ignore.
        else: # Other exception - raise it
            raise ex

# Example usage: Create "nodes" index
es_create_index_if_not_exists(es, "nodes")


Posted by Uli Köhler in Databases, ElasticSearch, Python

What is the ElasticSearch equivalent to an SQL table?

In ElasticSearch, the concept which closely resembles an SQL table is called an index.

Compared to an SQL table, the index does not neccessarily need to have a predefined structure – the ElasticSearch index is more similar to a MongoDB collection.

However, an elasticsearch index has many features similar to SQL tables such as indices (which you typically don’t need to create explicity – ElasticSearch takes care of that for you).

Typically, indices contain lots of similar documents that have (mostly) the same properties.

Posted by Uli Köhler in Databases, ElasticSearch

How to fix Elasticsearch Python elasticsearch.exceptions.NotFoundError: NotFoundError(404, ‘index_not_found_exception’, ‘no such index [node]’, node, index_or_alias)

Problem:

You want to update ElasticSearch index settings in Python using code like

es.indices.put_settings(index="node", body={
    "index.mapping.total_fields.limit": 100000
})

but you see an error message like this one:

Traceback (most recent call last):
  File "estest.py", line 11, in <module>
    es.indices.put_settings(index="node", body={
  File "/usr/local/lib/python3.8/dist-packages/elasticsearch/client/utils.py", line 168, in _wrapped
    return func(*args, params=params, headers=headers, **kwargs)
  File "/usr/local/lib/python3.8/dist-packages/elasticsearch/client/indices.py", line 786, in put_settings
    return self.transport.perform_request(
  File "/usr/local/lib/python3.8/dist-packages/elasticsearch/transport.py", line 415, in perform_request
    raise e
  File "/usr/local/lib/python3.8/dist-packages/elasticsearch/transport.py", line 381, in perform_request
    status, headers_response, data = connection.perform_request(
  File "/usr/local/lib/python3.8/dist-packages/elasticsearch/connection/http_urllib3.py", line 277, in perform_request
    self._raise_error(response.status, raw_data)
  File "/usr/local/lib/python3.8/dist-packages/elasticsearch/connection/base.py", line 330, in _raise_error
    raise HTTP_EXCEPTIONS.get(status_code, TransportError)(
elasticsearch.exceptions.NotFoundError: NotFoundError(404, 'index_not_found_exception', 'no such index [node]', node, index_or_alias)

Solution:

The index needs to be created first in order to be able to put settings. First, double-check if you spelled the index name correctly! You can see the index name in the exception: no such index [node] means that the index is called node

The direct way to create an index is

es.indices.create("node")

But note that this will fail if the index already exists. In order to work around this issue, I recommend to use the code from our previous post How to create ElasticSearch index if it doesn’t already exist in Python:

def es_create_index_if_not_exists(es, index):
    """Create the given ElasticSearch index and ignore error if it already exists"""
    try:
        es.indices.create(index)
    except elasticsearch.exceptions.RequestError as ex:
        if ex.error == 'resource_already_exists_exception':
            pass # Index already exists. Ignore.
        else: # Other exception - raise it
            raise exnodes

and use the es_create_index_if_not_exists()  function to create your index:

es_create_index_if_not_exists(es, "node") # Creates the "node" index ; doesn't fail if it already exists


 

Posted by Uli Köhler in Databases, ElasticSearch, Python

How to set index setting using Python ElasticSearch client

You can set index settings using the official ElasticSearch python client library by using:

es.indices.put_settings(index="my-index", body={
    # Put your index settings here
    # Example: "index.mapping.total_fields.limit": 100000
})

Full example:

from elasticsearch import Elasticsearch

es = Elasticsearch()

es.indices.put_settings(index="ways", body={
    "index.mapping.total_fields.limit": 100000
})
Posted by Uli Köhler in Databases, ElasticSearch, Python

How to get IndicesClient when using ElasticSearch Python API

When using the official ElasticSearch Python client, you can get the IndicesClient for an Elasticsearch instance by using

es.indices

Full example:

from elasticsearch import Elasticsearch

es = Elasticsearch()

indices_client = es.indices


Posted by Uli Köhler in Databases, ElasticSearch, Python

How to increase ElasticSearch total field limit using Python API

When using ElasticSearch, you will sometimes encounter an Limit of total fields [1000] has been exceeded when you insert a large document.

One solution that often works for real-world scenarios is to just increase the default limit of 1000 to, for example, 100000 to account for even the largest documents.

How this can be done is, however, not well-documented for the ElasticSearch Python API. Here’s how you can do it:

from elasticsearch import Elasticsearch

es = Elasticsearch()

es.indices.put_settings(index="my-index", body={
    "index.mapping.total_fields.limit": 100000
})


Posted by Uli Köhler in Databases, ElasticSearch, Python

Faster Python Elasticsearch index() by using concurrent.futures ThreadPoolExecutor

In our previous post Elasticsearch Python minimal index() / insert example we showed how to insert a document into Elasticsearch.

When inserting a large number of documents into Elasticsearch, you will notice that it’s extremely slow to wait for the API call to finish before trying to insert the document.

In this post we’ll show a simple way of doing many requests in parallel so multiple index operations are running concurrently while your code is processing more documents. For this, we’ll use concurrent.futures.ThreadPoolExecutor and – after inserting all documents into the queue, use concurrent.futures.wait to wait for all requests to finish before we’ll exit.

#!/usr/bin/env python3
from elasticsearch import Elasticsearch
from concurrent.futures import ThreadPoolExecutor
import concurrent.futures

index_executor = ThreadPoolExecutor(64)
futures = []

es = Elasticsearch()
for i in range(1000):
    future = index_executor.submit(es.index, index="test-index", id=i, body={"test": 123})
    futures.append(future)

print("Waiting for requests to complete...")
concurrent.futures.wait(futures)


Posted by Uli Köhler in Databases, ElasticSearch, Python

Elasticsearch Python minimal index() / insert example

This minimal example inserts a single document into Elasticsearch running at http://localhost:9200:

#!/usr/bin/env python3
from elasticsearch import Elasticsearch

es = Elasticsearch()
es.index(index="test-index", id=1, body={"test": 123})


Posted by Uli Köhler in Databases, ElasticSearch, Python

Simple Elasticsearch setup with docker-compose

The following docker-compose.yml is a simple starting point for using ElasticSearch within a docker-based setup:

version: '2.2'
services:
    elasticsearch1:
        image: docker.elastic.co/elasticsearch/elasticsearch:7.13.4
        container_name: elasticsearch1
        environment:
            - cluster.name=docker-cluster
            - node.name=elasticsearch1
            - cluster.initial_master_nodes=elasticsearch1
            - bootstrap.memory_lock=true
            - http.cors.allow-origin=http://localhost:1358,http://127.0.0.1:1358
            - http.cors.enabled=true
            - http.cors.allow-headers=X-Requested-With,X-Auth-Token,Content-Type,Content-Length,Authorization
            - http.cors.allow-credentials=true
            - "ES_JAVA_OPTS=-Xms512m -Xmx512m"
        ulimits:
            memlock:
                soft: -1
                hard: -1
        volumes:
            - ./esdata1:/usr/share/elasticsearch/data
        ports:
            - 9200:9200
    dejavu:
        image: appbaseio/dejavu
        container_name: dejavu
        ports:
            - 1358:1358

Now create the esdata1 directory with the correct permissions:

sudo mkdir esdata1
sudo chown -R 1000:1000 esdata1

We also need to configure the vm.max_map_count sysctl parameter:

echo -e "\nvm.max_map_count=524288\n" | sudo tee -a /etc/sysctl.conf && sudo sysctl -w vm.max_map_count=524288


I recommend to place it in /opt/elasticsearch, but you can place wherever you like.

If you want to autostart it on boot, see Create a systemd service for your docker-compose project in 10 seconds or just use this snippet from said post:

curl -fsSL https://techoverflow.net/scripts/create-docker-compose-service.sh | sudo bash /dev/stdin

This will create a systemd service named elasticsearch (if your directory is named elasticsearch like /opt/elasticsearch) and enable and start it immediately. Hence you can restart using

sudo systemctl restart elasticsearch

and view the logs using

sudo journalctl -xfu elasticsearch

For more complex setup involving more than one node, see our previous post on ElasticSearch docker-compose.yml and systemd service generator

Posted by Uli Köhler in Container, Databases, Docker, ElasticSearch

How to export certificates from Traefik certificate store

Traefik stores certificates as base64 encoded X.509 certificates and keys inside the certificate store.

This is a python script to export certificate from Traefik certificate store .json file:

import json
import base64

# Read Traefik ACME JSON
with open("acme.json") as acme_file:
    acme = json.load(acme_file)

# Select certificates from a specific resolver
resolver_name = "my-resolver"
certificates = acme[resolver_name]["Certificates"]

# Find the specific certificate we are looking for
certificate = [certificate for certificate in certificates if "myddomain.com" in certificate["domain"].get("sans", [])][0]

# Extract X.509 certificate data
certificate_data = base64.b64decode(certificate["certificate"])
key_data = base64.b64decode(certificate["key"])

# Export certificate and key to file
with open("certificate.pem", "wb") as certfile:
    certfile.write(certificate_data)

with open("key.pem", "wb") as keyfile:
    keyfile.write(key_data)

Note that depending on what is the primary name for your certificate, you might need to use

if "myddomain.com" == certificate["domain"]["main"]

instead of

if "myddomain.com" in certificate["domain"].get("sans", [])


Posted by Uli Köhler in Python, Traefik

How to find XCP-NG host-uuid

For many xe commands on XCP-NG you have to use a host-uuid=... parameter.

In order to find out your Host UUID, use

xe host-list

Example:

[03:19 virt01-xcpng ~]# xe host-list
uuid ( RO)                : 71739b18-2999-4794-a024-87d5d26215d1
          name-label ( RW): virt01-xcpng
    name-description ( RW): Default install

In this example, the Host UUID of the only host is 71739b18-2999-4794-a024-87d5d26215d1.

Posted by Uli Köhler in Virtualization

BUP MySQL backup using mysqldump without intermediary file

BUP is a nice git-based backup tool that is both free and easy to use and saves space by differential backups.

You can also use bup to backup a MySQL database using mysqldump directly instead of first dumping to a .sql file and then backing up the file.

This is possible by piping the mysqldump output directly into bup split:

mysqldump [...]| bup -d $BUP_DIR split -n mysqldump.sql

By using -n mysqldump.sql you are telling bup that the file created by the dumping should be named mysqldump.sql in the backup.

Full example:

export BUP_DIR=/var/lib/bup/mysql.bup
export MARIADB_ROOT_PASSWORD=piahaen9ehilei0Ieneirohthue4Iu

bup -d $BUP_DIR init
mysqldump -uroot -p${MARIADB_ROOT_PASSWORD} --all-databases | bup -d $BUP_DIR split -n mysqldump.sql


Posted by Uli Köhler in bup