Resistor temperature coefficient calculator

Calculate the minimum and maximum value of a resistor based on its temperature coefficient.

TechOverflow calculators:
You can enter values with SI suffixes like 12.2m (equivalent to 0.012) or 14k (14000) or 32u (0.000032).
The results are calculated while you type and shown directly below the calculator, so there is no need to press return or click on a Calculate button. Just make sure that all inputs are green by entering valid values.

Ω

ppm

°C

°C

Posted by Uli Köhler in Calculators, Electronics

Sense resistor power dissipation calculator

TechOverflow calculators:
You can enter values with SI suffixes like 12.2m (equivalent to 0.012) or 14k (14000) or 32u (0.000032).
The results are calculated while you type and shown directly below the calculator, so there is no need to press return or click on a Calculate button. Just make sure that all inputs are green by entering valid values.

Too much power dissipation? You need to use a current sense amplifier ! See our Sense resistor / current shunt + current sense amplifier calculator !

Want to calculate the correct sense resistor value for your desired sense voltage? See Sense resistor / current shunt calculator

This calculator allows you to find out how much power your sense resistor will dissipate and how much voltage it will drop at a given current.

A

Ω

R_{text{sense}} = frac{U_{text{drop}}}{I_{text{sense}}} P_{text{sense}} = I_{text{sense}}² cdot R_{text{sense}}
Posted by Uli Köhler in Calculators, Electronics

How to fix CoreOS “WARNING: This system is using cgroups v1”

Problem:

When logging into your CoreOS instance, you see this warning message:

############################################################################
WARNING: This system is using cgroups v1. For increased reliability
it is strongly recommended to migrate this system and your workloads
to use cgroups v2. For instructions on how to adjust kernel arguments
to use cgroups v2, see:
https://docs.fedoraproject.org/en-US/fedora-coreos/kernel-args/

To disable this warning, use:
sudo systemctl disable coreos-check-cgroups.service
############################################################################

but when you look at https://docs.fedoraproject.org/en-US/fedora-coreos/kernel-args/ you only see an example of how to initialize a new CoreOS instance with Ignition files with cgroups v2.

Solution:

In order to migrate your system to cgroups v2, run

sudo rpm-ostree kargs --delete=systemd.unified_cgroup_hierarchy

After that, you need to reboot your system in order for the changes to take effect:

sudo systemctl reboot

After the system has rebooted, the error should disappear.

Posted by Uli Köhler in CoreOS

A simple CoreOS config for beginners with password login

In constrast to other Linux-based systems, CoreOS requires quite a large learning curve to get installed properly – for example, you have to create the right ignition file for . This is a huge obstacle to overcome especially for first-time users.

This posts attempts to alleviate the steep learning curve by providing a basic config that is suitable for most practical (and especially small-scale) usecases and provides a good starting point for custom configs.

Simple install

First, boot up the VM from the CoreOS Live CD. We assume that you have a DHCP network connected to eth0. You will see a shell immediately.

The VM will automatically acquire an IP address over DHCP.

You can use TechOverflow’s hosted ignition file for the installation. You need to use the correct disk instead of /dev/xvda depending on your hardware/hypervisor. If in doubt, use lsblk to find the correct disk name.

Now run the installation command:

sudo coreos-installer install /dev/xvda --copy-network --ignition-url https://techoverflow.net/coreos.ign

After the installation is finished, reboot using

reboot

and the machine has rebooted, you can use the default login credentials:

Username: admin
Password: coreos

The hostname is CoreOS.

You absolutely need to change the password after the installation! If you create another user, remember that you still need to change the password of the admin user using

sudo passwd admin

Build your own config file

This is the Ignition YAML we used to create the correct config file. Use our online transpiler at https://fcct.techoverflow.net to compile the YAML to the JSON file. In order to create a new password hash, use TechOverflow’s docker-based mkpasswd approach.

variant: fcos
version: 1.0.0
passwd:
  users:
    - name: admin
      groups:
        - "sudo"
        - "docker"
      password_hash: $y$j9T$n6h8P2ik8tfoNUFBBoly00$7bnrMF8oFrB25Fc3NqigqEH/MI5YXIJwtCG/iEsns.2

systemd:
  units:
    - name: docker.service
      enabled: true

    - name: containerd.service
      enabled: true
    - name: [email protected]
      dropins:
      - name: autologin-core.conf
        contents: |
          [Service]
          # Override Execstart in main unit
          ExecStart=
          # Add new Execstart with `-` prefix to ignore failure
          ExecStart=-/usr/sbin/agetty --autologin admin --noclear %I $TERM
          TTYVTDisallocate=no
storage:
  files:
    - path: /etc/hostname
      mode: 0644
      contents:
        inline: |
          CoreOS
    - path: /etc/profile.d/systemd-pager.sh
      mode: 0644
      contents:
        inline: |
          # Tell systemd to not use a pager when printing information
          export SYSTEMD_PAGER=cat
    - path: /etc/sysctl.d/20-silence-audit.conf
      mode: 0644
      contents:
        inline: |
          # Raise console message logging level from DEBUG (7) to WARNING (4)
          # to hide audit messages from the interactive console
          kernel.printk=4
    - path: /etc/ssh/sshd_config.d/20-enable-passwords.conf
      mode: 0644
      contents:
        inline: |
          # Enable SSH password login
          PasswordAuthentication yes

which results in the following transpiled JSON:

{
  "ignition": {
    "version": "3.0.0"
  },
  "passwd": {
    "users": [
      {
        "groups": [
          "sudo",
          "docker"
        ],
        "name": "admin",
        "passwordHash": "$y$j9T$n6h8P2ik8tfoNUFBBoly00$7bnrMF8oFrB25Fc3NqigqEH/MI5YXIJwtCG/iEsns.2"
      }
    ]
  },
  "storage": {
    "files": [
      {
        "contents": {
          "source": "data:,CoreOS%0A"
        },
        "mode": 420,
        "path": "/etc/hostname"
      },
      {
        "contents": {
          "source": "data:,%23%20Tell%20systemd%20to%20not%20use%20a%20pager%20when%20printing%20information%0Aexport%20SYSTEMD_PAGER%3Dcat%0A"
        },
        "mode": 420,
        "path": "/etc/profile.d/systemd-pager.sh"
      },
      {
        "contents": {
          "source": "data:,%23%20Raise%20console%20message%20logging%20level%20from%20DEBUG%20(7)%20to%20WARNING%20(4)%0A%23%20to%20hide%20audit%20messages%20from%20the%20interactive%20console%0Akernel.printk%3D4%0A"
        },
        "mode": 420,
        "path": "/etc/sysctl.d/20-silence-audit.conf"
      },
      {
        "contents": {
          "source": "data:,%23%20Enable%20SSH%20password%20login%0APasswordAuthentication%20yes%0A"
        },
        "mode": 420,
        "path": "/etc/ssh/sshd_config.d/20-enable-passwords.conf"
      }
    ]
  },
  "systemd": {
    "units": [
      {
        "enabled": true,
        "name": "docker.service"
      },
      {
        "enabled": true,
        "name": "containerd.service"
      },
      {
        "dropins": [
          {
            "contents": "[Service]\n# Override Execstart in main unit\nExecStart=\n# Add new Execstart with `-` prefix to ignore failure\nExecStart=-/usr/sbin/agetty --autologin admin --noclear %I $TERM\nTTYVTDisallocate=no\n",
            "name": "autologin-core.conf"
          }
        ],
        "name": "[email protected]"
      }
    ]
  }
}


Posted by Uli Köhler in CoreOS

Real-world data on CRS309-1G-8S+ RouterOS Wireguard throughput

Also see Wireguard bandwidth performance of the MikroTik CRS326-24G-2S+

We tested the throughput of the new Wireguard functionality MikroTik CRS309-1G-8S+ running on RouterOS 7.1beta6.

Our test setup consists of a Desktop PC with 1GBase-T connection and a virtualized server on XCP-NG, attached with a 10GB shared connection, both running Ubuntu. Note that the L2 switching infrastructure (consisting only of MikroTik CRS3xx and CRS610 switching with complete hardware offloading) is ignored here because due to 100% hardware offloading to the marvelous Marvell switch chips it has orders of magnitude higher performance compared to any L3 function, hence it will only have minimal impact only the overall performance.

Wireguard was being used without preshared keys. Hitherto, it is unknown to us whether PSKs will have an impact on throughput.

The command on the Desktop was

dd if=/dev/urandom bs=100M | netcat -v 10.185.244.199 2222

whereas the command on the server was

netcat -vvnlp 2222 > /dev/null

As we expected with an uncompressed protocol like Wireguard, there is no difference if you pipe the data from /dev/urandom as opposed to /dev/zero.

Scenario: Routing from Wireguard to local routed VLAN

With IP firewall

The Desktop was connected to the CRS309-1G-8S+ using Wireguard. The virtual server was connected to the CRS309 as default gateway within a separate VLAN that was designed to be routed. The CRS309 L3 hardware offloading capability was disabled.

The IP firewall contained 8 simple accept and fasttrack rules. All the WireGuard traffic only matched the last (8th) rule and was accepted. It has not been tested whether fasttracking the Wireguard connection would increase performance

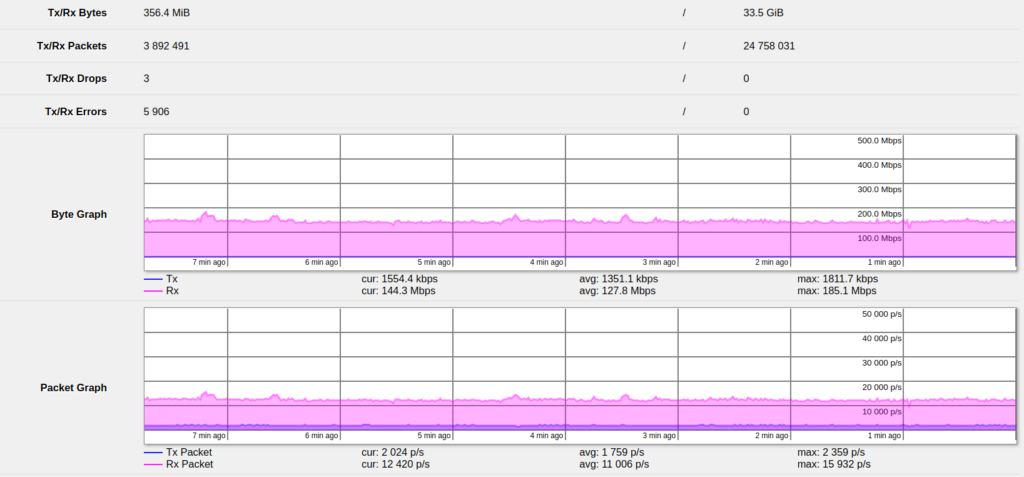
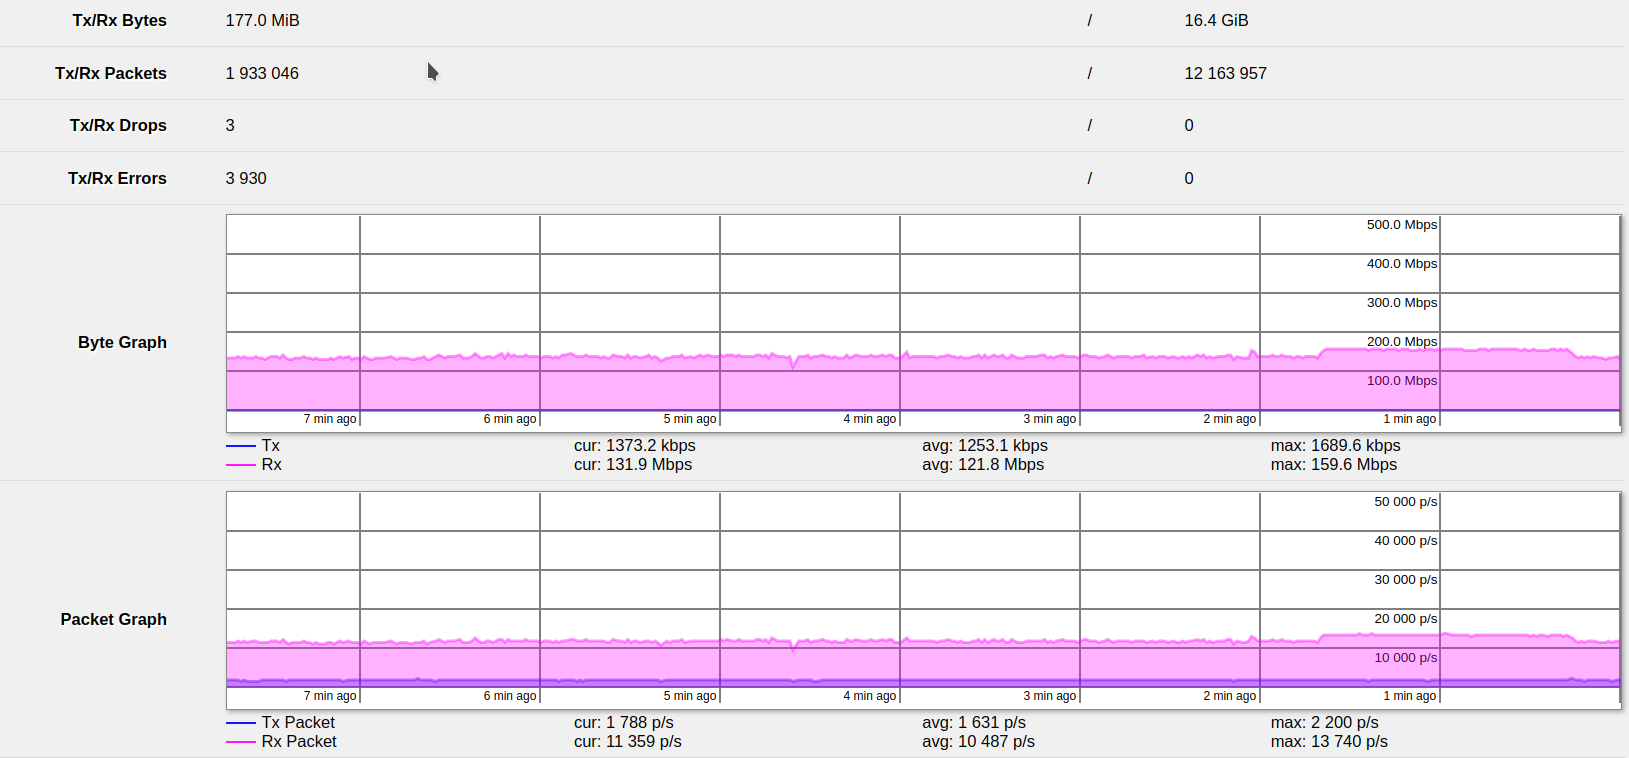
The throughput results showed a steady rate of 131 Mbit/s (unidirectional, bidirectional not tested), but up to 160 Mbit/s. It is unknown what caused the increase in speed, but it’s possible that additional traffic was L3-forwarded over the switch during the test.

Without IP firewall

The same test was repeated with the IP firewall being disabled in the Bridge Settings.

As expected, disabling additional IP firewall processing caused the throughput to increase, but only by a small margin. The typical speed was around 160 Mbit/s (unidirectional), with peaks up to 185 Mbit/s.

Conclusion

It should be pretty obvious that the CRS309-1G-S+ outperforms most conventional VPN solutions when using Wireguard. For a street price of ~175€, it is not only an awesome switch, but also doubles as a more than adequate Wireguard router for most practical applications.

Reliablity considerations

Note that at the moment of writing this article, Wireguard is only available in the RouterOS 7.1beta6 firmware, which is not yet considered stable. While I have not experienced any problems that have affected reliability in any way, if you run a network where it hurts if it fails, you should consider using alternative solutions in the meantime.

Posted by Uli Köhler in MikroTik, Networking, VPN, Wireguard

Wireguard bandwidth performance of the MikroTik CRS326-24G-2S+

Also see Real-world data on CRS309-1G-8S+ RouterOS Wireguard throughput

We tested the new Wireguard functionality MikroTik CRS326-24G-2S+ running on RouterOS 7.1beta6.

Our test setup consists of a Desktop PC with 1GBase-T connection and a virtualized server on XCP-NG, attached with a 10GB shared connection, both running Ubuntu. Note that the L2 switching infrastructure (consisting only of MikroTik CRS3xx and CRS610 switching with complete hardware offloading) is ignored here because due to 100% hardware offloading to the marvelous Marvell switch chips it has orders of magnitude higher performance compared to any L3 function, hence it will only have minimal impact only the overall performance.

Wireguard was being used without preshared keys. Hitherto, it is unknown to us whether PSKs will have an impact on throughput.

Scenario: Routing between two wireguard VPNs

Both the Desktop and the server were connected to two different Wireguard interfaces on the CRS326-24G-2S+.

The CRS326 routed between those interfaces. The virtualized server ran a netcat server while the Desktop ran the wireguard client. IP firewall was disabled during this test, but the switch still had to L3 forward the packets.

Throughput results

The effective throughput of L3 forwarding, doing one Wireguard decryption and one WireGuard encryption operation (both without PSK) is 108.1 Mbit/s (unidirectional. Bidirectional has not been tested)

This is an awesome result, considering that the CRS326-24G-2S+ is only ~120€ street price and is an awesome switch. But it seems like Wireguard is capable of making a high performance VPN router from just a managed MikroTik switch.

Reliablity considerations

Note that at the moment of writing this article, Wireguard is only available in the RouterOS 7.1beta6 firmware, which is not yet considered stable. While I have not experienced any problems that have affected reliability in any way, if you run a network where it hurts if it fails, you should consider using alternative solutions in the meantime.

Posted by Uli Köhler in MikroTik, Networking, VPN, Wireguard

Simple 5-minute Vaultwarden (SQLite) setup using docker-compose

In order to setup Vaultwarden in a docker-compose & SQLite based configuration (e.g. on CoreOS), first we need to create a directory. I recommend using /opt/vaultwarden.

Run all the following commands and place all the following files in the /opt/vaultwarden directory!

First, we’ll create a .env file with random passwords (I recommend using pwgen 30). Not using a unique, random password here is a huge security risk since it will allow full admin access to Vaultwarden!

ADMIN_TOKEN=iqueingufo3LohshoohoG3tha2zou6
SIGNUPS_ALLOWED=true

Now place your docker-compose.yml:

version: '3.4'
services:
  vaultwarden:
    image: vaultwarden/server:latest
    environment:
      - ADMIN_TOKEN=${ADMIN_TOKEN}
      - SIGNUPS_ALLOWED=${SIGNUPS_ALLOWED}
    volumes:
      - ./vw_data:/data
    ports:
      - 17881:80

Next, we’ll create a systemd service to autostart docker-compose:

curl -fsSL https://techoverflow.net/scripts/create-docker-compose-service.sh | sudo bash /dev/stdin

This will automatically start vaultwarden.

Now you need to configure your reverse proxy server to point https://vaultwarden.mydomain.com . You need to use https, http won’t work due to some browser limitations.

Now we need to configure vaultwarden using the admin interface.

Go to https://vaultwarden.mydomain.com/admin and enter the ADMIN_TOKEN from .env.

There are two things that you need to configure here:

  • The Domain Name under General settings
  • The email server settings under SMTP email settings

With these settings configured, Vaultwarden should be up and running and you can access it using https://vaultwarden.mydomain.com .

After the first user has been setup and tested, you can uncheck the Allow new signups in General settings in the admin interface. This is recommended since everyone who will be able to guess your domain name would be able to create a Vaultwarden account otherwise.

Posted by Uli Köhler in Container, Docker

Simple 15-minute passbolt setup using docker-compose

This is how I run my local passbolt instance.

First, create the directory. I use /opt/passbolt. Run all the following commands and place all the following files in that directory!

First, initialize the folders with the correct permissions:

mkdir -p passbolt_gpg
chown -R 33:33 passbolt_gpg

Now create a .env file with random passwords (I recommend using pwgen 30):

MARIADB_ROOT_PASSWORD=meiJieseingi4dutiareimoh2Aiv5j
MARIADB_USER_PASSWORD=ohre3ye1oNexeShiuChaengahzuemo

Now place your docker-compose.yml:

version: '3.4'
services:
  mariadb:
    image: mariadb:latest
    environment:
      - MYSQL_DATABASE=passbolt
      - MYSQL_USER=passbolt
      - MYSQL_PASSWORD=${MARIADB_USER_PASSWORD}
      - MYSQL_ROOT_PASSWORD=${MARIADB_ROOT_PASSWORD}
    volumes:
      - ./mariadb_data:/var/lib/mysql

  passbolt:
    image: passbolt/passbolt:latest-ce
    tty: true
    depends_on:
      - mariadb
    environment:
      - DATASOURCES_DEFAULT_HOST=mariadb
      - DATASOURCES_DEFAULT_USERNAME=passbolt
      - DATASOURCES_DEFAULT_PASSWORD=${MARIADB_USER_PASSWORD}
      - DATASOURCES_DEFAULT_DATABASE=passbolt
      - DATASOURCES_DEFAULT_PORT=3306
      - DATASOURCES_QUOTE_IDENTIFIER=true
      - APP_FULL_BASE_URL=https://passbolt.mydomain.com
      - [email protected]
      - EMAIL_TRANSPORT_DEFAULT_HOST=smtp.mydomain.com
      - EMAIL_TRANSPORT_DEFAULT_PORT=587
      - [email protected]
      - EMAIL_TRANSPORT_DEFAULT_PASSWORD=yei5QueiNa5ahF0Aice8Na0aphoyoh
      - EMAIL_TRANSPORT_DEFAULT_TLS=true
      - [email protected]
    volumes:
      - ./passbolt_gpg:/etc/passbolt/gpg
      - ./passbolt_web:/usr/share/php/passbolt/webroot/img/public
    command: ["/usr/bin/wait-for.sh", "-t", "0", "mariadb:3306", "--", "/docker-entrypoint.sh"]
    ports:
      - 17880:80

Be sure to replace all the email addresses, domain names and SMTP credentials by the values appropriate for your setup.

Now startup passbolt for the first time, it will initialize the database:

docker-compose up

You need to keep passbolt running during the following steps.

First, we’ll send a test email:

docker-compose exec passbolt su -m -c "bin/cake passbolt send_test_email"

If you see

The message has been successfully sent!

then your SMTP config is correct. Otherwise, debug the error message, and, if neccessary, modify the EMAIL_… environment variables in docker-compose.yml and restart passbolt afterwards.

Now we’ll create an admin user:

docker-compose exec passbolt su -m -c "bin/cake passbolt register_user -u [email protected] -f John -l Doe -r admin" -s /bin/sh www-data

If you want to create a normal (non-admin) user, use user instead of admin:

docker-compose exec passbolt su -m -c "bin/cake passbolt register_user -u [email protected] -f Jane -l Doe -r user" -s /bin/sh www-data

After that, the only thing left to do is to create a systemd service to autostart your passbolt service:

curl -fsSL https://techoverflow.net/scripts/create-docker-compose-service.sh | sudo bash /dev/stdin

Passbolt is now running on port 17880 (you can configure this using docker-compose.yml). Just configure your reverse proxy appropriately to point to this port.

Posted by Uli Köhler in Container, Docker

How to import standard CA certificates into MikroTik RouterOS

You can use the following commands to download the standard CA certificates from the Curl webpage and import them:

/tool fetch url=https://curl.se/ca/cacert.pem
/certificate import file-name=cacert.pem passphrase=""

This will typically take a couple of minutes.

I recommend to connect to your MikroTik router using SSH, e.g.

ssh [email protected]

so you’re able to copy and paste commands more easily.

Posted by Uli Köhler in MikroTik

How to run Jupyter Lab as systemd service

If you want to run your Jupyter Lab as a network service on any modern Linux distribution, you can install a systemd service that runs Jupyter. First, you need to install jupyter lab using

sudo pip3 install jupyterlab

In case you don’t have pip3, use sudo apt -y install python3-pip or the equivalent on your distribution.

Note that this script will run Jupyter without token authentication and without password and it will listen on any IP (--ip=0.0.0.0) by default. Either change the command line flags or be aware of the security implications !

#!/bin/bash
# This script installs and enables/starts a systemd service
export NAME=Jupyter

# Create service file
cat >/etc/systemd/system/${NAME}.service <<EOF
[Unit]
Description=${NAME}

[Service]
Type=simple
ExecStart=/usr/bin/env jupyter lab --ip=0.0.0.0 --port 17256 --LabApp.token=''

WorkingDirectory=/home/uli/jupyter
User=uli
Group=uli

Restart=on-failure
RestartSec=5s

[Install]
WantedBy=multi-user.target
EOF

# Enable and start service
systemctl enable --now ${NAME}

You need to change the following entries in the script in order to make it work for you:

WorkingDirectory=/home/uli/jupyter
User=uli
Group=uli

Set the WorkingDirectory to whatever directory you want Jupyter to run in. Note that anyone being able to access the webinterface will basically have full access to that directory!

Set User and Group to the user that should run. Note that running Jupyter as root is not allowed. In case you still want to do it, add the --allow-root flag to the command line options.

Now run the script as root to install the service:

sudo ./install-jupyter-service.sh

Now you can access Jupyter at http://[ip of the computer]:17256.

Changing the configuration

In order to change the configuration, I recommend to edit /etc/systemd/systemd/Jupyter.service (or /etc/systemd/systemd/${NAME}.service if you changed export NAME=Jupyter) directly. After that, run

sudo systemctl daemon-reload
sudo systemctl restart Jupyter

You can also change the installation script and re-run it, but you still need to run daemon-reload and restart.

Running multiple Jupyter instances

In order to run  multiple instances, just run multiple copies of the installation script with different names. For example, use

export NAME=Jupyter-DeepLearning

Debugging Jupyter Lab output

If you have problems with Juypter Lab starting up, use

sudo systemctl status Jupyter

in order to view the status and

sudo journalctl -xfu Jupyter

to view all the logs.

Status output example:

● Jupyter.service - Jupyter
     Loaded: loaded (/etc/systemd/system/Jupyter.service; enabled; vendor preset: enabled)
     Active: active (running) since Fri 2021-06-11 03:44:28 CEST; 4s ago
   Main PID: 48753 (jupyter-lab)
      Tasks: 1 (limit: 14226)
     Memory: 51.7M
     CGroup: /system.slice/Jupyter.service
             └─48753 /usr/bin/python3 /usr/local/bin/jupyter-lab --ip=0.0.0.0 --port 17256 --LabApp.token=

Jun 11 03:44:29 uli-desktop env[48753]: [I 2021-06-11 03:44:29.215 ServerApp] nbclassic | extension was successfully loaded.
Jun 11 03:44:29 uli-desktop env[48753]: [I 2021-06-11 03:44:29.216 LabApp] JupyterLab extension loaded from /usr/local/lib/python3.8/dist-packages/jupyterlab
Jun 11 03:44:29 uli-desktop env[48753]: [I 2021-06-11 03:44:29.216 LabApp] JupyterLab application directory is /usr/local/share/jupyter/lab
Jun 11 03:44:29 uli-desktop env[48753]: [I 2021-06-11 03:44:29.219 ServerApp] jupyterlab | extension was successfully loaded.
Jun 11 03:44:29 uli-desktop env[48753]: [I 2021-06-11 03:44:29.220 ServerApp] Serving notebooks from local directory: /dev/shm
Jun 11 03:44:29 uli-desktop env[48753]: [I 2021-06-11 03:44:29.220 ServerApp] Jupyter Server 1.8.0 is running at:
Jun 11 03:44:29 uli-desktop env[48753]: [I 2021-06-11 03:44:29.220 ServerApp] http://uli-desktop:17256/lab
Jun 11 03:44:29 uli-desktop env[48753]: [I 2021-06-11 03:44:29.220 ServerApp]     http://127.0.0.1:17256/lab
Jun 11 03:44:29 uli-desktop env[48753]: [I 2021-06-11 03:44:29.220 ServerApp] Use Control-C to stop this server and shut down all kernels (twice to skip confirmation).
Jun 11 03:44:29 uli-desktop env[48753]: [W 2021-06-11 03:44:29.224 ServerApp] No web browser found: could not locate runnable browser.

Uninstalling the Jupyter Lab service

In order to just stop and disable autostart (but not uninstall) the jupyter lab service, use

sudo systemctl disable --now Jupyter

After that, you can just remove the service file in order to permanently uninstall the service:

sudo rm /etc/systemd/system/Jupyter.service

You can always reinstall using our installation script.

Note that if you have changed the export NAME=... line, you need to replace Jupyter by the value of Name
Posted by Uli Köhler in Python, systemd

How to disable Jupyter Token Authentication

If you want to run Jupyter in a context where the token authentication should be disabled, use the

--LabApp.token=''

command line flag. This will users allow to access the Jupyter without entering any credentials.

Note that this has security implications and everyone that can access the Jupyter server IP & port will be able to access Jupyter! I recommend to at least add another layer of authentication like HTTP basic authentication if you use Jupyter in a public network.

Posted by Uli Köhler in Python

Autoinstall script for systemd timer and associated service

The following script will install a systemd .timer file and the associated .service file  into /etc/systemd/system/ and enable the timer (i.e. start on boot) and start the timer immediately.

#!/bin/bash
# This script installs and enables/starts a systemd timer
# It also installs the service file that is run by the given timer
export NAME=MyService

cat >/etc/systemd/system/${NAME}.service <<EOF
# ADD SYSTEMD SERVICE FILE CONTENT HERE
EOF

cat >/etc/systemd/system/${NAME}.timer <<EOF
# ADD SYSTEMD TIMER FILE CONTENT HERE
EOF

# Enable and start service
systemctl enable --now ${NAME}.timer

In order to modify the script for your systemd service, replace MyService by the desired name of your service in

export NAME=MyService

insert the content of your .service file at

# ADD SYSTEMD SERVICE FILE CONTENT HERE

and insert the content of your .timer file at

# ADD SYSTEMD TIMER FILE CONTENT HERE

Full example

The following complete example installs a systemd service named MyService that runs /usr/bin/python3 myscript.py every two hours:

#!/bin/bash
# This script installs and enables/starts a systemd timer
# It also installs the service file that is run by the given timer
export NAME=MyService

cat >/etc/systemd/system/${NAME}.service <<EOF
[Unit]
Description=${NAME}

[Service]
Type=oneshot
ExecStart=/usr/bin/python3 myscript.py
WorkingDirectory=/opt/myservice
EOF

cat >/etc/systemd/system/${NAME}.timer <<EOF
[Unit]
Description=${NAME} timer

[Timer]
OnCalendar=*-*-* 00,02,04,06,08,10,12,14,16,18,20,22:00:00
Persistent=true

[Install]
WantedBy=timers.target
EOF

# Enable and start service
systemctl enable --now ${NAME}.timer
Posted by Uli Köhler in systemd

How to run systemd timer every five minutes

The syntax to run a systemd timer every minute is:

OnCalendar=*-*-* *:00,05,10,15,20,25,30,35,40,45,50,55:00

i.e. run it on the first second (:00) of every 5th minute (00,05,10,15,20,25,30,35,40,45,50,55).

Posted by Uli Köhler in systemd

How to run systemd timer every three hours

The syntax to run a systemd timer every three hours is:

OnCalendar=*-*-* 00,03,06,09,12,15,18,21:00:00

i.e. run it on the first minute and first second (00:00) of every second hour (00,03,06,09,12,15,18,21).

Posted by Uli Köhler in systemd

How to run systemd timer every two hours

The syntax to run a systemd timer every two hours is:

OnCalendar=*-*-* 00,02,04,06,08,10,12,14,16,18,20,22:00:00

i.e. run it on the first minute and first second (00:00) of every second hour (00,02,04,06,08,10,12,14,16,18,20,22).

Posted by Uli Köhler in systemd

How to run systemd timer every minute

The syntax to run a systemd timer every minute is:

OnCalendar=*-*-* *:*:00

i.e. run it on the first second (00) every minute.

Posted by Uli Köhler in systemd

Autoinstall script for systemd service

The following script will install a systemd service file into /etc/systemd/system/ and enable it (i.e. start on boot) and start it immediately.

#!/bin/bash
# This script installs and enables/starts a systemd service
export NAME=MyService

# Create service file
cat >/etc/systemd/system/${NAME}.service <<EOF
# ADD SYSTEMD SERVICE FILE CONTENT HERE
EOF

# Enable and start service
systemctl enable --now ${NAME}

In order to modify the script for your systemd service, replace MyService by the desired name of your service in

export NAME=MyService

and insert the content of your .service file at

# ADD SYSTEMD SERVICE FILE CONTENT HERE

Full example

The following complete example installs a systemd service named MyService that runs /usr/bin/python3 myscript.py:

#!/bin/bash
# This script installs and enables/starts a systemd service
export NAME=MyService

# Create service file
cat >/etc/systemd/system/${NAME}.service <<EOF
[Unit]
Description=MyService

[Service]
Type=oneshot
ExecStart=/usr/bin/python3 myscript.py
WorkingDirectory=/opt/myservice

[Install]
WantedBy=multi-user.target
EOF

# Enable and start service
systemctl enable --now ${NAME}


Posted by Uli Köhler in systemd

How to fix Traefik “Gateway Timeout” for Docker services

Problem

If you have setup your Traefik instance with Docker providers, you will often encounter an issue where every service running on Docker or docker-compose will return

Gateway Timeout

(HTTP response 504) after a couple of seconds.

Why does the gateway timeout occur?

This issue is caused by the Traefik instance not being on the same Docker network(s) as the containers running the services. Therefore, the IP address of the traefik container is firewalled from being able to access the IP addresses of the docker containers.

There are two ways to fix this issue.

Preferred solution: Use host networking

The host is able to access all docker container IP addresses. Therefore, we can operate the traefik contaienr with network_mode: "host" so it doesn’t receive a separate IP address in a separate network but uses the hosts’s IP address and ports directly.

In order enable host networking in a docker-compose-based setup, use

network_mode: "host" 

For example:

version: "3.3"
services:
  traefik:
    image: "traefik:v2.4.8"
    network_mode: "host"
# [...]

The approach of using host network also has the added advantage of increasing traefik throughput, since you don’t need any docker port forwarding but the host ports (like port 80 for HTTP and port 443 for HTTPS) are connected directly to traefik.

Alternate solution: Add traefik to every docker network

You can also add the traefik instance to each and every docker network where a service container is located. This will work, but you need to remember to add the traefik instance to every docker container. Since this is not only often a lot of work (especially if you have many services with separate networks running in your setup)

Posted by Uli Köhler in Traefik

How to install ruby & rubygems in Alpine Linux

Problem:

You want to install ruby and the gem package manager in Alpine linux, but running apk install ruby rubygems shows you that the package doesn’t exist

/ # apk add ruby rubygems
ERROR: unable to select packages:
  rubygems (no such package):
    required by: world[rubygems]

Solution:

gem is included in the ruby package. So the only command you need to run is

apk update
apk add ruby

Example output:

/ # apk add ruby
(1/7) Installing ca-certificates (20191127-r5)
(2/7) Installing gdbm (1.19-r0)
(3/7) Installing gmp (6.2.1-r0)
(4/7) Installing readline (8.1.0-r0)
(5/7) Installing yaml (0.2.5-r0)
(6/7) Installing ruby-libs (2.7.3-r0)
(7/7) Installing ruby (2.7.3-r0)
Executing busybox-1.32.1-r6.trigger
Executing ca-certificates-20191127-r5.trigger
OK: 928 MiB in 154 packages

After doing that, you can immediately use both ruby and gem.

Posted by Uli Köhler in Alpine Linux, Container, Docker, Linux, Ruby

How to fix StereoPi Ethernet & USB not working

If you are trying to work with your StereoPi, you might have a situation in which Ethernet and USB are not working while the Raspberry Pi boots up and HDMI output works fine.

The reasons for this is that you are trying to power your board using the MicroUSB connector instead of using the USB power cable that comes with your StereoPi. The USB power cable is the one that has an USB Type-A connector at one end and the small white plug with a red and a black lead on the other side.

How to fix

  • Unplug the MicroUSB cable from the StereoPi
  • Unplug the USB power cable from
  • Now plug in only the USB power cable
  • In case your StereoPi doesn’t boot up immediately, switch the small switch on the StereoPi (which is adjacent to the socket where you connected the USB power cable) to the other side

Once your StereoPi has finished booting up, Ethernet and USB will work immediately

Why don’t USB & Ethernet work with the MicroUSB cable

If you are powering your StereoPi using the MicroUSB connector, only the Compute Module will be powered. All the functions of the StereoPi board, including USB power to the USB ports and the Ethernet chip will not receive power. Even if you have plugged in both MicroUSB and the USB power connector, you might have switched off the power switch – all will appear normal, as the Raspberry Pi boots up properly, but the StereoPi will not be powered properly.

Note that switching on the power from the USB power cable after the StereoPi has booted up will not fix the issue: While this will give power to the components on the StereoPi board, the operating system which is running on the StereoPi will not properly recognize the components. You need to reboot the StereoPi in order for the operating system to recognize all StereoPi components and initialize them correctly.

For more information on how to power the StereoPi, see the StereoPi wiki which contains a section on how to properly power the board.

Posted by Uli Köhler in Raspberry Pi
This website uses cookies to improve your experience. We'll assume you're ok with this, but you can opt-out if you wish. Cookie settingsACCEPTPrivacy &amp; Cookies Policy