How to read IDF diabetes statistics in Python using Pandas

The International Diabetes Foundation provides a Data portal with various statistics related to diabetes.

In this post we’ll show how to read the Diabetes estimates (20-79 y) / People with diabetes, in 1,000s data export in CSV format using pandas.

First download IDF (people-with-diabetes--in-1-000s).csv from the data page.

Now we can parse the CSV file:

import pandas as pd

# Download at https://www.diabetesatlas.org/data/en/indicators/1/
df = pd.read_csv("IDF (people-with-diabetes--in-1-000s).csv")
# Parse year columns to obtain floats and multiply by thousands factor. Pandas fails to parse values like "12,345.67"
for column in df.columns:
    try:
        int(column)
        df[column] = df[column].apply(lambda s: None if s == "-" else float(s.replace(",", "")) * 1000)
    except:
        pass

As you can see in the postprocessing step, the number of diabetes patients are given in 1000s in the CSV, so we multiply them by 1000 to obtain the actual numbers.

If you want to modify the data columns (i.e. the columns referring to year), you can use this simple template:

for column in df.columns:
    try:
        int(column) # Will raise ValueError() if column is not a year number
        # Whatever you do here will only be applied to year columns
        df[column] = df[column] * 0.75 # Example on how to modify a column
        # But note that if your code raises an Exception, it will be ignored!
    except:
        pass

Let’s plot some data:

regions = df[df["Type"] == "Region"] # Only regions, not individual countries

from matplotlib import pyplot as plt
plt.style.use("ggplot")
plt.gcf().set_size_inches(20,4)
plt.ylabel("Diabetes patients [millions]")
plt.xlabel("Region")
plt.title("Diabetes patients in 2019 by region")
plt.bar(regions["Country/Territory"], regions["2019"] / 1e6)

Note that if you use a more recent dataset than the version I’m using the 2019 column might not exist in your CSV file. Choose an appropriate column in that case.
Posted by Uli Köhler in Bioinformatics, pandas, Python

How to repair docker-compose MariaDB instances (aria_chk -r)

Problem:

You are trying to run a MariaDB container using docker-compose. However, the database container doesn’t start up and you see error messages like these in the logs:

[ERROR] mysqld: Aria recovery failed. Please run aria_chk -r on all Aria tables and delete all aria_log.######## files
[ERROR] Plugin 'Aria' init function returned error.
[ERROR] Plugin 'Aria' registration as a STORAGE ENGINE failed.
....
[ERROR] Could not open mysql.plugin table. Some plugins may be not loaded
[ERROR] Failed to initialize plugins.
[ERROR] Aborting

Solution:

The log messages already tell you what to do – but they don’t tell you how to do it:

Aria recovery failed. Please run aria_chk -r on all Aria tables and delete all aria_log.######## files

First, backup the entire MariaDB data directory: Check onto which host directory the data directory (/var/lib/mysql) of the container is mapped and copy the entire directory to a backup space. This is important in case the repair process fails.

Now let’s run aria_chk -r to check and repair MySQL table files.

docker-compose run my-db bash -c 'aria_chk -r /var/lib/mysql/**/*'

Replace my-db by the name of your database container. This will attempt to repair a lot of non-table-files as well but aria_chk will happily ignore those.

Now we can delete the log files:

docker-compose run my-db bash -c 'rm /var/lib/mysql/aria_log.*'

Again, replace my-db by the name of your database container.

Posted by Uli Köhler in Databases, Docker

Parsing World Population Prospects (WPP) XLSX data in Python

The United Nations provides the Word Population Prospects (WPP) dataset on geographic and age distribution of mankind as downloadable XLSX files.

Reading these files in Python is rather easy. First we have to find out how many rows to skip. For the 2019 WPP dataset this value is 16 since row 17 contains all the column headers. The number of rows to skip might be different depending on the dataset. We’re using WPP2019_POP_F07_1_POPULATION_BY_AGE_BOTH_SEXES.xlsx in this example.

We can use Pandas read_excel() function to import the dataset in Python:

import pandas as pd

df = pd.read_excel("WPP2019_INT_F03_1_POPULATION_BY_AGE_ANNUAL_BOTH_SEXES.xlsx", skiprows=16, na_values=["..."])

This will take a few seconds until the large dataset has been processed. Now we can check if skiprows=16 is the correct value. It is correct if pandas did recognize the column names correctly:

>>> df.columns
Index(['Index', 'Variant', 'Region, subregion, country or area *', 'Notes',
       'Country code', 'Type', 'Parent code', 'Reference date (as of 1 July)',
       '0-4', '5-9', '10-14', '15-19', '20-24', '25-29', '30-34', '35-39',
       '40-44', '45-49', '50-54', '55-59', '60-64', '65-69', '70-74', '75-79',
       '80-84', '85-89', '90-94', '95-99', '100+'],
      dtype='object')

Now let’s filter for a country:

russia = df[df["Region, subregion, country or area *"] == 'Russian Federation']

This will show us the population data for multiple years in 5-year intervals from 1950 to 2020. Now let’s filter for the most recent year:

russia.loc[russia["Reference date (as of 1 July)"].idxmax()]

This will show us a single dataset:

Index                                                 3255
Variant                                          Estimates
Region, subregion, country or area *    Russian Federation
Notes                                                  NaN
Country code                                           643
Type                                          Country/Area
Parent code                                            923
Reference date (as of 1 July)                         2020
0-4                                                9271.69
5-9                                                9350.92
10-14                                              8174.26
15-19                                              7081.77
20-24                                               6614.7
25-29                                              8993.09
30-34                                              12543.8
35-39                                              11924.7
40-44                                              10604.6
45-49                                              9770.68
50-54                                              8479.65
55-59                                                10418
60-64                                              10073.6
65-69                                              8427.75
70-74                                              5390.38
75-79                                              3159.34
80-84                                              3485.78
85-89                                              1389.64
90-94                                              668.338
95-99                                              102.243
100+                                                 9.407
Name: 3254, dtype: object
​

How can we plot that data? First, we need to select all the columns that contain age data. We’ll do this by manually inserting the name of the first such column (0-4) into the following code and assuming that there are no columns after the last age column:

>>> df.columns[df.columns.get_loc("0-4"):]
Index(['0-4', '5-9', '10-14', '15-19', '20-24', '25-29', '30-34', '35-39',
       '40-44', '45-49', '50-54', '55-59', '60-64', '65-69', '70-74', '75-79',
       '80-84', '85-89', '90-94', '95-99', '100+'],
      dtype='object')

Now let’s select those columns from the russia dataset:

most_recent_russia = russia.loc[russia["Reference date (as of 1 July)"].idxmax()]
age_columns = df.columns[df.columns.get_loc("0-4"):]

russian_age_data = most_recent_russia[age_columns]

Let’s have a look at the dataset:

>>> russian_age_data
0-4      9271.69
5-9      9350.92
10-14    8174.26
15-19    7081.77
20-24     6614.7
25-29    8993.09
30-34    12543.8
35-39    11924.7
40-44    10604.6
45-49    9770.68
50-54    8479.65
55-59      10418
60-64    10073.6
65-69    8427.75
70-74    5390.38
75-79    3159.34
80-84    3485.78
85-89    1389.64
90-94    668.338
95-99    102.243
100+       9.407

That looks useable, note however that the values are in thousands, i.e. we have to multiply the values by 1000 to obtain the actual estimates of the population. Let’s plot it:

from matplotlib import pyplot as plt
plt.style.use("ggplot")

plt.title("Age composition of the Russian population (2020)")
plt.ylabel("People in age group [Millions]")
plt.xlabel("Age group")
plt.gcf().set_size_inches(15,5)
# Data is given in thousands => divide by 1000 to obtain millions
plt.plot(russian_age_data.index, russian_age_data.as_matrix() / 1000., lw=3)

The finished plot will look like this:

Here’s our finished script:

#!/usr/bin/env python3
import pandas as pd
df = pd.read_excel("WPP2019_POP_F07_1_POPULATION_BY_AGE_BOTH_SEXES.xlsx", skiprows=16)
# Filter only russia
russia = df[df["Region, subregion, country or area *"] == 'Russian Federation']

# Filter only most recent estimate (1 row)
most_recent_russia = russia.loc[russia["Reference date (as of 1 July)"].idxmax()]
# Retain only value columns
age_columns = df.columns[df.columns.get_loc("0-4"):]
russian_age_data = most_recent_russia[age_columns]

# Plot!
from matplotlib import pyplot as plt
plt.style.use("ggplot")

plt.title("Age composition of the Russian population (2020)")
plt.ylabel("People in age group [Millions]")
plt.xlabel("Age group")
plt.gcf().set_size_inches(15,5)
# Data is given in thousands => divide by 1000 to obtain millions
plt.plot(russian_age_data.index, russian_age_data.as_matrix() / 1000., lw=3)

# Export as SVG
plt.savefig("russian-demographics.svg")


Posted by Uli Köhler in Bioinformatics, Data science, pandas, Python

How to automatically cleanup your docker registry instance

Quick install

This quick-install script works if you are running the docker registry image using docker-compose and the service in docker-compose.yml is called registry. I recommend to use our example on how to install the docker registry for Gitlab (not yet available).

Run this in the directory where docker-compose.yml  is located!

wget -qO- https://techoverflow.net/scripts/install-registry-autocleanup.sh | sudo bash

Need an explanation (or not using docker-compose)?

Docker registry instances will store every version of every image you push to them, so especially if you are in a continous integration environment you might want to do periodic cleanups that delete all images without a tag.

The command to do that is

registry garbage-collect /etc/docker/registry/config.yml -m

You can use a systemd service like

[Unit]
Description=registry-gc

[Service]
Type=oneshot
ExecStart=/usr/local/bin/docker-compose exec -T registry bin/registry garbage-collect /etc/docker/registry/config.yml -m
WorkingDirectory=/opt/my-registry

and a timer like

[Unit]
Description=registry-gc

[Timer]
OnCalendar=daily
Persistent=true

[Install]
WantedBy=timers.target

to run the command daily. You need to adjust both the WorkingDirectory and the exact docker-compose exec command to suit your needs.

Copy both files to /etc/systemd/system and enable the timer using

sudo systemctl enable registry-gc.timer

and you can run it manually at any time using

sudo systemctl start registry-gc.service
Posted by Uli Köhler in Docker

How to fix Gitlab Runner ‘dial unix /var/run/docker.sock: connect: permission denied’

Problem:

In your Gitlab build jobs that use docker you see error messages like

Got permission denied while trying to connect to the Docker daemon socket at unix:///var/run/docker.sock: Post http://%2Fvar%2Frun%2Fdocker.sock/v1.40/auth: dial unix /var/run/docker.sock: connect: permission denied

Solution:

usermod -a -G docker gitlab-runner

to give the user running the jobs permission to access docker resources then restart the server/VM on which the runner is installed !

Still doesn’t work? Check if you have installed docker correctly. We recommend to use our automated install script, see How to install docker and docker-compose on Ubuntu in 30 seconds.

Posted by Uli Köhler in Docker

How to automatically remove docker images that are not associated to a container daily

Note: This will not only remove docker images without a tag but all docker images not associated to a running or stopped container. See our previous post How to automatically cleanup (prune) docker images daily in case this is not the desired behaviour.

docker image prune provides an easy way to remove “unused” docker images from a system and hence fixes or significantly delays docker eating up all your disk space on e.g. automated disk space.

I created a systemd-timer based daily image removal routine using TechOverflow’s Simple systemd timer generator.

Quick install using

wget -qO- https://techoverflow.net/scripts/install-cleanup-docker-all.sh | sudo bash

This is the script which automatically creates & installs both systemd config files.

#!/bin/sh
# This script installs automated docker cleanup.
# onto systemd-based systems.
# See https://techoverflow.net/2020/02/04/how-to-remove-all-docker-images-that-are-not-associated-to-a-container/
# for details on what images are removed.
# It requires that docker is installed properly

cat >/etc/systemd/system/PruneDockerAll.service <<EOF
[Unit]
Description=PruneDockerAll

[Service]
Type=oneshot
ExecStart=/bin/bash -c "docker image ls --format '{{.ID}}' | xargs docker image rm ; true"
WorkingDirectory=/tmp
EOF

cat >/etc/systemd/system/PruneDockerAll.timer <<EOF
[Unit]
Description=PruneDockerAll

[Timer]
OnCalendar=daily
Persistent=true

[Install]
WantedBy=timers.target
EOF

# Enable and start service
systemctl enable PruneDockerAll.timer && sudo systemctl start PruneDockerAll.timer


To view the logs, use

journalctl -xfu PruneDockerAll.service

To view the status, use

sudo systemctl status PruneDockerAll.timer

To immediately cleanup your docker images, use

sudo systemctl start PruneDockerAll.service
Posted by Uli Köhler in Docker

How to remove all stopped docker containers

Removing all docker containers that are currently stopped is simple:

docker container prune

In case you want to skip the Are you sure you want to continue? [y/N] confirmation, use:

docker container prune -f

Also see our post on How to remove all docker images that are not associated to a container.

Posted by Uli Köhler in Docker

How to remove all docker images that are not associated to a container

In our previous post we showed how to prune docker images to free up space on your hard drive. However, this approach will not remove images that have tags (i.e. names) associated with them.

Often you want to remove all images that are not required by one of the containers (both running and stopped containers).

This is pretty easy:

docker image ls --format '{{.ID}}' | xargs docker image rm

This command will list all image IDs using docker image ls --format '{{.ID}}' and run docker image rm for every image ID.

Since docker image rm will fail for images that are associated to either a running or a stopped container (hence that image won’t be deleted), this will only delete those images that are not associated to any container.

In case you get a lot of those error messages as output from the command:

Error response from daemon: conflict: unable to delete 1f9cfa8dc305 (cannot be forced) - image is being used by running container 22a27af7d595
Error response from daemon: conflict: unable to delete 9af515ad5c74 (must be forced) - image is being used by stopped container 2ebcbd936841

don’t worry, that’s fine, that just means one of your images is associated to a container and hence won’t be deleted.

Posted by Uli Köhler in Docker

How to print only image ID in ‘docker image ls’

Use --format  '{{.ID}}':

docker image ls --format '{{.ID}}'


Posted by Uli Köhler in Docker

How to read TSV (tab-separated values) in C++

This minimal example show your how to read & parse a tab-separated values (TSV) file in C++. We use boost::algorithm::split to split each line into its tab-separated components.

#include <fstream>
#include <iostream>
#include <string>
#include <vector>
#include <boost/algorithm/string.hpp>

using namespace std;
using namespace boost::algorithm;

int main(int argc, char** argv) {
    ifstream fin("test.tsv");
    string line;
    while (getline(fin, line)) {
        // Split line into tab-separated parts
        vector<string> parts;
        split(parts, line, boost::is_any_of("\t"));
        // TODO Your code goes here!
        cout << "First of " << parts.size() << " elements: " << parts[0] << endl;
    }
    fin.close();
}


Posted by Uli Köhler in C/C++

C++ read file line by line minimal example

This minimal example reads a file line-by-line using std::getline and prints out each line on stdout.

#include <fstream>
#include <iostream>
#include <string>

using namespace std;

int main(int argc, char** argv) {
    ifstream fin("test.tsv");
    string line;
    while (getline(fin, line)) {
        // TODO Your code goes here. This is just an example!
        cout << line << endl;
    }
    fin.close();
}


Posted by Uli Köhler in C/C++

How to fix bitnami mariadb ‘mkdir: cannot create directory ‘/bitnami/mariadb’: Permission denied’

Problem:

You are trying to run a docker bitnami/mariadb container but when you try to start it up, you see an error message like

mariadb_1   | mkdir: cannot create directory '/bitnami/mariadb': Permission denied

Solution:

bitnami containers mostly are non-root-containers, hence you need to adjust the permissions for the data directory mapped onto the host.

First, find out what directory your /bitnami is mapped to on the host. For example, for

services:
     mariadb:
         image: 'bitnami/mariadb:latest'
         environment:
             - ALLOW_EMPTY_PASSWORD=yes
         volumes:
             - '/var/lib/my_docker/mariadb_data:/bitnami'

it is mapped to /var/lib/my_docker/mariadb_data.

Now chown this directory to 1001:1001 since the image is using UID 1001 as the user running the command:

sudo chown -R 1001:1001 [directory]

for example

sudo chown -R 1001:1001 /var/lib/my_docker/mariadb_data


Posted by Uli Köhler in Docker

RocksDB minimal example in C++

This minimal example shows how to open a RocksDB database, write a key and how to read it.

#include <cassert>
#include <string>
#include <rocksdb/db.h>

using namespace std;

int main(int argc, char** argv) {
    rocksdb::DB* db;
    rocksdb::Options options;
    options.create_if_missing = true;
    rocksdb::Status status =
    rocksdb::DB::Open(options, "/tmp/testdb", &db);
    assert(status.ok());

    // Insert value
    status = db->Put(rocksdb::WriteOptions(), "Test key", "Test value");
    assert(status.ok());

    // Read back value
    std::string value;
    status = db->Get(rocksdb::ReadOptions(), "Test key", &value);
    assert(status.ok());
    assert(!status.IsNotFound());

    // Read key which does not exist
    status = db->Get(rocksdb::ReadOptions(), "This key does not exist", &value);
    assert(status.IsNotFound());
}

Build using this CMakeLists.txt

add_executable(rocksdb-example rocksdb-example.cpp)
target_link_libraries(rocksdb-example rocksdb dl)

Compile using

cmake .
make
./rocksdb-example


Posted by Uli Köhler in C/C++, Databases

How to install RocksDB on Ubuntu

deb-buildscripts provides a convenient build script for building RocksDB as a deb package. Since RocksDB optimizes for the current computer’s CPU instruction set extensions (-march=native), it is required to build RocksDB on the computer where you will run it, or at least one with the same CPU type (generation)

First install the prerequisites:

sudo apt-get -y install devscripts debhelper build-essential fakeroot zlib1g-dev libbz2-dev libsnappy-dev libgflags-dev libzstd-dev

then build RocksDB:

git clone https://github.com/ulikoehler/deb-buildscripts.git
cd deb-buildscripts
./deb-rocksdb.py

This will build the librocksdb and librocksdb-dev packages in the deb-buildscripts directory.

Posted by Uli Köhler in C/C++, Linux

How to fix nginx FastCGI error ‘upstream sent too big header while reading response header from upstream’

Problem:

You’re getting 502 Bad gateway errors in your nginx + FastCGI (PHP) setup. You see error messages like

2020/01/28 11:58:19 [error] 9728#9728: *1 upstream sent too big header while reading response header from upstream, client: 2001:16b8:2681:7600:bc28:b49d:3318:e9c4, server: techoverflow.net, request: "GET /category/calculators/ HTTP/2.0", upstream: "fastcgi://unix:/var/run/php/php7.2-fpm.sock:", host: "techoverflow.net", referrer: "https://techoverflow.net/?s=calcul"

in your error log.

Solution:

You need to increase your FastCGI buffers by adding

fastcgi_buffers 32 256k;
fastcgi_buffer_size 512k;

next to every instance of fastcgi_pass in your nginx config and then restarting nginx:

sudo service nginx restart

Note that the values for the buffer sizes listed in this example are just recommendations and might be adjusted up or down depending on your requirements – however, these values tend to work well for modern server hardware (although many administrators tend to use smaller buffers).

Posted by Uli Köhler in nginx

How to install x11vnc on DISPLAY=:0 as a systemd service

First, install x11vnc using e.g.

sudo apt -y install x11vnc

Now run this script as the user that is running the X11 session. The script needs to know the correct user to start x11vnc as.

wget -qO- https://techoverflow.net/scripts/install-x11vnc.sh | sudo bash -s $USER

This will install a systemd service like

[Unit]
Description=VNC Server for X11

[Service]
Type=simple
User=uli
Group=uli
ExecStart=/usr/bin/x11vnc -display :0 -norc -forever -shared -autoport 5900
Restart=always
RestartSec=10s

[Install]
WantedBy=multi-user.target

and automatically enable it on boot and start it.

You can connect to the computer using VNC now e.g. using:

vncviewer [hostname]
Posted by Uli Köhler in Linux

How to fix Platform IO “No tasks to run found. Configure tasks…”

If you see this message while trying to run a PlatformIO task like Build or Upload:

No tasks to run found. Configure tasks...

you can fix that easily: Open Preferences: Open settings (JSON) in Visual Studio code (the default keybinding to open the action menu is Ctrl+Shift+P).

Then look for this line:

"task.autoDetect": "off"

and delete it.

Now save the file. You can immediately run PlatformIO tasks after saving settings.json without restarting Visual Studio Code !

Posted by Uli Köhler in PlatformIO

How to connect to your 3D printer using picocom

Use this command to connect to your Marlin-based 3D printer:

picocom -b 115200 /dev/ttyUSB0 --imap lfcrlf --echo

This command might also work for firmwares other than Marlin.

On some boards the USB port is called /dev/ttyACM0 instead of /dev/ttyUSB0. In this case, use

picocom -b 115200 /dev/ttyACM0 --imap lfcrlf --echo

By default, picocom uses character maps that cause the newlines not to be shown correctly. --imap lfcrlf maps line feeds sent by the printer to CR + LF on the terminal. --echo enables local echo, enabling you to see what you are typing.


Posted by Uli Köhler in Hardware, Linux

How to extract South Korean patent application number from PDF

Note: This approach will only work if the patent PDF contains text and is not a scanned image. If you can select the text in your PDF reader, it’s likely a suitable PDF patent. Note that Espacenet downloads PDF patents that do not contain text.

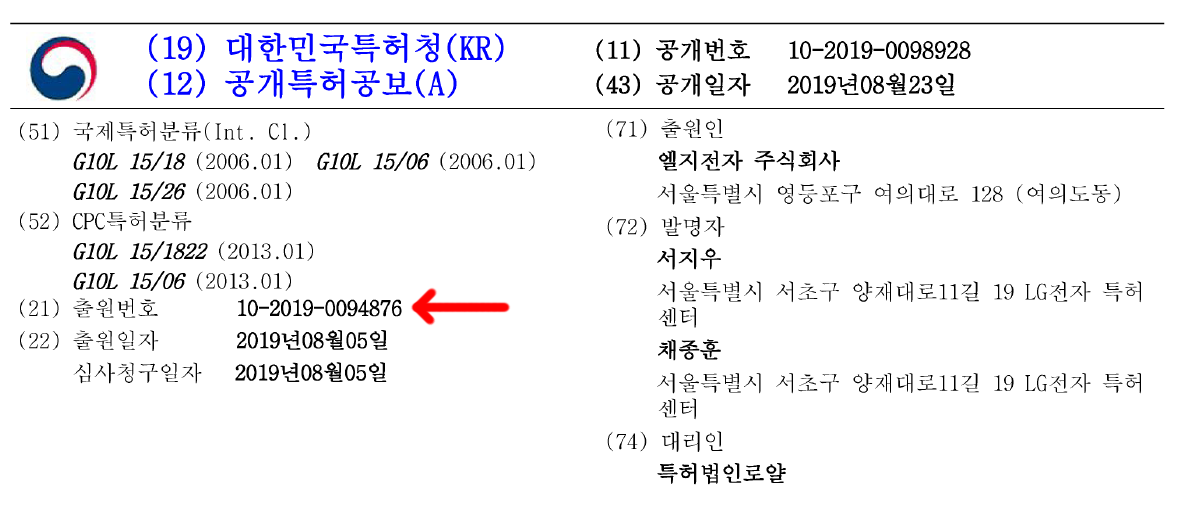
South Korean patents like this example list an application number that is listed on the front page (marked in red):


In this example, the application number is 10-2019-0094876.

In order to automatically extract the number, we can use pdftotext together with the ubiquitous Linux tools grep and tail.

First, download the original PDF (e.g. from Google Patents). In this example, the file is named KR20190098928A_Original_document_20200123004431.pdf.

Now run pdftotext on this file:

pdftotext KR20190098928A.pdf

This will produce a text file named KR20190098928A.txt
containing all the text from the original PDF.

Now we can grep for 출원번호 which is the Korean term for application number, together with (21), which is the column number for the application number. Just seeing boxes? Don’t worry, your computer knows what it means, you just don’t have a south korean font installed – just ignore it.

Now we can filter out only the information we want:

grep --after=1 "(21) 출원번호" KR20190098928A.txt | tail -n 1

In our example, this will print 10-2019-0094876.

How does it work?

The relevant section in KR20190098928A.txt looks like this:

(21) 출원번호
10-2019-0094876

We basically grep for the content of the first line and tell grep to print one line after the match (--after 1). This will print both the matching line and the line containing the application number. Now we can use tail -n 1 to print just the last line (-n 1) from the output.

Need any other information from the patent metadata? Often you can use a similar approach and just modify the grep statement. In some cases, consider using -layout or -raw as option to pdftotext.

Need professional software engineering services when automatically extracting data from your PDFs? Checkout TechOverflow consulting.


Posted by Uli Köhler in Patents
This website uses cookies to improve your experience. We'll assume you're ok with this, but you can opt-out if you wish. Cookie settingsACCEPTPrivacy &amp; Cookies Policy