Uli Köhler

How to get all WordPress posts as JSON using Python & the WordPress REST API

In our previous post How to get WordPress posts as JSON using Python & the WordPress REST API we showed how to fetch a single page of 10 posts using the WordPress REST API in Python.

In this post, we’ll use the pagination in order to fetch a list of all the posts.

Firstly, we observe that once we query an invalid page such as ?page=1000000, the returned JSON will be

{'code': 'rest_post_invalid_page_number',
 'message': 'The page number requested is larger than the number of pages available.',
 'data': {'status': 400}}

instead of the JSON array representing the list of posts.

Using this information, we can write a fetcher that fetches pages of 100 posts each until this error message is encountered:

from tqdm import tqdm
import requests

def page_numbers():
    """Infinite generate of page numbers"""
    num = 1
    while True:
        yield num
        num += 1

posts = []
for page in tqdm(page_numbers()):
    # Fetch the next [pagesize=10] posts
    posts_page = requests.get("https://mydomain.com/wp-json/wp/v2/posts", params={"page": page, "per_page": 100}).json()
    # Check for "last page" error code
    if isinstance(posts_page, dict) and posts_page["code"] == "rest_post_invalid_page_number": # Found last page
        break
    # No error code -> add posts
    posts += posts_page


Posted by Uli Köhler in Python, Wordpress

How to install “autom4te” on Alpine Linux

Problem:

When trying to build applications on Alpine Linux, you sometimes see messages like

sh: autom4te: not found
aclocal: error: autom4te failed with exit status: 127

but when you try to apk install autom4te you see that the package can not be found:

fetch https://dl-cdn.alpinelinux.org/alpine/v3.17/main/x86_64/APKINDEX.tar.gz
fetch https://dl-cdn.alpinelinux.org/alpine/v3.17/community/x86_64/APKINDEX.tar.gz
ERROR: unable to select packages:
  autom4te (no such package):
    required by: world[autom4te]

Solution:

autom4te is available from the autoconf package. Therefore, in order to fix the issue, you can run

apk install autoconf


Posted by Uli Köhler in Alpine Linux

How to install “aclocal” on Alpine Linux

Problem:

When trying to build applications on Alpine Linux, you sometimes see messages like

./automake.sh: line 5: aclocal: not found

but when you try to apk install aclocal you see that the package can not be found:

fetch https://dl-cdn.alpinelinux.org/alpine/v3.17/main/x86_64/APKINDEX.tar.gz
fetch https://dl-cdn.alpinelinux.org/alpine/v3.17/community/x86_64/APKINDEX.tar.gz
ERROR: unable to select packages:
  aclocal (no such package):
    required by: world[aclocal]

Solution:

aclocal is available from the automake package. Therefore, in order to fix the issue, you can run

apk install automake


Posted by Uli Köhler in Alpine Linux

How to install “cpp” on Alpine Linux

Problem:

When trying to build applications on Alpine Linux, you often see messages like

Looking for cpp (not found)

but when you try to apk install cpp you see an error message like

fetch https://dl-cdn.alpinelinux.org/alpine/v3.17/main/x86_64/APKINDEX.tar.gz
fetch https://dl-cdn.alpinelinux.org/alpine/v3.17/community/x86_64/APKINDEX.tar.gz
ERROR: unable to select packages:
  cpp (no such package):
    required by: world[cpp]

Solution:

cpp is just an alias for any C++ compiler. In practice, that means either installing clang++ or g++. I typically recommend g++, even though both will work for most applications.

Therefore, in order to fix the issue, you can run

apk install g++


Posted by Uli Köhler in Alpine Linux

How to fix bup make AssertionError: assert not date.startswith(b’$Format’)

Problem:

While trying to build bup using make you see the following error message:

set -e; bup_ver=$(./bup version); \
echo "s,%BUP_VERSION%,$bup_ver,g" > Documentation/substvars.tmp; \
echo "s,%BUP_DATE%,$bup_ver,g" >> Documentation/substvars.tmp
Traceback (most recent call last):
  File "/usr/lib/python3.10/runpy.py", line 196, in _run_module_as_main
    return _run_code(code, main_globals, None,
  File "/usr/lib/python3.10/runpy.py", line 86, in _run_code
    exec(code, run_globals)
  File "/home/uli/dev/deb-buildscripts/bup/lib/bup/main.py", line 181, in <module>
    cmd_module = import_module('bup.cmd.'
  File "/usr/lib/python3.10/importlib/__init__.py", line 126, in import_module
    return _bootstrap._gcd_import(name[level:], package, level)
  File "<frozen importlib._bootstrap>", line 1050, in _gcd_import
  File "<frozen importlib._bootstrap>", line 1027, in _find_and_load
  File "<frozen importlib._bootstrap>", line 1006, in _find_and_load_unlocked
  File "<frozen importlib._bootstrap>", line 688, in _load_unlocked
  File "<frozen importlib._bootstrap_external>", line 883, in exec_module
  File "<frozen importlib._bootstrap>", line 241, in _call_with_frames_removed
  File "/home/uli/dev/deb-buildscripts/bup/lib/bup/cmd/version.py", line 5, in <module>
    from bup import options, version
  File "/home/uli/dev/deb-buildscripts/bup/lib/bup/version.py", line 20, in <module>
    assert not date.startswith(b'$Format')
AssertionError
make: *** [GNUmakefile:252: Documentation/substvars] Fehler 1

Solution:

This error occurs because bup can’t determine the correct version & date for bup. This happens because you deleted the .git directory which bup needs in order to determine its version.

You can create a clone of bup with the .git directory intact by just cloning, for example, the specific version you want to build:

git clone -b 0.33 --depth 1 https://github.com/bup/bup

and then run

./configure
make -j4

as usual

Posted by Uli Köhler in bup

How to get WordPress posts as JSON using Python & the WordPress REST API

You can use the requests library to fetch the posts as JSON from /wp-json/wp/v2/posts

On the wordpress site, you typically don’t need to configure this – the JSON API is enabled by default and accessing publically available info can be done without authentication.

import requests

# posts is a list of JSON objects, each representing a post
posts = requests.get("https://mydomain.com/wp-json/wp/v2/posts").json()

This will, by default, fetch the most recent 10 posts. See TODO for more info on how to fetch all posts using pagination

Posted by Uli Köhler in Python, Wordpress

Windows Auto-Login registry .reg file generator

This generator allows you to generate a .reg registry file to autologin any user (even admin users), allowing for basically a one-click installation. Tested with Windows10.

Your inputs are not sent to our servers but only processed in your browser! Hence, your username & password are safe.

Continue reading →

Posted by Uli Köhler in Generators, Windows

How to escape double quotes (“) in stirng

Note: This solution does not deal with double quotes which are escaped already correctly, plus it does not correctly escape backslashes. However it can still serve as a starting point for doing customized escaping.

'foo"bar"gas'.replace(/"/g, "\\\"") # Results in foo\"bar\"gas


Posted by Uli Köhler in Javascript

Remove all slashes from string using pure Javascript

"foo/bar/gas".replace(/\//g, "") # foobargas


Posted by Uli Köhler in Javascript

Where to find cheap 49.9Ω resistor networks for Ethernet?

For Ethernet applications, you often need a lot of 49.9Ω resistors. Due to the assembly costs, it’s often more cost-effective to use resistor networks instead of multiple individual resistors.

LCSC has a cheap 1% array of 4 independent resistors priced at 0.0082€/pc @1kpc: 4D03WGF499JT5E

Mouser’s 1% arrays of 4 independent resistors are priced at 0,017€/pc @1kpc and therefore more than 2x the price of LCSC: CAY16-49R9F4LF

However, Mouser offers free shipping to Germany whereas LCSC’s shipping is always around 37€ using DHL express.


Posted by Uli Köhler in Electronics

How to strap the LAN8720A pins?

In most applications, you want to set MODE[2:0] to 111 in order to enable the all-capabilities auto-negotation mode. The other modes are rather special and rarely used (such as repeated mode). In effect, this means:

  • Strap RXD0/MODE0 high – it has an internal pull-up so you don’t need an explicit strap
  • Strap RXD1/MODE1 high – it has an internal pull-up so you don’t need an explicit strap
  • Strap CRS_DV/MODE2 high – it has an internal pull-up so you don’t need an explicit strap

In applications where you don’t have an external 1.2V regulator, you need to strap REGOFF=0, i.e.:

  • If you don’t use an LED, strap REGOFF/LED1 low – it has an internal pull-down, so you don’t need an explicit strap.
  • If you use an LED on LED1, you want the anode of the LED to be connected to the LAN8720A (with the cathode of the LED being connected to GND using a current-limiting resistor)

The last strap you need to think about is nINTSEL/REFCLKO. You need to evaluate whether you need the REFCLKO pin to output a 50MHz reference signal in your application. This is only the case if you feed the REFCLKO output to a clock input of another IC.

  • In case you need nINT/REFCLKO to output the 50 MHz reference clock, you need to strap LED2 low. You need an explicit strap to do so, or in case you are using an LED on LED2, you want the anode of the LED to be connected to the LAN8720A (with the cathode of the LED being connected to GND using a current-limiting resistor), and a 10K resistor in parallel to the LED.
  • In case you need nINT/REFCLKO to act as an interrupt pin, (or if you don’t care), you need to strap LED2 high.  Since LED2 has an internal pull-up, you don’t need an explicit pull-up. or in case you are using an LED on LED2, you want the cathode of the LED to be connected to the LAN8720A (with the anode of the LED being connected to 3.3V using a current-limiting resistor).

Summary

For the LAN8720A, you often don’t need explicit straps – the only pin where you have to seriously think for 95% of all PCB designs is whether you need the REFCLKO feature.

For further reference, see the LAN8720A datasheet.

Posted by Uli Köhler in Electronics

How to fix Ubuntu PHP Call to undefined function mb_internal_encoding()

Problem:

When you see the following error message in your PHP log:

2022/12/22 12:57:20 [error] 1908680#1908680: *9092980 FastCGI sent in stderr: "PHP message: PHP Fatal error:  Uncaught Error: Call to undefined function mb_internal_encoding() in /var/www/snappymail/v/0.0.0/include.php:90
Stack trace:
#0 /var/www/index.php(11): include()
#1 {main}
  thrown in /var/www/snappymail/v/0.0.0/include.php on line 90" while reading response header from upstream, client: ::ffff:77.7.108.195, server: mydomain.com, request: "GET /?admin HTTP/2.0", upstream: "fastcgi://unix:/var/run/php/php8.2-fpm.sock:", host: "mydomain.com"

Solution:

The missing function mb_internal_encoding() is from the PHP mbstring module.

In order to install it, first you need to identify the PHP version running the given script. This can be done either by looking at the webserver config files for the given domain, or by looking in the error log. In this case, we can identify that the PHP version is 8.2 from upstream: "fastcgi://unix:/var/run/php/php8.2-fpm.sock:"

In case you can’t identify the correct version, I recommend installing mbstring for every installed PHP version, which you can see by using sudo dpkg --get-selections | grep php.

Given the version number, we can install the mbstring extension from the Ubuntu/Debian package sources:

sudo apt -y install php8.2-mbstring

Depending on your configuration you might also need to restart the webserver and/or PHP-FPM service. I recommend to try it out without restart, then restart the webserver and (if you are using PHP-FPM) restart the PHP-FPM for your PHP version. In case that doesn’t help, you can always reboot.

After that, the error message should have disappeared – sometimes you need to install additional PHP modules and it’s best to just watch the error log for more missing functions or other errors related to missing extension.

Posted by Uli Köhler in PHP

How to install magic-wormhole on CoreOS

Step 1: Install pip

sudo rpm-ostree install python3-pip

then reboot for the changes to take effect:

sudo systemctl reboot

Step 2: Install magic-wormhole

sudo pip install magic-wormhole


Posted by Uli Köhler in CoreOS

Simple tsconfig.json template for NodeJS

Use this tsconfig.json as a starting point to setup your NodeJS TypeScript project:

{
  "compilerOptions": {
    "strict": false,
    "target": "es2020",
    "module": "commonjs",
    "moduleResolution": "node",
    "esModuleInterop": true,
    "sourceMap": true,
    "resolveJsonModule": true,
    "isolatedModules": true,
    "skipLibCheck": true,
    "outDir": "./build",
    "rootDir": "./",
    "lib": [
      "esnext"
    ],
    "forceConsistentCasingInFileNames": true
  },
  "include": [
    "**/*.ts",
    "types/*.ts"
  ],
  "exclude": [
    "node_modules"
  ]
}


Posted by Uli Köhler in NodeJS, Typescript

How to import @koa/router in Typescript

import Router from '@koa/router';
import Koa from 'koa';

const app = new Koa();
const router = new Router();


Posted by Uli Köhler in NodeJS, Typescript

How to import Koa in Typescript

import Koa from 'koa';

const app = new Koa();

/* TODO your code goes here */


Posted by Uli Köhler in NodeJS, Typescript

Minimal Koa Typescript example using @koa/router and koa-body

This example showcases how to make a simple Hello World server using Koa in Typescript.

import Router from '@koa/router';
import koaBody from 'koa-body';
import Koa from 'koa';

const router = new Router();
const app = new Koa();

app.use(koaBody());

router.get('/', (ctx)  => {
    ctx.body = "Hello world";
});

app
    .use(router.routes())
    .use(router.allowedMethods());

if (!module.parent) app.listen(3000);
{
  "compilerOptions": {
    "strict": true,
    "target": "es2020",
    "module": "commonjs",
    "moduleResolution": "node",
    "esModuleInterop": true,
    "sourceMap": true,
    "resolveJsonModule": true,
    "isolatedModules": true,
    "skipLibCheck": true,
    "outDir": "./build",
    "rootDir": "./",
    "lib": [
      "esnext"
    ],
    "forceConsistentCasingInFileNames": true
  },
  "include": [
    "**/*.ts",
    "types/*.ts"
  ],
  "exclude": [
    "node_modules"
  ]
}
{
  "name": "KoaTypescriptTest",
  "version": "1.0.0",
  "description": "",
  "scripts": {
    "start": "./node_modules/.bin/tsnd --respawn server.ts",
    "build": "./node_modules/.bin/tsc -b tsconfig.json"
  },
  "dependencies": {
    "@koa/router": "^12.0.0",
    "koa": "^2.14.1",
    "koa-body": "^6.0.1"
  },
  "devDependencies": {
    "@types/koa": "^2.13.5",
    "@types/koa__router": "^12.0.0",
    "@types/node": "^18.11.17",
    "ts-node-dev": "^1.1.8",
    "typescript": "^4.9.4"
  }
}


Posted by Uli Köhler in NodeJS, Typescript

How many hours are there in each month?

On average, any given month has 730.48 hours.

  • January: 744 hours
  • February: On average, february has 677.76 hours,  more  specifically
    • 672 hours (if it is not a leap year)
    • 696 hours (if it is a leap year)
  • March: 744 hours
  • April: 720 hours
  • May: 744 hours
  • June: 720 hours
  • July: 744 hours
  • August: 744 hours
  • September: 720 hours
  • October: 744 hours
  • November: 720 hours
  • December: 744 hours

You can calculate that yourself, by using 24 h/day * [number of days in month] – for example, for January: 24h * 31 days = 744h

For calculating the average number of days for February, we have to consider that every 100 years has 24 leap years and 74 non-leap years. Given that, we can calculate the average number of hours using (672*76+696*24)/100=677.76

The total average is computed by summing all the months’ number of hours and dividing by 12:

(744+677.76+744+720+744+720+744+744+720+744+720+744)/12=730.48


Posted by Uli Köhler in Mathematics

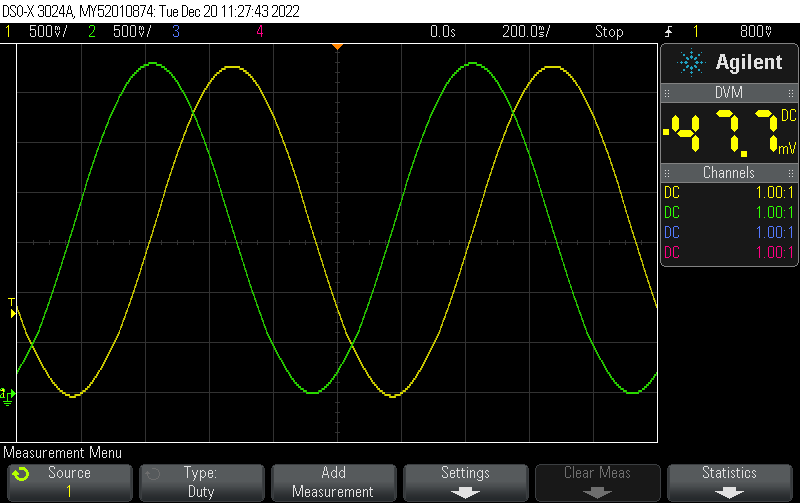
How to generate sin and cos waves using the LECD PWM on the STM32

Based on our previous post How to generate PWM output representing a sine wave on the ESP32 (Arduino/PlatformIO) this post uses two different IO pins to generate both a sine and a cosine wave dynamically.

#include <Arduino.h>
#include <driver/ledc.h>

void setup() {
    Serial.begin(115200);

    ledcSetup(LEDC_CHANNEL_0, 10000 /* Hz */, 12);
    ledcSetup(LEDC_CHANNEL_1, 10000 /* Hz */, 12);

    ledcAttachPin(GPIO_NUM_32, LEDC_CHANNEL_0);
    ledcAttachPin(GPIO_NUM_25, LEDC_CHANNEL_1);
}

/**
 * @brief Calculate the PWM duty cycle (assuming 12 bits resolution) of a sine wave of
 * given frequency. micros() is used as a timebase
 * 
 * @param frequency The frequency in Hz
 * @return int the corresponding 12-bit PWM value
 */
int sinePWMValue(float frequency, int maxPWMValue, float (*sinCos)(float)) {
  unsigned long currentMicros = micros(); // get the current time in microseconds

  // calculate the sine wave value for the current time
  int halfMax = maxPWMValue/2;
  int sineValue = halfMax + (halfMax-10) * sinCos(2 * PI * currentMicros / (1000000 / frequency));
  return sineValue;
}

void loop() {
    // Example of how to change the duty cycle to 25%
    ledcWrite(LEDC_CHANNEL_0, sinePWMValue(1.0, 4096, sinf));
    ledcWrite(LEDC_CHANNEL_1, sinePWMValue(1.0, 4096, cosf));
}

The output, filtered by a 4th order Salley-Key filter each (using the LM324) looks like this:

Posted by Uli Köhler in Analog, Arduino, Electronics, ESP8266/ESP32, PlatformIO

How to generate PWM output representing a sine wave on the ESP32 (Arduino/PlatformIO)

The following function will compute the value of a sine wave using micros() as a timebase, with adjustable frequency. It is hardcoded to expect a 12 bit resolution PWM

/**
 * @brief Calculate the PWM duty cycle (assuming 12 bits resolution) of a sine wave of
 * given frequency. micros() is used as a timebase
 * 
 * @param frequency The frequency in Hz
 * @return int the corresponding 12-bit PWM value
 */
int sinePWMValue(float frequency) {
  unsigned long currentMicros = micros(); // get the current time in microseconds

  // calculate the sine wave value for the current time
  int sineValue = 2048 + 2047 * sin(2 * PI * currentMicros / (1000000 / frequency));
  return sineValue;
}

Based on this, we can use the basic code of our previous post ESP32 minimal Arduino PWM output example (PlatformIO) to generate a 1Hz sine wave (represented by a 10kHz PWM):

#include <Arduino.h>
#include <driver/ledc.h>

void setup() {
    Serial.begin(115200);

    ledcSetup(LEDC_CHANNEL_0, 10000 /* Hz */, 12);

    ledcAttachPin(GPIO_NUM_14, LEDC_CHANNEL_0);
    ledcWrite(LEDC_CHANNEL_0, 2048); // 50%
}

/**
 * @brief Calculate the PWM duty cycle (assuming 12 bits resolution) of a sine wave of
 * given frequency. micros() is used as a timebase
 * 
 * @param frequency The frequency in Hz
 * @return int the corresponding 12-bit PWM value
 */
int sinePWMValue(float frequency) {
  unsigned long currentMicros = micros(); // get the current time in microseconds

  // calculate the sine wave value for the current time
  int sineValue = 2048 + 2047 * sin(2 * PI * currentMicros / (1000000 / frequency));
  return sineValue;
}

void loop() {
    // Example of how to change the duty cycle to 25%
    ledcWrite(LEDC_CHANNEL_0, sinePWMValue(1.0));
}


Posted by Uli Köhler in Arduino, ESP8266/ESP32, PlatformIO