Embedded

ESPAsyncWebserver: How to run code in main loop thread

When working with ESPAsyncWebserver, you will soon encounter one of its most fundamental limitations: Its code will always run in interrupts, hence you can’t use delay() or any function that uses delay() or similar functions internally.

However, there’s a simple programming pattern that will enable you to execute code in the main thread if requested by the webserver. Note: In this example, we will only cover how to activate code in the main loop from the webserver, but the response will be sent before the code in the main loop is run – hence, the response is just {"status": "ok"} and it doesn’t depend on whatever is happening on the main loop.

The idea is to have a global flag:

bool request_serial_output = false;

which is set in the webserver handler code, whereas the main loop checks the flag repeatedly:

void loop() {
  if(request_serial_output) {
    request_serial_output = false; // Clear flag
    // TODO Add handling code here
  }
}

Full example

This example uses PlatformIO and should work on any ESP32 board.

#include <Arduino.h>
#include <WiFi.h>
#include <ESPAsyncWebServer.h>
#include <ArduinoJson.h>

AsyncWebServer server(80);

bool request_serial_output = false;

void setup() { 
  Serial.begin(115200);
  // Connect Wifi, restart if not connecting
  // https://techoverflow.net/2021/01/21/how-to-fix-esp32-not-connecting-to-the-wifi-network/
  WiFi.begin("MyWifi", "mywifipassword");
  uint32_t notConnectedCounter = 0;
  while (WiFi.status() != WL_CONNECTED) {
      delay(100);
      Serial.println("Wifi connecting...");
      notConnectedCounter++;
      if(notConnectedCounter > 50) { // Reset board if not connected after 5s
          Serial.println("Resetting due to Wifi not connecting...");
          ESP.restart();
      }
  }
  Serial.print("Wifi connected, IP address: ");
  Serial.println(WiFi.localIP());

  // Initialize webserver URLs
  server.on("/api/test", HTTP_GET, [](AsyncWebServerRequest *request) {
      // Send request to main loop
      request_serial_output = true;
      // Send JSON "ok" response.
      // NOTE: The response will be sent BEFORE the main loop has finished
      // processing the request
      AsyncResponseStream *response = request->beginResponseStream("application/json");
      DynamicJsonDocument json(1024);
      json["status"] = "ok";
      serializeJson(json, *response);
      request->send(response);
  });

  // Start webserver
  server.begin();
}

void loop() {
  if(request_serial_output) {
    request_serial_output = false; // Clear flag
    // Output serial
    Serial.println("First message. Now waiting one second...");
    // Wait 1s. You can't do that in the webserver handler!
    delay(1000);
    // Output another message on Serial
    Serial.println("Second message!");
  }
}
[env:nodemcu-32s]
platform = espressif32
board = nodemcu-32s
framework = arduino
monitor_speed = 115200
lib_deps =
    ESP Async [email protected]
    [email protected]
 

Posted by Uli Köhler in ESP8266/ESP32, PlatformIO

How to enter serial bootloader on the ESP32

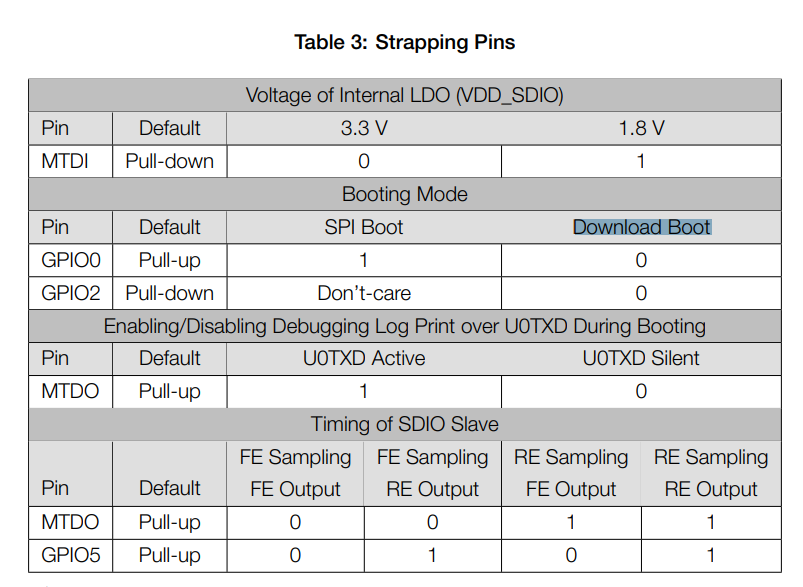
In order to enter the serial bootloader on the ESP32, connect both GPIO0 and GPIO2 to GND while the ESP32 is starting up.

A typical hardware sequence to enter the bootloader is:

  1. Connect GPIO0 and GPIO2 to GND
  2. Connect the EN or RST pin to GND for at least 100ms, then connect to 3.3V

The second step will restart the ESP32.

Posted by Uli Köhler in ESP8266/ESP32

What is “Download Mode” on the ESP32?

The ESP-WROOM-32E datasheet Table 3 defines that when GPIO0 and GPIO2 are low during startup, you will enter Download mode without Download mode being defined anywhere in the datasheet:

Download mode is the factory-integrated ROM serial bootloader. By strapping GPIO0 and GPIO2 low at the same time, you can flash a new firmware using the serial port.


Posted by Uli Köhler in Embedded, ESP8266/ESP32

How to fix Marlin random driver error detected coil short circuit crash (Trinamic TMC)

Problem:

When using Trinamic drivers with the Marlin 3D printer firmware, you might occasionally experience errors like

Send: N4193 G1 X12.345 Y34.567 E122.15252
Recv: 
Recv: E driver error detected: 0x10136000
Recv: coil short circuit
Recv: 		X	Y	Z	E
Recv: Enabled		true	true	true	true
Recv: Set current	2000	2000	2000	1000
Recv: RMS current	1999	1999	1999	990
Recv: MAX current	2819	2819	2819	1396
Recv: Run current	31/31	31/31	31/31	19/31
Recv: Hold current	15/31	15/31	15/31	9/31
Recv: Global scaler	167/256	167/256	167/256	133/256
Recv: CS actual	31/31	31/31	22/31	19/31
Recv: PWM scale	196716	33095745	65576	33488924
Recv: vsense
Recv: stealthChop	true	true	true	true
Recv: msteps		128	128	128	128
Recv: interp		true	true	true	true
Recv: tstep		171	678	max	1580
Recv: PWM thresh.	24	24	411	13
Recv: [mm/s]		102	102	3	41
Recv: OT prewarn	false	false	false	false
Recv: triggered
Recv:  OTP		false	false	false	false
Recv: off time	4	4	4	4
Recv: blank time	24	24	24	24
Recv: hysteresis
Recv:  -end		2	2	2	2
Recv:  -start		1	1	1	1
Recv: Stallguard thrs	0	0	0	0
Recv: uStep count	62	32	227	497
Recv: DRVSTATUS	X	Y	Z	E
Recv: sg_result	0	0	395	0
Recv: stallguard
Recv: fsactive
Recv: stst		*	*		*
Recv: olb
Recv: ola
Recv: s2gb					*
Recv: s2ga
Recv: otpw
Recv: ot
Recv: Driver registers:
Recv: 		X	0x00:1F:40:00
Recv: 		Y	0x00:1F:40:00
Recv: 		Z	0x80:16:41:8B
Recv: 		E	0x10:13:60:00
Recv: 
Recv: 
Recv: echo:Driver error
Recv: Error:Printer halted. kill() called!
Changing monitoring state from "Printing" to "Error"

Solution:

If the error always occurs at the start of each print, be sure to check your stepper motor setup for actual shorts! Measure the inducitivity using an LCR meter to be sure, it should be around the rated value for your motor! See this post for information about typical stepper motor inductivity.

If the error occurs occasionally, it is recommended in the datasheet that you use more conservative short detection settings.

You need to make the change this in Marlin/src/module/stepper/trinamic.cpp.

Go to the section for the driver type you are using. In my example, this would be

#if HAS_DRIVER(TMC5160)
// ...
void tmc_init(/* ... */) {
   // NOTE: tmc_init() is the function we need to insert code in!
}
#endif

Now insert, just before the TERN(HYBRID_THRESHOLD, /* ... */) line (if such a line does not exist, insert at the end of the function:

// Set more conservative short detection settings
st.shortfilter(3); // 3us SHORT filter
st.s2vs_level(15); // Lowest sensitivity short to supply voltage protection
st.s2g_level(15); // Lowest sensitivity short to ground protection
st.shortdelay(1); // 1.5us instead of 0.75us short delay

These are the most conservative settings possible using this setup.

Now retry your print.

In case this still doesn’t help, you can disable short protection entirely. Note that short protection exists to prevent damage to your stepper motor, your mainboard and your cabling, so you should only disable it if there is no other choice!

In order to disable short protection entirely, insert this code block instead of the conservative setting code block from above:

// Disable short protection entirely
st.diss2g(true);
st.diss2vs(true);

Tested with Marlin version 2.0.9.1

Posted by Uli Köhler in 3D printing, Embedded

Test code for 8 Neopixel/WS2812B LEDs

This test code toggles 8 WS2812b LEDs with circulating colors and will test all three R/G/B LEDs in each LED plus their connection.. It is based on an ESP32 with a 74LV245 level shifter, but it will also work on other platforms supported by NeoPixelBus. In my configuration, the 3.3V signal output pin is on pin 13.

#include <NeoPixelBus.h>
#include <NeoPixelAnimator.h>

const uint16_t PixelCount = 8;
const uint8_t PixelPin = 13;

NeoPixelBus<NeoGrbFeature, Neo800KbpsMethod> strip(PixelCount, PixelPin);

void DrawPixels(uint32_t offset)
{
    strip.SetPixelColor((0 + offset) % 8, RgbColor(255, 0, 0));
    strip.SetPixelColor((1 + offset) % 8, RgbColor(0, 255, 0));
    strip.SetPixelColor((2 + offset) % 8, RgbColor(0, 0, 255));
    strip.SetPixelColor((3 + offset) % 8, RgbColor(255, 255, 0));
    strip.SetPixelColor((4 + offset) % 8, RgbColor(0, 255, 255));
    strip.SetPixelColor((5 + offset) % 8, RgbColor(255, 0, 255));
    strip.SetPixelColor((6 + offset) % 8, RgbColor(255, 255, 255));
    strip.SetPixelColor((7 + offset) % 8, RgbColor(0, 0, 0));
    strip.Show();
}

void setup()
{
    strip.Begin();
    strip.Show();
}

uint32_t loopCounter = 0;
void loop()
{
  DrawPixels(loopCounter);
  loopCounter++;
  delay(250);
}

PlatformIO config:

; PlatformIO Project Configuration File
;
;   Build options: build flags, source filter
;   Upload options: custom upload port, speed and extra flags
;   Library options: dependencies, extra library storages
;   Advanced options: extra scripting
;
; Please visit documentation for the other options and examples
; https://docs.platformio.org/page/projectconf.html

[env:nodemcu-32s]
platform = espressif32
board = nodemcu-32s
framework = arduino
lib_deps =
     makuna/NeoPixelBus @ ^2.6.9


Posted by Uli Köhler in Electronics, ESP8266/ESP32, PlatformIO

How I fixed PlatformIO Arduino

Problem:

When uploading an Atmel AVR firmware like for the Arduino Uno using PlatformIO, you see an error message like

Auto-detected: /dev/ttyACM0
Uploading .pio/build/uno/firmware.hex
avrdude: stk500_recv(): programmer is not responding
avrdude: stk500_getsync() attempt 1 of 10: not in sync: resp=0x00
avrdude: stk500_recv(): programmer is not responding
avrdude: stk500_getsync() attempt 2 of 10: not in sync: resp=0x00
avrdude: stk500_recv(): programmer is not responding
avrdude: stk500_getsync() attempt 3 of 10: not in sync: resp=0x00
avrdude: stk500_recv(): programmer is not responding
avrdude: stk500_getsync() attempt 4 of 10: not in sync: resp=0x00
avrdude: stk500_recv(): programmer is not responding
avrdude: stk500_getsync() attempt 5 of 10: not in sync: resp=0x00
avrdude: stk500_recv(): programmer is not responding
avrdude: stk500_getsync() attempt 6 of 10: not in sync: resp=0x00
avrdude: stk500_recv(): programmer is not responding
avrdude: stk500_getsync() attempt 7 of 10: not in sync: resp=0x00
avrdude: stk500_recv(): programmer is not responding
avrdude: stk500_getsync() attempt 8 of 10: not in sync: resp=0x00
avrdude: stk500_recv(): programmer is not responding
avrdude: stk500_getsync() attempt 9 of 10: not in sync: resp=0x00
avrdude: stk500_recv(): programmer is not responding
avrdude: stk500_getsync() attempt 10 of 10: not in sync: resp=0x00

avrdude done.  Thank you.

*** [upload] Error 1

or

Auto-detected: /dev/ttyUSB0
Uploading .pio/build/uno/firmware.hex
avrdude: stk500_getsync() attempt 1 of 10: not in sync: resp=0x00
avrdude: stk500_getsync() attempt 2 of 10: not in sync: resp=0x00
avrdude: stk500_getsync() attempt 3 of 10: not in sync: resp=0x00
avrdude: stk500_getsync() attempt 4 of 10: not in sync: resp=0x00
avrdude: stk500_getsync() attempt 5 of 10: not in sync: resp=0x00
avrdude: stk500_getsync() attempt 6 of 10: not in sync: resp=0x00
avrdude: stk500_getsync() attempt 7 of 10: not in sync: resp=0x00
avrdude: stk500_getsync() attempt 8 of 10: not in sync: resp=0x00
avrdude: stk500_getsync() attempt 9 of 10: not in sync: resp=0x00
avrdude: stk500_getsync() attempt 10 of 10: not in sync: resp=0x00

avrdude done.  Thank you.

*** [upload] Error 1

Solution

This issue occurs if:

  • Either there is no bootloader on the board or the bootloader is damaged or
  • The wrong upload speed for this bootloader is selected

Note that  you can flash a new/updated bootloader using the Arduino IDE, overwriting the old / defective bootloader. You can do that using an AVR programmer, or you can do it using another Arduino. This will make working with the board much easier in general, but it will most likely fix your programming issues. In case you flash a new bootloader, the correct upload_speed setting in platformio.ini will typically be upload_speed = 115200.

In case you want to work with the bootloader currently present on the board, you need to select the correct upload_speed setting.

Depending on the age of the bootloader on the board, it will typically have either 115200, 57600 or 19200 baud speed.

In order to fix the issue, edit platformio.ini and add

upload_speed = 115200

then restart the upload. In case this doesn’t work, try

upload_speed = 57600

and

upload_speed = 19200

Rarely, the following setting work:

upload_speed = 9600

or

upload_speed = 230400

In case none of these settings work at all, either you are facing a hardware defect or you need to flash a new bootloader onto the board. I recommend to always try to flash a bootloader first before throwing away the board.

Posted by Uli Köhler in Arduino, Electronics, Embedded, PlatformIO

How fast is analogRead() on the ESP8266?

An analogRead() call on the ESP8266 takes about 90-100 microseconds.

I tested this experimentally using a Wemos D1 Mini board, PlatformIO and this code:

uint32_t t0 = micros();
for (size_t i = 0; i < 1000; i++)
{
    analogRead(A0);
}
uint32_t t1 = micros();
Serial.print("1000 analogRead() calls took [us]: ");
Serial.println(t1-t0);

Output:

1000 analogRead() calls took [us]: 97168

Since 1000 analogRead() calls (including some overhead from the loop) took 97.168ms, one analogRead() call takes about 97.168us (+-0.02us).

Posted by Uli Köhler in Arduino, Electronics, ESP8266/ESP32, PlatformIO

How to enable Watchdog on ESP8266/ESP32 using PlatformIO

You can enable the watchdog on the ESP8266 or ESP32 using

ESP.wdtEnable(5000);

where 5000 is the number of milliseconds until the watchdog times out.

Call

ESP.wdgFeed();

periodically to reset the watchdog.

Posted by Uli Köhler in ESP8266/ESP32, PlatformIO

What does ESP8266 rst cause: 2 mean?

Sometimes you will see a message like

 ets Jan  8 2013,rst cause:2, boot mode:(3,6)

load 0x4010f000, len 3460, room 16 
tail 4
chksum 0xcc
load 0x3fff20b8, len 40, room 4 
tail 4
chksum 0xc9
csum 0xc9
v0007e100
~ld
7

on the ESP8266 serial line.

rst cause: 2 means that the ESP was restarted from the firmware using

ESP.restart();

Typically such a restart is intentional. Look for ESP.restart() calls in your firmware. It’s not straightforward to identify which ESP.restart() call caused the reset. I recommend to insert Serial.println() statements describing the reset cause before every call to ESP.restart(), for example:

Serial.println("Resetting due to Wifi not connecting...");
ESP.restart();


Posted by Uli Köhler in Electronics, ESP8266/ESP32, PlatformIO

How to fix ESP8266 PlatformIO error: WIFI_STA was not declared in this scope

Problem:

When compiling your PlatformIO firmware, you see an error message like

src/main.cpp: In function 'void setup()':
src/main.cpp:49:10: error: 'class WiFiClass' has no member named 'mode'
   49 |     WiFi.mode(WIFI_STA);
      |          ^~~~
src/main.cpp:49:15: error: 'WIFI_STA' was not declared in this scope
   49 |     WiFi.mode(WIFI_STA);
      |               ^~~~~~~~

Solution:

You included WiFi.h instead of the correct ESP8266WiFi.h. This will cause multiple issues like reboots on WiFi.begin() even if it compiles correctly.

Replace

#include <WiFi.h>

with

#include <ESP8266WiFi.h>

everywhere in your source code and does not support

WiFi.mode(WIFI_STA);

For more details, see our previous post on How to fix PlatformIO ESP8266 WiFi.h: No Such File or Directory

Posted by Uli Köhler in Electronics, ESP8266/ESP32, PlatformIO

How I fixed ESP8266 WiFi.begin() rst cause 4 on PlatformIO

I faced an issue with my PlatformIO ESP8266 firmware causing a rst cause 4 reset a few seconds after calling WiFi.begin():

ets Jan  8 2013,rst cause:4, boot mode:(3,2)

wdt reset
load 0x4010f000, len 3460, room 16 
tail 4
chksum 0xcc
load 0x3fff20b8, len 40, room 4 
tail 4
chksum 0xc9
csum 0xc9
v0007e660
~ld
7

and a subsequent reboot of the firmware. The issue repeated ad infinitum.

In my case, the issue was that I had listed WiFi as lib_deps dependency in platformio.ini:

lib_deps =
    WiFi

instead of including #include <ESP8266WiFi.h> instead of #include <WiFi.h>. See How to fix PlatformIO ESP8266 WiFi.h: No Such File or Directory for more details.

Posted by Uli Köhler in Electronics, ESP8266/ESP32, PlatformIO

How to install ArduinoOTA for ESP8266/ESP32 on PlatformIO (platformio.ini and lib_deps)

As the ESP Arduino framework already includes ArduinoOTA, there is no need to explicitly install or require ArduinoOTA.

You do not need to add anything to platformio.ini or lib_deps in order to use ArduinoOTA on the ESP8266 or ESP32.

In order to use ArduinoOTA, the minimum you need to to is to include it:

#include <ArduinoOTA.h>

then call

ArduinoOTA.begin();

in your setup() function and then call

ArduinoOTA.handle();

periodically (for example, in your loop() function).

For a more complete example, see:

Posted by Uli Köhler in ESP8266/ESP32, PlatformIO

Minimal PlatformIO ESP8266 ArduinoOTA example

This simple firmware will connect to Wifi and enable over-the-air update (OTA) using ArduinoOTA on any ESP8266 module. Use it as a starting point for your own firmware to enable OTA.

#include <Arduino.h>
#include <ArduinoOTA.h>
#include <ESP8266WiFi.h>

void setup() {
  Serial.begin(115200);
  /**
   * Connet to Wifi
   */
  WiFi.begin("MyWifiSSID", "MyWifiPassword");
  uint32_t notConnectedCounter = 0;
  while (WiFi.status() != WL_CONNECTED) {
      delay(100);
      Serial.println("Wifi connecting...");
      notConnectedCounter++;
      if(notConnectedCounter > 150) { // Reset board if not connected after 5s
          Serial.println("Resetting due to Wifi not connecting...");
          ESP.restart();
      }
  }
  Serial.print("Wifi connected, IP address: ");
  Serial.println(WiFi.localIP());
  /**
   * Enable OTA update
   */
  ArduinoOTA.begin();
}

void loop() {
  // Check for over the air update request and (if present) flash it
  ArduinoOTA.handle();
}
[env:d1_mini]
platform = espressif8266
board = d1_mini
framework = arduino
monitor_speed = 115200

[env:d1_mini_ota]
extends = env:d1_mini
upload_protocol = espota
upload_port = 192.168.178.166

For more details on how the two targets (d1_mini and d1_mini_ota) work, see How to handle both OTA and serial upload in platformio.ini. Note that you need to enter the ESP8266’s IP address or mDNS name in order for OTA to work.

The firmware will print the Wifi IP address on the serial port, so you can use PlatformIO’s Monitor feature to view it.

Posted by Uli Köhler in Electronics, Embedded, ESP8266/ESP32, PlatformIO

How to handle both OTA and serial upload in platformio.ini

When you’re writing a PlatformIO firmware that can be uploaded using both ArduinoOTA and over the serial port, I recommend this platformio.ini setup:

Start with your normal config for serial upload:

[env:d1_mini]
platform = espressif8266
board = d1_mini
framework = arduino
monitor_speed = 115200

And now add a new OTA target that extends the serial config, effectively inheriting the complete build configuration including the lib_deps:

[env:d1_mini_ota]
extends = env:d1_mini
upload_protocol = espota
upload_port = 192.168.178.166

In upload_port you need to enter either the IP address or the mDNS name of the board that shall be flashed. The IP address we entered (192.168.178.166) is just an example.

Also note that depending on the name of your original build target, change

extends = env:d1_mini

to the name of your original target (including env:)

Complete platformio.ini example

[env:d1_mini]
platform = espressif8266
board = d1_mini
framework = arduino
monitor_speed = 115200

[env:d1_mini_ota]
extends = env:d1_mini
upload_protocol = espota
upload_port = 10.9.1.106


Posted by Uli Köhler in Electronics, ESP8266/ESP32, PlatformIO

How to fix PlatformIO ESP8266 ArduinoOTA error: stopAll is not a member of WiFiUDP

Problem:

When compiling your PlatformIO firmware, you see an error message like

/home/uli/.platformio/packages/framework-arduinoespressif8266/libraries/ArduinoOTA/ArduinoOTA.cpp: In member function 'void ArduinoOTAClass::_runUpdate()':
/home/uli/.platformio/packages/framework-arduinoespressif8266/libraries/ArduinoOTA/ArduinoOTA.cpp:268:12: error: 'stopAll' is not a member of 'WiFiUDP'
  268 |   WiFiUDP::stopAll();
      |            ^~~~~~~

Solution:

Remove WiFi from the lib_deps secton of your platform.ini. Before the fix:

lib_deps =
    ESP Async [email protected]
    [email protected]
    WiFi

After the fix:

lib_deps =
    ESP Async [email protected]
    [email protected]

Now check your source code and replace any

#include <WiFi.h>

by

#include <ESP8266WiFi.h>

in order to prevent the WiFi.h: No Such File or Directory  issue as outlined in How to fix PlatformIO ESP8266 WiFi.h: No Such File or Directory

Now you need to completely remove the .pio folder from your project directory in order to ensure a clean build:

rm -rf .pio

After that, recompile your firmware.

Posted by Uli Köhler in Arduino, Electronics, ESP8266/ESP32, PlatformIO

How to fix PlatformIO ESP8266 WiFi.h: No Such File or Directory

Problem:

When compiling your PlatformIO firmware, you see an error message like

src/main.cpp:2:10: fatal error: WiFi.h: No such file or directory

**************************************************************
* Looking for WiFi.h dependency? Check our library registry!
*
* CLI  > platformio lib search "header:WiFi.h"
* Web  > https://platformio.org/lib/search?query=header:WiFi.h
*
**************************************************************

    2 | #include <WiFi.h>

Solution:

Instead of

#include <WiFi.h>

use

#include <ESP8266WiFi.h>

Now delete the .pio folder from the project directory to ensure a clean build by using:

rm -rf .pio

In case that doesn’t help, see our article on how to fix this issue by adding the WiFi library to the dependencies: How to fix PlatformIO WiFi.h: No Such File or Directory

Posted by Uli Köhler in Arduino, Electronics, ESP8266/ESP32, PlatformIO

How to fix PlatformIO multiple definition of `WiFi’ error

Problem:

When compiling your PlatformIO firmware, you see an error message like

Linking .pio/build/d1_mini_lite/firmware.elf
/home/uli/.platformio/packages/toolchain-xtensa/bin/../lib/gcc/xtensa-lx106-elf/10.3.0/../../../../xtensa-lx106-elf/bin/ld: .pio/build/d1_mini_lite/libbc0/libWiFi.a(WiFi.cpp.o):(.bss.WiFi+0x0): multiple definition of `WiFi'; .pio/build/d1_mini_lite/libd39/libESP8266WiFi.a(ESP8266WiFi.cpp.o):(.bss.WiFi+0x0): first defined here
collect2: error: ld returned 1 exit status
*** [.pio/build/d1_mini_lite/firmware.elf] Error 1

Solution:

Move WiFi in the lib_deps section in platformio.ini to the top of the list. Before the fix:

lib_deps =
    ESP Async [email protected]
    [email protected]
    WiFi

After the fix:

lib_deps =
    WiFi
    ESP Async [email protected]
    [email protected]

Now you need to completely remove the .pio folder from your project directory:

rm -rf .pio

After that, recompile your firmware.

Complete platformio.ini example after fixing the issue:

[env:d1_mini_lite]
platform = espressif8266
board = d1_mini_lite
framework = arduino
monitor_speed = 115200
lib_deps =
    WiFi
    ESP Async [email protected]
    [email protected]


Posted by Uli Köhler in Arduino, Electronics, PlatformIO

How to fix PlatformIO WiFi.h: No Such File or Directory

Important note: On the ESP8266, this solution is not recommended. See How to fix PlatformIO ESP8266 WiFi.h: No Such File or Directory instead

Problem:

When compiling your PlatformIO firmware, you see an error message like

src/main.cpp:2:10: fatal error: WiFi.h: No such file or directory

**************************************************************
* Looking for WiFi.h dependency? Check our library registry!
*
* CLI  > platformio lib search "header:WiFi.h"
* Web  > https://platformio.org/lib/search?query=header:WiFi.h
*
**************************************************************

    2 | #include <WiFi.h>

Solution:

Add WiFi to the lib_deps in platformio.ini (create lib_deps if it is not present already):

lib_deps =
    WiFi

and then recompile.

Complete platformio.ini example:

[env:d1_mini_lite]
platform = espressif8266
board = d1_mini_lite
framework = arduino
monitor_speed = 115200
lib_deps =
    ESP Async [email protected]
    [email protected]
    WiFi


Posted by Uli Köhler in Arduino, Electronics, PlatformIO

How to fix PlatformIO SPI.h: No Such File or Directory

Problem:

When compiling your PlatformIO firmware, you see an error message like

In file included from .pio/libdeps/esp32dev/Adafruit BusIO/Adafruit_BusIO_Register.h:2:0,
                 from .pio/libdeps/esp32dev/Adafruit INA219/Adafruit_INA219.h:21,
                 from .pio/libdeps/esp32dev/Adafruit INA219/Adafruit_INA219.cpp:31:
.pio/libdeps/esp32dev/Adafruit BusIO/Adafruit_SPIDevice.h:6:17: fatal error: SPI.h: No such file or directory

*************************************************************
* Looking for SPI.h dependency? Check our library registry!
*
* CLI  > platformio lib search "header:SPI.h"
* Web  > https://platformio.org/lib/search?query=header:SPI.h
*
*************************************************************

Solution:

Add SPI to the lib_deps in platformio.ini, for example, before:

lib_deps =
    adafruit/Adafruit INA219 @ ^1.1.1

After:

lib_deps =
    adafruit/Adafruit INA219 @ ^1.1.1
    SPI

and then recompile.

Posted by Uli Köhler in Arduino, Electronics, PlatformIO

How to fix PlatformIO Adafruit_BusIO_Register.h: No Such File or Directory

Problem:

When compiling your PlatformIO firmware, you see an error message like

In file included from .pio/libdeps/esp32dev/Adafruit INA219/Adafruit_INA219.cpp:31:0:
.pio/libdeps/esp32dev/Adafruit INA219/Adafruit_INA219.h:21:37: fatal error: Adafruit_BusIO_Register.h: No such file or directory

*********************************************************************************
* Looking for Adafruit_BusIO_Register.h dependency? Check our library registry!
*
* CLI  > platformio lib search "header:Adafruit_BusIO_Register.h"
* Web  > https://platformio.org/lib/search?query=header:Adafruit_BusIO_Register.h
*
*********************************************************************************

Solution:

Add adafruit/Adafruit BusIO @ ^1.9.3 to the lib_deps in platformio.ini, for example, before:

lib_deps =
    adafruit/Adafruit INA219 @ ^1.1.1

After:

lib_deps =
    adafruit/Adafruit INA219 @ ^1.1.1
    adafruit/Adafruit BusIO @ ^1.9.3

and then recompile.

Posted by Uli Köhler in Arduino, Electronics, PlatformIO