Embedded

What does mbed-tls error code -0x3F80 mean?

When you see an error message such as

E (169535) esp-tls-mbedtls: mbedtls_ssl_handshake returned -0x3F80

on your microcontroller (e.g. ESP32), this means

MBEDTLS_ERR_PK_ALLOC_FAILED

In other words, there is not enough memory for mbed-tls to work – specifically, there is not enough memory to allocate the public key. Try to reduce the memory usage of your application.
Posted by Uli Köhler in ESP8266/ESP32, mbed

What does mbed-tls error code -0x3B00 mean

If you see an error message like the following one on your microcontroller (such as ESP32):

E (41544) esp-tls-mbedtls: mbedtls_ssl_handshake returned -0x3B00

this means MBEDTLS_ERR_PK_INVALID_PUBKEY.

As of the version of mbed TLS used in esp-idf v4.4.3, only RSA & (certain types of) Elliptic Curve keys are supported. In my tests, X25519/EC256 keys didn’t work and there were indications that P-384 keys also didn’t work. Generally, using RSA keys is a safe bet when working with mbed-tls.

Posted by Uli Köhler in Arduino, Embedded, ESP8266/ESP32, mbed

FreeRTOS task with static stack memory (xTaskCreateStatic) example

Also see our previous post which uses dynamically allocated memory using xTaskCreate()How to add FreeRTOS task (thread) to any PlatformIO project

#include <freertos/FreeRTOS.h>
#include <freertos/task.h>

constexpr size_t MY_TASK_STACK_SIZE = 1024;
static StaticTask_t myTaskBuffer;
static StackType_t myTaskStack[ MY_TASK_STACK_SIZE ];


void MyTask(void * parameter)
{
    while(true)
    {
        // TODO Your code goes here
    }
}

void setup()
{
    xTaskCreateStatic(
        MyTask, // Task function
        "MyTask", // Name
        MY_TASK_STACK_SIZE, // Stack size
        nullptr, // Parameter
        tskIDLE_PRIORITY,
        myTaskStack,
        &myTaskBuffer);
}

void loop() {
}


Posted by Uli Köhler in Arduino, FreeRTOS

What does mbed-tls error code -0x7F00 mean?

When you see an error message such as

E (61175) esp-tls-mbedtls: mbedtls_ssl_setup returned -0x7F00

on your microcontroller (e.g. ESP32), this means

MBEDTLS_ERR_SSL_ALLOC_FAILED

In other words, there is not enough memory for mbed-tls to work. Try to reduce the memory usage of your application.

Posted by Uli Köhler in ESP8266/ESP32, mbed

How to fix GCC error: unknown type name ‘size_t’ (STM32)

Problem:

When you try to compile your C/C++ project (typically a STM32 project):

C:/Users/User/MyProject/MyHeader.h:9:7: error: unknown type name 'size_t'
    9 | const size_t MySize = 15;
      |       ^~~~~~

Solution:

At the top of the file where this error occurs, add the following line:

#include <stddef.h>


Posted by Uli Köhler in C/C++, GCC errors, STM32

PySerial minimal RFC2217 example: Copy data received from serial port to stdout

Also see the same example for a local serial port: PySerial minimal example: Copy data received from serial port to stdout

This example connects to the RFC2217 remote serial port on 10.1.2.3 port 1234. It does not send data to the serial port but only copies data received from the serial port to stdout.

#!/usr/bin/env python3
import serial
with serial.serial_for_url("rfc2217://10.1.2.3:1234", baudrate=115200) as ser:
    try:
        while True:
            response = ser.read()
            if response:
                print(response.decode("iso-8859-1"), end="")
    finally:
        ser.close()


By using iso-8859-1   decoding, we ensure that even binary bytes are decoded in some way and do not cause an exception.

Posted by Uli Köhler in Embedded, Python

How to fix ESP32 FreeRTOS error: too few arguments to function ‘void vPortEnterCritical(portMUX_TYPE*)’

Problem:

On FreeRTOS on the ESP32, you want to use a critical zone like this:

portENTER_CRITICAL();
// Your critical code goes here!
portEXIT_CRITICAL();

but while compiling the procject, you see an error message like

src/main.cpp: In function 'void MyFunc(size_t, int16_t)':
/home/uli/.platformio/packages/framework-arduinoespressif32@src-f2ea83e2545300b10a69ff44ef9dc6cd/tools/sdk/esp32/include/freertos/port/xtensa/include/freertos/portmacro.h:476:75: error: too few arguments to function 'void vPortEnterCritical(portMUX_TYPE*)'
 #define portENTER_CRITICAL(mux)                     vPortEnterCritical(mux)

Solution:

You need to use portENTER_CRITICAL() and portEXIT_CRITICAL() with a spinlock, i.e.

portENTER_CRITICAL(&mySpinlock);
// TODO Your critical code goes here!
portEXIT_CRITICAL(&mySpinlock);

In order to see a full example on how to initialize a spinlock in FreeRTOS and use it for critical zones, see our previous post ESP32 critical zone example using FreeRTOS / PlatformIO

Posted by Uli Köhler in Arduino, ESP8266/ESP32, FreeRTOS, PlatformIO

ESP32 critical zone example using FreeRTOS / PlatformIO

In order to enter a critical zone on the ESP32 using FreeRTOS, you have to do the following:

Globally declare a spinlock:

portMUX_TYPE mySpinlock;

In setup(), initialize the spinlock:

spinlock_initialize(&mySpinlock);

Now, wherever you want to enter a critical zone, run:

portENTER_CRITICAL(&mySpinlock);
// TODO Your critical code goes here!
portEXIT_CRITICAL(&mySpinlock);

When using this in an interrupt handler, use this instead:

portENTER_CRITICAL_ISR(&mySpinlock);
// TODO Your critical code goes here!
portEXIT_CRITICAL_ISR(&mySpinlock);


FreeRTOS will ensure that no two threads using mySpinlock are run at the same time.

Posted by Uli Köhler in Arduino, ESP8266/ESP32, FreeRTOS, PlatformIO

How I fixed PlatformIO Arduino portGET_ARGUMENT_COUNT() result does not match for 0 arguments

Problem:

When trying to compile your Arduino PlatformIO project, you see multiple error messages like the following.

In file included from /home/uli/.platformio/packages/toolchain-xtensa-esp32/xtensa-esp32-elf/sys-include/stdlib.h:19,
                 from /home/uli/.platformio/packages/toolchain-xtensa-esp32/xtensa-esp32-elf/include/c++/8.4.0/cstdlib:75,
                 from /home/uli/.platformio/packages/toolchain-xtensa-esp32/xtensa-esp32-elf/include/c++/8.4.0/stdlib.h:36,
                 from /home/uli/.platformio/packages/framework-arduinoespressif32/cores/esp32/WString.h:26,
                 from /home/uli/.platformio/packages/framework-arduinoespressif32/cores/esp32/Print.h:26,
                 from /home/uli/.platformio/packages/framework-arduinoespressif32/libraries/WiFi/src/WiFi.h:27,
                 from /home/uli/.platformio/packages/framework-arduinoespressif32/libraries/WiFi/src/WiFi.cpp:24:
/home/uli/.platformio/packages/framework-arduinoespressif32/tools/sdk/esp32/include/freertos/port/xtensa/include/freertos/portmacro.h:717:41: error: static assertion failed: portGET_ARGUMENT_COUNT() result does not match for 0 arguments
 _Static_assert(portGET_ARGUMENT_COUNT() == 0, "portGET_ARGUMENT_COUNT() result does not match for 0 arguments");

Solution:

For me, the solution was as follows. I had

build_flags = --std=c++17

in my platformio.ini. Replacing it by

build_flags = --std=gnu++17

fixed the issue for me.

Posted by Uli Köhler in Arduino, C/C++, PlatformIO

How to take a remote screenshot on the Raspberry Pi

You can login to your Raspi using ssh -CX pi@IPADDRESS and then run

DISPLAY=:0 scrot screenshot.png

to take a screenshot of the display that is currently attached. After that, use

feh screenshot.png

(due to ssh -CX this will display the image locally on your Linux desktop) or copyscreenshot.png to your local computer using scprsyncWinSCP or any other tool.

This is useful for debugging what is happening on your display.

Posted by Uli Köhler in Raspberry Pi

Raspberry Pi libcamera VLC recording to H.264 (1920×1080)

On the Pi, run

libcamera-vid -t 0 --width 1920 --height 1080 --codec h264 -o out.h264

This will record Full-HD video (1920×1080) to out.h264

Posted by Uli Köhler in Audio/Video, Raspberry Pi

How to list available cameras on Raspberry Pi (libcamera)

Use this command to list all available cameras:

libcamera-still --list-cameras

Example output:

$ libcamera-still --list-cameras
Available cameras
-----------------
0 : imx477 [4056x3040] (/base/soc/i2c0mux/i2c@1/imx477@1a)
    Modes: 'SRGGB10_CSI2P' : 1332x990 [120.05 fps - (696, 528)/2664x1980 crop]
           'SRGGB12_CSI2P' : 2028x1080 [50.03 fps - (0, 440)/4056x2160 crop]
                             2028x1520 [40.01 fps - (0, 0)/4056x3040 crop]
                             4056x3040 [10.00 fps - (0, 0)/4056x3040 crop]


Posted by Uli Köhler in Audio/Video, Raspberry Pi

How to fix Raspberry Pi OS raspivid: command not found

Problem:

When trying to run raspivid on Raspberry Pi OS Lite, you will see the following error message:

bash: raspivid: command not found

Solution:

In recent versions of Raspberry Pi OS, raspivid has been replaced by libcamera-vid. Therefore, use libcamera-vid instead of raspivid.

Posted by Uli Köhler in Audio/Video, Raspberry Pi

How to allow remote SMB/CIFS access to /home/pi on the Raspberry Pi

First, install samba using

sudo apt -y install samba

then append the following to /etc/samba/smb.conf

[pi]
   comment = pi
   path = /home/pi
   writeable = yes
   browseable = yes
   public = yes
   create mask = 0644
   directory mask = 0755
   force user = pi

and finally restart samba:

sudo systemctl restart smbd

Now your /home/pi will be accessible via SMB (including write access).

Posted by Uli Köhler in Linux, Raspberry Pi

How to generate sin and cos waves using the LECD PWM on the STM32

Based on our previous post How to generate PWM output representing a sine wave on the ESP32 (Arduino/PlatformIO) this post uses two different IO pins to generate both a sine and a cosine wave dynamically.

#include <Arduino.h>
#include <driver/ledc.h>

void setup() {
    Serial.begin(115200);

    ledcSetup(LEDC_CHANNEL_0, 10000 /* Hz */, 12);
    ledcSetup(LEDC_CHANNEL_1, 10000 /* Hz */, 12);

    ledcAttachPin(GPIO_NUM_32, LEDC_CHANNEL_0);
    ledcAttachPin(GPIO_NUM_25, LEDC_CHANNEL_1);
}

/**
 * @brief Calculate the PWM duty cycle (assuming 12 bits resolution) of a sine wave of
 * given frequency. micros() is used as a timebase
 * 
 * @param frequency The frequency in Hz
 * @return int the corresponding 12-bit PWM value
 */
int sinePWMValue(float frequency, int maxPWMValue, float (*sinCos)(float)) {
  unsigned long currentMicros = micros(); // get the current time in microseconds

  // calculate the sine wave value for the current time
  int halfMax = maxPWMValue/2;
  int sineValue = halfMax + (halfMax-10) * sinCos(2 * PI * currentMicros / (1000000 / frequency));
  return sineValue;
}

void loop() {
    // Example of how to change the duty cycle to 25%
    ledcWrite(LEDC_CHANNEL_0, sinePWMValue(1.0, 4096, sinf));
    ledcWrite(LEDC_CHANNEL_1, sinePWMValue(1.0, 4096, cosf));
}

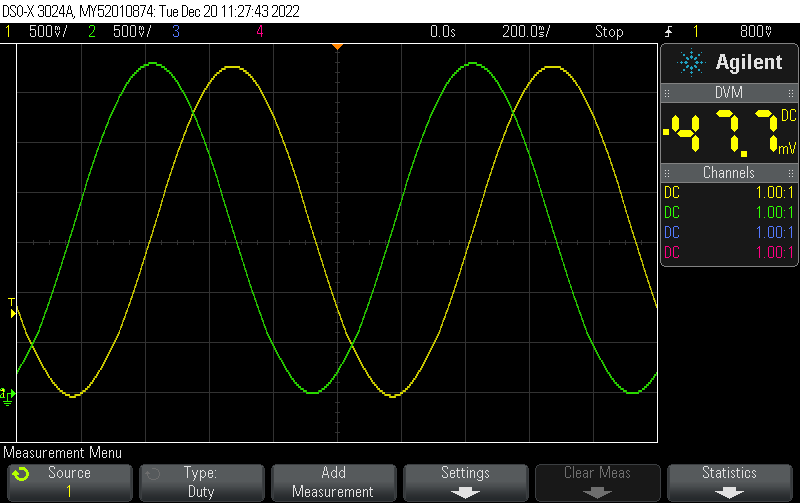
The output, filtered by a 4th order Salley-Key filter each (using the LM324) looks like this:

Posted by Uli Köhler in Analog, Arduino, Electronics, ESP8266/ESP32, PlatformIO

How to generate PWM output representing a sine wave on the ESP32 (Arduino/PlatformIO)

The following function will compute the value of a sine wave using micros() as a timebase, with adjustable frequency. It is hardcoded to expect a 12 bit resolution PWM

/**
 * @brief Calculate the PWM duty cycle (assuming 12 bits resolution) of a sine wave of
 * given frequency. micros() is used as a timebase
 * 
 * @param frequency The frequency in Hz
 * @return int the corresponding 12-bit PWM value
 */
int sinePWMValue(float frequency) {
  unsigned long currentMicros = micros(); // get the current time in microseconds

  // calculate the sine wave value for the current time
  int sineValue = 2048 + 2047 * sin(2 * PI * currentMicros / (1000000 / frequency));
  return sineValue;
}

Based on this, we can use the basic code of our previous post ESP32 minimal Arduino PWM output example (PlatformIO) to generate a 1Hz sine wave (represented by a 10kHz PWM):

#include <Arduino.h>
#include <driver/ledc.h>

void setup() {
    Serial.begin(115200);

    ledcSetup(LEDC_CHANNEL_0, 10000 /* Hz */, 12);

    ledcAttachPin(GPIO_NUM_14, LEDC_CHANNEL_0);
    ledcWrite(LEDC_CHANNEL_0, 2048); // 50%
}

/**
 * @brief Calculate the PWM duty cycle (assuming 12 bits resolution) of a sine wave of
 * given frequency. micros() is used as a timebase
 * 
 * @param frequency The frequency in Hz
 * @return int the corresponding 12-bit PWM value
 */
int sinePWMValue(float frequency) {
  unsigned long currentMicros = micros(); // get the current time in microseconds

  // calculate the sine wave value for the current time
  int sineValue = 2048 + 2047 * sin(2 * PI * currentMicros / (1000000 / frequency));
  return sineValue;
}

void loop() {
    // Example of how to change the duty cycle to 25%
    ledcWrite(LEDC_CHANNEL_0, sinePWMValue(1.0));
}


Posted by Uli Köhler in Arduino, ESP8266/ESP32, PlatformIO

ESP32 minimal Arduino PWM output example (PlatformIO)

#include <Arduino.h>
#include <driver/ledc.h>

void setup() {
    Serial.begin(115200);

    ledcSetup(LEDC_CHANNEL_0, 10000 /* Hz */, 12);

    ledcAttachPin(GPIO_NUM_14, LEDC_CHANNEL_0);
    ledcWrite(LEDC_CHANNEL_0, 2048); // 50%
}

void loop() {
    // Example of how to change the duty cycle to 25%
    ledcWrite(LEDC_CHANNEL_0, 1024);
}


Posted by Uli Köhler in Arduino, ESP8266/ESP32, PlatformIO

ESP32 minimal LEDC PWM configuration example on PlatformIO/Arduino using ESP-IDF LEDC API

This example configures the LEDC PWM timer at 10 kHz with 12 bit resolution, outputting a 50% duty cycle PWM on IO14. This code uses the ESP-IDF API directly in order to configure the PWM

#include <Arduino.h>
#include <driver/ledc.h>

void setup() {
    Serial.begin(115200);

    ledc_timer_config_t ledc_timer = {
        .speed_mode       = LEDC_HIGH_SPEED_MODE,
        .duty_resolution  = LEDC_TIMER_12_BIT,
        .timer_num        = LEDC_TIMER_0,
        .freq_hz          = 10000,
        .clk_cfg          = LEDC_AUTO_CLK
    };
    ESP_ERROR_CHECK(ledc_timer_config(&ledc_timer));

    ledc_channel_config_t ledc_channel = {
        .gpio_num       = GPIO_NUM_14,
        .speed_mode     = LEDC_HIGH_SPEED_MODE,
        .channel        = LEDC_CHANNEL_0,
        .intr_type      = LEDC_INTR_DISABLE,
        .timer_sel      = LEDC_TIMER_0,
        .duty           = 2048, // Set duty to 50%
        .hpoint         = 0
    };
    ESP_ERROR_CHECK(ledc_channel_config(&ledc_channel));
}

void loop() {
}


Posted by Uli Köhler in Arduino, ESP8266/ESP32, PlatformIO

What are the ESP32 DAC output pins?

  • Pin IO25 is connected to DAC_1
  • Pin IO26 is connected to DAC_2

Source: ESP32 technical reference manual, Table 4-4

Posted by Uli Köhler in Analog, ESP8266/ESP32