Embedded

How to fix ESP32 Last error reported from esp-tls: 0x8001

Problem:

While trying to use TLS such as MQTTS or HTTPS on the ESP32, you see an error message like

[MQTT] Last error reported from esp-tls: 0x8001

Solution:

0x8001 means ESP_ERR_ESP_TLS_CANNOT_RESOLVE_HOSTNAME. In other words, the ESP32 is unable to resolve the hostname of the host you’re trying to connect to using DNS.

Typically, this is a DNS problem, so check the DNS settings of your network. Also check if the ESP32 has a correct DNS server set – for example, if the ESP32 has 0.0.0.0 as a DNS server, this explains why it isn’t able to resolve the hostname.

Sometimes this issue is also caused by the hostname not existing at all (i.e. there is no DNS entry for that hostname). You can easily check this by resolving the hostname you’re trying to connect
Posted by Uli Köhler in C/C++, Embedded, ESP8266/ESP32, Networking

Which pins on the ESP32-S2 are DAC outputs?

Only two pins on the ESP32-S2 are capable of being DAC outputs:

  • GPIO23 is DAC_1
  • GPIO24 is DAC_2

Source: ESP32-S2 datasheet

Posted by Uli Köhler in ESP8266/ESP32

How to output 2.048MHz clock on any pin on the ESP32

You can use the LEDC timer (typically used for PWM) to output a 50% duty cycle clock with 3.3V P-P amplitude on any output-capable GPIO pin.

First,

#include <driver/ledc.h>

then setup the timer. You only need to do this once on startup, no code in your loop function is required.

/**
 * Setup 2.048MHz clock output on GPIO33
 */
ledc_timer_config_t ledc_timer = {
    .speed_mode = LEDC_HIGH_SPEED_MODE,
    .bit_num    = LEDC_TIMER_2_BIT,
    .timer_num  = LEDC_TIMER_0,
    .freq_hz    = 2048000
};
ledc_channel_config_t ledc_channel = {
    .gpio_num   = GPIO_NUM_33,
    .speed_mode = LEDC_HIGH_SPEED_MODE,
    .channel    = LEDC_CHANNEL_0,
    .timer_sel  = LEDC_TIMER_0,
    .duty       = 2
};
ledc_timer_config(&ledc_timer);
ledc_channel_config(&ledc_channel);


Posted by Uli Köhler in ESP8266/ESP32

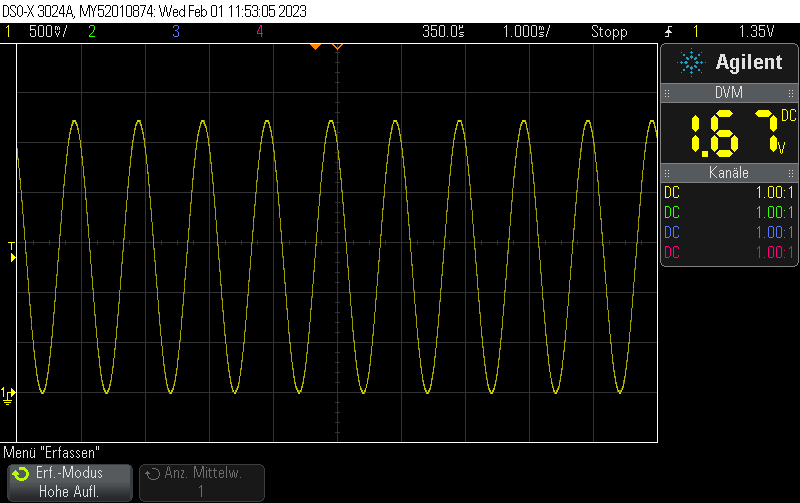
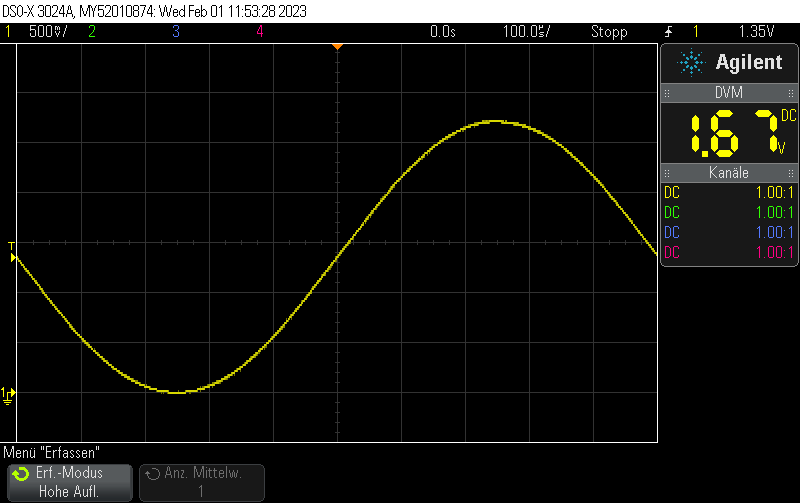
How does the ESP32 DAC cosine generator waveform look on an Oscilloscope?

The ESP32 DAC has a built-in cosine waveform generator. Even though it’s an 8-bit DAC, the waveform looks pretty clean.

For an example on how to generate this wavefrm in firmware, see How to use the ESP32 DAC sine/cosine waveform generator using Arduino / PlatformIO

Posted by Uli Köhler in Electronics, ESP8266/ESP32

How to use the ESP32 DAC sine/cosine waveform generator using Arduino / PlatformIO

The ESP32 and its derivatives such as the ESP32-S2 have a built-in sine/cosine waveform generator for the built-in 8-bit DAC.

Using it requires ESP-IDF v5.1+ (see the official example). Using it with Arduino is slightly harder, since the stable version of the arduino-esp32 framework at the time of writing this post is based on ESP-IDF v4.4 which does not provide the DAC cosine generator API.

Therefore, we have to explicitly specify the arduino-espressif32 version (git commit) in platformio.ini:

[env:esp32dev]
platform = espressif32
# Commit f9cddfde697b659b9e818ec514f1505d2bd4a8ae is branch esp-idf-v5.1-libs @2022-02-01
platform_packages = framework-arduinoespressif32 @ https://github.com/espressif/arduino-esp32.git#f9cddfde697b659b9e818ec514f1505d2bd4a8ae
board = esp32dev
framework = arduino

The example main source code is pretty simple:

#include <Arduino.h>
#include <driver/dac_cosine.h>

void setup() {
    dac_cosine_handle_t chan0_handle;
    dac_cosine_config_t cos0_cfg = {
        .chan_id = DAC_CHAN_1, // GPIO26
        .freq_hz = 1000,
        .clk_src = DAC_COSINE_CLK_SRC_DEFAULT,
        .atten = DAC_COSINE_ATTEN_DEFAULT,  
        .phase = DAC_COSINE_PHASE_0,  
        .offset = 0,
        //.flags.force_set_freq = false,
    };
    ESP_ERROR_CHECK(dac_cosine_new_channel(&cos0_cfg, &chan0_handle));
    ESP_ERROR_CHECK(dac_cosine_start(chan0_handle));
}

void loop() {
  // put your main code here, to run repeatedly:
  delay(1000);
}

If you want to see how the generated waveform looks on an oscilloscope, see How does the ESP32 DAC cosine generator waveform look on an Oscilloscope?

Posted by Uli Köhler in Arduino, ESP8266/ESP32, PlatformIO

Minimal PlatformIO ESP32 ArduinoOTA example

Based on our Minimal PlatformIO ESP8266 ArduinoOTA example, this is a minimal starting point for your ESP32 program running ArduinoOTA.

#include <Arduino.h>
#include <WiFi.h>
#include <ArduinoOTA.h>


void setup() {
  Serial.begin(115200);
  /**
   * Connect to Wifi
   */
  WiFi.begin("MyWifi", "abc123abc");
  uint32_t notConnectedCounter = 0;
  while (WiFi.status() != WL_CONNECTED) {
      delay(100);
      Serial.println("Wifi connecting...");
      notConnectedCounter++;
      if(notConnectedCounter > 150) { // Reset board if not connected after 15s
          Serial.println("Resetting due to Wifi not connecting...");
          ESP.restart();
      }
  }
  Serial.print("Wifi connected, IP address: ");
  Serial.println(WiFi.localIP());
  /**
   * Enable OTA update
   */
  ArduinoOTA.begin();
}

void loop() {
  // Check for over the air update request and (if present) flash it
  ArduinoOTA.handle();
}

platformio.ini

Add the following section to your platformio.ini to enable flashing via OTA as well as flashing via serial:

[env:OTA]
extends = env:esp32dev
upload_protocol = espota
upload_port = 10.19.50.80
upload_flags = --host_port=55910
Posted by Uli Köhler in ESP8266/ESP32, PlatformIO

STM32 HAL equivalent of Arduino millis()

The equivalent of Arduino’s millis() function when using the STM32 HAL is

HAL_GetTick()

The ticks occur once every millisecond, so this will also give you a millisecond timer that will overflow after some time equivalently to how millis() overflows.

Posted by Uli Köhler in Arduino, STM32

How to print WiFi MAC address to serial on ESP32 (Arduino)?

It’s as simple as

Serial.println(WiFi.macAddress());

Full example

#include <Arduino.h>

void setup() {
    Serial.begin(115200);
    Serial.println(WiFi.macAddress());
}

void loop() {
    // ...
}


Posted by Uli Köhler in Arduino, ESP8266/ESP32

How to get WiFi MAC address as binary on the ESP32 (Arduino)?

uint8_t mac[6];
WiFi.macAddress(mac);


Posted by Uli Köhler in Arduino, ESP8266/ESP32, Networking

VirtualHere USB server & systemd autostart on Raspberry Pi in 15 seconds

The following script will download the VirtualHere USB server for the Raspberry Pi (generic version for ARM) and create a systemd service called vhusbd.service.

In case you are not using the Raspberry Pi, see the VirtualHere server download page to obtain.

#!/bin/bash
# This script installs and enables/starts the VirtualHere USB server
wget -O /usr/bin/vhusbd https://www.virtualhere.com/sites/default/files/usbserver/vhusbdarm
chmod a+x /usr/bin/vhusbd

cat >/etc/systemd/system/vhusbd.service <<EOF
[Unit]
Description=vhusbd
After=network-online.target

[Service]
Restart=always
User=root
Group=root
ExecStart=/usr/bin/vhusbd

[Install]
WantedBy=multi-user.target
EOF

# Enable and start service
systemctl enable --now vhusbd.service


Posted by Uli Köhler in Embedded, Raspberry Pi

How read STM32 HRTIM master timer current counter value

The STM32 HRTIM (high resolution timer) provides a high speed counter that is suitable for benchmarks due to its high counting frequency of up to 240 MHz on the STM32H743.

You can read its current counter value using

uint32_t t0 = HRTIM1->sMasterRegs.MCNTR;


Posted by Uli Köhler in STM32

How to determine how many percent of memory (heap) are free on ESP32?

This approach works for Arduino / PlatformIO as well as ESP-IDF projects.

#include <esp_heap_caps.h>

uint32_t freeHeapBytes = heap_caps_get_free_size(MALLOC_CAP_DEFAULT);
uint32_t totalHeapBytes = heap_caps_get_total_size(MALLOC_CAP_DEFAULT);
float percentageHeapFree = freeHeapBytes * 100.0f / (float)totalHeapBytes;

// Print to serial
Serial.printf("[Memory] %.1f%% free - %d of %d bytes free\n", percentageHeapFree, freeHeapBytes, totalHeapBytes);

Also see How to find number of free bytes in ESP32 memory / heap?

Posted by Uli Köhler in ESP8266/ESP32

How to find number of free bytes in ESP32 memory / heap?

This approach works for Arduino / PlatformIO as well as ESP-IDF projects.

#include <esp_heap_caps.h>

uint32_t freeHeapBytes = heap_caps_get_free_size(MALLOC_CAP_DEFAULT);


Posted by Uli Köhler in ESP8266/ESP32

How to use vPortGetHeapStats() on the ESP32?

Problem:

You see an error message like the following one while compiling your ESP32 project

src/main.cpp:128:3: error: 'vPortGetHeapStats' was not declared in this scope
   vPortGetHeapStats(&heapStats);

Solution:

Although vPortGetHeapStats() is typically defined in freertos/portable.h, you can not use   vPortGetHeapStats() on the ESP32 since the frameworks do not use the FreeRTOS heap implementation.

In order to find informatio about heap usage, use the ESP heap API such as esp_get_free_heap_size().

Posted by Uli Köhler in ESP8266/ESP32, FreeRTOS

What caps argument to give to ESP32 heap_caps_…() functions?

Almost all of the ESP32 heap_caps_...() functions take a uint32_t caps argument.

In case you just want to have general information about the heap, use

MALLOC_CAP_DEFAULT

as an argument.

Most applications will rarely use any other value than MALLOC_CAP_DEFAULT. Other values which are used semi-frequently include:

  • MALLOC_CAP_SPIRAM
  • MALLOC_CAP_INTERNAL (memory must not be located in SPI RAM)
For more details on how the memory of the ESP32 is organized, see the official documentation.
Posted by Uli Köhler in ESP8266/ESP32

ESP32 minimal heap_caps_print_heap_info() example (PlatformIO/Arduino)

On the ESP32, you can use heap_caps_print_heap_info() to print information to the serial port about how much memory is free on the heap (plus other details such as the largest free block).

#include <esp_heap_caps.h>

void setup() {
}

void loop() {
  heap_caps_print_heap_info(MALLOC_CAP_8BIT);
}

Example output

Heap summary for capabilities 0x00000004:
  At 0x3ffb8000 len 6688 free 0 allocated 4404 min_free 0
    largest_free_block 0 alloc_blocks 8 free_blocks 0 total_blocks 8
  At 0x3ffb0000 len 25480 free 0 allocated 22204 min_free 0
    largest_free_block 0 alloc_blocks 70 free_blocks 0 total_blocks 70
  At 0x3ffae6e0 len 6192 free 8 allocated 3860 min_free 8
    largest_free_block 0 alloc_blocks 10 free_blocks 1 total_blocks 11
  At 0x3ffb6388 len 7288 free 0 allocated 4524 min_free 0
    largest_free_block 0 alloc_blocks 38 free_blocks 0 total_blocks 38
  At 0x3ffb9a20 len 16648 free 8 allocated 13964 min_free 0
    largest_free_block 0 alloc_blocks 32 free_blocks 1 total_blocks 33
  At 0x3ffcc5d0 len 80432 free 8 allocated 73140 min_free 8
    largest_free_block 0 alloc_blocks 320 free_blocks 1 total_blocks 321
  At 0x3ffe0440 len 15072 free 0 allocated 12260 min_free 0
    largest_free_block 0 alloc_blocks 41 free_blocks 0 total_blocks 41
  At 0x3ffe4350 len 113840 free 18440 allocated 90724 min_free 2560
    largest_free_block 7796 alloc_blocks 157 free_blocks 12 total_blocks 169
  Totals:
    free 18464 allocated 225080 min_free 2576 largest_free_block 7796


Posted by Uli Köhler in Arduino, ESP8266/ESP32, PlatformIO

FreeRTOS task queue with static memory (xQueueCreateStatic) minimal example

Also see our previous post FreeRTOS task queue minimal example which also has examples for how to send & receive with a queue. The post you’re currently viewing is just about xQueueCreateStatic()

enum class MQTTTaskType : uint8_t {
    SendStatus = 0,
    SendInfo
};

// This struct will be inserted into the queue
struct MQTTTask {
    MQTTTaskType task; // The type of work that is requested from the received
    // TODO add your custom fields here if requred
};

constexpr size_t MQTT_TASK_QUEUE_LENGTH = 6;
static QueueHandle_t mqttTaskQueue;
static StaticQueue_t mqttTaskQueueStatic;
static uint8_t mqttTaskQueueStorageArea[ MQTT_TASK_QUEUE_LENGTH * sizeof(MQTTTask) ];

void setup() {
    // Create task queue
    mqttTaskQueue = xQueueCreateStatic( MQTT_TASK_QUEUE_LENGTH,
                                 sizeof(MQTTTask),
                                 mqttTaskQueueStorageArea,
                                 &mqttTaskQueueStatic );
}


Posted by Uli Köhler in C/C++, Embedded, FreeRTOS, PlatformIO

What does mbed-tls error code -0x0010 mean?

If you see an error message like the following one on your microcontroller (such as ESP32):

E (46462) esp-tls-mbedtls: mbedtls_ssl_handshake returned -0x0010

this means MBEDTLS_ERR_MPI_ALLOC_FAILED. In other words, mbedtls can’t allocate enough memory for its operation.

In order to fix this, try to reduce the amount of memory other parts of your application consume.

Posted by Uli Köhler in Arduino, Embedded, ESP8266/ESP32, mbed

What does mbed-tls error code -0x2700 mean?

If you see an error message like the following one on your microcontroller (such as ESP32):

E (137011) esp-tls-mbedtls: mbedtls_ssl_handshake returned -0x2700

this means MBEDTLS_ERR_X509_CERT_VERIFY_FAILED.

Either you are using the wrong certificate on the server or you are using the wrong certificate on the mbed-tls side for verifying the certificate.

In order to check the server side, it is often helpful to check the server’s TLS certificate using OpenSSL:

openssl s_client -connect myhostname.com:443


Posted by Uli Köhler in Arduino, Embedded, ESP8266/ESP32, mbed

What does mbed-tls error code -0x3F80 mean?

When you see an error message such as

E (169535) esp-tls-mbedtls: mbedtls_ssl_handshake returned -0x3F80

on your microcontroller (e.g. ESP32), this means

MBEDTLS_ERR_PK_ALLOC_FAILED

In other words, there is not enough memory for mbed-tls to work – specifically, there is not enough memory to allocate the public key. Try to reduce the memory usage of your application.

Posted by Uli Köhler in ESP8266/ESP32, mbed