Raspberry Pi

How to fix Raspberry Pi OS raspivid: command not found

Problem:

When trying to run raspivid on Raspberry Pi OS Lite, you will see the following error message:

bash: raspivid: command not found

Solution:

In recent versions of Raspberry Pi OS, raspivid has been replaced by libcamera-vid. Therefore, use libcamera-vid instead of raspivid.

Posted by Uli Köhler in Audio/Video, Raspberry Pi

How to allow remote SMB/CIFS access to /home/pi on the Raspberry Pi

First, install samba using

sudo apt -y install samba

then append the following to /etc/samba/smb.conf

[pi]
   comment = pi
   path = /home/pi
   writeable = yes
   browseable = yes
   public = yes
   create mask = 0644
   directory mask = 0755
   force user = pi

and finally restart samba:

sudo systemctl restart smbd

Now your /home/pi will be accessible via SMB (including write access).

Posted by Uli Köhler in Linux, Raspberry Pi

How to setup image slideshow kiosk on Raspbian

1. Configure autologin

sudo raspi-config -> 1 System options -> S5 Boot / auto-login -> Set to B2 Console Autologin

2. Use our script to configure the kiosk

sudo apt -y install xserver-xorg xinit x11-xserver-utils matchbox-window-manager xautomation unclutter feh
mkdir -p ~/kiosk-images

sudo cat >~/kiosk.sh <<EOF
#!/bin/sh
xset -dpms
xset s off
xset s noblank
matchbox-window-manager -use_titlebar no &
unclutter &
feh -Y -x -q -D 5 -B black -F -Z -z -r ~/kiosk-images
EOF
chmod a+x ~/kiosk.sh

sudo cat >>~/.bashrc <<EOF
# Kiosk xinit
xinit ~/kiosk.sh -- vt$(fgconsole)
EOF

3. Place images in ~/kiosk-images

e.g. via scp or rsync

4. Reboot

sudo reboot

Note: When logging in using SSH, the .bashrc hack (found originally at reelyactive) will cause xinit to run, with the message

/usr/lib/xorg/Xorg.wrap: Only console users are allowed to run the X server

appearing on screen and the console not opening. In that case, just type Ctrl+C to stop xinit and see the normal shell.

Posted by Uli Köhler in Raspberry Pi

How to enable USB-C host mode on Raspberry Pi

If you want to connect an USB device such as a 3D printer mainboard to your Raspberry Pi 4 using the USB-C connector as opposed to the larger USB-A connector, you need to first configure the Raspberry Pi kernel to use host mode for the USB-C connector.

To temporarily enable it:

sudo modprobe -r dwc2 && sudo dtoverlay dwc2 dr_mode=host && sudo modprobe dwc2

This method has the advantage of not requiring a reboot.

To permanently enable it:

Edit /boot/config.txt and add

dtoverlay=dwc2,dr_mode=host

at the end of the file (in the [all] section). Then

reboot

Posted by Uli Köhler in Raspberry Pi

How to install tailscale on Ubuntu

In order to instal tailscale, on any Ubuntu version, you can use the official tailscale install command:

sudo apt -y install curl apt-transport-https
curl -fsSL https://tailscale.com/install.sh | sh
Posted by Uli Köhler in Headscale, Raspberry Pi, VPN

Fullscreen camera view using libcamera-vid

libcamera-vid --width 1920 --height 1080 -f -t 10000000000

-t 10000000000 means to run for 10000000000 milliseconds (almost 4 months)

Posted by Uli Köhler in Audio/Video, Electronics, Raspberry Pi

How to fix raspistill ERROR: the system should be configured for the legacy camera stack

Problem:

While trying to capture an image using raspistill, you see the following error message

ERROR: the system should be configured for the legacy camera stack

and no image is being produced

Solution 1 (recommended): Use libcamera

Recent versions of Raspbian use libcamera instead of the broadcom legacy camera API. You can capture an image using libcamera-still similarly to raspistill:

libcamera-still -o test.jpg

Solution 2: Enable legacy camera API

If you absolutely need raspistill specifically to work, you can still enable the legacy camera API using rpi-config:

sudo raspi-config

Go to:

  • 3 Interface Config
  • I1 Legacy Camera

and choose Yes to enable the legacy camera API.

Posted by Uli Köhler in Audio/Video, Raspberry Pi

Raspberry Pi libcamera VLC livestreaming (1920×1080)

On the Pi, run

libcamera-vid -t 0 --width 1920 --height 1080 --codec h264 --inline --listen -o tcp://0.0.0.0:8888

On the client, run

vlc tcp/h264://192.168.1.185:8888/

where 192.168.1.185 is the IP address of the Raspberry Pi.

Posted by Uli Köhler in Audio/Video, Raspberry Pi

What pin pitch does the Raspberry Pi DSI display connector / cable have?

The Raspberry Pi DSI display connector (for example the DSI display cable that comes with the Raspberry Pi 7″ display) has a pin pitch of 1.0mm:

Posted by Uli Köhler in Raspberry Pi

How to install tailscale on Raspberry Pi

Just use the official install command from the tailscale website:

curl -fsSL https://tailscale.com/install.sh | sh


Posted by Uli Köhler in Headscale, Raspberry Pi, VPN

Which way to mount the Raspberry Pi DSI display cable for the Raspberry Pi 7″ display

First, mount the Raspberry Pi on top of the display PCB on the back of the display.

On the bottom (display) PCB, the silver contacts of the cable should be at the top (facing the Raspberry Pi):

On the Raspberry Pi, the silver contacts should face towards the USB connectors:

Overall, it should look like this:

Posted by Uli Köhler in Raspberry Pi

How to enable OctoPi WiFi connection on boot

First, install OctoPi to the SD card – for example, using rpi-imagerHow to install OctoPi using rpi-imager

Open the boot partition on the OctoPi SD card and create a file wpa_supplicant.conf there, with the following content:

country=de
update_config=1
ctrl_interface=/var/run/wpa_supplicant

network={   
   scan_ssid=1
   ssid="MyWifi"  
   psk="abc123abc"
}

Always set the correct country code at the top ! If you don’t set it correctly, it won’t work!

Set ssid to the name of the wireless network.

Set psk to the wifi password.

Posted by Uli Köhler in 3D printing, Raspberry Pi

How to install OctoPi using rpi-imager

First open rpi-imager:

then select Choose OS

Sroll down to Other specific-purpose OS (do not click on Other general-purpose OS, even though it sounds similar!)

Click on Other specific-purpose OS:

Now click on 3D printing:

Click on OctoPi:

Now click on OctoPi (stable):

Now click on Choose Storage to select the SD card you want to write the image to:

Click on the correct device to select it – double check to make sure you have selected the correct device !

Now click Write to download the image and write it to the SD card:

and now grab a coffee since it will take a couple of minutes to write:

Posted by Uli Köhler in 3D printing, Raspberry Pi

How long is the Raspberry Pi DSI display cable?

The DSI display cable that comes with the Raspberry Pi 7″ display is 10cm (100mm) long:

Posted by Uli Köhler in Raspberry Pi

How many pins does the Raspberry Pi display DSI cable have?

The Rasbperry Pi DSI connector / cable has 15 pins:

Posted by Uli Köhler in Raspberry Pi

How to enable Raspberry Pi (Raspbian) WiFi connection on boot

Open the boot partition on the Rasbian SD card and create a file wpa_supplicant.conf there, with the following content:

country=de
update_config=1
ctrl_interface=/var/run/wpa_supplicant

network={   
   scan_ssid=1
   ssid="MyWifi"  
   psk="abc123abc"
}

Always set the country code at the top ! If you don’t set it correctly, it won’t work!

Set ssid to the name of the wireless network.

Set psk to the wifi password.

Posted by Uli Köhler in Raspberry Pi

How to fix apt E: Unable to locate package rpi-imager

Problem:

While trying to install rpi-imager using

sudo apt install rpi-imager

you see this error message:

Reading package lists... Done
Building dependency tree       
Reading state information... Done

No apt package "rpi-imager", but there is a snap with that name.
Try "snap install rpi-imager"

E: Unable to locate package rpi-imager

Solution:

sudo apt -y install rpi-imager only works on Raspbian. On Ubuntu etc, you can install rpi-imager using

sudo snap install rpi-imager

Then start it using

rpi-imager

Posted by Uli Köhler in Linux, Raspberry Pi

LIRC Setup for Raspberry Pi (Receiver)

Quite simple. Just install it using

sudo apt-get install lirc

Update /boot/config.txt with dtoverlay=gpio-ir,gpio_pin=18

To use lirc in “default” mode (the default mode after installation is “devinput” mode) modify by sudo nano /etc/lirc/lirc_options.conf.

Change to driver = default

BTW: My first post on this blog 🙂

Posted by Tobias Gutmann in Raspberry Pi

How to hide all boot text & blinking cursor on Raspberry Pi

In order to hide all the boot messages (including the terminal) and the blinking cursor on the Raspberry Pi, edit /boot/cmdline.txt and first change

console=tty1

to

console=tty3

After that, add the following to the end of the line:

 loglevel=3 quiet logo.nologo vt.global_cursor_default=0

Now you can reboot and enjoy the clutter-free experience.

Posted by Uli Köhler in Raspberry Pi

How to change OctoScreen minimum extrusion temperature

Problem:

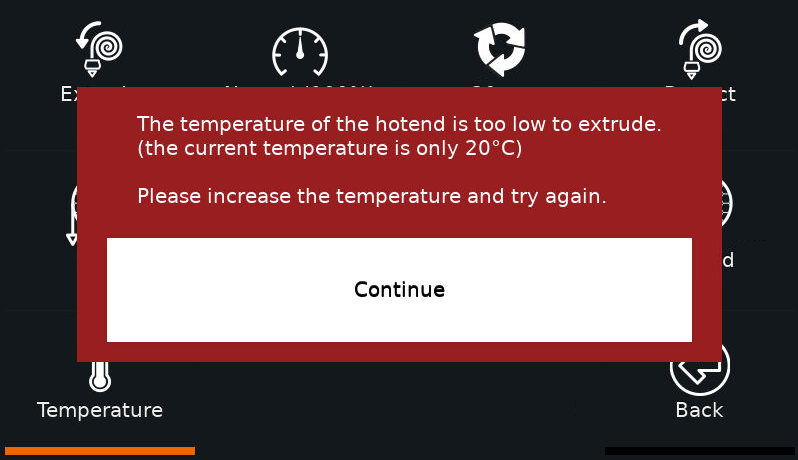
When trying to extrude low-temperature filaments using OctoScreen, you will see this error message:

The temperature of the hotend is too low to extrude. Please increase the temperature and try again

By default, OctoScreen has a minimum extrusion temperature of 150°C which is fine for PLA, but  for some low temperature materials you need to change the hardcoded value.

Note that setting you minimum extrusion temperature too low might damage or even destroy your extruder, if the material is not properly melted. So take caution in setting the correct value here.

Solution:

Open utils/tools.go and edit this line:

const MIN_HOTEND_TEMPERATURE = 150

Just set your desired temperature and then recompile (see the OctoScreen README on how to do that)

Note that often the firmware (like Marlin) has a separate cold extrusion prevention limit, so you need to change the limit in both OctoScreen and the firmware. For Marlin, see How to disable Marlin cold extrusion prevention via G-Code.


Posted by Uli Köhler in 3D printing, Embedded, Raspberry Pi