Networking

How to check SSL/TLS certificate expiry using openssl

Use the following command to check the expiry date of a SSL/TLS certificate. This command also includes SNI (server name indication)

echo | openssl s_client -connect techoverflow.net:443 2>&1 | sed --quiet '/-BEGIN CERTIFICATE-/,/-END CERTIFICATE-/p' | openssl x509 -noout -text | grep --after 2 Validity

Remember to replace both instances of techoverflow.net by the domain name to test!

Example output:

Validity
    Not Before: Aug 18 00:00:00 2021 GMT
    Not After : Aug 17 23:59:59 2022 GMT


Posted by Uli Köhler in Linux, Networking

How to view active calls details on FreePBX

Just want to know how many active calls are going on and not interested in the details? See How to view number of active calls on FreePBX

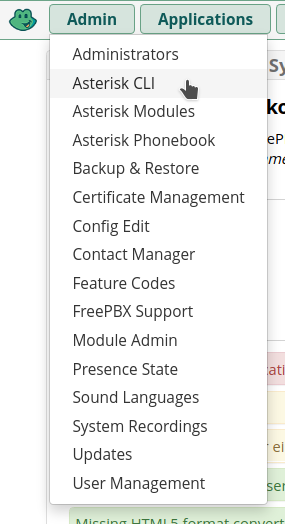
In order to view the details of ongoing calls on FreePBX, go to Admin -> Asterisk CLI

and enter

core show channels verbose

Now click Send command on the right:

This will display, for example

Channel              Context              Extension        Prio State   Application  Data                      CallerID        Duration Accountcode PeerAccount BridgeID
PJSIP/MyTrunk-4924   from-sip-external                        1 Up      AppDial      (Outgoing Line)           015212345678    00:00:28                         4e5accae-8a9c-48bb-b
PJSIP/123-0000000e   macro-dialout-trunk  s                  27 Up      Dial         PJSIP/01521234567@MyTrunk 492468024123    00:00:28                         4e5accae-8a9c-48bb-b
2 active channels
1 active call
8 calls processed

In the example shown, a PJSIP client (phone) registered as extension 123, calls out on a PJSIP trunk line named MyTrunk-492468024123, calling the PSTN number 015212345678.

Posted by Uli Köhler in FreePBX

How to view number of active calls on FreePBX

Also want to see call details like which extension is calling which number, call duration and which trunks are being used? See How to view active calls details on FreePBX instead.

In order to view how many calls are active concurrently on FreePBX, go to Admin -> Asterisk CLI

and enter

core show calls

Now click Send command on the right:

This will display, for example

1 active call
6 calls processed

indicating that one call is currently going on.

If no calls are currently in process, it will display

0 active calls
6 calls processed


Posted by Uli Köhler in FreePBX

How to replace string in reverse proxy HTTP request using Lua & nginx

You can use access_by_lua_block in order to replace arbitrary strings in an nginx request. Note: This will replace in the request to the reverse proxy, not in the response from the reverse proxy. See How to replace HTTP response data in nginx using lua for a Lua-based approach on how to replace a string in the response.

access_by_lua_block {
    ngx.req.read_body()
    local body = ngx.req.get_body_data()
    if body then
        body = ngx.re.gsub(body, "string_to_replace", "string_by_which_to_replace")
    end
    ngx.req.set_body_data(body)
}

This is typically used in a location {} block so you can just replace when a specific set of URLs is accessed:

location /config {
   proxy_pass http://127.0.0.1:12345/;
    proxy_set_header X-Forwarded-For $remote_addr;

    access_by_lua_block {
       ngx.req.read_body()
       local body = ngx.req.get_body_data()
       if body then
            body = ngx.re.gsub(body, "myvar", "myothervar")
       end
       ngx.req.set_body_data(body)
    }
}


Posted by Uli Köhler in nginx

How to replace HTTP response data in nginx using lua

This is an example of how to use body_filter_by_lua_block to replace parts of the response by a string. Note that since it’s a Lua feature, you’ll be able to use arbitrary code when modifying the body, including network requests, parsing etc. Note: This will replace in the response send to the client, not in the request sent to the the reverse proxy. See How to replace string in reverse proxy HTTP request using Lua & nginx for a Lua-based approach on how to replace a string in the request.

header_filter_by_lua_block { ngx.header.content_length = nil }
body_filter_by_lua_block {
        local body = ngx.arg[1]
        if body then
                body = ngx.re.gsub(body, "string_to_replace", "string_by_which_to_replace")
        end
        ngx.arg[1] = body
}

This is typically used in a location {} block to only replace strings for specific sets of URLs:

location /config {
   proxy_pass http://127.0.0.1:12345/;
    proxy_set_header X-Forwarded-For $remote_addr;
    proxy_set_header Host meet.techoverflow.net;

    header_filter_by_lua_block { ngx.header.content_length = nil }
    body_filter_by_lua_block {
            local body = ngx.arg[1]
            if body then
                    body = ngx.re.gsub(body, "myvar", "myothervar")
            end
            ngx.arg[1] = body
    }
}


Posted by Uli Köhler in nginx

How to add multiple VLANs over single network interface to Synology DSM

Update: This approach works for both Synology DSM version 6.x and 7.x (tested with 6.2 and 7.0). In DSM 7, you won’t see the added network interfaces in the control panel.

I have a Synology NAS running Synology DSM 7. Since I’m running multiple VLANs over a single 10 Gbit/s Ethernet Link, I want the NAS to have multiple sub-network-interfaces. For example, I want it to have not only eth5 (no VLAN) but also eth5.200 for VLAN 200.

In order to do this, I created /usr/local/etc/rc.d/vlan.sh which will be run on NAS startup (most methods described on Synology forums didn’t work for me).

#!/bin/sh
insmod /lib/modules/8021q.ko
ip link del eth5.200

ip link add link eth5 name eth5.200 type vlan id 200
ip addr add 10.82.66.1/24 brd 10.82.66.255 dev eth5.200
ip link set dev eth5.200 up

You will also see those network interfaces in the interface manager (the Synology DSM software will automatically generate config files for them) but they will all be labeled LAN 5, so sometimes you have to click through all of them in order to find the correct one.

In order to setup the interfaces, copy the script to /usr/local/etc/rc.d/vlan.sh, then

sudo chmod +x /usr/local/etc/rc.d/vlan.sh

then run it once using

/usr/local/etc/rc.d/vlan.sh

after which (DSM version 6 only!) you need to configure the IP addresses again in the Synology web interface (just like for any normal network interface).

Adding more VLANs is easy, just repeat all the lines except the insmod line, for example:

#!/bin/sh
insmod /lib/modules/8021q.ko
ip link del eth5.200
ip link del eth5.201

ip link add link eth5 name eth5.200 type vlan id 200
ip addr add 10.82.66.1/24 brd 10.82.66.255 dev eth5.200
ip link set dev eth5.200 up

ip link add link eth5 name eth5.201 type vlan id 201
ip addr add 10.82.67.1/24 brd 10.82.67.255 dev eth5.201
ip link set dev eth5.201 up

This approach using vlan.sh turned out to be both reboot-safe and update-safe, although so far I have not performed the upgrade to Synology DSM 7.x
Posted by Uli Köhler in Linux, Networking

tcpdump capture traffic from & to specific host

tcpdump -i enp3s0 'host 192.168.178.32' -w /tmp/mydump.pcap
Posted by Uli Köhler in Networking

tcpdump capture on specific port

tcpdump -i enp3s0 'port 8918' -w /tmp/mydump.pcap


Posted by Uli Köhler in Networking

Oracle Cloud free tier VM.Standard.E2.1.Micro /proc/cpuinfo

processor       : 0
vendor_id       : AuthenticAMD
cpu family      : 23
model           : 1
model name      : AMD EPYC 7551 32-Core Processor
stepping        : 2
microcode       : 0x1000065
cpu MHz         : 1996.246
cache size      : 512 KB
physical id     : 0
siblings        : 2
core id         : 0
cpu cores       : 1
apicid          : 0
initial apicid  : 0
fpu             : yes
fpu_exception   : yes
cpuid level     : 13
wp              : yes
flags           : fpu vme de pse tsc msr pae mce cx8 apic sep mtrr pge mca cmov pat pse36 clflush mmx fxsr sse sse2 ht syscall nx mmxext fxsr_opt pdpe1gb rdtscp lm rep_good nopl cpuid extd_apicid tsc_known_freq pni pclmulqdq ssse3 fma cx16 sse4_1 sse4_2 x2apic movbe popcnt tsc_deadline_timer aes xsave avx f16c rdrand hypervisor lahf_lm cmp_legacy cr8_legacy abm sse4a misalignsse 3dnowprefetch osvw topoext perfctr_core ssbd ibpb vmmcall fsgsbase tsc_adjust bmi1 avx2 smep bmi2 rdseed adx smap clflushopt sha_ni xsaveopt xsavec xgetbv1 xsaves clzero xsaveerptr virt_ssbd arat arch_capabilities
bugs            : sysret_ss_attrs null_seg spectre_v1 spectre_v2 spec_store_bypass
bogomips        : 3992.49
TLB size        : 1024 4K pages
clflush size    : 64
cache_alignment : 64
address sizes   : 40 bits physical, 48 bits virtual
power management:

processor       : 1
vendor_id       : AuthenticAMD
cpu family      : 23
model           : 1
model name      : AMD EPYC 7551 32-Core Processor
stepping        : 2
microcode       : 0x1000065
cpu MHz         : 1996.246
cache size      : 512 KB
physical id     : 0
siblings        : 2
core id         : 0
cpu cores       : 1
apicid          : 1
initial apicid  : 1
fpu             : yes
fpu_exception   : yes
cpuid level     : 13
wp              : yes
flags           : fpu vme de pse tsc msr pae mce cx8 apic sep mtrr pge mca cmov pat pse36 clflush mmx fxsr sse sse2 ht syscall nx mmxext fxsr_opt pdpe1gb rdtscp lm rep_good nopl cpuid extd_apicid tsc_known_freq pni pclmulqdq ssse3 fma cx16 sse4_1 sse4_2 x2apic movbe popcnt tsc_deadline_timer aes xsave avx f16c rdrand hypervisor lahf_lm cmp_legacy cr8_legacy abm sse4a misalignsse 3dnowprefetch osvw topoext perfctr_core ssbd ibpb vmmcall fsgsbase tsc_adjust bmi1 avx2 smep bmi2 rdseed adx smap clflushopt sha_ni xsaveopt xsavec xgetbv1 xsaves clzero xsaveerptr virt_ssbd arat arch_capabilities
bugs            : sysret_ss_attrs null_seg spectre_v1 spectre_v2 spec_store_bypass
bogomips        : 3992.49
TLB size        : 1024 4K pages
clflush size    : 64
cache_alignment : 64
address sizes   : 40 bits physical, 48 bits virtual
power management:


Posted by Uli Köhler in Cloud, Networking

How to disable virtual cloud network firewall on Oracle Cloud

When running VM instances on Oracle Cloud, you might want to use all ports, not just the few ports that are open by default. This post shows how to disable the Virtual Cloud Network firewall altogether. Additionally, you need to configure the instance firewall e.g. via SSH. For Ubuntu, see How to disable instance firewall on Ubuntu on Oracle Cloud.

You need to use firefox to access the UI. It will not work in chrome!

First login to the cloud network dashboard at https://cloud.oracle.com/networking/vcns

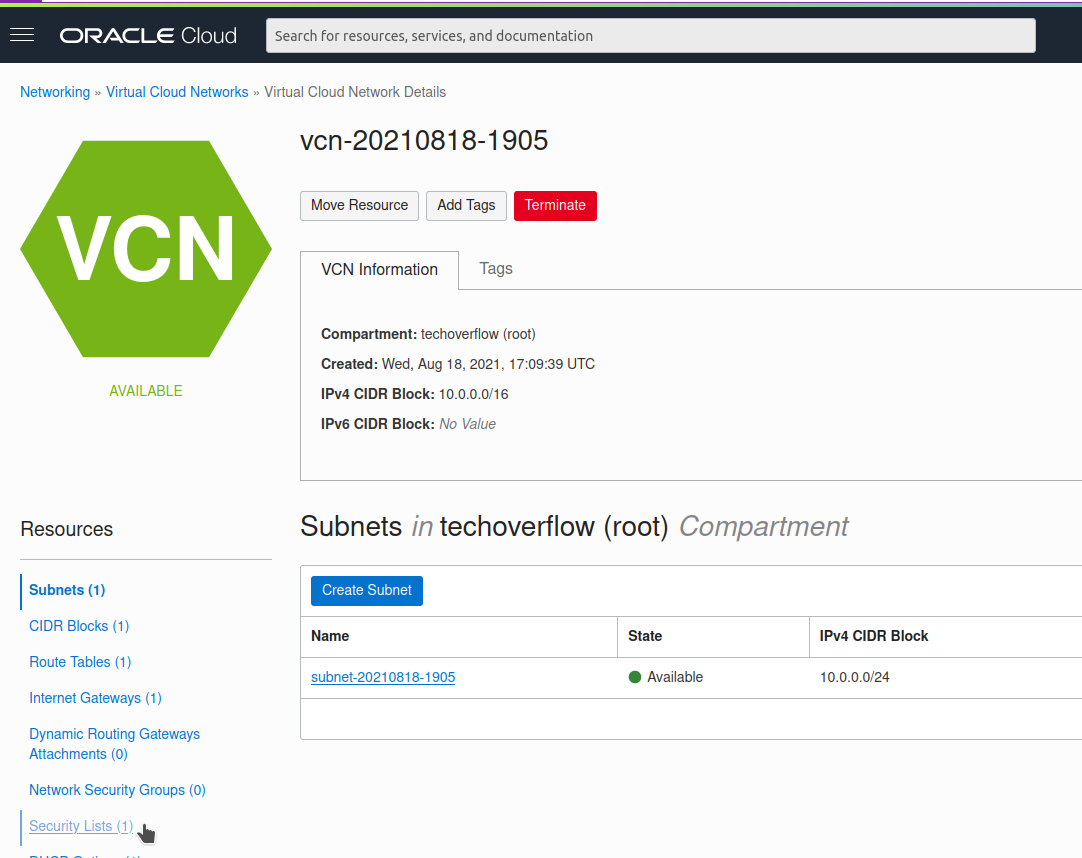
Now click the virtual cloud network:

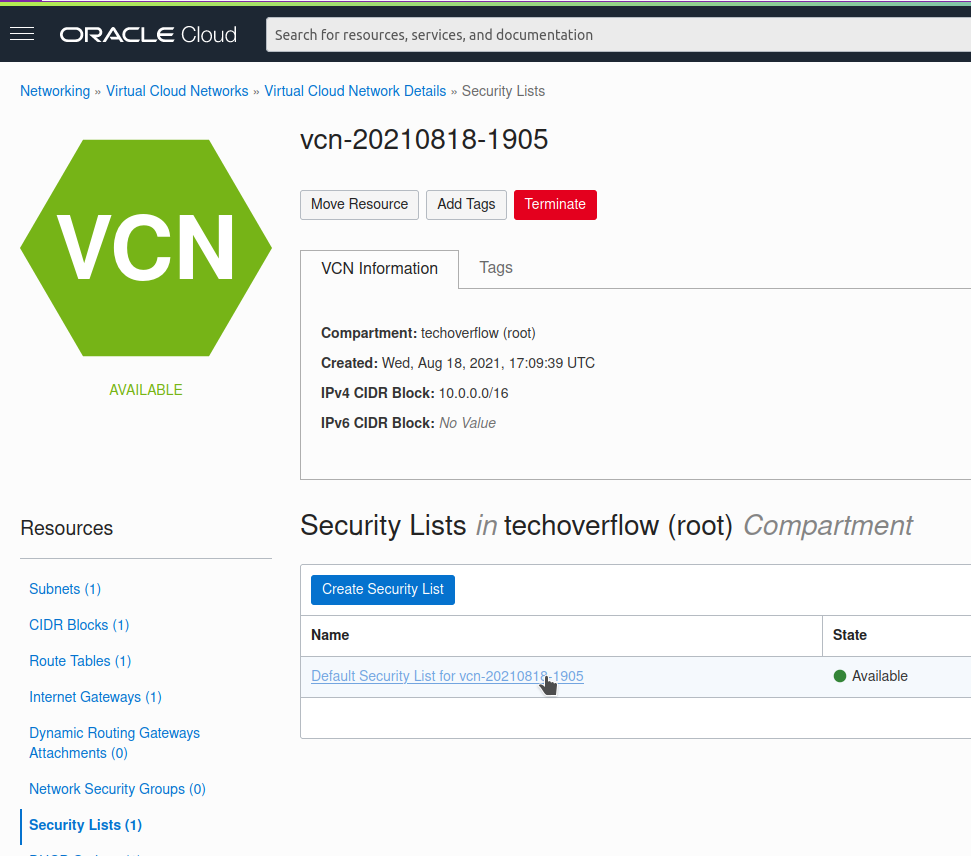
Now click Security lists on the bottom left:


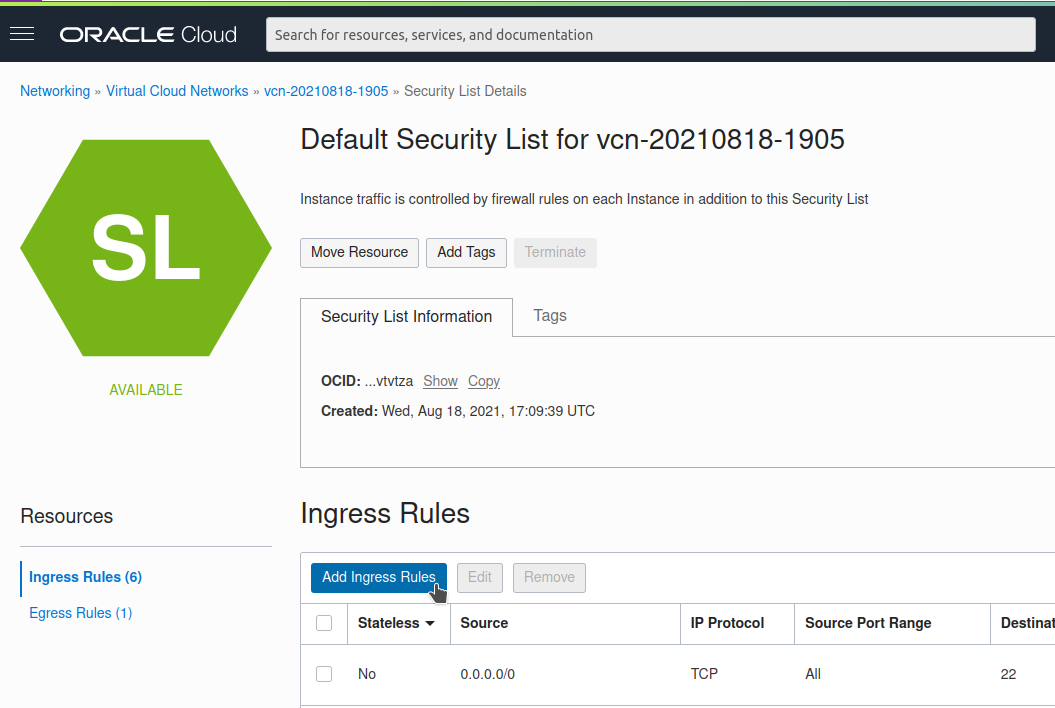
Click the Default security list (which has been automatically created)

Click Add Ingress Rules

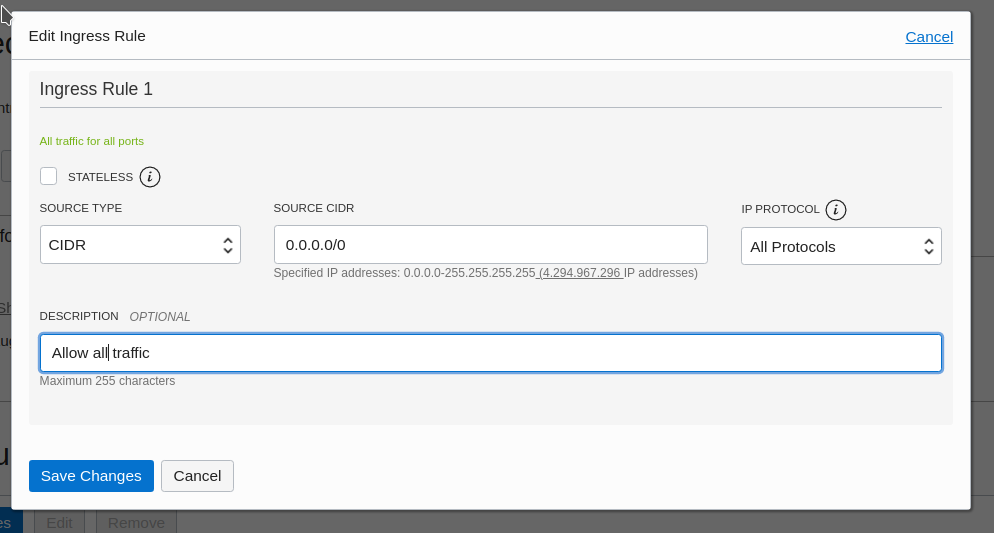
Enter source 0.0.0.0/0 (i.e. all IP addresses) and IP protocol All protocols:

Now click Save changes and don’t forget to configure your instance firewall

Posted by Uli Köhler in Cloud, Networking

How to automatically re-resolve DNS in Wireguard on Linux

When installing wireguard-tools on Linux, it includes a script called reresolve-dns.sh. This will take care of automatically re-resolving.

According to its documentation, you should run it every 30 seconds or so.

So we can just create a systemd timer to run it every 30 seconds.

Easy way

Use our script

wget -qO- https://techoverflow.net/scripts/install-wireguard-reresolve-dns.sh | sudo bash /dev/stdin

Now you need to enable it for each relevant interface separately, for example for wg0:

systemctl enable --now [email protected]

Hard way

Do manually what our script does.

Create /etc/systemd/system/[email protected]:

[Unit]
Description=wg-reresolve-dns@

[Service]
Type=oneshot
ExecStart=/usr/share/doc/wireguard-tools/examples/reresolve-dns/reresolve-dns.sh %i

Create /etc/systemd/system/[email protected]:

[Unit]
Description=wg-reresolve-dns@ timer
[Timer]
Unit=wg-reresolve-dns@%i.service
OnCalendar=*-*-* *:*:00,30
Persistent=true
[Install]
WantedBy=timers.target

Now you need to enable it for each relevant interface separately, for example for wg0:

systemctl enable --now [email protected]
Posted by Uli Köhler in Networking, systemd, VPN, Wireguard

How to disable instance firewall on Ubuntu on Oracle Cloud

Note: This describes how to disable the firewall on an Ubuntu instance. You additionally need to configure the cloud network security list! See How to disable virtual cloud network firewall on Oracle Cloud for details!

The Oracle firewall is iptables based. We can disable the Ubuntu instance firewall using

sudo iptables -F
sudo netfilter-persistent save

Explanation:

  • iptables -F: Flush (remove all) iptables rules
  • netfilter-persistent save Save empty ruleset to disk so it will be reloaded on reboot.
Posted by Uli Köhler in Cloud, Networking

What does rport without port number mean in SIP

When you have a SIP Via: header like

Via: SIP/2.0/UDP 95.117.121.206:18050;rport;branch=z9hG4bKabc123

the rport parameter means respond to the port from which the request was received

This is extremely useful in case of NAT traversal because you don’t know upfront which outgoing NAT port your packets will be mapped to.

Posted by Uli Köhler in Networking

Python raw TCP client minimal example & cheatsheet

import socket

try:
    # Initialize socket
    sock = socket.socket(socket.AF_INET, socket.SOCK_STREAM)
    sock.connect(("192.168.238.1", 12345))
    
    # Example: Send
    sock.send(b"abc123abc")

    # Example: Receive with timeout
    sock.settimeout(0.1)
    data = sock.recv(2048)
finally:
    sock.close()


Posted by Uli Köhler in Networking, Python

Wie kann man sip.alice-voip.de DNS-IP ohne O2-Nameserver auflösen?

Aktuell ist die IP-Addresse von sip.alice-voip.de nur über die offiziellen O2-DNS-Server auflösbar. Für viele Anwendungen ist es jedoch sinnvoll oder möglich, nicht die DNS-Server von O2 zu nutzen und trotzdem muss sip.alice-voip.de korrekt aufgelöst werden.

TechOverflow publiziert aus diesem Grund die IP-Addrese von sip.alice-voip.de unter dem Domainnamen sip.alice-voip.de.techoverflow.net, um die reibungslose Zusammenarbeit zwischen IT-Systemen zu ermöglichen – so können beispielsweise. Beispielsweise.

Aktuell ist es unbekannt, ob die IP-Addresse von allen O2-Anschlüssen gleich aufgelöst wird. Aus diesem und anderen Gründen wird keinerlei Gewähr für die Richtigkeit oder Funktionalität der publizierten IP-Addresse übernommen. Wessen Prozesse von der Richtigkeit der IP-Addresse abhängen, sollte (wie unten beschrieben) selbst einen FlareDNS-Updater für seine eigene Domain hosten.

Selbst hosten

Die IP-Addresse wird mithilfe des FlareDNS-Beispiels CopyDNS.py alle 2 Minuten vollautomatisch aktualisiert, falls sie sich ändern sollte.

docker run --network host --rm --name FlareDNS-sip.alice-voip.de ulikoehler/flaredns:latest python CopyDNS.py --email [email protected] --api-key c6c94fd52184dcc783c5ec1d5089ec354b9d9 --hostname sip.alice-voip.de.techoverflow.net -q sip.alice-voip.de -s 192.168.178.1 --ipv4 --interval 120 --debug

Dieses Skript wird automatisch per systemd ausgeführt:

[Unit]
Description=FlareDNS DyDNS update for domain sip.alice-voip.de.techoverflow.net
Requires=docker.service
After=docker.service

[Service]
ExecStart=/usr/bin/env docker run --network host --rm --name FlareDNS-sip.alice-voip.de ulikoehler/flaredns:latest python CopyDNS.py --email [email protected] --api-key c6c94fd52184dcc783c5ec1d5089ec354b9d9 --hostname sip.alice-voip.de.techoverflow.net -q sip.alice-voip.de -s 192.168.178.1 --ipv4 --interval 120 --debug
WorkingDirectory=/opt/FlareDNS
Restart=always
User=root
Group=docker

[Install]
WantedBy=multi-user.target


Posted by Uli Köhler in FreePBX, Networking

How to DNS query specific nameservers in Python

In networking, you sometimes need to resolve a hostname using a specific nameserver, be it for testing purposes or because some hostnames are only resolveable internally.

This can be done using dnspython which you can install using pip3 install dnspython.

The following example illustrates the easiest way of performing a query.

import dns.resolver

def dns_query_specific_nameserver(query="techoverflow.net", nameserver="1.1.1.1", qtype="A"):
    """
    Query a specific nameserver for:
    - An IPv4 address for a given hostname (qtype="A")
    - An IPv6 address for a given hostname (qtype="AAAA")
    
    Returns the IP address as a string
    """
    resolver = dns.resolver.Resolver(configure=False)
    resolver.nameservers = [nameserver]
    answer = resolver.resolve(query, qtype)

    if len(answer) == 0:
        return None
    else:
        return str(answer[0])
    
# NOTE: May throw dns.resolver.NXDOMAIN, dns.resolver.NoAnswer or similar

# IPv4 Usage example
dns_query_specific_nameserver(qtype="A") # e.g. '172.67.166.211'
# IPv6 usage example
dns_query_specific_nameserver(qtype="AAAA") # e.g. '2606:4700:3035::ac43:a6d3'


Posted by Uli Köhler in Networking, Python

How are SIP messages terminated?

SIP messages are terminated by \r\n\r\n (CRLFCRLF). Note that SIP message use \r\n (CRLF) and not just \n(CRLF)!

Posted by Uli Köhler in Networking

How to get external IPv6 address in Python

Also see: How to get external IPv4 address in Python

You can use the free IPify service together with requests to get your current external IPv6 address. Note that this will only work if IPv6 is enabled on the host running the script, and it has a valid IPv6 configuration. Most notably, on Docker containers it will typically only work in network_mode: host:

#!/usr/bin/env python3
import requests

def get_current_ipv6():
    """Get the current external IPv6 address or return None if no connection to the IPify service is possible"""
    try:
        return requests.get("https://api6.ipify.org", timeout=5).text
    except requests.exceptions.ConnectionError as ex:
        return None

# Usage example
print(get_current_ipv6()) # Prints e.g. 2a01:4f9:c010:278::1
Posted by Uli Köhler in Networking, Python

How to get external IPv4 address in Python

Also see: How to get external IPv6 address in Python

You can use the free IPify service together with requests to get your current IPv4 address:

#!/usr/bin/env python3
import requests

def get_current_ipv4():
    """Get the current external IPv4 address or return None if no connection to the IPify service is possible"""
    try:
        return requests.get("https://api4.ipify.org", timeout=5).text
    except requests.exceptions.ConnectionError as ex:
        return None

# Usage example
print(get_current_ipv4()) # Prints e.g. 95.216.138.188


Posted by Uli Köhler in Networking, Python

How to use Cloudflare API key instead of token in Python Cloudflare API

Problem:

You want to access Cloudflare using the Cloudflare Python API like this:

#!/usr/bin/env python3
import CloudFlare
cf = CloudFlare.CloudFlare(
    email="[email protected]",
    token="Oochee3_aucho0aiTahc8caVuak6Que_N_Aegi9o"
)
# ...

but when you try to use the key=... argument like this:

cf = CloudFlare.CloudFlare(
    email="[email protected]",
    key="Oochee3_aucho0aiTahc8caVuak6Que_N_Aegi9o"
)

you see this error message:

Traceback (most recent call last):
  File "run.py", line 4, in <module>
    cf = CloudFlare.CloudFlare(
TypeError: __init__() got an unexpected keyword argument 'key'

Solution:

Just use the key in the token=... argument like this:

cf = CloudFlare.CloudFlare(
    email="[email protected]",
    token="[YOUR API KEY]"
)

This usage is officially documented in the README section of the Cloudflare API.

Posted by Uli Köhler in Networking, Python