Networking

How to fix Python Cloudflare CloudFlare.exceptions.CloudFlareAPIError: no token defined

Problem:

You want to run a program using the Cloudflare API, e.g. this example code:

#!/usr/bin/env python3
import CloudFlare

cf = CloudFlare.CloudFlare({
    "email": "[email protected]",
    "token": "Oochee3_aucho0aiTahc8caVuak6Que_N_Aegi9o" 
})
zones = cf.zones.get()
for zone in zones:
    zone_id = zone['id']
    zone_name = zone['name']
    print(zone_id, zone_name)

But when trying to run it, you see the following error message:

Traceback (most recent call last):
  File "run.py", line 8, in 
    zones = cf.zones.get()
  File "/usr/local/lib/python3.8/dist-packages/CloudFlare/cloudflare.py", line 672, in get
    return self._base.call_with_auth('GET', self._parts,
  File "/usr/local/lib/python3.8/dist-packages/CloudFlare/cloudflare.py", line 117, in call_with_auth
    self._AddAuthHeaders(headers, method)
  File "/usr/local/lib/python3.8/dist-packages/CloudFlare/cloudflare.py", line 90, in _AddAuthHeaders
    raise CloudFlareAPIError(0, 'no token defined')
CloudFlare.exceptions.CloudFlareAPIError: no token defined

Solution:

You are using the wrong syntax to give arguments to CloudFlare.CloudFlare(), use email=… and token=… arguments directly instead of using a dict!

cf = CloudFlare.CloudFlare(
    email="[email protected]",
    token="Oochee3_aucho0aiTahc8caVuak6Que_N_Aegi9o"
)

Note that you can’t do all operations with all tokens and if you perform an operation that is not possible with your token, you’ll see an error message like CloudFlare.exceptions.CloudFlareAPIError: Invalid request headers
Posted by Uli Köhler in Networking, Python

How to fix Python Cloudflare CloudFlare.exceptions.CloudFlareAPIError: no email and no token defined

Problem:

You want to run a program using the Cloudflare API, e.g. this example code:

#!/usr/bin/env python3
import CloudFlare

cf = CloudFlare.CloudFlare()
zones = cf.zones.get()
for zone in zones:
    zone_id = zone['id']
    zone_name = zone['name']
    print(zone_id, zone_name)

But when trying to run it, you see the following error message:

Traceback (most recent call last):
  File "test-cloudflare-api.py", line 5, in <module>
    zones = cf.zones.get()
  File "/usr/local/lib/python3.8/dist-packages/CloudFlare/cloudflare.py", line 672, in get
    return self._base.call_with_auth('GET', self._parts,
  File "/usr/local/lib/python3.8/dist-packages/CloudFlare/cloudflare.py", line 117, in call_with_auth
    self._AddAuthHeaders(headers, method)
  File "/usr/local/lib/python3.8/dist-packages/CloudFlare/cloudflare.py", line 88, in _AddAuthHeaders
    raise CloudFlareAPIError(0, 'no email and no token defined')
CloudFlare.exceptions.CloudFlareAPIError: no email and no token defined

Solution:

The Cloudflare API is missing the credentials you use to login. The easiest way to call the API with credentials is to initialize CloudFlare.CloudFlare() with the email and token as arguments

cf = CloudFlare.CloudFlare(
    email="[email protected]",
    token="Oochee3_aucho0aiTahc8caVuak6Que_N_Aegi9o"
)

Note that you can’t do all operations with all tokens and if you perform an operation that is not possible with your token, you’ll see an error message like CloudFlare.exceptions.CloudFlareAPIError: Invalid request headers
Posted by Uli Köhler in Networking, Python

Who is client and who is server in Wireguard?

Wireguard doesn’t really use the concept of client and server the same way OpenVPN does. A wireguard interface does not have a fixed role as client or server – think about it like this:

  • A wireguard connection is a link between two peers
  • One wireguard interface can host one or many connections

For a single connection:

  • connection can be considered a client if it knows a fixed endpoint (IP address or hostname) to connect to, i.e. if you have Endpoint set in your wireguard config like this:
    Endpoint = vpn.mydomain.com:31265

    client will take the initiative and send packets to the server without having received any packet from the server beforehand – just like in classical VPNs.

  • connection can be considered a server if it doesn’t have an Endpoint set to connect to. A server will learn which IP address to send packets to once a client has completed the handshake. If a client IP address changes, the server will learn the new IP address as soon as it receives a validated packet from the client.

Most real-world wireguard connections have one client and one server. There are exceptions to this, namely if both endpoints have a static IP address or fixed host name, so both wireguard instances always know which IP address or hostname to send packets to.

Posted by Uli Köhler in Networking, VPN, Wireguard

What to look for in “wg show” output?

This is an example wg show output:

interface: MyVPN
  public key: xJ+A//t9RbOU4ISIr61tsZwc8SPLbLONXhknnU1QvBQ=
  private key: (hidden)
  listening port: 12073

peer: xgmml6wPoe9auL5oGhqScQXLByfrI/1xq3sOJzYaNhE=
  endpoint: 77.55.81.22:23711
  allowed ips: 10.178.212.1/32, 10.39.24.0/24
  latest handshake: 37 seconds ago
  transfer: 948 B received, 1.40 KiB sent
  persistent keepalive: every 30 seconds

This is what I look for:

  • Is the desired wireguard interface present? If not, this indicates that either the computer doesn’t even try to start the interface (e.g. because autostart is not enabled) or starting it fails, for example because the route is already defined
  • Are the desired peers listed? If not, this is always a configuration error
  • Is persistent keepalive enabled? Without persistent keepalive, you will not be able to properly debug Wireguard because no packets will be sent unless some traffic is going through the interface. Therefore, I strongly recommend to always enable persistent keepalive even if you plan to disable it later!
  • Is latest handshake listed and recent? Not being able to handshake with a remote peer typically indic-ates either a network problem or a configuration problem, but in some cases it’s also a system-related problem:
    • System problems: Is wireguard interface on the local & remote side up & configured?
    • Networking problems: Port not forwarded to destination machine, TCP port instead of UDP port forwarded, local or remote internet access is firewalled, incorrect port given, incorrect IP address or hostname given, DynDNS hostname not updated, Wireguard tries to access IPv6 address but only IPv4 port is forwarded properly (check using host)
    • Wireguard configuration problem: Does the remote peer use the correct private key that matches the public key in the local configuration? Does the remote configuration have listed the local public key as peer at all? Does the local configuration have the correct private key that matches the public key listed in the remote config? Does the peer public key match the endpoint (if specified) or maybe the key doesn’t match the endpoint?
  • transfer should show >0 bytes received and sent! This is typically equivalent to the latest handshake debugging method. Bytes being sent but no bytes being received typically indicates that the Wireguard interface is trying to perform an handshake but does not get any reply back.

Also see my WireguardConfig project which makes this kind of configuration much easier

Posted by Uli Köhler in Networking, VPN, Wireguard

Install & autostart Wireguard config on Ubuntu or Debian

We will assume that you already have a wireguard config file, e.g. MyVPN.conf

  1. Copy MyVPN.conf to /etc/wireguard/MyVPN.conf:
    sudo cp MyVPN.conf /etc/wireguard/MyVPN.conf
  2. Start & enable (i.e. autostart) service:
    sudo systemctl enable --now wg-quick@MyVPN
  3. Check if it works using
    sudo wg show

Example wg-show output

interface: MyVPN
  public key: xJ+A//t9RbOU4ISIr61tsZwc8SPLbLONXhknnU1QvBQ=
  private key: (hidden)
  listening port: 12073

peer: xgmml6wPoe9auL5oGhqScQXLByfrI/1xq3sOJzYaNhE=
  endpoint: 77.55.81.22:23711
  allowed ips: 10.178.212.1/32, 10.39.24.0/24
  latest handshake: 37 seconds ago
  transfer: 948 B received, 1.40 KiB sent
  persistent keepalive: every 30 seconds


Posted by Uli Köhler in Networking, VPN, Wireguard

What are “MIB counters” in Ethernet?

In some Ethernet switch or router datasheets you see sentences like

Gathers 34 MIB counters per port

MIB means Management Information Base, that is information that can be used to manage a networking system.

A typical set of MIB counters is:

  • Number of packets received (for each port)
  • Number of packets sent (for each port)
  • Number of bytes transmitted (for each port)
  • Number of bytes received (for each port)
  • Number of packets with faulty CRC received (for each port)
  • Number of unicast packets received (for each port)
  • Number of broadcast packets received (for each port)
  • Number of small packets (<64 bytes) (for each port)
  • Number of small-ish packets (64-127 bytes) (for each port)
  • Number of small-to-medium packets (128-255 bytes) (for each port)
  • Number of medium packets (256-511 bytes) (for each port)
  • Number of medium-to-large packets (512-1023 bytes) (for each port)
  • Number of large packets (1024-1522 bytes) (for each port)
  • Number of CSMA/CD collisions during transmission (for each port)
  • Number of times a single packet had multiple CSMA/CD collisions (for each port)
  • Number of deferred packets (packet had a collision but will be tried again (for each port)
  • Number of packets dropped because buffer is full (for each port where the packet is received)

These can be used to compute other parameters such as the current throughput. For example, to calculate the transmit throughput, use

  • Query number of bytes transmitted, store in variable A
  • Wait 1 second
  • Query number of bytes transmitted again, store in variable B
  • Number of bytes transmitted in that second is (B-A)
  • Throughput is (B-A)/1s
Posted by Uli Köhler in Electronics, Networking

What is the default username/password for guacamole?

The default is:

  • Usernameguacadmin
  • Password: guacadmin
Posted by Uli Köhler in Networking

What does WireGuard AllowedIPs actually do?

Wireguard’s allowed_ips field does two different things. Let’s consider the following WireGuard config (generated by the WireguardConfig Site2Site example):

[Interface]
# Name = office1.mydomain.org
PrivateKey = ......
Address = 10.82.85.1/24
ListenPort = 19628

[Peer]
# Name = office2.mydomain.org
PublicKey = ...
AllowedIPs = 10.82.85.2/32, 192.168.200.0/24
PersistentKeepalive = 60

We can see that for the peer office2.mydomain.org the AllowedIPs field is set to 10.82.85.2/32, 192.168.200.0/24.

AllowedIPs does two things:

  • It adds a route to the given networks, i.e. packets addressed to 10.82.85.2/32 or to 192.168.200.0/24 will be routed through the WireGuard interface to that peer
  • It will allow packets with the source IPs 10.82.85.2/32 or 192.168.200.0/24 to be routed from the given peer on the WireGuard interface

Note especially the second point. Any packet from the given peer with a source IP address which is not listed in AllowedIPs will be discarded! While this does not replace a firewall, it serves a an integral part of Wireguard’s security model.

Posted by Uli Köhler in VPN, Wireguard

How to migrate from OpenVPN to Wireguard for Site-to-Site VPNs

The following diagram will assist you in transitioning your VPNs from OpenVPN to Wireguard.

Many users have difficulties in grasping the allowed_ips concept, even though it’s mostly similar to OpenVPN’s route and the architecture where no. In most usecases, you can consider any WireGuard instance with ListenPort = ... to be a server and any WireGuard instance with Endpoint = ... defined for a given peer as client.

Diagram source

The WireGuard config is available as WireguardConfig example Site2Site.json

Posted by Uli Köhler in OpenVPN, VPN, Wireguard

How to automount CIFS/SMB on Alpine Linux

In order to automatically mount CIFS on boot of an Alpine Linux instance, use a line like this in /etc/fstab:

//1.2.3.4/mydrive /mydrive   cifs uid=1000,gid=1000,credentials=/root/.smb-credentials,iocharset=utf8,noperm 0 0

with a standard /root/.smb-credentials like this:

user=myuser
password=raatahteiC1veiza8ahno8lu5quook

and run the following command to enable automount on boot:

rc-update add netmount boot

After a reboot, the filesystem should mount automatically.

Posted by Uli Köhler in Alpine Linux, Networking

How to autostart Wireguard using systemd (wg-quick)

If you’ve added a wg-quick config, e.g. /etc/wireguard/wg0.conf, you can enable autostarting it on system boot using systemd:

sudo systemctl enable --now wg-quick@wg0

If you have started Wireguard with this config manually before, you need to shut it down first or systemd will not be able to start it !

Posted by Uli Köhler in Networking, systemd, Wireguard

How I connected a network_mode: host container to its database container

I have setup my FreePBX to use network_mode: 'host' but faced issues when it couldn’t connect to the MariaDB container which was not using network_mode: 'host'.

I fixed this by:

  • Setting the MariaDB container to network_mode: 'host'
  • Setting the FreePBX container to connect to 127.0.0.1 (DB_HOST=127.0.0.1). Setting it to localhost did NOT allow FreePBX to connect to MariaDB!
Posted by Uli Köhler in Docker, FreePBX, Networking

What is MikroTik RouterOS WebFig?

WebFig is the Web UI for MikroTik RouterOS routers. When people say to use WebFig for a given task, this typically means to not use the MikroTik terminal.

Posted by Uli Köhler in MikroTik, Networking

How to add RFC1918 address list to MikroTik using terminal

Use these commands to add all RFC1918 networks to a MikroTik RouterOS IP address list:

/ip firewall address-list add address=10.0.0.0/8 list=RFC1918
/ip firewall address-list add address=172.16.0.0/12 list=RFC1918
/ip firewall address-list add address=192.168.0.0/16 list=RFC1918
Posted by Uli Köhler in MikroTik, Networking

Complete list of RFC1918 addresses

RFC1918 defines the following networks as private address spaces:

  • 1.0.0.0/8
  • 172.16.0.0/12
  • 192.168.0.0/16
Posted by Uli Köhler in Networking

How to fix MikroTik RouterOS Couldn’t add New Firewall Address List – … is not a valid dns name (6)

Problem:

If you want to add a MikroTik Address List e.g. for use in firewall rules like this:

you see an error message like

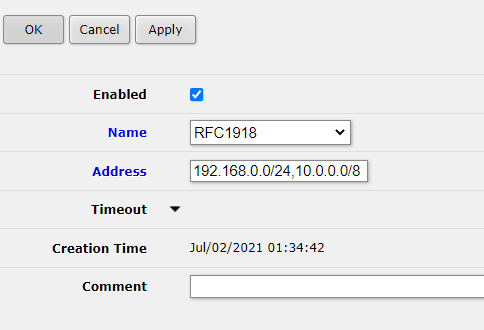
Couldn't add New Firewall Address List - 192.168.0.0/24,10.0.0.0/8 is not a valid dns name (6)

Solution:

You can’t add multiple addresses to an address list at once. The way to add multiple addresses to an address list is to create multiple entries with the same Name.

See our detailed guide on How to add multiple addresses to MikroTik RouterOS address list using WebFig for more details on how to achieve that in WebFig.

Posted by Uli Köhler in MikroTik, Networking

How to add multiple addresses to MikroTik RouterOS address list using WebFig

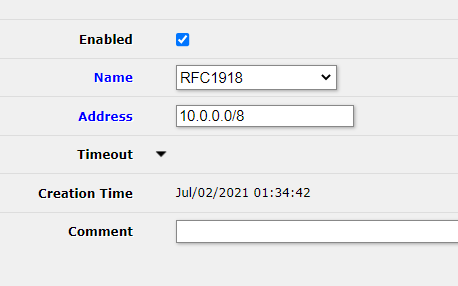
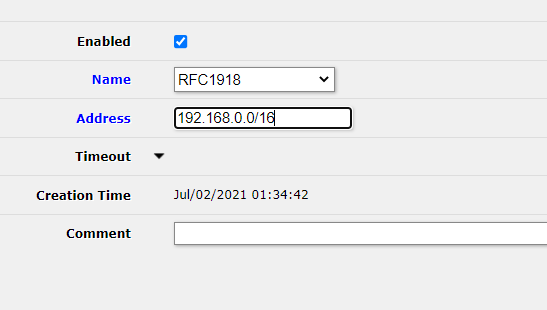
If you are trying to create a MikroTik firewall address list using WebFig (in IP/Firewall), you will see that you can’t just add multiple addresses in the Address field:

How to add multiple addresses

First, add the first address like this:

This will look like this in the Address List view:

Then, add another address with the same name (the comment can be different if you want). You can also select the name using the dropdown for the Name field.

This will look like this in the Address List view:

Our RFC1918 list will now identify both networks 10.0.0.0/8 and 192.168.0.0/16.

Posted by Uli Köhler in MikroTik, Networking

How to run Asterisk command from shell

Use

asterisk -rx "[command]"

to run an Asterisk command (-x) in an already running Asterisk server (-r), for example:

asterisk -rx "core restart now"


Posted by Uli Köhler in FreePBX

How to restart Asterisk in FreePBX

This tutorial will show how to restart the Asterisk service in FreePBX.

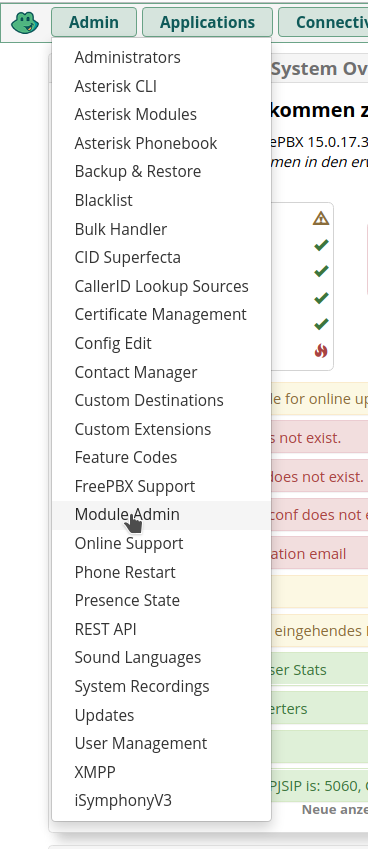
First, you need to install the Asterisk CLI module. In order to do that, login to your FreePBX admin panel and click at the Admin -> Module Admin menu entry.

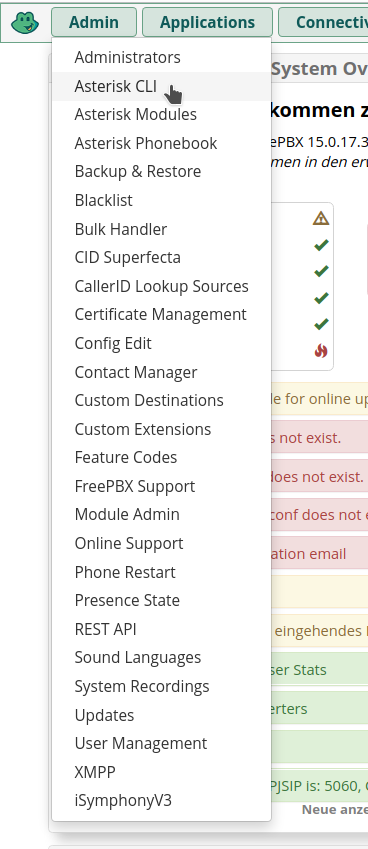
After the module is installed, open Admin -> Asterisk CLI

Now enter one of the following commands

  • If you just want to restart Asterisk immediately, even if that stops ongoing calls, enter
    core restart now

    This is typically used while setting up the PBX

  • If you don’t want to interrupt ongoing calls but you don’t want to admit new calls, use
    core restart gracefully

    Asterisk will restart when all ongoing calls have been finished

  • In case you don’t want to interrupt ongoing calls but still admit new calls to the system, use
    core restart when convenient

    Asterisk will restart at the first opportunity when no calls are in progress

Posted by Uli Köhler in FreePBX

Minimal .ssh/config for passwordless login

The following configuration specifies an SSH key and username to login to a specific machine.

Host 192.168.1.215
  User uli
  IdentityFile /home/uli/.ssh/id_bup
  IdentitiesOnly yes

After you have copied it to ~/.ssh/config, you can just

ssh 192.168.1.215

to the machine, without specifying key or user name

Posted by Uli Köhler in Networking