Networking

How to fix bup bup.client.ClientError: server tunnel returned exit code 255

Problem:

When running bup using the bup remote functionality, e.g. using

bup init -r 192.168.1.215:/var/bup

you see these error messages:

Traceback (most recent call last):                                                                                                                            
  File "/usr/lib/bup/cmd/bup-init", line 45, in <module>                                                                                                      
    cli = client.Client(argv_bytes(opt.remote), create=True)                                                                                                  
  File "/usr/lib/bup/cmd/../bup/client.py", line 108, in __init__                                                                                             
    self._available_commands = self._get_available_commands()                                                                                                 
  File "/usr/lib/bup/cmd/../bup/client.py", line 181, in _get_available_commands                                                                              
    raise ClientError('unexpected help header ' + repr(line))                                                                                                 
bup.client.ClientError: unexpected help header b''                                                                                                            
Exception ignored in: <function Client.__del__ at 0x7fa7d7e2bb80>                                                                                             
Traceback (most recent call last):                                                                                                                            
  File "/usr/lib/bup/cmd/../bup/client.py", line 122, in __del__                                                                                              
    self.close()                                                                                                                                              
  File "/usr/lib/bup/cmd/../bup/client.py", line 147, in close                                                                                                
    raise ClientError('server tunnel returned exit code %d' % rv)                                                                                             
bup.client.ClientError: server tunnel returned exit code 255

Solution

You need to accept the remote host key and setup passwordless login, else bup won’t be able to connect to the host using SSH.

Just SSH to the host without username (since bup will not use an explicit username either):

ssh 192.168.1.215

If you see a prompt like

The authenticity of host '10.11.12.15 (10.11.12.15)' can't be established.
ECDSA key fingerprint is SHA256:ZaIJ51uHwI9Q3i/CKdjF3Erwt27CjQqa4YL45UV5rwM.
Are you sure you want to continue connecting (yes/no/[fingerprint])? 

enter yes and press return.

If you see a password prompt, you have not setup SSH correctly.

I use the following ~/.ssh/config on the bup client:

Host 192.168.1.215
  User bup
  IdentityFile /home/uli/.ssh/id_bup
  IdentitiesOnly yes

and I have copy-&-pasted the content of /home/uli/.ssh/id_bup.pub to /home/bup/.ssh/authorized_keys on the bup server in order to setup passwordless login.
Posted by Uli Köhler in Networking

How to fix bup remote sh: bup: not found

Problem:

When running bup using the bup remote function, e.g.

bup init -r 192.168.1.215:/var/bup

you see an error like

sh: bup: not found                                                                                                                                            
Traceback (most recent call last):                                                                                                                            
  File "/usr/lib/bup/cmd/bup-init", line 45, in <module>                                                                                                      
    cli = client.Client(argv_bytes(opt.remote), create=True)                                                                                                  
  File "/usr/lib/bup/cmd/../bup/client.py", line 108, in __init__                                                                                             
    self._available_commands = self._get_available_commands()                                                                                                 
  File "/usr/lib/bup/cmd/../bup/client.py", line 181, in _get_available_commands                                                                              
    raise ClientError('unexpected help header ' + repr(line))                                                                                                 
bup.client.ClientError: unexpected help header b''

Solution

First, login using SSH to your server and check if bup is installed by running

bup

Example output:

Usage: bup [-?|--help] [-d BUP_DIR] [--debug] [--profile] <command> [options...]

Common commands:
    fsck       Check backup sets for damage and add redundancy information
    ftp        Browse backup sets using an ftp-like client
    fuse       Mount your backup sets as a filesystem
[...]

If that works, you need to ensure bup is located at /usr/bin/bup !

Run

which bup

to find out where bup is located.

If, for example, it’s at /usr/local/bin/bup, you need to symlink it to /usr/bin/bup:

ln -sf /usr/local/bin/bup /usr/bin/bup
Posted by Uli Köhler in Networking

What is DTMF playback?

DTMF – also called tone dialling – is when a phone number is being dialled by tones at a specific frequency. Each number key on the phone is assigned a combination of two specific tones that are played when the key is being pressed.
DTMF is a newer version of dialing over analog lines, compared to the older pulse dialing method.

DTMF playback controls, if your phone plays the characteristic tone for each.

If DTMF playback is enabled, every time you press a number key on your phone, you will hear the characteristic tone for that key.

If DTMF playback is disabled, you will not hear a DTMF tone while pressing the number keys on your phone.

Posted by Uli Köhler in Networking

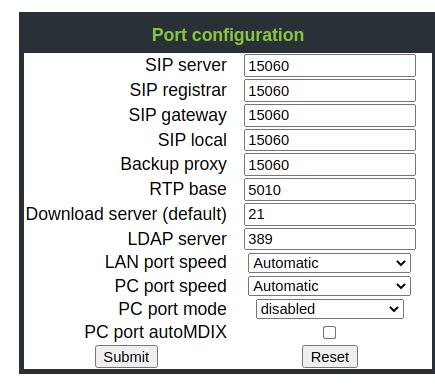
How to configure SIP server port on OpenStage 40

The OpenStage 40 SIP phone supports SIP port configuration using

Admin -> Network -> Port settings


Posted by Uli Köhler in Networking

How to change SIP port in FreePBX

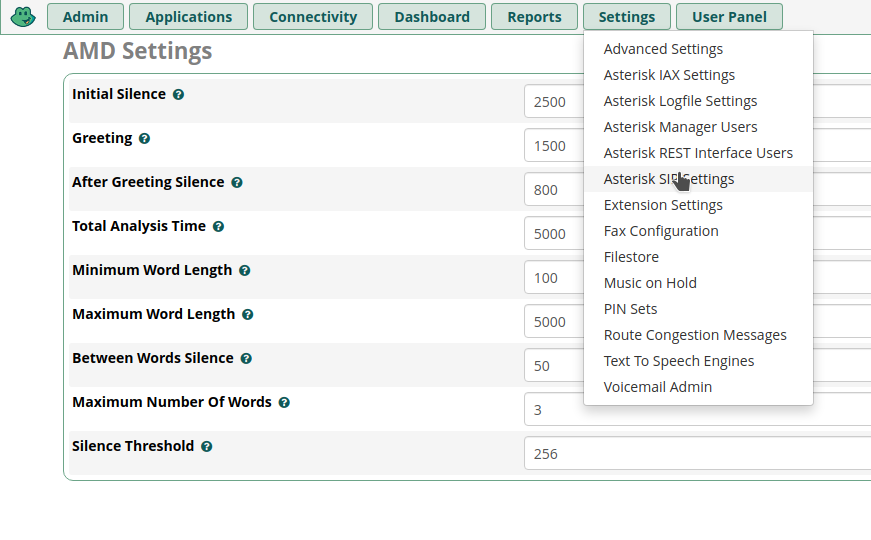
In order to change the SIP port for chan_pjsip from the default port 5060 to a custom value first go to Settings => Asterisk SIP Settings

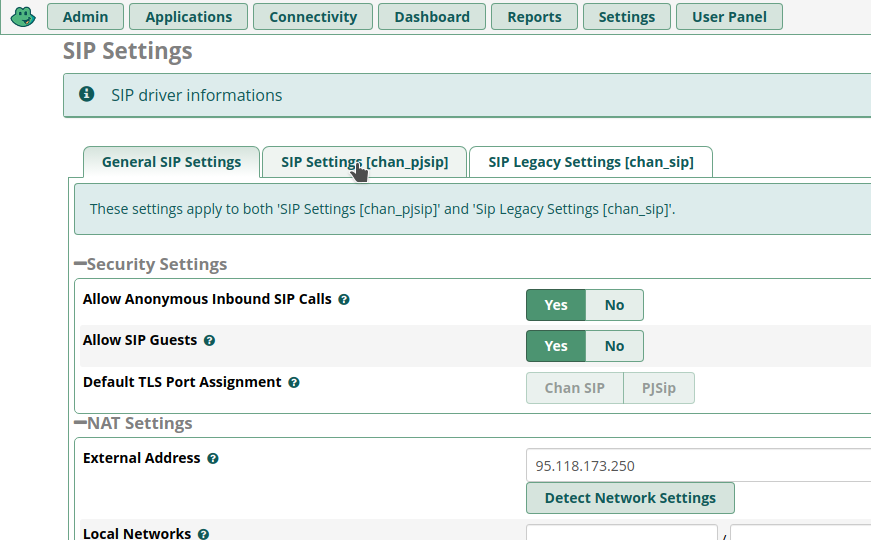
Then go to the SIP settings [chan_pjsip] tab:

Now scroll down to the bottom of the page and look for

Change it to the desired port, e.g. 15060

click Submit on the bottom right

After that, don’t forget to click Apply Config on the top right

You also need to Restart Asterisk after the change.

Posted by Uli Köhler in FreePBX

How to fix pfSense FreeRADIUS Login incorrect (eap_peap: TLS Alert read:fatal:access denied)

Problem:

When trying to login using WPA-EAP or 802.1X using the RADIUS protocol for authentication, you see an error message like

(235) Login incorrect (eap_peap: TLS Alert read:fatal:access denied): [uli/<via Auth-Type = eap>] (from client APs port 0 cli 98-55-2B-A9-76-B9)

Solution:

The issue in my case was that the CA certificate was not valid any more. Go to

Services => FreeRADIUS => EAP

and scroll down to Certificates for TLS

You need to choose correct, valid certificates for both the SSL CA Certificate and the SSL Server Certificate. The CA must be the CA that issued the server certificate. It is recommended to use self-signed certificates for RADIUS EAP.

Posted by Uli Köhler in Networking

How to fix FreePBX 15 The Module Named “manager” is required.

Problem:

When trying to install a FreePBX 15 module like Asterisk REST Interface Users you see the error message

The Module Named "manager" is required.

but you can’t find the manager module in the module list

Solution:

As you can see in module.xml in manager’s GitHub repository (which you can find easily by just googling FreePBX manager), the module is called

Asterisk API

Note that you can just click on the The Module Named "arimanager" is required. message if you disable your AdBlocker.

Posted by Uli Köhler in FreePBX

How to fix FreePBX 15 The Module Named “arimanager” is required.

Problem:

When trying to install a FreePBX 15 module like Asterisk Info you see the error message

The Module Named "arimanager" is required.

but you can’t find the arimanager module in the list of available modules.

Solution:

As you can see in module.xml in arimanager’s GitHub repository (which you can find easily by just googling arimanager), the module is called

Asterisk REST Interface Users

In order to install it, you also need the manager module which is called

Asterisk API

Note that you can just click on the The Module Named "arimanager" is required. message if you disable your AdBlocker.

Posted by Uli Köhler in FreePBX

How to ping gateway in ESP32

You can use the ESP32Ping library in order to easily ping the current gateway IP:

if(Ping.ping(WiFi.gatewayIP(), 1)) { // 1: Just one ping
  // TODO What to do on ping succes
  // Example: Print response time 
  Serial.print(Ping.averageTime()); // Unit: ms
  Serial.println(" ms");
} else {
  // TODO What to do if ping failed?
}

Full example:

#include <Arduino.h>
#include <WiFi.h>

#include <ESP32Ping.h>

void waitForWiFiConnectOrReboot(bool printOnSerial=true) {
  uint32_t notConnectedCounter = 0;
  while (WiFi.status() != WL_CONNECTED) {
      delay(100);
      if(printOnSerial) {
        Serial.println("Wifi connecting...");
      }
      notConnectedCounter++;
      if(notConnectedCounter > 50) { // Reset board if not connected after 5s
          if(printOnSerial) {
            Serial.println("Resetting due to Wifi not connecting...");
          }
          ESP.restart();
      }
  }
  if(printOnSerial) {
    // Print wifi IP addess
    Serial.println("IP address: ");
    Serial.println(WiFi.localIP());
  }
}

#define LED_BUILTIN 2

void setup() {
  Serial.begin(115200);
  WiFi.begin("MyWifiSSID", "MyWifiPassword");
  // Wait for wifi to be connected
  waitForWiFiConnectOrReboot();
  // Initialize LED
  pinMode(LED_BUILTIN,OUTPUT);
}

void loop() {
  if(Ping.ping(WiFi.gatewayIP())) {
    digitalWrite(LED_BUILTIN,HIGH);
    Serial.print(Ping.averageTime());
    Serial.println(" ms");
  } else {
    digitalWrite(LED_BUILTIN, LOW);
    Serial.println("Error :(");
  }

}

Example output

6.12 ms
5.12 ms
5.11 ms
5.16 ms
4.95 ms
4.88 ms
4.84 ms
7.67 ms
5.01 ms
4.87 ms
4.81 ms
4.80 ms
4.85 ms
5.08 ms
5.76 ms
4.54 ms
5.12 ms
2.77 ms
4.88 ms
4.84 ms
6.07 ms
5.08 ms
4.91 ms
6.04 ms
4.88 ms
4.98 ms
6.43 ms
8.18 ms
4.93 ms
5.17 ms
4.97 ms
5.46 ms
5.88 ms
4.78 ms
4.88 ms
6.03 ms
4.84 ms
5.70 ms
5.94 ms
7.25 ms
5.07 ms
4.78 ms
5.51 ms
4.99 ms
5.04 ms
4.79 ms
4.94 ms
4.81 ms
5.97 ms
5.85 ms
4.83 ms
4.80 ms
4.80 ms
6.29 ms
4.99 ms
5.04 ms
9.21 ms
5.20 ms
6.05 ms
6.14 ms
5.03 ms
4.90 ms
7.22 ms
5.06 ms
4.94 ms
9.03 ms
5.13 ms
11.97 ms
6.32 ms
6.12 ms
4.92 ms
4.92 ms
6.01 ms
4.96 ms
4.98 ms
4.94 ms
6.08 ms
6.11 ms
4.93 ms
5.05 ms
5.78 ms
4.47 ms
6.28 ms
5.02 ms
5.13 ms
5.11 ms
5.19 ms
8.89 ms
5.76 ms
5.18 ms
8.08 ms
4.97 ms
4.89 ms
4.70 ms
5.40 ms
7.46 ms
5.09 ms
4.95 ms
4.96 ms
5.01 ms
5.01 ms
4.89 ms
6.22 ms
6.76 ms
6.92 ms
6.10 ms
9.61 ms
5.29 ms
6.13 ms
5.15 ms
5.02 ms
5.03 ms
5.01 ms
6.13 ms
4.78 ms
3.90 ms
6.27 ms
8.07 ms
5.94 ms
4.50 ms
6.13 ms
4.99 ms
6.07 ms
4.80 ms
4.84 ms
4.95 ms
4.95 ms
6.78 ms
4.88 ms


Posted by Uli Köhler in C/C++, ESP8266/ESP32, Networking

Real-world data on CRS309-1G-8S+ RouterOS Wireguard throughput

Also see Wireguard bandwidth performance of the MikroTik CRS326-24G-2S+

We tested the throughput of the new Wireguard functionality MikroTik CRS309-1G-8S+ running on RouterOS 7.1beta6.

Our test setup consists of a Desktop PC with 1GBase-T connection and a virtualized server on XCP-NG, attached with a 10GB shared connection, both running Ubuntu. Note that the L2 switching infrastructure (consisting only of MikroTik CRS3xx and CRS610 switching with complete hardware offloading) is ignored here because due to 100% hardware offloading to the marvelous Marvell switch chips it has orders of magnitude higher performance compared to any L3 function, hence it will only have minimal impact only the overall performance.

Wireguard was being used without preshared keys. Hitherto, it is unknown to us whether PSKs will have an impact on throughput.

The command on the Desktop was

dd if=/dev/urandom bs=100M | netcat -v 10.185.244.199 2222

whereas the command on the server was

netcat -vvnlp 2222 > /dev/null

As we expected with an uncompressed protocol like Wireguard, there is no difference if you pipe the data from /dev/urandom as opposed to /dev/zero.

Scenario: Routing from Wireguard to local routed VLAN

With IP firewall

The Desktop was connected to the CRS309-1G-8S+ using Wireguard. The virtual server was connected to the CRS309 as default gateway within a separate VLAN that was designed to be routed. The CRS309 L3 hardware offloading capability was disabled.

The IP firewall contained 8 simple accept and fasttrack rules. All the WireGuard traffic only matched the last (8th) rule and was accepted. It has not been tested whether fasttracking the Wireguard connection would increase performance

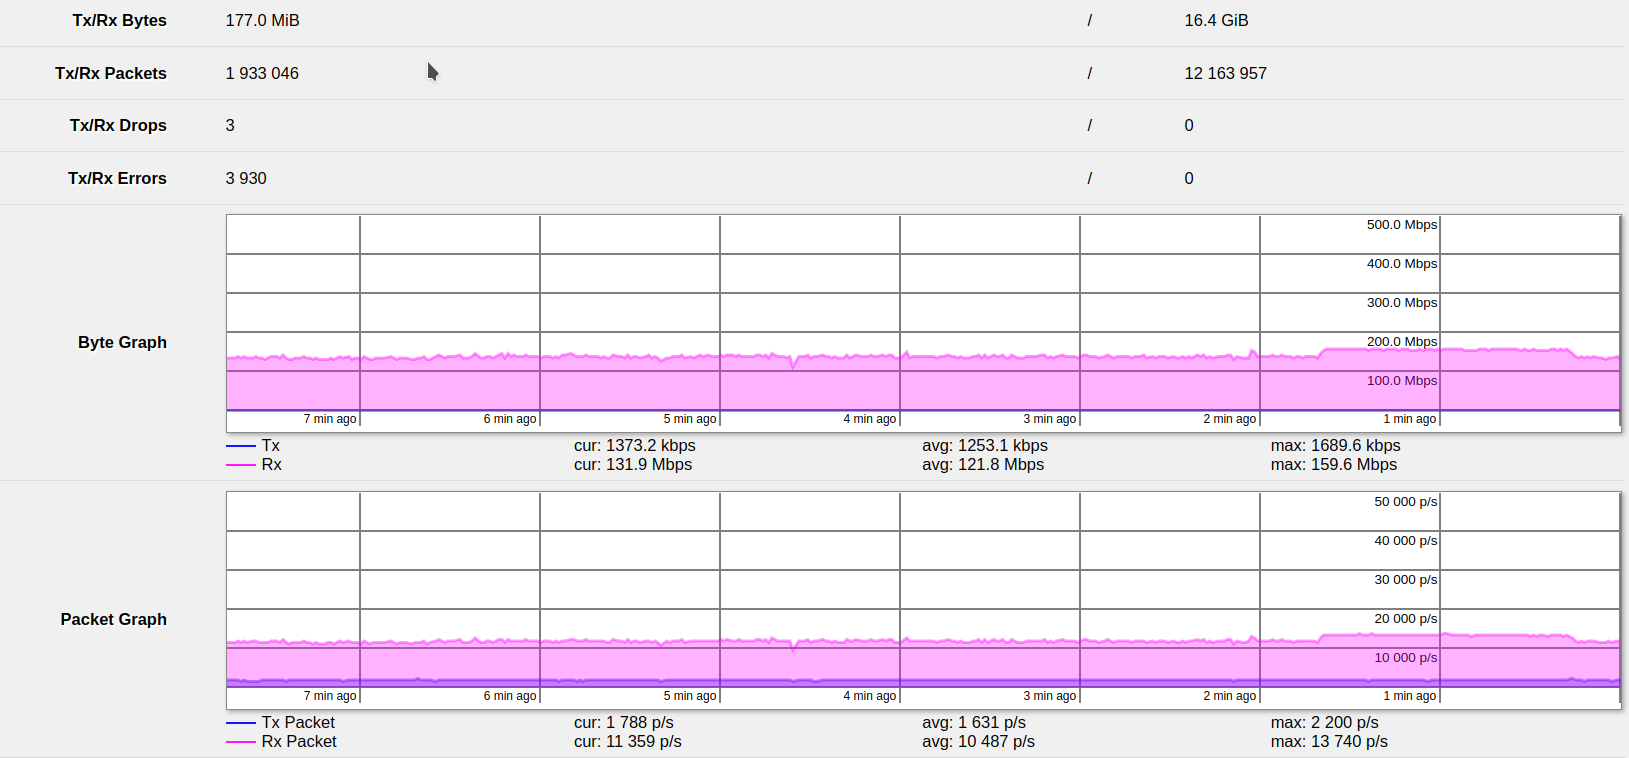
The throughput results showed a steady rate of 131 Mbit/s (unidirectional, bidirectional not tested), but up to 160 Mbit/s. It is unknown what caused the increase in speed, but it’s possible that additional traffic was L3-forwarded over the switch during the test.

Without IP firewall

The same test was repeated with the IP firewall being disabled in the Bridge Settings.

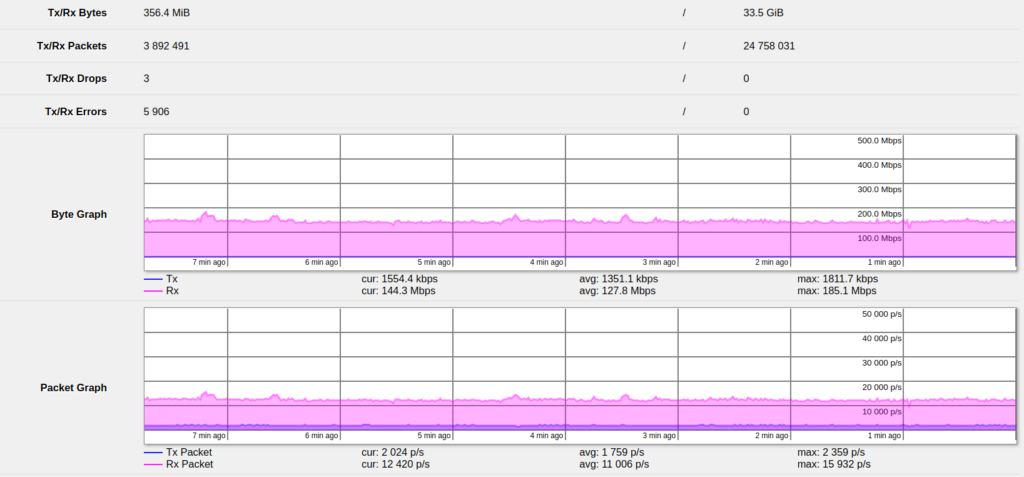
As expected, disabling additional IP firewall processing caused the throughput to increase, but only by a small margin. The typical speed was around 160 Mbit/s (unidirectional), with peaks up to 185 Mbit/s.

Conclusion

It should be pretty obvious that the CRS309-1G-S+ outperforms most conventional VPN solutions when using Wireguard. For a street price of ~175€, it is not only an awesome switch, but also doubles as a more than adequate Wireguard router for most practical applications.

Reliablity considerations

Note that at the moment of writing this article, Wireguard is only available in the RouterOS 7.1beta6 firmware, which is not yet considered stable. While I have not experienced any problems that have affected reliability in any way, if you run a network where it hurts if it fails, you should consider using alternative solutions in the meantime.

Posted by Uli Köhler in MikroTik, Networking, VPN, Wireguard

Wireguard bandwidth performance of the MikroTik CRS326-24G-2S+

Also see Real-world data on CRS309-1G-8S+ RouterOS Wireguard throughput

We tested the new Wireguard functionality MikroTik CRS326-24G-2S+ running on RouterOS 7.1beta6.

Our test setup consists of a Desktop PC with 1GBase-T connection and a virtualized server on XCP-NG, attached with a 10GB shared connection, both running Ubuntu. Note that the L2 switching infrastructure (consisting only of MikroTik CRS3xx and CRS610 switching with complete hardware offloading) is ignored here because due to 100% hardware offloading to the marvelous Marvell switch chips it has orders of magnitude higher performance compared to any L3 function, hence it will only have minimal impact only the overall performance.

Wireguard was being used without preshared keys. Hitherto, it is unknown to us whether PSKs will have an impact on throughput.

Scenario: Routing between two wireguard VPNs

Both the Desktop and the server were connected to two different Wireguard interfaces on the CRS326-24G-2S+.

The CRS326 routed between those interfaces. The virtualized server ran a netcat server while the Desktop ran the wireguard client. IP firewall was disabled during this test, but the switch still had to L3 forward the packets.

Throughput results

The effective throughput of L3 forwarding, doing one Wireguard decryption and one WireGuard encryption operation (both without PSK) is 108.1 Mbit/s (unidirectional. Bidirectional has not been tested)

This is an awesome result, considering that the CRS326-24G-2S+ is only ~120€ street price and is an awesome switch. But it seems like Wireguard is capable of making a high performance VPN router from just a managed MikroTik switch.

Reliablity considerations

Note that at the moment of writing this article, Wireguard is only available in the RouterOS 7.1beta6 firmware, which is not yet considered stable. While I have not experienced any problems that have affected reliability in any way, if you run a network where it hurts if it fails, you should consider using alternative solutions in the meantime.

Posted by Uli Köhler in MikroTik, Networking, VPN, Wireguard

How to import standard CA certificates into MikroTik RouterOS

You can use the following commands to download the standard CA certificates from the Curl webpage and import them:

/tool fetch url=https://curl.se/ca/cacert.pem
/certificate import file-name=cacert.pem passphrase=""

This will typically take a couple of minutes.

I recommend to connect to your MikroTik router using SSH, e.g.

ssh admin@192.168.17.1

so you’re able to copy and paste commands more easily.

Posted by Uli Köhler in MikroTik

How to generate WireGuard key (private & public) in Python without dependencies

The following code allows you to generate a WireGuard private & public key without having to install any Python library.

import subprocess

def generate_wireguard_keys():
    """
    Generate a WireGuard private & public key
    Requires that the 'wg' command is available on PATH
    Returns (private_key, public_key), both strings
    """
    privkey = subprocess.check_output("wg genkey", shell=True).decode("utf-8").strip()
    pubkey = subprocess.check_output(f"echo '{privkey}' | wg pubkey", shell=True).decode("utf-8").strip()
    return (privkey, pubkey)

Usage example:

print(generate_wireguard_key())

Output:

('KIm+ZlY86I+cInG4FWZpKmhADUnxrqhdtQ5UzaFbuVs=', 'ctX9oUw+CkRe7GfSmUHAB9JjLfQWALOs0gXU9Ikhg1g=')
Posted by Uli Köhler in Networking, Python

How to install .txz package on pfSense

In order to install a .txz file on your pfSense:

  1. Download the file to your computer and scp it to your pfSense to /tmp, e.g.:
    scp pfSense-pkg-WireGuard-0.1.1_1.txz admin@pfsense.techoverflow.net:/tmp/
  2. Login as admin to your pfSense via SSH and press 8to go into the root shell:
    ssh admin@pfsense.techoverflow.net
  3. Go into /tmp and then run pkg install <.txz>. When prompted, confirm using y.
  4. cd /tmp
    pkg install pfSense-pkg-WireGuard-0.1.1_1.txz


You can install multiple packages at once using pkg install <1.txz> <2.txz> [...]. This is recommended if the packages belong together.p

Posted by Uli Köhler in Networking

How to fix OpenWRT: Unknown package ‘…’

Problem:

You are trying to install an OpenWRT package using e.g.

opkg install luci-app-openvpn

but you see an error message like

Unknown package 'luci-app-openvpn'.
Collected errors:
 * opkg_install_cmd: Cannot install package luci-app-openvpn.

Solution:

There are two different reasons why this error can occur:

  1. You forgot to run
    opkg update

    Note that you need to run opkg update after each reboot since the package lists are only stored in the RAM

  2. The package actually doesn’t exist. Check
    opkg list

    for a list of packages that can be installed for your OpenWRT version and architecture. In very rare cases you might need to build a package from source if it isn’t available, or you might need to upgrade your OpenWRT version if that’s possible for your router.

Posted by Uli Köhler in Networking

How I fixed OpenWRT LuCI error /etc/config/luci seems to be corrupt, unable to find section ‘main’

Problem:

When you try to open your OpenWRT Web UI, you see an error message like

/usr/lib/lua/luci/dispatcher.lua:427: /etc/config/luci seems to be corrupt, unable to find section 'main'

Solution:

In my case, the issue was a bad rpcd configuration which I restored from an older OpenWRT version that contained the config line

option socket /var/run/ubus.sock

instead of the correct

option socket /var/run/ubus/ubus.sock

You can replace your rpcd config by the default by running the following command over SSH:

cp /rom/etc/config/rpcd /etc/config/rpcd

and then

reboot
Posted by Uli Köhler in Networking

How to check / enable DHCP in Alpine Linux installer

Once you have booted from the Alpine Linux installer CD and logged in using root<no password> as described in What is the Alpine linux default login & password?, one often wants to test if DHCP works before going through the installer and potentially having to repeat the process.

First enable Ethernet using

ifconfig eth0 up

Then run the DHCP client using

udhcpc eth0

This will show you the IP address of the lease that your Alpine Live CD did acquire.

Posted by Uli Köhler in Alpine Linux, Linux, Networking

Should you use static IP addresses or static DHCP leases?

I generally recommend static DHCP leases over static IP addresses for almost any circumstance.

There are three primary reasons for that:

  • DHCP will automatically configure gateway, DNS servers and other options – if you change your network configuration, this will avoid having to reconfigure your devices with static IP addresses.
  • Monitoring capability: You’ll be able to see if a device has requested the IP address from the DHCP server. This also means that you have an easy way
  • Failure tolerance: If you connect the device to the wrong network – for example, if you connect it to the wrong VLAN – it will still try to acquire an IP address. which you can see in the DHCP lease table of the router. This is often relevant when, for example, changing network components or moving equipment between locations. Quite often, it’s hard to access equipment that has an unknown IP address and a complete reset would also delete a lot of configuration work.

There are cases however, where a static IP address should be preferred:

  • DHCP server needs static IP: If the device is the DHCP server itself, obviously you need to set a static IP address (only on the interface where the DHCP server is enabled, of course)
  • Reliability: If the device is mission-critical, you might not want to depend on the DHCP server being online. You need to weigh this argument against the failure tolerance and monitoring capability arguments as listed above! Note than some devices will only try to acquire an IP address using DHCP once and will not retry if no DHCP server answers!
  • Network without DHCP server: If there is no DHCP server on the local network, obviously you need a static IP
  • Dynamic MAC address: If a device doesn’t use the same MAC address all the time

If your device supports DHCP with fallback, I recomend that you use a static lease plus a static IP fallback with the same IP address. This approach can combine the advantages of both static leases and static IP addresses.

Posted by Uli Köhler in Networking