Programming languages

How to use boto3 to upload BytesIO to Wasabi / S3 in Python

This snippet provides a concise example on how to upload a io.BytesIO() object to

import boto3

# Create connection to Wasabi / S3
s3 = boto3.resource('s3',
    endpoint_url = 'https://s3.eu-central-1.wasabisys.com',
    aws_access_key_id = 'MY_ACCESS_KEY',
    aws_secret_access_key = 'MY_SECRET_KEY'
)

# Get bucket object
boto_test_bucket = s3.Bucket('boto-test')

# Create a test BytesIO we want to upload
import io
buf = io.BytesIO()
buf.write(b"Hello S3 world!")

# Reset read pointer. DOT NOT FORGET THIS, else all uploaded files will be empty!
buf.seek(0)
    
# Upload the file. "MyDirectory/test.txt" is the name of the object to create
boto_test_bucket.upload_fileobj(buf, "MyDirectory/test.txt")

Don’t forget to fill in MY_ACCESS_KEY and MY_SECRET_KEY. Depending on what region and what S3-compatible service you use, you might need to use another endpoint URL at https://s3.eu-central-1.wasabisys.com.

Also don’t forget

buf.seek(0)

or your uploaded files will be empty.
 

Posted by Uli Köhler in Python, S3

How to use boto3 to upload file to Wasabi / S3 in Python

Using boto to upload data to Wasabi is pretty simple, but not well-documented.

import boto3

# Create connection to Wasabi / S3
s3 = boto3.resource('s3',
    endpoint_url = 'https://s3.eu-central-1.wasabisys.com',
    aws_access_key_id = 'MY_ACCESS_KEY',
    aws_secret_access_key = 'MY_SECRET_KEY'
)

# Get bucket object
boto_test_bucket = s3.Bucket('boto-test')

# Create a test file we want to upload
with open("upload-test.txt", "w") as outfile:
    outfile.write("Hello S3!")
    
# Upload the file. "MyDirectory/test.txt" is the name of the object to create
boto_test_bucket.upload_file("upload-test.txt", "MyDirectory/test.txt")

Don’t forget to fill in MY_ACCESS_KEY and MY_SECRET_KEY. Depending on what region and what S3-compatible service you use, you might need to use another endpoint URL at https://s3.eu-central-1.wasabisys.com.

Posted by Uli Köhler in Python, S3

How to fix Python ValueError: unsupported format character ‘ ‘ (0x20) at index 3

Problem:

You are trying to use Python format strings like

"Hello %.3 world" % 1.234

but you see an error message like

---------------------------------------------------------------------------
ValueError                                Traceback (most recent call last)
<ipython-input-4-7cbe94e4525d> in <module>
----> 1 "Hello %.3 world" % 1.234

ValueError: unsupported format character ' ' (0x20) at index 9

Solution:

Your format string %.3 is incomplete ! You need to specify the type of value to format, e.g. f for floating point, d for integers, s for strings etc. So instead of %.3, write %.3f, or instead of just % write e.g. %f, %d or %s depending on the data type of the variable you want to insert there.

Posted by Uli Köhler in Python

How to auto-fit Pandas pd.to_excel() XLSX column width

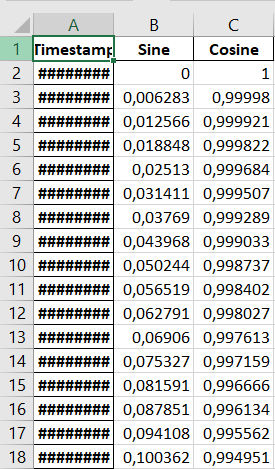
If you export XLSX data using df.to_excel(), the column widths in the spreadsheet are left as default and are not adjusted automatically:

# Load example dataset
df = pd.read_csv("https://datasets.techoverflow.net/timeseries-example.csv", parse_dates=["Timestamp"])
df.set_index("Timestamp", inplace=True)

# Export dataset to XLSX
df.to_excel("example.xlsx")

Solution

You can use UliPlot‘s auto_adjust_xlsx_column_width in order to automatically adjust the column width.

pip install UliPlot

Then use it like this in order to  export the XLSX:

from UliPlot.XLSX import auto_adjust_xlsx_column_width

# Load example dataset
df = pd.read_csv("https://datasets.techoverflow.net/timeseries-example.csv", parse_dates=["Timestamp"])
df.set_index("Timestamp", inplace=True)

# Export dataset to XLSX
with pd.ExcelWriter("example.xlsx") as writer:
    df.to_excel(writer, sheet_name="MySheet")
    auto_adjust_xlsx_column_width(df, writer, sheet_name="MySheet", margin=0)

Note that the algorithm currently tends to oversize the columns a bit, but in most cases, every type of column will fit.

Posted by Uli Köhler in pandas, Python

Minimal ESP32 NTP client example using NTPClient_Generic and PlatformIO

Example of using NTPClient_Generic

main.cpp

#include <Arduino.h>
#include <WiFi.h>
#include <NTPClient_Generic.h>

#define TIME_ZONE_OFFSET_HRS 1 // UTC+1 for Germany, winter time
#define NTP_UPDATE_INTERVAL_MS 60000L // Update every 60s automatically
WiFiUDP ntpUDP;
NTPClient ntpClient(ntpUDP, "europe.pool.ntp.org", (3600 * TIME_ZONE_OFFSET_HRS), NTP_UPDATE_INTERVAL_MS);

void ntpUpdateTask(void* param) {
  while(true) {
    // Update NTP. This will only ACTUALLY update if
    // the NTP client has not updated for NTP_UPDATE_INTERVAL_MS
    ntpClient.update();
    vTaskDelay(1000 / portTICK_PERIOD_MS);
  }
}

void setup() {
  Serial.begin(115200);
  // Force reset Wifi to avoid failure to connect
  WiFi.disconnect(true);
  // Set hostname
  WiFi.config(INADDR_NONE, INADDR_NONE, INADDR_NONE);
  WiFi.setHostname("ESP-NTP");
  // Connect to Wifi
  WiFi.begin("MyWifiSSID", "MyWifiPassword");
  while (WiFi.status() != WL_CONNECTED) {
      delay(100);
      Serial.println("Wifi connecting...");
  }

  // Start NTP client (i.e. start listening for NTP packets)
  ntpClient.begin();
  // Create task to automatically update NTP in the background
  xTaskCreate(ntpUpdateTask, "NTP update", 2000, nullptr, 1, nullptr);
}

void loop() {
  delay(1000);
  if (ntpClient.updated()) {
    Serial.println("# Time in sync with NTP server");
  } else {
    Serial.println("# TIME NOT IN SYNC WITH NTP SERVER !");
    return; // Do not print time
  }

  Serial.println("UTC : " + ntpClient.getFormattedUTCTime());
  Serial.println("UTC : " + ntpClient.getFormattedUTCDateTime());
  Serial.println("LOC : " + ntpClient.getFormattedTime());
}

platformio.ini

[env:nodemcu-32s]
platform = espressif32
board = nodemcu-32s
framework = arduino
monitor_speed = 115200
lib_deps =
    khoih.prog/NTPClient_Generic @ ^3.2.2
    Time

Example output:

Wifi connecting...
Wifi connecting...
Wifi connecting...
# TIME NOT IN SYNC WITH NTP SERVER !
# Time in sync with NTP server
UTC : 01:22:07
UTC : 01:22:07 Sun 07 Feb 2021
LOC : 02:22:07
# Time in sync with NTP server
UTC : 01:22:08
UTC : 01:22:08 Sun 07 Feb 2021
LOC : 02:22:08
# Time in sync with NTP server
UTC : 01:22:09
UTC : 01:22:09 Sun 07 Feb 2021
LOC : 02:22:09


Posted by Uli Köhler in C/C++, ESP8266/ESP32, PlatformIO

How to get current gateway IP address on ESP8266/ESP32

In order to get the current gateway IP address on the ESP8266 or ESP32, use:

WiFi.gatewayIP();

In order to print the gateway IP address on the serial port, use

Serial.println("Gateway IP address: ");
Serial.println(WiFi.gatewayIP());

In order to get the gateway IP address as string, use

String gatewayIP = WiFi.gatewayIP().toString();


Posted by Uli Köhler in C/C++, Embedded, ESP8266/ESP32, PlatformIO

ESP32 minimal WebSocket example (ESPAsyncWebserver / PlatformIO)

Minimal firmware to use WebSockets on the ESP32 using ESPAsyncWebserver:

main.cpp

#include <Arduino.h>
#include <WiFi.h>
#include <ESPAsyncWebServer.h>
#include <ArduinoJson.h>

AsyncWebServer server(80);
AsyncWebSocket ws("/ws");

AsyncWebSocketClient* wsClient;
 
void onWsEvent(AsyncWebSocket * server, AsyncWebSocketClient * client, AwsEventType type, void * arg, uint8_t *data, size_t len){
  if(type == WS_EVT_CONNECT){
    wsClient = client;
  } else if(type == WS_EVT_DISCONNECT){
    wsClient = nullptr;
  }
}

/**
 * Wait for WiFi connection, and, if not connected, reboot
 */
void waitForWiFiConnectOrReboot(bool printOnSerial=true) {
  uint32_t notConnectedCounter = 0;
  while (WiFi.status() != WL_CONNECTED) {
      delay(100);
      if(printOnSerial) {
        Serial.println("Wifi connecting...");
      }
      notConnectedCounter++;
      if(notConnectedCounter > 50) { // Reset board if not connected after 5s
          if(printOnSerial) {
            Serial.println("Resetting due to Wifi not connecting...");
          }
          ESP.restart();
      }
  }
  if(printOnSerial) {
    // Print wifi IP addess
    Serial.println("IP address: ");
    Serial.println(WiFi.localIP());
  }
}


void setup() { 
  Serial.begin(115200);
  WiFi.config(INADDR_NONE, INADDR_NONE, INADDR_NONE);
  WiFi.setHostname("ESP-Websocket-Test");

  WiFi.begin("MyWifiSSID", "MyWifiPassword");
  waitForWiFiConnectOrReboot();

  // Start webserver
  ws.onEvent(onWsEvent);
  server.addHandler(&ws);
  server.begin();
}

uint64_t counter = 0;
void loop() {
  // If client is connected ...
  if(wsClient != nullptr && wsClient->canSend()) {
    // .. send hello message :-)
    wsClient->text("Hello client");
  }

  // Wait 10 ms
  delay(10);
}

platformio.ini:

[env:nodemcu-32s]
platform = espressif32
board = nodemcu-32s
framework = arduino
monitor_speed = 115200
lib_deps =
    ESP Async [email protected]
    [email protected]

Python code for testing:

import websocket
ws = websocket.WebSocket()
ws.connect("ws://192.168.1.211/ws")
while True:
    result = ws.recv()
    print(result)

This will print Hello Client many times a second.

Posted by Uli Köhler in C/C++, ESP8266/ESP32, PlatformIO

How to fix Python WebSocket ValueError: scheme http is invalid

Problem:

You want to use Python to connect to your WebSocket server:

import websocket
ws = websocket.WebSocket()
ws.connect("http://192.168.1.211/ws")

But you see an error message like

---------------------------------------------------------------------------
ValueError                                Traceback (most recent call last)
<ipython-input-2-5108525d0b43> in <module>
      1 import websocket
      2 ws = websocket.WebSocket()
----> 3 ws.connect("http://10.228.152.103/ws")
      4 while True:
      5     result = ws.recv()

c:\python38\lib\site-packages\websocket\_core.py in connect(self, url, **options)
    220         # FIXME: "header", "cookie", "origin" and "host" too
    221         self.sock_opt.timeout = options.get('timeout', self.sock_opt.timeout)
--> 222         self.sock, addrs = connect(url, self.sock_opt, proxy_info(**options),
    223                                    options.pop('socket', None))
    224 

c:\python38\lib\site-packages\websocket\_http.py in connect(url, options, proxy, socket)
    106         return _open_proxied_socket(url, options, proxy)
    107 
--> 108     hostname, port, resource, is_secure = parse_url(url)
    109 
    110     if socket:

c:\python38\lib\site-packages\websocket\_url.py in parse_url(url)
     61             port = 443
     62     else:
---> 63         raise ValueError("scheme %s is invalid" % scheme)
     64 
     65     if parsed.path:

ValueError: scheme http is invalid

Solution:

The websocket-client library wants you to use ws://host/path instead of http://host/path. So instead of

ws.connect("http://10.228.152.103/ws")

use

ws.connect("http://10.228.152.103/ws")
Posted by Uli Köhler in Python

How to fix Python WebSocket TypeError: __init__() missing 3 required positional arguments: ‘environ’, ‘socket’, and ‘rfile’

Problem:

You are trying to connect a WebSocket in Python:

import websocket
ws = websocket.WebSocket()

but you see an error message like

TypeError                                 Traceback (most recent call last)
<ipython-input-3-5108525d0b43> in <module>
      1 import websocket
----> 2 ws = websocket.WebSocket()
      3 ws.connect("ws://192.168.1.211/ws")
      4 while True:
      5     result = ws.recv()

TypeError: __init__() missing 3 required positional arguments: 'environ', 'socket', and 'rfile'

Solution:

You have installed the wrong library ! You need to use websocket-client instead of websocket !

First, uninstall websocket:

pip uninstall websocket

Now install websocket-client:

pip install websocket-client

Now try again – your code should work now.

Posted by Uli Köhler in Python

How to fix ESP32 too few arguments to function ‘esp_err_t esp_wifi_sta_wpa2_ent_enable(const esp_wpa2_config_t*)’

Problem:

While trying to compile your ESP32 application, you see this compiler error:

src\main.cpp: In function 'void wifiConnectWPAEAP(const char*, const char*, const char*, const char*)':
src\main.cpp:23:32: error: too few arguments to function 'esp_err_t esp_wifi_sta_wpa2_ent_enable(const esp_wpa2_config_t*)'   esp_wifi_sta_wpa2_ent_enable();
                                ^

Solution:

Replace

esp_wifi_sta_wpa2_ent_enable();

by

esp_wpa2_config_t config = WPA2_CONFIG_INIT_DEFAULT();
esp_wifi_sta_wpa2_ent_enable(&config);
Posted by Uli Köhler in C/C++, Embedded, ESP8266/ESP32

How to fix ESP32 fatal error: ESP8266WiFi.h: No such file or directory

Problem:

While trying to compile your ESP32 application, you see this compiler error:

fatal error: ESP8266WiFi.h: No such file or directory

Solution:

ESP8266WiFi.h is the Wifi header for the ESP8266. For the ESP32, it’s named WiFi.h. In order to fix the issue, replae

#include <ESP8266WiFi.h>

by

#include <WiFi.h>
Posted by Uli Köhler in C/C++, Embedded, ESP8266/ESP32

How to fix Alpine Linux fatal error: stdio.h: No such file or directory

Problem:

When trying to compile a C/C++ program or library on Alpine Linux, you see an error message like

/home/user/test.cpp:5:10: fatal error: stdio.h: No such file or directory
  123 | #include <stdio.h>
      |          ^~~~~~~~~

Solution:

Install the libc headers using

apk add musl-dev


Posted by Uli Köhler in Alpine Linux, C/C++, GCC errors, Linux

How to fix cfgrib TypeError: open_dataset() got an unexpected keyword argument ‘filter_by_keys’

Problem:

You want to open a GRB2 file using the cfgrib library using code like

import xarray as xr
ds = xr.open_dataset('myfile.grb2', engine='cfgrib', filter_by_keys={'typeOfLevel': 'atmosphere'})

But you see an exception like

TypeError: open_dataset() got an unexpected keyword argument 'filter_by_keys'

Solution:

You can’t use filter_by_keys=… as argument to xr.open_dataset() directly. You need to use backend_kwargs like this:

ds = xr.open_dataset('myfile.grb2', engine='cfgrib', backend_kwargs={'filter_by_keys': {'typeOfLevel': 'atmosphere'}})


Posted by Uli Köhler in Data science, Python

Minimal ESP8266 WiFi example

#include <Arduino.h>
#include <ESP8266WiFi.h>

void setup() {
  Serial.begin(115200);
  WiFi.begin("MySSID", "MyPassword");
  while (WiFi.status() != WL_CONNECTED) {
    Serial.println("Wifi connecting...");
    delay(500);
  }
  Serial.println("Wifi connected");
}

void loop() {
  // put your main code here, to run repeatedly:
}


Posted by Uli Köhler in C/C++, ESP8266/ESP32

How to fix .NET Core: Could not execute because the application was not found or a compatible .NET SDK is not installed.

Problem:

You are trying to run a .NET core command using e.g.

dotnet new console

but you see this error message:

Could not execute because the application was not found or a compatible .NET SDK is not installed.
Possible reasons for this include:
  * You intended to execute a .NET program:
      The application 'new' does not exist.
  * You intended to execute a .NET SDK command:
      It was not possible to find any installed .NET SDKs.
      Install a .NET SDK from:
        https://aka.ms/dotnet-download

Solution:

You didn’t install a .NET Core SDK, only the .NET Core host.

Install the SDK by using e.g. (this command works on Debian & Ubuntu)

sudo apt -y install dotnet-sdk-5.0

You might need to select the correct version (5.0 in this example).

Posted by Uli Köhler in C#

How to fix Angular ng: not found

Problem:

When trying to run a command like ng build, e.g. in a CI setup, you see an error message like

sh: ng: not found

Preferred solution:

Only the machine where you’re running this command, you have not installed the ng command globally.

However, your node_modules folder will have a local installation of @angular/cli.

In order to use it, replace ng by ./node_modules/.bin/ng.

For example, a scripts section of your package.json

"scripts": {
  "build": "ng build"
},

would be replaced by

"scripts": {
  "build": "./node_modules/.bin/ng build"
},

Alternative solution:

Install ng globally on the machine running the command by using

sudo npm i -g @angular/cli


Posted by Uli Köhler in Angular

How to grep for WordPress DB_NAME, DB_USER, DB_PASSWORD and DB_HOST in wp-config.php

This grep statement filters out the DB_NAME, DB_USER, DB_PASSWORD and DB_HOST contents from a wp-config.php:

grep -oP "define\(['\"]DB_NAME['\"],\s*['\"]\K[^'\"]+(?=[\'\"]\s*\)\s*;)" wp-config.php

For example, from the wp-config.php line

define('DB_NAME', 'techoverflow');

it will extract techoverflow.

Here are the statements for DB_NAME, DB_USER, DB_PASSWORD and DB_HOST:

DB_NAME=$(grep -oP "define\(['\"]DB_NAME['\"],\s*['\"]\K[^'\"]+(?=[\'\"]\s*\)\s*;)" wp-config.php)
DB_USER=$(grep -oP "define\(['\"]DB_USER['\"],\s*['\"]\K[^'\"]+(?=[\'\"]\s*\)\s*;)" wp-config.php)
DB_PASSWORD=$(grep -oP "define\(['\"]DB_PASSWORD['\"],\s*['\"]\K[^'\"]+(?=[\'\"]\s*\)\s*;)" wp-config.php)
DB_HOST=$(grep -oP "define\(['\"]DB_HOST['\"],\s*['\"]\K[^'\"]+(?=[\'\"]\s*\)\s*;)" wp-config.php)

You can use this, for example, in automatic backup scripts without manually copying the password to the backup script

Posted by Uli Köhler in PHP, Wordpress

Best practice Angular 11 production build command

Note: This command does not work for Angular 14+ and is only kept for reference. See Best practice Angular 14 production build command for an updated command!
This is the command I use to make production builds of Angular 11+ webapps:
ng build --prod --aot --build-optimizer --common-chunk --vendor-chunk --named-chunks


While it will consume quite some CPU and RAM during the build, it will produce a highly efficient compiled output.

Posted by Uli Köhler in Angular, Javascript

How to load sample dataset in Pandas

This code loads an example dataset in Pandas but requires an internet connection:

import pandas as pd
iris = pd.read_csv('https://raw.githubusercontent.com/mwaskom/seaborn-data/master/iris.csv')

This is how the iris dataset looks like:

For a more detailed answer with other options on how to import example datasets, see this StackOverflow post.

Posted by Uli Köhler in pandas, Python

How to make two-level nested defaultdict in Python

In order to make a defaultdict that contains defaultdicts of dict, use

my_doc = defaultdict(lambda: defaultdict(dict))


Posted by Uli Köhler in Python