Uli Köhler

ESP32-S3 multiple frequency PWM output using the LEDC driver

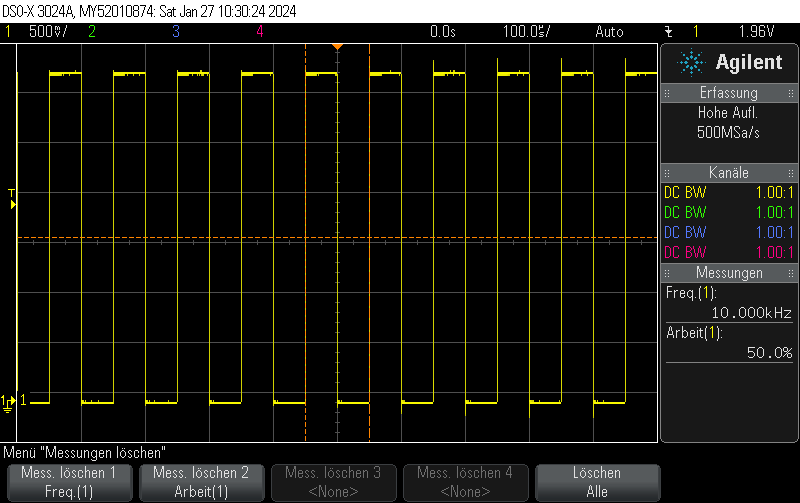
This Arduino/PlatformIO firmware outputs 50% duty cycle PWM at different frequencies on multiple pins using the LEDC PWM driver, utilizing all four timers:

  • 10 kHz on GPIO10
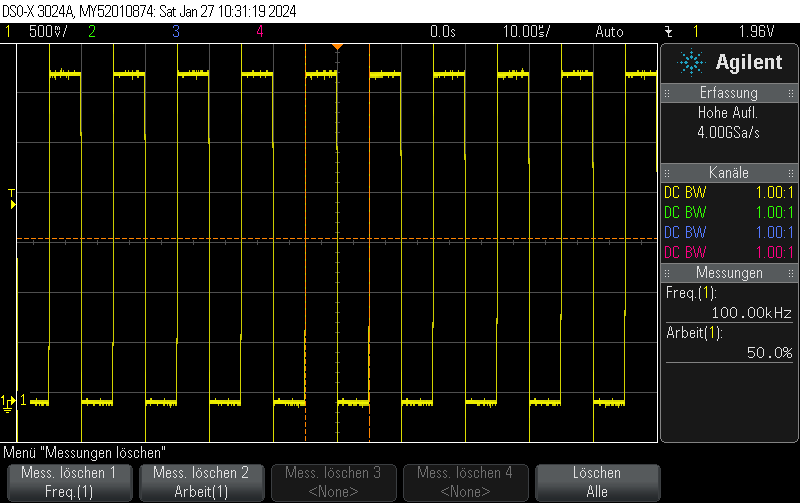
  • 100 kHz on GPIO11
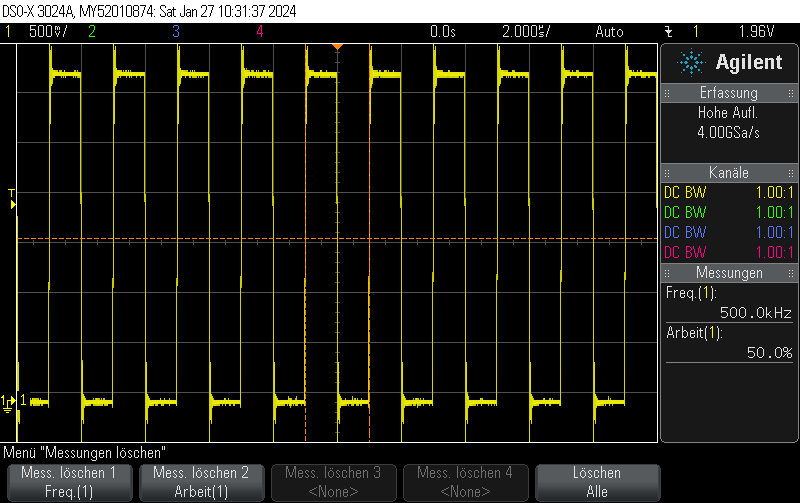
  • 500 kHz on GPIO12
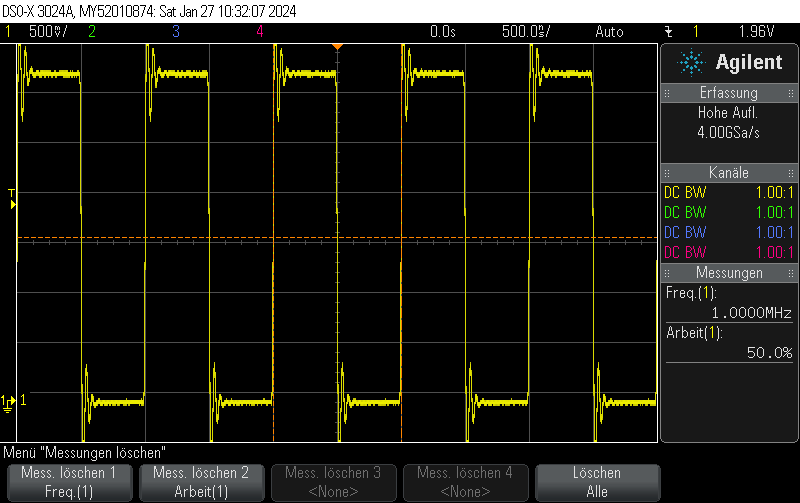
  • 1 MHz on GPIO13
#include <Arduino.h>
#include <driver/ledc.h>

void setup() {

  ledc_timer_config_t ledc_timer1 = {
      .speed_mode       = LEDC_LOW_SPEED_MODE,
      .duty_resolution  = LEDC_TIMER_1_BIT,
      .timer_num        = LEDC_TIMER_0,
      .freq_hz          = 10000,
      .clk_cfg          = LEDC_AUTO_CLK
  };
  ESP_ERROR_CHECK(ledc_timer_config(&ledc_timer1));

  ledc_timer_config_t ledc_timer2 = {
      .speed_mode       = LEDC_LOW_SPEED_MODE,
      .duty_resolution  = LEDC_TIMER_1_BIT,
      .timer_num        = LEDC_TIMER_1,
      .freq_hz          = 100000,
      .clk_cfg          = LEDC_AUTO_CLK
  };
  ESP_ERROR_CHECK(ledc_timer_config(&ledc_timer2));

  ledc_timer_config_t ledc_timer3 = {
      .speed_mode       = LEDC_LOW_SPEED_MODE,
      .duty_resolution  = LEDC_TIMER_1_BIT,
      .timer_num        = LEDC_TIMER_2,
      .freq_hz          = 500000,
      .clk_cfg          = LEDC_AUTO_CLK
  };
  ESP_ERROR_CHECK(ledc_timer_config(&ledc_timer3));

  ledc_timer_config_t ledc_timer4 = {
      .speed_mode       = LEDC_LOW_SPEED_MODE,
      .duty_resolution  = LEDC_TIMER_1_BIT,
      .timer_num        = LEDC_TIMER_3,
      .freq_hz          = 1000000,
      .clk_cfg          = LEDC_AUTO_CLK
  };
  ESP_ERROR_CHECK(ledc_timer_config(&ledc_timer4));


  /**
   * @brief Configure LEDC output channels
   */

  ledc_channel_config_t ledc1 = {
      .gpio_num       = GPIO_NUM_10,
      .speed_mode     = LEDC_LOW_SPEED_MODE,
      .channel        = LEDC_CHANNEL_0,
      .intr_type      = LEDC_INTR_DISABLE,
      .timer_sel      = LEDC_TIMER_0,
      .duty           = 1, // Set duty to 50%
      .hpoint         = 0
  };
  ESP_ERROR_CHECK(ledc_channel_config(&ledc1));

  ledc_channel_config_t ledc2 = {
      .gpio_num       = GPIO_NUM_11,
      .speed_mode     = LEDC_LOW_SPEED_MODE,
      .channel        = LEDC_CHANNEL_1,
      .intr_type      = LEDC_INTR_DISABLE,
      .timer_sel      = LEDC_TIMER_1,
      .duty           = 1, // Set duty to 50%
      .hpoint         = 0
  };
  ESP_ERROR_CHECK(ledc_channel_config(&ledc2));

  ledc_channel_config_t ledc3 = {
      .gpio_num       = GPIO_NUM_12,
      .speed_mode     = LEDC_LOW_SPEED_MODE,
      .channel        = LEDC_CHANNEL_2,
      .intr_type      = LEDC_INTR_DISABLE,
      .timer_sel      = LEDC_TIMER_2,
      .duty           = 1, // Set duty to 50%
      .hpoint         = 0
  };
  ESP_ERROR_CHECK(ledc_channel_config(&ledc3));

  ledc_channel_config_t ledc4 = {
      .gpio_num       = GPIO_NUM_13,
      .speed_mode     = LEDC_LOW_SPEED_MODE,
      .channel        = LEDC_CHANNEL_3,
      .intr_type      = LEDC_INTR_DISABLE,
      .timer_sel      = LEDC_TIMER_3,
      .duty           = 1, // Set duty to 50%
      .hpoint         = 0
  };
  ESP_ERROR_CHECK(ledc_channel_config(&ledc4));

}

void loop() {
  // Nothing to do here
  delay(1000);
}

GPIO10
GPIO11
GPIO12
GPIO13
Posted by Uli Köhler in Arduino, ESP8266/ESP32, PlatformIO

How to set OPKG HTTP/HTTPS proxy sever

export https_proxy=http://10.1.2.3:8080/
export http_proxy=http://10.1.2.3:8080/
opkg update


Posted by Uli Köhler in OpenWRT

ESP32(-S3) ADC1 ESP-IDF minimal oneshot example with curve calibration

#include <esp_adc/adc_oneshot.h>
#include <esp_adc/adc_cali.h>
#include <esp_adc/adc_cali_scheme.h>


adc_oneshot_unit_handle_t adc1_handle = nullptr;
adc_cali_handle_t adc_cali_channel_handle = nullptr;

void InitADC() {
    //-------------ADC1 Init---------------//
    adc_oneshot_unit_init_cfg_t init_config1 = {
        .unit_id = ADC_UNIT_1,
    };
    ESP_ERROR_CHECK(adc_oneshot_new_unit(&init_config1, &adc1_handle));

    //-------------ADC1 Config---------------//
    adc_oneshot_chan_cfg_t config = {
        .atten = ADC_ATTEN_DB_11,
        .bitwidth = ADC_BITWIDTH_DEFAULT, // default width is max supported width
    };
    ESP_ERROR_CHECK(adc_oneshot_config_channel(adc1_handle, ADC_CHANNEL_6, &config));

    // Initialize 
    adc_cali_curve_fitting_config_t cali_config = {
        .unit_id = ADC_UNIT_1,
        .chan = ADC_CHANNEL_6,
        .atten = ADC_ATTEN_DB_11,
        .bitwidth = ADC_BITWIDTH_DEFAULT,
    };
    ESP_ERROR_CHECK(adc_cali_create_scheme_curve_fitting(&cali_config, &adc_cali_channel_handle));


}

void ADCRead() {
    // Read raw value
    int raw = 0;
    ESP_ERROR_CHECK(adc_oneshot_read(adc1_handle, ADC_CHANNEL_6, &raw));

    // Apply calibration to value
    int voltage = 0;
    ESP_ERROR_CHECK(adc_cali_raw_to_voltage(adc_cali_channel_handle, raw, &voltage));

    printf("ADC Channel[%d] Cali Voltage: %d mV\n", ADC_CHANNEL_6, voltage);
}

Usage example:

InitADC();
while(true)
{
    ADCRead();
    // Wait for some delay before reading again
    vTaskDelay(50 / portTICK_PERIOD_MS);
}

This prints, for example:

ADC Channel[6] Cali Voltage: 163 mV


Posted by Uli Köhler in C/C++, ESP8266/ESP32

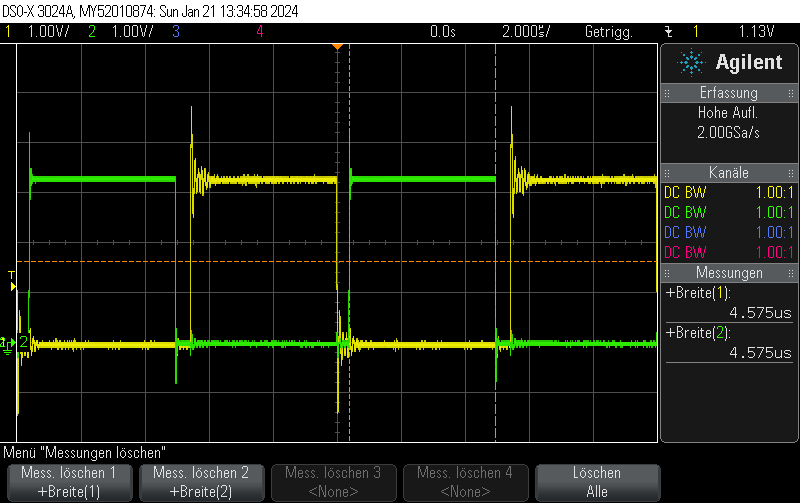
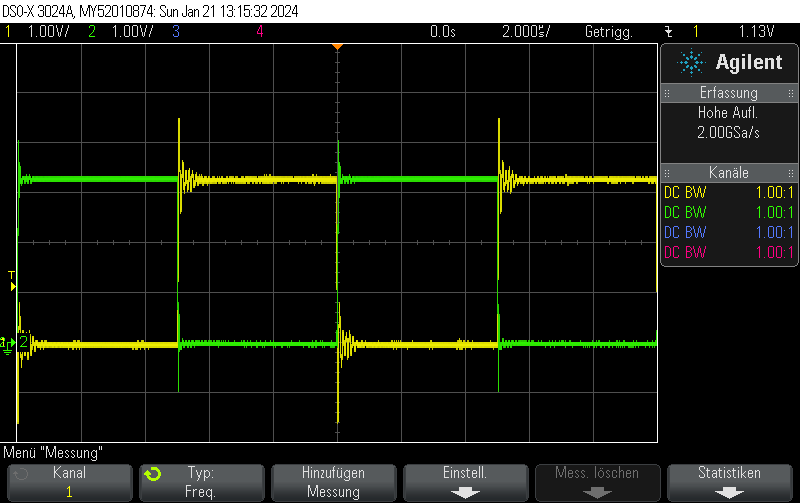
ESP32(-S3) LEDC complementary output with programmable dead time example

On the ESP32 platform, you can use the LEDC PWM driver to generate programmable dead time by setting the duty (i.e. length of pulse) and hpoint(time offset of pulse) appropriately.

#include <driver/ledc.h>
ledc_timer_config_t ledc_timer = {
    .speed_mode       = LEDC_LOW_SPEED_MODE,
    .duty_resolution  = LEDC_TIMER_8_BIT,
    .timer_num        = LEDC_TIMER_0,
    .freq_hz          = 100000,
    .clk_cfg          = LEDC_AUTO_CLK
};
ESP_ERROR_CHECK(ledc_timer_config(&ledc_timer));

uint32_t deadTime = 20; // Large value to show clearly on the oscilloscope

ledc_channel_config_t ledc_noninverted_channel = {
    .gpio_num       = GPIO_NUM_10,
    .speed_mode     = LEDC_LOW_SPEED_MODE,
    .channel        = LEDC_CHANNEL_0,
    .intr_type      = LEDC_INTR_DISABLE,
    .timer_sel      = LEDC_TIMER_0,
    .duty           = 127-deadTime/2, // Set duty to 50%
    .hpoint         = 0
};
ESP_ERROR_CHECK(ledc_channel_config(&ledc_noninverted_channel));

ledc_channel_config_t ledc_complementary_channel = {
    .gpio_num       = GPIO_NUM_11,
    .speed_mode     = LEDC_LOW_SPEED_MODE,
    .channel        = LEDC_CHANNEL_1,
    .intr_type      = LEDC_INTR_DISABLE,
    .timer_sel      = LEDC_TIMER_0,
    .duty           = 127-deadTime/2, // Set cycle to start just after 50%
    .hpoint         = 127,
};
ESP_ERROR_CHECK(ledc_channel_config(&ledc_complementary_channel));

Posted by Uli Köhler in ESP8266/ESP32

ESP32(-S3) LEDC inverted output example

#include <driver/ledc.h>
ledc_timer_config_t ledc_timer = {
    .speed_mode       = LEDC_LOW_SPEED_MODE,
    .duty_resolution  = LEDC_TIMER_8_BIT,
    .timer_num        = LEDC_TIMER_0,
    .freq_hz          = 100000,
    .clk_cfg          = LEDC_AUTO_CLK
};
ESP_ERROR_CHECK(ledc_timer_config(&amp;ledc_timer));

ledc_channel_config_t ledc_inverted_channel = {
    .gpio_num       = GPIO_NUM_11,
    .speed_mode     = LEDC_LOW_SPEED_MODE,
    .channel        = LEDC_CHANNEL_1,
    .intr_type      = LEDC_INTR_DISABLE,
    .timer_sel      = LEDC_TIMER_0,
    .duty           = 128, // Set cycle to start just after 50%
    .hpoint         = 0,
    .flags = {.output_invert = true}
};
ESP_ERROR_CHECK(ledc_channel_config(&amp;ledc_inverted_channel));


Posted by Uli Köhler in ESP8266/ESP32

ESP32(-S3) LEDC complementary PWM example

#include <driver/ledc.h>
ledc_timer_config_t ledc_timer = {
    .speed_mode       = LEDC_LOW_SPEED_MODE,
    .duty_resolution  = LEDC_TIMER_8_BIT,
    .timer_num        = LEDC_TIMER_0,
    .freq_hz          = 100000,
    .clk_cfg          = LEDC_AUTO_CLK
};
ESP_ERROR_CHECK(ledc_timer_config(&ledc_timer));

ledc_channel_config_t ledc_noninverted_channel = {
    .gpio_num       = GPIO_NUM_10,
    .speed_mode     = LEDC_LOW_SPEED_MODE,
    .channel        = LEDC_CHANNEL_0,
    .intr_type      = LEDC_INTR_DISABLE,
    .timer_sel      = LEDC_TIMER_0,
    .duty           = 127, // Set duty to 50%
    .hpoint         = 0
};
ESP_ERROR_CHECK(ledc_channel_config(&ledc_noninverted_channel));

ledc_channel_config_t ledc_inverted_channel = {
    .gpio_num       = GPIO_NUM_11,
    .speed_mode     = LEDC_LOW_SPEED_MODE,
    .channel        = LEDC_CHANNEL_1,
    .intr_type      = LEDC_INTR_DISABLE,
    .timer_sel      = LEDC_TIMER_0,
    .duty           = 128, // Set cycle to start just after 50%
    .hpoint         = 0,
    .flags = {.output_invert = true}
};
ESP_ERROR_CHECK(ledc_channel_config(&ledc_inverted_channel));

Posted by Uli Köhler in ESP8266/ESP32

ESP32 rmt_tx sync manager minimal example

See ESP32 rmt_tx simple pulse example (ESP-IDF) for an example without sync manager

#include <driver/rmt_tx.h>
rmt_channel_handle_t channel;
rmt_tx_channel_config_t tx_chan_config = {
    .gpio_num = GPIO_NUM_19,          // GPIO number
    .clk_src = RMT_CLK_SRC_DEFAULT,   // select source clock
    .resolution_hz = 1 * 1000 * 1000, // 1 MHz resolution
    .mem_block_symbols = 64,          // memory block size, 64 * 4 = 256 Bytes
    .trans_queue_depth = 1,           // set the number of transactions that can pend in the background
};
ESP_ERROR_CHECK(rmt_new_tx_channel(&tx_chan_config, &channel));
ESP_ERROR_CHECK(rmt_enable(channel));

rmt_symbol_word_t txdata[64];
txdata[0] = {
    .duration0 = 100,
    .level0 = 1,
    .duration1 = 0,
    .level1 = 0,
};

// install sync manager
rmt_channel_handle_t tx_channels[] = {channel};
rmt_sync_manager_handle_t synchro = NULL;
rmt_sync_manager_config_t synchro_config = {
    .tx_channel_array = tx_channels,
    .array_size = sizeof(tx_channels) / sizeof(rmt_channel_handle_t),
};
ESP_ERROR_CHECK(rmt_new_sync_manager(&synchro_config, &synchro));

// Create simple encoder
rmt_copy_encoder_config_t encoder_config;
rmt_encoder_handle_t encoder;
ESP_ERROR_CHECK(rmt_new_copy_encoder(&encoder_config, &encoder));

rmt_transmit_config_t tx_config = {
    .loop_count = 0, // no transfer loop
};

while(true)
{
    ESP_ERROR_CHECK(rmt_transmit(channel, encoder, pulseRMT, 1*sizeof(rmt_symbol_word_t), &tx_config));
    // Wait for one second
    vTaskDelay(10 / portTICK_PERIOD_MS);
}


Posted by Uli Köhler in Allgemein, ESP8266/ESP32

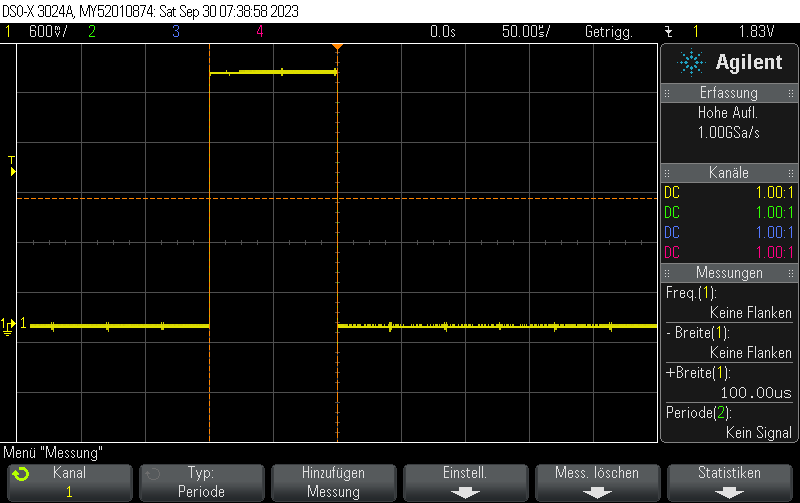
ESP32 rmt_tx simple pulse example (ESP-IDF)

In contrast to our previous example from  ESP32 RMT pulse generation minimal example using Arduino &#038; PlatformIO this example uses the new rmt_tx API.

#include <driver/rmt_tx.h>
rmt_channel_handle_t channel;
rmt_tx_channel_config_t tx_chan_config = {
    .gpio_num = GPIO_NUM_19,          // GPIO number
    .clk_src = RMT_CLK_SRC_DEFAULT,   // select source clock
    .resolution_hz = 1 * 1000 * 1000, // 1 MHz resolution
    .mem_block_symbols = 64,          // memory block size, 64 * 4 = 256 Bytes
    .trans_queue_depth = 1,           // set the number of transactions that can pend in the background
};
ESP_ERROR_CHECK(rmt_new_tx_channel(&tx_chan_config, &channel));
ESP_ERROR_CHECK(rmt_enable(channel));

rmt_symbol_word_t txdata[64];
txdata[0] = {
    .duration0 = 100,
    .level0 = 1,
    .duration1 = 0,
    .level1 = 0,
};

// Create simple encoder
rmt_copy_encoder_config_t encoder_config;
rmt_encoder_handle_t encoder;
ESP_ERROR_CHECK(rmt_new_copy_encoder(&encoder_config, &encoder));

rmt_transmit_config_t tx_config = {
    .loop_count = 0, // no transfer loop
};

while(true)
{
    ESP_ERROR_CHECK(rmt_transmit(channel, encoder, pulseRMT, 1*sizeof(rmt_symbol_word_t), &tx_config));
    // Wait for one second
    vTaskDelay(10 / portTICK_PERIOD_MS);
}

Result:

Posted by Uli Köhler in ESP8266/ESP32

How to fix ESP32 rmt: rmt_transmit(476): channel not in enable state

If you get the following error during a rmt_transmit() call:

rmt: rmt_transmit(476): channel not in enable state

call

ESP_ERROR_CHECK(rmt_enable(channel));

after calling rmt_new_tx_channel().

Full initialization example

rmt_channel_handle_t channel;
rmt_tx_channel_config_t tx_chan_config = {
    .gpio_num = GPIO_NUM_19,          // GPIO number
    .clk_src = RMT_CLK_SRC_DEFAULT,   // select source clock
    .resolution_hz = 1 * 1000 * 1000, // 1 MHz resolution
    .mem_block_symbols = 64,          // memory block size, 64 * 4 = 256 Bytes
    .trans_queue_depth = 1,           // set the number of transactions that can pend in the background
};
ESP_ERROR_CHECK(rmt_new_tx_channel(&tx_chan_config, &channel));
ESP_ERROR_CHECK(rmt_enable(channel));


Posted by Uli Köhler in ESP8266/ESP32

How to manually run KiCad KLC visual-diff

The kicad-library-utils have a nice visual diff tools which can be used to compare different versions of symbols.

Run it manually on a symbol library such as Regulator_Switching.kicad_sym using

python ~/dev/kicad-library-utils/html-diff/src/html_diff.py $(git rev-parse origin/master) Regulator_Switching.kicad_sym

This will compare the currently checked-out revision to the current origin/master revision (you might need to git fetch --all to update the current revision).

It will produce a directory Regulator_Switching.diff, containing one HTML files for each changed symbol.

Example:

Regulator_Switching.diff
└── TPS62130.html


Posted by Uli Köhler in KiCAD

What are the MPNs for JST HL crimp contacts?

  • The male contact is called SSM-21T-P1.4LCSC link, 0.0227€/pc @1000pcs
  • The female contact is called SSF-21T-P1.4LCSC link 0.0205€/pc @1000pcs

Prices are for reference only.

Posted by Uli Köhler in Components

Recommended open-source screenshot software

My recommended software for screenshots is Flameshot

Posted by Uli Köhler in Allgemein

How to find docker network ID for every docker-compose service running in the current directory

Run the following command in the directory where docker-compose.yml resides:

docker-compose -f $(find . -name 'docker-compose.yml' -type f) ps -q | xargs -I {} docker inspect --format '{{.Name}}: {{range .NetworkSettings.Networks}}{{.NetworkID}}{{end}}' {}

Example output:

/myservice-server-1: 3b533d2074e7230426adf0d269b399d356066130719ffd3ef68d6d492f3757f6
/myservice-ui-1: 3b533d2074e7230426adf0d269b399d356066130719ffd3ef68d6d492f3757f6

Breakdown of the command:

  • docker-compose -f $(find . -name 'docker-compose.yml' -type f) ps -q: This part finds all docker-compose.yml files in the current directory and its subdirectories and runs docker-compose ps -q for each of them. This command lists the running containers’ IDs for each service defined in the Docker Compose files.
  • xargs -I {} docker inspect --format '{{.Name}}: {{range .NetworkSettings.Networks}}{{.NetworkID}}{{end}}' {}: This part takes the container IDs output by the previous step and runs docker inspect on each of them. It extracts the container’s name and its Ethernet interface information using a custom format. It formats the output as “ServiceName: NetworkID.”
Posted by Uli Köhler in Docker

How to fix Python YAML namedtuple error: yaml.representer.RepresenterError: (‘cannot represent an object’, …

Problem:

You are trying to yaml.safe_dump() an object which is (or contains) a namedtuple instance such as:

import yaml
import collections

MyTuple = collections.namedtuple("MyTuple", ["a", "b", "c"])
mytuple = MyTuple(1,2,3)

yaml.safe_dump(mytuple)

which results in the following exception:

Traceback (most recent call last):
  File "<stdin>", line 1, in <module>
  File "/home/uli/.local/lib/python3.10/site-packages/yaml/__init__.py", line 269, in safe_dump
    return dump_all([data], stream, Dumper=SafeDumper, **kwds)
  File "/home/uli/.local/lib/python3.10/site-packages/yaml/__init__.py", line 241, in dump_all
    dumper.represent(data)
  File "/home/uli/.local/lib/python3.10/site-packages/yaml/representer.py", line 27, in represent
    node = self.represent_data(data)
  File "/home/uli/.local/lib/python3.10/site-packages/yaml/representer.py", line 58, in represent_data
    node = self.yaml_representers[None](self, data)
  File "/home/uli/.local/lib/python3.10/site-packages/yaml/representer.py", line 231, in represent_undefined
    raise RepresenterError("cannot represent an object", data)
yaml.representer.RepresenterError: ('cannot represent an object', MyTuple(a=1, b=2, c=3))

Solution:

You need to add a custom representer to implicitly convert your namedtuple to a dict.

Before running yaml.safe_dump(), add the following lines:

import collections

def represent_namedtuple(dumper, data):
    return dumper.represent_dict(data._asdict())

yaml.SafeDumper.add_representer(MyTuple, represent_namedtuple)

You need to add_representer() for every namedtuple you use!

Now, the yaml.safe_dump() call should work perfectly:

yaml.safe_dump(mytuple) # Returns 'a: 1\nb: 2\nc: 3\n'


Posted by Uli Köhler in Python

How to fix Python yaml.representer.RepresenterError: (‘cannot represent an object’, defaultdict(<class ‘list’>, ….

Problem:

You are trying to yaml.safe_dump() an object which is (or contains) a defaultdict, e.g.:

import yaml
import collections

yaml.safe_dump(collections.defaultdict(list))

which results in the following exception:

Traceback (most recent call last):
  File "<stdin>", line 1, in <module>
  File "/home/uli/.local/lib/python3.10/site-packages/yaml/__init__.py", line 269, in safe_dump
    return dump_all([data], stream, Dumper=SafeDumper, **kwds)
  File "/home/uli/.local/lib/python3.10/site-packages/yaml/__init__.py", line 241, in dump_all
    dumper.represent(data)
  File "/home/uli/.local/lib/python3.10/site-packages/yaml/representer.py", line 27, in represent
    node = self.represent_data(data)
  File "/home/uli/.local/lib/python3.10/site-packages/yaml/representer.py", line 58, in represent_data
    node = self.yaml_representers[None](self, data)
  File "/home/uli/.local/lib/python3.10/site-packages/yaml/representer.py", line 231, in represent_undefined
    raise RepresenterError("cannot represent an object", data)
yaml.representer.RepresenterError: ('cannot represent an object', defaultdict(<class 'list'>, {}))

Solution:

You need to add a custom representer to implicitly convert the defaultdict to a dict.

Before running yaml.safe_dump(), add the following lines:

import collections
from yaml.representer import Representer

yaml.SafeDumper.add_representer(collections.defaultdict, Representer.represent_dict)

Now, the yaml.safe_dump() call should work perfectly:

yaml.safe_dump(collections.defaultdict(list)) # Returns'{}\n'


Posted by Uli Köhler in Python

Python script to find largest files with given extension recursively

This simple Python script will list all files sorted by filesize in the given directory recursively. You must give an -e/--extension argument to only consider specific filename extensions. Filename extensions are compared in a case-insensitive manner.

#!/usr/bin/env python3
import os
import argparse

def convert_size(size_bytes):
    """ Convert byte size to a human-readable format. """
    for unit in ['B', 'KB', 'MB', 'GB', 'TB', 'PB', 'EB']:
        if size_bytes < 1024:
            return f"{size_bytes:.2f}{unit}"
        size_bytes /= 1024
    return f"{size_bytes:.2f}YB"

def get_files_with_extensions(root_dir, extensions):
    """ Recursively find files with the given extensions in the directory. """
    for root, dirs, files in os.walk(root_dir):
        for file in files:
            if any(file.lower().endswith(ext.lower()) for ext in extensions):
                full_path = os.path.join(root, file)
                size = os.path.getsize(full_path)
                yield full_path, size

def main():
    parser = argparse.ArgumentParser(description="List files with specific extensions sorted by size.")
    parser.add_argument("directory", type=str, help="Directory to search")
    parser.add_argument("-e", "--extension", type=str, action='append', help="File extension to filter by", required=True)
    args = parser.parse_args()

    files = list(get_files_with_extensions(args.directory, args.extension))
    files.sort(key=lambda x: x[1])

    for file, size in files:
        print(f"{convert_size(size)} - {file}")

if __name__ == "__main__":
    main()

Usage example: Find largest Python files:

python ListLargestFiles.py -e py  .

Usage example: Find (some types of) movies:

python ListLargestFiles.py -e mov -e avi -e mkv -e mp4 ~/Nextcloud

Example output:

[...]
108.81MB - /home/uli/Nextcloud/Google Fotos/20220925_151542.mp4
117.92MB - /home/uli/Nextcloud/Google Fotos/20220925_151958.mp4
237.51MB - /home/uli/Nextcloud/Google Fotos/20220911_115209.mp4
265.02MB - /home/uli/Nextcloud/Google Fotos/20220905_151716.mp4
317.36MB - /home/uli/Nextcloud/Google Fotos/20220912_124906.mp4
431.06MB - /home/uli/Nextcloud/Google Fotos/20220921_153051.mp4
Posted by Uli Köhler in Python

What is a practical OPUS bitrate for podcasts?

My recommendation for podcast audio is:

  • If the OPUS file is mainly intended for listening, choose 32kbit/s with VBR. This will cause a little distortion to the voices
  • If the OPUS file is mainly intended for archival and later listening, choose 48 kbit/s with VBR. The difference between a WAV file and a OPUS file with 48 kbit/s for speech data is hardly distinguishable even using headphones, unless you specifically compare the data (as in A-B tests).
  • For pure archival – in order to reduce generational loss – you can of course use lossless FLAC encoding. However, practically speaking, a 64kbit/s (or 96kbit/s if you’re just too paranoid) VBR-enabled OPUS file is so transparent that it’s hardly worth spending the huge amount of hard drive space using FLAC.

Note that VBR (variable bitrate) should always be enabled for speech data, since most podcast/speech-like data contains lots of silence. Therefore, using pure constant bitrate is strongly discouraged.

Posted by Uli Köhler in Audio

Fast & practical AV1 video encoding using ffmpeg

This command allows you to encode videos as AVI with near-realtime speed on commodity computers.

On a more modern AMD server, this works with a AMD Ryzen 5 3600, this works at up to 0.4x speed (~10..15 encode frames per second) for phone video up to ~2.5x for webinar-like video. However, some movies such as shaky phone video, will only work at 0.05x speed = 0.8 encoded frames per second. It really depends on many factors, and also will change a lot during encoding. You need to encode the entire video to judge both the speed and the resulting file size.
On older computers, or for certain movie clips, this can still be horribly slow (Down to ~0.3 encoded frames per second). Consider using H.265 as an alternative, but keep in mind that it’s much, much less space-efficient.

ffmpeg -i input.mp4 -crf 35 -c:v libaom-av1 -usage realtime -tune 0 -c:a libopus -b:a 64k av1.mkv

The most important flag here is -usage realtime which configures the encoder to use fast (as opposed to slow and more efficient) encoding.

-c:a libopus -b:a 64k is optional here but if you’re investing the computing time into re-encoding your video, you might as well re-encode the audio to use a proper codec.

-tune 0 configures the encoder to optimize for visual quality.

See the ffmpeg info page on AV1 for more info. Note that at least on Ubuntu 22.04, only the libaom-av1 encoder is included in the standard ffmpeg version.

Posted by Uli Köhler in Video

How to re-encode all WAV files in the current directory to OPUS

for i in *.wav ; do ffmpeg -i "${i}" -c:a libopus -vbr on -compression_level 10 "${i}.opus" ; done


Posted by Uli Köhler in Audio