Docker

How I fixed docker panic: assertion failed: write: circular dependency occurred

Problem:

When starting docker on a VM that got suddenly turned off before during a power outage, the docker daemon failed to start up with the following error log:

Jan 05 15:15:14 CoreOS-Haar dockerd[5333]: time="2022-01-05T15:15:14.946815577Z" level=info msg="Starting up" 
Jan 05 15:15:14 CoreOS-Haar dockerd[5333]: time="2022-01-05T15:15:14.947842629Z" level=info msg="detected 127.0.0.53 nameserver, assuming systemd-resolved, so using resolv.conf: /run/systemd/resolve/resolv.conf" 
Jan 05 15:15:14 CoreOS-Haar dockerd[5333]: time="2022-01-05T15:15:14.949500623Z" level=info msg="parsed scheme: \"unix\"" module=grpc
Jan 05 15:15:14 CoreOS-Haar dockerd[5333]: time="2022-01-05T15:15:14.949617127Z" level=info msg="scheme \"unix\" not registered, fallback to default scheme" module=grpc
Jan 05 15:15:14 CoreOS-Haar dockerd[5333]: time="2022-01-05T15:15:14.949705114Z" level=info msg="ccResolverWrapper: sending update to cc: {[{unix:///run/containerd/containerd.sock  <nil> 0 <nil>}] <nil> <nil>}" module=grpc
Jan 05 15:15:14 CoreOS-Haar dockerd[5333]: time="2022-01-05T15:15:14.949776371Z" level=info msg="ClientConn switching balancer to \"pick_first\"" module=grpc
Jan 05 15:15:14 CoreOS-Haar dockerd[5333]: time="2022-01-05T15:15:14.950747679Z" level=info msg="parsed scheme: \"unix\"" module=grpc
Jan 05 15:15:14 CoreOS-Haar dockerd[5333]: time="2022-01-05T15:15:14.950788173Z" level=info msg="scheme \"unix\" not registered, fallback to default scheme" module=grpc
Jan 05 15:15:14 CoreOS-Haar dockerd[5333]: time="2022-01-05T15:15:14.950806216Z" level=info msg="ccResolverWrapper: sending update to cc: {[{unix:///run/containerd/containerd.sock  <nil> 0 <nil>}] <nil> <nil>}" module=grpc
Jan 05 15:15:14 CoreOS-Haar dockerd[5333]: time="2022-01-05T15:15:14.950815090Z" level=info msg="ClientConn switching balancer to \"pick_first\"" module=grpc
Jan 05 15:15:15 CoreOS-Haar dockerd[5333]: time="2022-01-05T15:15:15.012683899Z" level=info msg="[graphdriver] using prior storage driver: overlay2" 
Jan 05 15:15:15 CoreOS-Haar dockerd[5333]: time="2022-01-05T15:15:15.027806434Z" level=warning msg="Docker could not enable SELinux on the host system" 
Jan 05 15:15:15 CoreOS-Haar dockerd[5333]: time="2022-01-05T15:15:15.176098505Z" level=info msg="Loading containers: start." 
Jan 05 15:15:15 CoreOS-Haar dockerd[5333]: time="2022-01-05T15:15:15.728503609Z" level=info msg="Removing stale sandbox 22e03a9f65217fa0ce1603fa1d6326b7bf412777be94e930b02dbe6554549084 (154aa4bd403045e229b39cc4dda1d16a72b45d18671cab7c993bff4eaee9c2c9)" 
Jan 05 15:15:15 CoreOS-Haar dockerd[5333]: panic: assertion failed: write: circular dependency occurred
Jan 05 15:15:15 CoreOS-Haar dockerd[5333]: goroutine 1 [running]:
Jan 05 15:15:15 CoreOS-Haar dockerd[5333]: github.com/docker/docker/vendor/go.etcd.io/bbolt._assert(...)
Jan 05 15:15:15 CoreOS-Haar dockerd[5333]:         /builddir/build/BUILD/moby-20.10.11/src/github.com/docker/docker/vendor/go.etcd.io/bbolt/db.go:1172
Jan 05 15:15:15 CoreOS-Haar dockerd[5333]: github.com/docker/docker/vendor/go.etcd.io/bbolt.(*node).write(0xc0001e16c0, 0xc001381000)
Jan 05 15:15:15 CoreOS-Haar dockerd[5333]:         /builddir/build/BUILD/moby-20.10.11/src/github.com/docker/docker/vendor/go.etcd.io/bbolt/node.go:233 +0x3c5
Jan 05 15:15:15 CoreOS-Haar dockerd[5333]: github.com/docker/docker/vendor/go.etcd.io/bbolt.(*node).spill(0xc0001e16c0, 0xc0012da078, 0x1)
Jan 05 15:15:15 CoreOS-Haar dockerd[5333]:         /builddir/build/BUILD/moby-20.10.11/src/github.com/docker/docker/vendor/go.etcd.io/bbolt/node.go:374 +0x225
Jan 05 15:15:15 CoreOS-Haar dockerd[5333]: github.com/docker/docker/vendor/go.etcd.io/bbolt.(*node).spill(0xc0001e1650, 0xc000fefaa0, 0xc000d9dc50)
Jan 05 15:15:15 CoreOS-Haar dockerd[5333]:         /builddir/build/BUILD/moby-20.10.11/src/github.com/docker/docker/vendor/go.etcd.io/bbolt/node.go:346 +0xbc
Jan 05 15:15:15 CoreOS-Haar dockerd[5333]: github.com/docker/docker/vendor/go.etcd.io/bbolt.(*Bucket).spill(0xc000d6f180, 0xc000fefa00, 0xc000d9de40)
Jan 05 15:15:15 CoreOS-Haar dockerd[5333]:         /builddir/build/BUILD/moby-20.10.11/src/github.com/docker/docker/vendor/go.etcd.io/bbolt/bucket.go:570 +0x49a
Jan 05 15:15:15 CoreOS-Haar dockerd[5333]: github.com/docker/docker/vendor/go.etcd.io/bbolt.(*Bucket).spill(0xc000fca2b8, 0x310b759f, 0x55dfe7bf17e0)
Jan 05 15:15:15 CoreOS-Haar dockerd[5333]:         /builddir/build/BUILD/moby-20.10.11/src/github.com/docker/docker/vendor/go.etcd.io/bbolt/bucket.go:537 +0x3f6
Jan 05 15:15:15 CoreOS-Haar dockerd[5333]: github.com/docker/docker/vendor/go.etcd.io/bbolt.(*Tx).Commit(0xc000fca2a0, 0x0, 0x0)
Jan 05 15:15:15 CoreOS-Haar dockerd[5333]:         /builddir/build/BUILD/moby-20.10.11/src/github.com/docker/docker/vendor/go.etcd.io/bbolt/tx.go:160 +0xe8
Jan 05 15:15:15 CoreOS-Haar dockerd[5333]: github.com/docker/docker/vendor/go.etcd.io/bbolt.(*DB).Update(0xc000d6bc00, 0xc000d9e078, 0x0, 0x0)
Jan 05 15:15:15 CoreOS-Haar dockerd[5333]:         /builddir/build/BUILD/moby-20.10.11/src/github.com/docker/docker/vendor/go.etcd.io/bbolt/db.go:701 +0x105
Jan 05 15:15:15 CoreOS-Haar dockerd[5333]: github.com/docker/docker/vendor/github.com/docker/libkv/store/boltdb.(*BoltDB).AtomicPut(0xc000a862d0, 0xc000fd32d0, 0x65, 0xc000d46300, 0x179, 0x180, 0xc000fef890, 0x0, 0x55dfe5407900, 0x0, ...)
Jan 05 15:15:15 CoreOS-Haar dockerd[5333]:         /builddir/build/BUILD/moby-20.10.11/src/github.com/docker/docker/vendor/github.com/docker/libkv/store/boltdb/boltdb.go:371 +0x225
Jan 05 15:15:15 CoreOS-Haar dockerd[5333]: github.com/docker/docker/vendor/github.com/docker/libnetwork/datastore.(*datastore).PutObjectAtomic(0xc000c3bbc0, 0x55dfe6bd1398, 0xc000efad20, 0x0, 0x0)
Jan 05 15:15:15 CoreOS-Haar dockerd[5333]:         /builddir/build/BUILD/moby-20.10.11/src/github.com/docker/docker/vendor/github.com/docker/libnetwork/datastore/datastore.go:415 +0x3ca
Jan 05 15:15:15 CoreOS-Haar dockerd[5333]: github.com/docker/docker/vendor/github.com/docker/libnetwork/drivers/bridge.(*driver).storeUpdate(0xc0000c3c00, 0x55dfe6bd1398, 0xc000efad20, 0x0, 0x0)
Jan 05 15:15:15 CoreOS-Haar dockerd[5333]:         /builddir/build/BUILD/moby-20.10.11/src/github.com/docker/docker/vendor/github.com/docker/libnetwork/drivers/bridge/bridge_store.go:106 +0x6e
Jan 05 15:15:15 CoreOS-Haar dockerd[5333]: github.com/docker/docker/vendor/github.com/docker/libnetwork/drivers/bridge.(*driver).RevokeExternalConnectivity(0xc0000c3c00, 0xc000f19d80, 0x40, 0xc00111c300, 0x40, 0x0, 0x0)
Jan 05 15:15:15 CoreOS-Haar dockerd[5333]:         /builddir/build/BUILD/moby-20.10.11/src/github.com/docker/docker/vendor/github.com/docker/libnetwork/drivers/bridge/bridge.go:1405 +0x1f1
Jan 05 15:15:15 CoreOS-Haar dockerd[5333]: github.com/docker/docker/vendor/github.com/docker/libnetwork.(*endpoint).sbLeave(0xc000d41e40, 0xc000f63200, 0x1, 0x0, 0x0, 0x0, 0x0, 0xc001b91ce0)
Jan 05 15:15:15 CoreOS-Haar dockerd[5333]:         /builddir/build/BUILD/moby-20.10.11/src/github.com/docker/docker/vendor/github.com/docker/libnetwork/endpoint.go:751 +0x1326
Jan 05 15:15:15 CoreOS-Haar dockerd[5333]: github.com/docker/docker/vendor/github.com/docker/libnetwork.(*endpoint).Delete(0xc000d41b80, 0xc000f19d01, 0x0, 0x0)
Jan 05 15:15:15 CoreOS-Haar dockerd[5333]:         /builddir/build/BUILD/moby-20.10.11/src/github.com/docker/docker/vendor/github.com/docker/libnetwork/endpoint.go:842 +0x374
Jan 05 15:15:15 CoreOS-Haar dockerd[5333]: github.com/docker/docker/vendor/github.com/docker/libnetwork.(*sandbox).delete(0xc000f63200, 0x1, 0x55dfe61ee216, 0x1e)
Jan 05 15:15:15 CoreOS-Haar dockerd[5333]:         /builddir/build/BUILD/moby-20.10.11/src/github.com/docker/docker/vendor/github.com/docker/libnetwork/sandbox.go:229 +0x191
Jan 05 15:15:15 CoreOS-Haar dockerd[5333]: github.com/docker/docker/vendor/github.com/docker/libnetwork.(*controller).sandboxCleanup(0xc000432a00, 0x0)
Jan 05 15:15:15 CoreOS-Haar dockerd[5333]:         /builddir/build/BUILD/moby-20.10.11/src/github.com/docker/docker/vendor/github.com/docker/libnetwork/sandbox_store.go:278 +0xdae
Jan 05 15:15:15 CoreOS-Haar dockerd[5333]: github.com/docker/docker/vendor/github.com/docker/libnetwork.New(0xc0000c3b80, 0x9, 0x10, 0xc000878090, 0xc001e69e60, 0xc0000c3b80, 0x9)
Jan 05 15:15:15 CoreOS-Haar dockerd[5333]:         /builddir/build/BUILD/moby-20.10.11/src/github.com/docker/docker/vendor/github.com/docker/libnetwork/controller.go:248 +0x726
Jan 05 15:15:15 CoreOS-Haar dockerd[5333]: github.com/docker/docker/daemon.(*Daemon).initNetworkController(0xc00000c1e0, 0xc00021a000, 0xc001e69e60, 0xc000151270, 0xc00000c1e0, 0xc000686a10, 0xc001e69e60)
Jan 05 15:15:15 CoreOS-Haar dockerd[5333]:         /builddir/build/BUILD/moby-20.10.11/src/github.com/docker/docker/daemon/daemon_unix.go:855 +0xac
Jan 05 15:15:15 CoreOS-Haar dockerd[5333]: github.com/docker/docker/daemon.(*Daemon).restore(0xc00000c1e0, 0xc00045c4c0, 0xc00023e2a0)
Jan 05 15:15:15 CoreOS-Haar dockerd[5333]:         /builddir/build/BUILD/moby-20.10.11/src/github.com/docker/docker/daemon/daemon.go:490 +0x52c
Jan 05 15:15:15 CoreOS-Haar dockerd[5333]: github.com/docker/docker/daemon.NewDaemon(0x55dfe6bad710, 0xc00045c4c0, 0xc00021a000, 0xc000878090, 0x0, 0x0, 0x0)
Jan 05 15:15:15 CoreOS-Haar dockerd[5333]:         /builddir/build/BUILD/moby-20.10.11/src/github.com/docker/docker/daemon/daemon.go:1150 +0x2c1d
Jan 05 15:15:15 CoreOS-Haar dockerd[5333]: main.(*DaemonCli).start(0xc000b62720, 0xc00009a8a0, 0x0, 0x0)
Jan 05 15:15:15 CoreOS-Haar dockerd[5333]:         /builddir/build/BUILD/moby-20.10.11/src/github.com/docker/docker/cmd/dockerd/daemon.go:195 +0x785
Jan 05 15:15:15 CoreOS-Haar dockerd[5333]: main.runDaemon(...)
Jan 05 15:15:15 CoreOS-Haar dockerd[5333]:         /builddir/build/BUILD/moby-20.10.11/src/github.com/docker/docker/cmd/dockerd/docker_unix.go:13
Jan 05 15:15:15 CoreOS-Haar dockerd[5333]: main.newDaemonCommand.func1(0xc0000bc2c0, 0xc0000b2000, 0x0, 0xc, 0x0, 0x0)
Jan 05 15:15:15 CoreOS-Haar dockerd[5333]:         /builddir/build/BUILD/moby-20.10.11/src/github.com/docker/docker/cmd/dockerd/docker.go:34 +0x7d
Jan 05 15:15:15 CoreOS-Haar dockerd[5333]: github.com/docker/docker/vendor/github.com/spf13/cobra.(*Command).execute(0xc0000bc2c0, 0xc00011caa0, 0xc, 0xc, 0xc0000bc2c0, 0xc00011caa0)
Jan 05 15:15:15 CoreOS-Haar dockerd[5333]:         /builddir/build/BUILD/moby-20.10.11/src/github.com/docker/docker/vendor/github.com/spf13/cobra/command.go:850 +0x472
Jan 05 15:15:15 CoreOS-Haar dockerd[5333]: github.com/docker/docker/vendor/github.com/spf13/cobra.(*Command).ExecuteC(0xc0000bc2c0, 0x0, 0x0, 0x10)
Jan 05 15:15:15 CoreOS-Haar dockerd[5333]:         /builddir/build/BUILD/moby-20.10.11/src/github.com/docker/docker/vendor/github.com/spf13/cobra/command.go:958 +0x375
Jan 05 15:15:15 CoreOS-Haar dockerd[5333]: github.com/docker/docker/vendor/github.com/spf13/cobra.(*Command).Execute(...)
Jan 05 15:15:15 CoreOS-Haar dockerd[5333]:         /builddir/build/BUILD/moby-20.10.11/src/github.com/docker/docker/vendor/github.com/spf13/cobra/command.go:895
Jan 05 15:15:15 CoreOS-Haar dockerd[5333]: main.main()
Jan 05 15:15:15 CoreOS-Haar dockerd[5333]:         /builddir/build/BUILD/moby-20.10.11/src/github.com/docker/docker/cmd/dockerd/docker.go:97 +0x185
Jan 05 15:15:15 CoreOS-Haar systemd[1]: docker.service: Main process exited, code=exited, status=2/INVALIDARGUMENT

Solution:

First, try moving /var/lib/docker/network/files/local-kv.db:

sudo mv /var/lib/docker/network/files/local-kv.db /opt/old-docker-local-kv.db

and then restarting docker using e.g. sudo systemctl restart docker, which worked for many users on GitHub.

Only if that does not work, try the following brute-force method!

Move the /var/lib/docker directory to a new location for backup, after which docker was able to start up again:

sudo mv /var/lib/docker /opt/old-var-lib-docker

This is a pretty brute-force method of doing that but for me it worked totally fine since my setup did not use volumes but local directories. In case you are actively using volumes, you might need to restore the volumes from /opt/old-var-lib-docker manually!
 

Posted by Uli Köhler in Container, Docker

Simple uptime-kuma docker-compose setup: Self-hosted UptimeRobot alternative

In order to install Uptime-Kuma, first create a directory for the service to reside in. In this example, we’ll use /opt/uptimekuma

Note that at the moment UptimeKuma only supports one user, so if you need multiple users, you need to create multiple instances of Uptime-Kuma. Fortunately, this is extremely easy using docker-compose.

Now we will create docker-compose.yml

version: '3'
services:
  kuma:
    image: 'louislam/uptime-kuma:1'
    ports:
      - '17958:3001'
    volumes:
      - './uptimekuma_data:/app/data'

This will listen on port 17958. You can choose any port you want here, just make sure to choose different ports when running different instances of uptime-kuma.

Now you can use our script from Create a systemd service for your docker-compose project in 10 seconds to automatically start Uptime-Kuma on boot (and start it immediately):

curl -fsSL https://techoverflow.net/scripts/create-docker-compose-service.sh | sudo bash /dev/stdin

Now access https://<IP of controller>:17958 (or your custom HTTP port) to get started with the Uptime-Kuma setup.

Posted by Uli Köhler in Docker

Simple XenOrchestra setup using docker-compose

Also see this variant with Traefik reverse proxy config: XenOrchestra docker-compose setup with Traefik labels

Create a directory such as /opt/xenorchestra and create docker-compose.yml:

version: '3'
services:
    xen-orchestra:
        restart: unless-stopped
        image: ronivay/xen-orchestra:latest
        container_name: xen-orchestra
        network_mode: host
        stop_grace_period: 1m
        environment:
          - HTTP_PORT=1780
        cap_add:
          - SYS_ADMIN
        security_opt:
          - apparmor:unconfined
        volumes:
          - ./xo-data:/var/lib/xo-server
          - ./redis-data:/var/lib/redis

You can choose any HTTP port you want using HTTP_PORT=1780. In this case, we opted for using network_mode: host to bypass the docker networking, since XenOrchestra seems to work better with full network access instead of the container having an own IP.

Now you can use our script from Create a systemd service for your docker-compose project in 10 seconds to automatically start XenOrchestra on boot (and start it immediately):

curl -fsSL https://techoverflow.net/scripts/create-docker-compose-service.sh | sudo bash /dev/stdin

Now access https://<IP of controller>:1780 (or your custom HTTP port) to get started with the XO setup.

Posted by Uli Köhler in Docker, Virtualization

Simple Unifi controller setup using docker-compose

Updated 2022-12-24: Added --bind_ip 127.0.0.1 to prevent remote MongoDB access in context with network_mode: host. Thanks Matt Johnson for the suggestion 🙂

This setup runs both MongoDB and unifi using network_mode: host, this is why we are running MongoDB on a nonstandard port (so it will not interfere with other MongoDB instances). This has the huge benefit of allowing direct Layer 2 network access allowing L2 access point adoption.

Create a directory such as /opt/unifi and create docker-compose.yml

version: '2.3'
services:
  mongo:
    image: mongo:3.6
    network_mode: host
    restart: always
    volumes:
      - ./mongo_db:/data/db
      - ./mongo/dbcfg:/data/configdb
    command: mongod --bind_ip 127.0.0.1 --port 29718
  controller:
    image: "jacobalberty/unifi:latest"
    depends_on:
      - mongo
    init: true
    network_mode: host
    restart: always
    volumes:
      - ./unifi_dir:/unifi
      - ./unifi_data:/unifi/data
      - ./unifi_log:/unifi/log
      - ./unifi_cert:/unifi/cert
      - ./unifi_init:/unifi/init.d
      - ./unifi_run:/var/run/unifi
      - ./unifi_backup:/unifi/data/backup
    environment:
      - DB_URI=mongodb://localhost:29718/unifi
      - STATDB_URI=mongodb://localhost:29718/unifi_stat
      - DB_NAME=unifi
  logs:
    image: bash
    depends_on:
      - controller
    command: bash -c 'tail -F /unifi/log/*.log'
    restart: always
    volumes:
      - ./unifi_log:/unifi/log

Now create the directories with the correct permissions:

mkdir -p unifi_backup unifi_cert unifi_data unifi_dir unifi_init unifi_log unifi_run
chown -R 999:999 unifi_backup unifi_cert unifi_data unifi_dir unifi_init unifi_log unifi_run

Now you can use our script from Create a systemd service for your docker-compose project in 10 seconds to automatically start the controller on boot (and start it immediately):

curl -fsSL https://techoverflow.net/scripts/create-docker-compose-service.sh | sudo bash /dev/stdin

Now access https://<IP of controller>:8443 to get started with the setup or import a backup.

Posted by Uli Köhler in Docker, Networking

How to fix Unifi controller on Docker error /unifi/data/system.properties: Permission denied

Problem:

Your Unifi controller running on docker or docker-compose shows log messages like

controller_1  | [2021-12-29 17:37:26,396] <docker-entrypoint> Starting unifi controller service.
controller_1  | /usr/local/bin/docker-entrypoint.sh: line 97: /unifi/data/system.properties: Permission denied

on startup.

Solution:

Fix the permissions of the directory mounted. I have listed

volumes:
  - ./unifi_data:/unifi/data

in my docker-compose.yml.

Fix the permissions by

sudo chown -R 999:999 unifi_data
Posted by Uli Köhler in Container, Docker

Simple HomeAssistant docker-compose setup

First, create a directory where HomeAssistant will reside. I use /opt/homeassistant.

Create docker-compose.yml:

version: '3.5'
services:
  homeassistant:
    container_name: homeassistant
    restart: unless-stopped
    image: ghcr.io/home-assistant/home-assistant:stable
    network_mode: host
    privileged: true
    environment:
      - TZ=Europe/Berlin
    volumes:
      - ./homeassistant_config:/config
    depends_on:
      - mosquitto
  mosquitto:
    image: eclipse-mosquitto
    network_mode: host
    volumes:
      - ./mosquitto_conf:/mosquitto/config
      - ./mosquitto_data:/mosquitto/data
      - ./mosquitto_log:/mosquitto/log

Now start homeassistant so it creates the default config files:

docker-compose up

Once you see

homeassistant    | [services.d] done.

Press Ctrl+C to abort.

Now we’ll create the Mosquitto MQTT server config file in mosquitto_conf/mosquitto.conf:

persistence true
persistence_location /mosquitto/data/
log_dest file /mosquitto/log/mosquitto.log

listener 1883
## Authentication ##
allow_anonymous false
password_file /mosquitto/config/mosquitto.passwd

Now create the mosquitto password file and fix the permissions using

touch mosquitto_conf/mosquitto.passwd
chown -R 1883:1883 mosquitto_conf

We can now start create the homeassistant mosquitto user using

docker-compose run mosquitto mosquitto_passwd -c /mosquitto/config/mosquitto.passwd homeassistant

Enter a random password that will be used for the homeassistant user

Now we can edit the homeassistant config homeassistant_config/configuration.yml. This is my config – ensure to insert the random MQTT password we used before instead of ep2ooy8di3avohn1Ahm6eegheiResh:

# Configure a default setup of Home Assistant (frontend, api, etc)
default_config:

http:
  use_x_forwarded_for: true
  trusted_proxies:
  - 127.0.0.1
  ip_ban_enabled: true
  login_attempts_threshold: 5

mqtt:
  broker: "127.0.0.1"
  username: "homeassistant"
  password: "ep2ooy8di3avohn1Ahm6eegheiResh"

# Text to speech
tts:
  - platform: google_translate

group: !include groups.yaml
automation: !include automations.yaml
script: !include scripts.yaml
scene: !include scenes.yaml

Now we can start the server using

docker-compose up

You can also use our script to generate a systemd service to autostart the docker-compose config on boot:

curl -fsSL https://techoverflow.net/scripts/create-docker-compose-service.sh | sudo bash /dev/stdin

Now login to the web interface on port 8123 and configure your HomeAssistant!

Posted by Uli Köhler in Container, Docker, Home-Assistant, MQTT

How to fix Caddy container generating docker volume with autosave.json

My docker-compose-based Caddy setup re-created the container and hence created a new docker volume with only the autosave.json whenever it was restarted. Since it was auto-restarted once a minute, this led do over 70000 volumes piling up in /var/lib/docker/volumes.

The Caddy log shows that Caddy is creating /config/caddy/autosave.json:

mycaddy_1 | {"level":"info","ts":1637877640.7375677,"msg":"autosaved config (load with --resume flag)","file":"/config/caddy/autosave.json"}

I fixed this by mapping /config/caddy to a local directory:

- ./caddy_data:/config/caddy/

Complete docker-compose.yml example:

version: '3.5'
services:
  mycaddy:
    image: 'caddy:2.4.6-alpine'
    volumes:
      - ./caddy_data:/config/caddy/
      - ./static:/usr/share/caddy
      - ./Caddyfile:/etc/caddy/Caddyfile
    ports:
      - 19815:80


Posted by Uli Köhler in Docker, Networking

How to fix Mosquitto ‘exited with code 13’

When mosquitto exits with code 13 such as a in a docker based setup, you will often see not error messsage:

Attaching to mosquitto_mosquitto_1
mosquitto_mosquitto_1 exited with code 13

However, there will be an error message in mosquitto.logSo, ensure that you have configured a log_dest file in your mosquitto.conf such as:

log_dest file /mosquitto/log/mosquitto.log

and check that file. In my case it showed these error messages:

1637860284: mosquitto version 2.0.14 starting
1637860284: Config loaded from /mosquitto/config/mosquitto.conf.
1637860284: Error: Unable to open pwfile "/mosquitto/conf/mosquitto.passwd".
1637860284: Error opening password file "/mosquitto/conf/mosquitto.passwd".

In my case, the path of the password file was mis-spelled (conf instead of config)

Note that you need to create the password file in order for mosquitto to start up!

See How to setup standalone mosquitto MQTT broker using docker-compose for example commands on how to create the user and the password file


Posted by Uli Köhler in Docker, MQTT

How to fix Docker Home-Assistant [finish] process exit code 256

Problem:

Your Docker container running home-assistant always exits immediately after starting up, with the log being similar to this:

$ docker-compose up
Recreating homeassistant ... done
Attaching to homeassistant
homeassistant    | [s6-init] making user provided files available at /var/run/s6/etc...exited 0.
homeassistant    | [s6-init] ensuring user provided files have correct perms...exited 0.
homeassistant    | [fix-attrs.d] applying ownership & permissions fixes...
homeassistant    | [fix-attrs.d] done.
homeassistant    | [cont-init.d] executing container initialization scripts...
homeassistant    | [cont-init.d] done.
homeassistant    | [services.d] starting services
homeassistant    | [services.d] done.
homeassistant    | [finish] process exit code 256
homeassistant    | [finish] process received signal 15
homeassistant    | [cont-finish.d] executing container finish scripts...
homeassistant    | [cont-finish.d] done.
homeassistant    | [s6-finish] waiting for services.
homeassistant    | [s6-finish] sending all processes the TERM signal.
homeassistant    | [s6-finish] sending all processes the KILL signal and exiting.
homeassistant exited with code 0

Solution:

You need to start the container with --privileged=true if using docker directly to start up the service, or use privileged: true if using docker-compose.

Here’s an example of a working docker-compose.yml file:

version: '3.5'
services:
  homeassistant:
    container_name: homeassistant
    restart: unless-stopped
    image: ghcr.io/home-assistant/home-assistant:stable
    network_mode: host
    privileged: true
    environment:
      - TZ=Europe/Berlin
    volumes:
      - ./config:/config

https://techoverflow.net/wp-admin/post-new.php#category-all

Posted by Uli Köhler in Container, Docker, Home-Assistant

How to optimize MySQL/MariaDB tables in docker-compose

If your MariaDB / MySQL root password is stored in .env , use this command:

source .env && docker-compose exec mariadb mysqlcheck -uroot -p$MARIADB_ROOT_PASSWORD --auto-repair --optimize --all-databases

You can also directly use the root password in the command:

docker-compose exec mariadb mysqlcheck -uroot -phoox8AiFahuniPaivatoh2iexighee --auto-repair --optimize --all-databases


Posted by Uli Köhler in Container, Databases, Docker

How to enable Collabora for multiple domains using docker-compose

In our previous post How to run Collabora office for Nextcloud using docker-compose we investigated how to configure your Collabora office server using docker-compose.yml.

NEW answer for newer collabora versions

If you want to use multiple domains, you need to change this line in .env:

COLLABORA_DOMAIN=collabora.mydomain.com

to

aliasgroup1=https://nextcloud.mydomain.com:443,https://nextcloud.myseconddomain.com:443

OLD answer for older versions of collabora

If you want to use multiple domains, you need to change this line in .env:

COLLABORA_DOMAIN=collabora.mydomain.com

By reading the source code I found out that COLLABORA_DOMAIN is interpreted as a regular expression. Therefore you can use a (...|...|...) syntax.

COLLABORA_DOMAIN=(nextcloud.mydomain.com|nextcloud.myseconddomain.com)

After that, restart collabora.

Posted by Uli Köhler in Docker, Nextcloud

How to run Collabora office for Nextcloud using docker-compose

Create this docker-compose.yml, e.g. in /opt/collabora-mydomain:

version: '3'
services:
  code:
    image: collabora/code:latest
    restart: always
    environment:
      - password=${COLLABORA_PASSWORD}
      - username=${COLLABORA_USERNAME}
      - domain=${COLLABORA_DOMAIN}
      - extra_params=--o:ssl.enable=true
    ports:
      - 9980:9980

Now create this .env with the configuration. You need to change the password and the domain!

COLLABORA_USERNAME=admin
COLLABORA_PASSWORD=veecheit0Phophiesh1fahPah0Wue3
COLLABORA_DOMAIN=collabora.mydomain.com

Now you can create a systemd service to autostart by using our script from Create a systemd service for your docker-compose project in 10 seconds.

Run from inside your directory (e.g. /opt/collabora-mydomain)

curl -fsSL https://techoverflow.net/scripts/create-docker-compose-service.sh | sudo bash /dev/stdin

Now you need to configure your reverse proxy to point to port 9980. Here’s an example nginx config:

server {
    server_name collabora.mydomain.com;

    access_log /var/log/nginx/collabora.mydomain.com.access_log;
    error_log /var/log/nginx/collabora.mydomain.com.error_log info;

    location / {
        proxy_pass https://127.0.0.1:9980;
        proxy_http_version 1.1;
        proxy_read_timeout 3600s;
        proxy_set_header Upgrade $http_upgrade;
        proxy_set_header Connection "Upgrade";
        proxy_set_header Host            $host;
        proxy_set_header X-Forwarded-For $remote_addr;
        proxy_set_header X-Forwarded-Proto $scheme;
        add_header X-Frontend-Host $host;
        add_header Strict-Transport-Security "max-age=31536000; includeSubDomains" always;
    }

    listen [::]:80; # managed by Certbot
}

Now open your browser and open collabora.mydomain.com. If collabora is running correctly, you should see:

OK

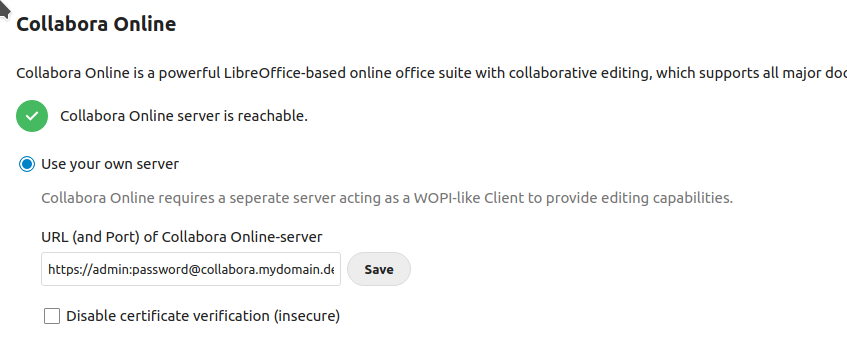
In Nextcloud, goto https://nextcloud.mydomain.com/settings/admin/richdocuments and set the

https://admin:[email protected]

Ensure to use your custom password from .env and your custom domain!

Click Save and you should see Collabora Online server is reachable:

Posted by Uli Köhler in Container, Docker, Nextcloud

How to fix Docker-Nextcloud Module php-imagick in this instance has no SVG support. For better compatibility it is recommended to install it.

Problem:

When using the official nextcloud docker image, you will see a message like

Module php-imagick in this instance has no SVG support. For better compatibility it is recommended to install it.

on the system overview page

Solution

This is a bug in the docker image and will likely be resolved soon – in the meantime, we can just manually install the required library on the container:

docker-compose exec nextcloud apt -y update
docker-compose exec nextcloud apt -y install libmagickcore-6.q16-6-extra

If you re-create the container, this change will be lost, but in my opinion it’s best to opt for a simple solution here and possible do it again once or twice as opposed to a permanent but much more labour-intensive procedure like updating the docker image and later migrating back to the official image.

Posted by Uli Köhler in Container, Docker

How to fix build ‘lz4 library not found, compiling without it’

Problem:

When compiling a piece of software – for example in your Dockerfile or on your PC – you see a warning message like

lz4 library not found, compiling without it

Solution:

Install liblz4, which is a library for a compression algorithm. On Ubuntu/Debian based systems you can install it using

sudo apt -y install liblz4-dev

In your Dockerfile, install using

RUN apt update && apt install -y liblz4-dev && rm -rf /var/lib/apt/lists/*

Otherwise, refer to the liblz4 GitHub page.

Posted by Uli Köhler in C/C++, Docker

Simple Elasticsearch setup with docker-compose

The following docker-compose.yml is a simple starting point for using ElasticSearch within a docker-based setup:

version: '2.2'
services:
    elasticsearch1:
        image: docker.elastic.co/elasticsearch/elasticsearch:7.13.4
        container_name: elasticsearch1
        environment:
            - cluster.name=docker-cluster
            - node.name=elasticsearch1
            - cluster.initial_master_nodes=elasticsearch1
            - bootstrap.memory_lock=true
            - http.cors.allow-origin=http://localhost:1358,http://127.0.0.1:1358
            - http.cors.enabled=true
            - http.cors.allow-headers=X-Requested-With,X-Auth-Token,Content-Type,Content-Length,Authorization
            - http.cors.allow-credentials=true
            - "ES_JAVA_OPTS=-Xms512m -Xmx512m"
        ulimits:
            memlock:
                soft: -1
                hard: -1
        volumes:
            - ./esdata1:/usr/share/elasticsearch/data
        ports:
            - 9200:9200
    dejavu:
        image: appbaseio/dejavu
        container_name: dejavu
        ports:
            - 1358:1358

Now create the esdata1 directory with the correct permissions:

sudo mkdir esdata1
sudo chown -R 1000:1000 esdata1

We also need to configure the vm.max_map_count sysctl parameter:

echo -e "\nvm.max_map_count=524288\n" | sudo tee -a /etc/sysctl.conf && sudo sysctl -w vm.max_map_count=524288


I recommend to place it in /opt/elasticsearch, but you can place wherever you like.

If you want to autostart it on boot, see Create a systemd service for your docker-compose project in 10 seconds or just use this snippet from said post:

curl -fsSL https://techoverflow.net/scripts/create-docker-compose-service.sh | sudo bash /dev/stdin

This will create a systemd service named elasticsearch (if your directory is named elasticsearch like /opt/elasticsearch) and enable and start it immediately. Hence you can restart using

sudo systemctl restart elasticsearch

and view the logs using

sudo journalctl -xfu elasticsearch

For more complex setup involving more than one node, see our previous post on ElasticSearch docker-compose.yml and systemd service generator

Posted by Uli Köhler in Container, Databases, Docker, ElasticSearch

How I connected a network_mode: host container to its database container

I have setup my FreePBX to use network_mode: 'host' but faced issues when it couldn’t connect to the MariaDB container which was not using network_mode: 'host'.

I fixed this by:

  • Setting the MariaDB container to network_mode: 'host'
  • Setting the FreePBX container to connect to 127.0.0.1 (DB_HOST=127.0.0.1). Setting it to localhost did NOT allow FreePBX to connect to MariaDB!
Posted by Uli Köhler in Docker, FreePBX, Networking

Recommended docker-compose mariadb service

I recommend this service:

mariadb:
  image: mariadb:latest
  environment:
    - MYSQL_DATABASE=servicename
    - MYSQL_USER=servicename
    - MYSQL_PASSWORD=${MARIADB_PASSWORD}
    - MYSQL_ROOT_PASSWORD=${MARIADB_ROOT_PASSWORD}
  volumes:
    - ./mariadb_data:/var/lib/mysql
  command: --default-storage-engine innodb
  restart: unless-stopped
  healthcheck:
    test: mysqladmin -p${MARIADB_ROOT_PASSWORD} ping -h localhost
    interval: 20s
    start_period: 10s
    timeout: 10s
    retries: 3

(replace servicename by the name of your service, e.g. kimai, redmine, …) and this .env:

MARIADB_ROOT_PASSWORD=eiNgam3woh4ahTee4chi9vohvauk6a
MARIADB_PASSWORD=shahb4alubei5Vie8arahhok2morae

You can also easily generate these passwords by using:

echo -e "MARIADB_ROOT_PASSWORD=$(pwgen 30 1)\nMARIADB_PASSWORD=$(pwgen 30 1)" > .env


Posted by Uli Köhler in Container, Docker

Local redmine backup using bup (docker-compose compatible)

This script uses bupto backup your docker-compose based redmine installation to a local bup folder e.g. in /var/lib/bup/my-redmine.bup:

#!/bin/bash
# Auto-determine the name from the directory name
# /opt/my-redmine => $NAME=my-redmine => /var/lib/bup/my-redmine.bup
export NAME=$(basename $(pwd))
export BUP_DIR=/var/lib/bup/$NAME.bup
bup_directory() {
        echo "BUPing $1"
        bup -d $BUP_DIR index $1 && bup save -9 --strip-path $(pwd) -n $1 $1
}
# Init
bup -d $BUP_DIR init
# Save MariaDB
source .env && docker-compose exec -T mariadb mysqldump -uroot -p${MARIADB_ROOT_PASSWORD} --all-databases | bup -d $BUP_DIR split -n $NAME-mariadb.sql
# Save directories
bup_directory redmine_data
bup_directory redmine_themes
# Backup self
bup_directory backup.sh
bup_directory docker-compose.yml
# OPTIONAL: Add par2 information
#   This is only recommended for backup on unreliable storage or for extremely critical backups
#   If you already have bitrot protection (like BTRFS with regular scrubbing), this might be overkill.
# Uncomment this line to enable:
# bup fsck -g

# OPTIONAL: Cleanup old backups
bup -d $BUP_DIR prune-older --keep-all-for 1m --keep-dailies-for 6m --keep-monthlies-for forever -9 --unsafe

It will backup:

  • MySQL data from inside redmine using mysqldump
  • The redmine_data folder
  • The redmine_themes folder
  • The backup script backup.sh itself
  • docker-compose.yml

Place it in the same folder where docker-compose.yml is located.

The script is compatible with our previous post How to create a systemd backup timer & service in 10 seconds

Posted by Uli Köhler in bup, Docker

Simple 5-minute Vaultwarden (SQLite) setup using docker-compose

In order to setup Vaultwarden in a docker-compose & SQLite based configuration (e.g. on CoreOS), first we need to create a directory. I recommend using /opt/vaultwarden.

Run all the following commands and place all the following files in the /opt/vaultwarden directory!

First, we’ll create a .env file with random passwords (I recommend using pwgen 30). Not using a unique, random password here is a huge security risk since it will allow full admin access to Vaultwarden!

ADMIN_TOKEN=iqueingufo3LohshoohoG3tha2zou6
SIGNUPS_ALLOWED=true

Now place your docker-compose.yml:

version: '3.4'
services:
  vaultwarden:
    image: vaultwarden/server:latest
    environment:
      - ADMIN_TOKEN=${ADMIN_TOKEN}
      - SIGNUPS_ALLOWED=${SIGNUPS_ALLOWED}
    volumes:
      - ./vw_data:/data
    ports:
      - 17881:80

Next, we’ll create a systemd service to autostart docker-compose:

curl -fsSL https://techoverflow.net/scripts/create-docker-compose-service.sh | sudo bash /dev/stdin

This will automatically start vaultwarden.

Now you need to configure your reverse proxy server to point https://vaultwarden.mydomain.com . You need to use https, http won’t work due to some browser limitations.

Now we need to configure vaultwarden using the admin interface.

Go to https://vaultwarden.mydomain.com/admin and enter the ADMIN_TOKEN from .env.

There are two things that you need to configure here:

  • The Domain Name under General settings
  • The email server settings under SMTP email settings

With these settings configured, Vaultwarden should be up and running and you can access it using https://vaultwarden.mydomain.com .

After the first user has been setup and tested, you can uncheck the Allow new signups in General settings in the admin interface. This is recommended since everyone who will be able to guess your domain name would be able to create a Vaultwarden account otherwise.

Posted by Uli Köhler in Container, Docker

Simple 15-minute passbolt setup using docker-compose

This is how I run my local passbolt instance.

First, create the directory. I use /opt/passbolt. Run all the following commands and place all the following files in that directory!

First, initialize the folders with the correct permissions:

mkdir -p passbolt_gpg
chown -R 33:33 passbolt_gpg

Now create a .env file with random passwords (I recommend using pwgen 30):

MARIADB_ROOT_PASSWORD=meiJieseingi4dutiareimoh2Aiv5j
MARIADB_USER_PASSWORD=ohre3ye1oNexeShiuChaengahzuemo

Now place your docker-compose.yml:

version: '3.4'
services:
  mariadb:
    image: mariadb:latest
    environment:
      - MYSQL_DATABASE=passbolt
      - MYSQL_USER=passbolt
      - MYSQL_PASSWORD=${MARIADB_USER_PASSWORD}
      - MYSQL_ROOT_PASSWORD=${MARIADB_ROOT_PASSWORD}
    volumes:
      - ./mariadb_data:/var/lib/mysql

  passbolt:
    image: passbolt/passbolt:latest-ce
    tty: true
    depends_on:
      - mariadb
    environment:
      - DATASOURCES_DEFAULT_HOST=mariadb
      - DATASOURCES_DEFAULT_USERNAME=passbolt
      - DATASOURCES_DEFAULT_PASSWORD=${MARIADB_USER_PASSWORD}
      - DATASOURCES_DEFAULT_DATABASE=passbolt
      - DATASOURCES_DEFAULT_PORT=3306
      - DATASOURCES_QUOTE_IDENTIFIER=true
      - APP_FULL_BASE_URL=https://passbolt.mydomain.com
      - [email protected]
      - EMAIL_TRANSPORT_DEFAULT_HOST=smtp.mydomain.com
      - EMAIL_TRANSPORT_DEFAULT_PORT=587
      - [email protected]
      - EMAIL_TRANSPORT_DEFAULT_PASSWORD=yei5QueiNa5ahF0Aice8Na0aphoyoh
      - EMAIL_TRANSPORT_DEFAULT_TLS=true
      - [email protected]
    volumes:
      - ./passbolt_gpg:/etc/passbolt/gpg
      - ./passbolt_web:/usr/share/php/passbolt/webroot/img/public
    command: ["/usr/bin/wait-for.sh", "-t", "0", "mariadb:3306", "--", "/docker-entrypoint.sh"]
    ports:
      - 17880:80

Be sure to replace all the email addresses, domain names and SMTP credentials by the values appropriate for your setup.

Now startup passbolt for the first time, it will initialize the database:

docker-compose up

You need to keep passbolt running during the following steps.

First, we’ll send a test email:

docker-compose exec passbolt su -m -c "bin/cake passbolt send_test_email"

If you see

The message has been successfully sent!

then your SMTP config is correct. Otherwise, debug the error message, and, if neccessary, modify the EMAIL_… environment variables in docker-compose.yml and restart passbolt afterwards.

Now we’ll create an admin user:

docker-compose exec passbolt su -m -c "bin/cake passbolt register_user -u [email protected] -f John -l Doe -r admin" -s /bin/sh www-data

If you want to create a normal (non-admin) user, use user instead of admin:

docker-compose exec passbolt su -m -c "bin/cake passbolt register_user -u [email protected] -f Jane -l Doe -r user" -s /bin/sh www-data

After that, the only thing left to do is to create a systemd service to autostart your passbolt service:

curl -fsSL https://techoverflow.net/scripts/create-docker-compose-service.sh | sudo bash /dev/stdin

Passbolt is now running on port 17880 (you can configure this using docker-compose.yml). Just configure your reverse proxy appropriately to point to this port.

Posted by Uli Köhler in Container, Docker