In the default configuration, you can use snmpwalk using SNMPv1 to query information from the MikroTik RB260GS or RB260GSP.
snmpwalk -v1 -c public IPADDRESS
for example:
snmpwalk -v1 -c public 192.168.88.1
In the default configuration, you can use snmpwalk using SNMPv1 to query information from the MikroTik RB260GS or RB260GSP.
snmpwalk -v1 -c public IPADDRESS
for example:
snmpwalk -v1 -c public 192.168.88.1
You want to import your SSH public key for passwordless login to your MikroTik router using either the terminal or WebFig/WinBox (as described in our previous post How to import SSH key to MikroTik RouterOS for passwordless login).
However, during import you see the following error message in the terminal:
unable to load key file (wrong format or bad passphrase)!
or in WebFig:
Couldn't perform action - unable to load key file (wrong format or bad passphrase)! (6)
Either you are using an elliptic curve key (which is not supported by RouterOS at the moment) or you are using a file which is not an SSH key.
The file you are uploading should look like this:
ssh-rsa AAAAB3NzaC1yc2EAAAADAQABAAABAQC6EyAUma+shOkTZ0a6WcipSb552WmQb8hTKvDOMxQ234HXAeuJg3KeJ8WdkbOIdYuNq08xBrpjinaRGSZwDqhAiQMMz6O3yfkGpWZNO26lBQkngspJU1w6HLXR9tRtRaqbXwc1kV0KS6quj4sRaGLHKMciTjx0cVbEQrLxBXIJvRl7a6w/VukE+c9LhcRBZTrYB6Er7vGMM7VtgThzq+reFnql4kicG83NuPHjC/9Z78ehxpSekSrBYTYMuqiC1m8RW/l0mI8TtkUAU/qnTuwMXqVh0oOPGSWe4qvnbjCThRkDIEuK19CyCr5uyvZTV268SftEKaKOB7wcjevZlR11 uli@uli-desktop
The most important aspect is that it needs to start with ssh-rsa, else RouterOS won’t import it – RouterOS supports ed25519 keys since RouterOS 7.7, which is in beta at the time of writing this post.
You can generate a new keypair and save it to id_mikrotik and id_mikrotik.pub using
ssh-keygen -t rsa -b 8192 -f id_mikrotik
Important: You can not use elliptic curve keys (tested with ed25519) as of RouterOS 7.9 – RSA keys will work!
First, upload the public key to the filesystem of the router using Files – in the following image, the SSH key is listed at the bottom:
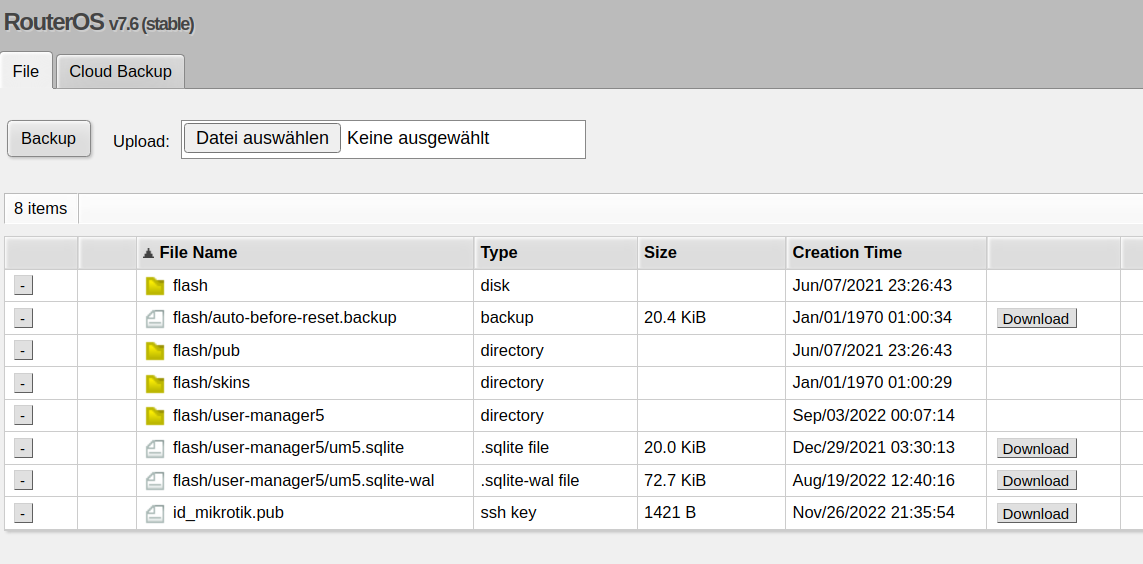
/user/ssh-keys/import user=admin public-key-file=id_mikrotik.pub
Now go to System -> Users, open the SSH keys tab:
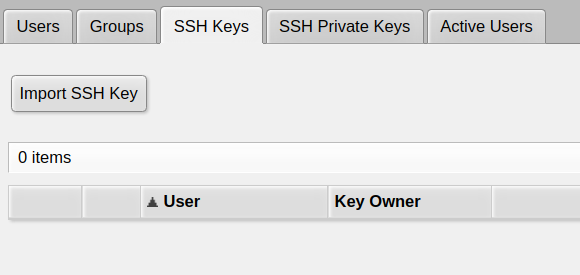
There, click Import SSH Key
open the user you want to add the public key for (typically admin if you didn’t create other users before):
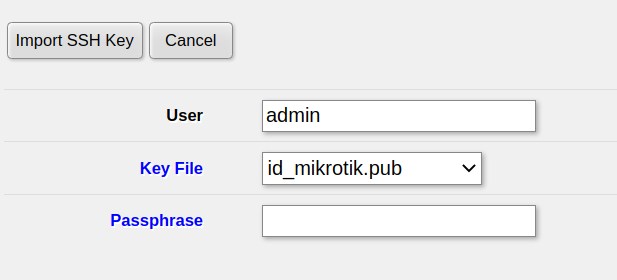 then click
 Import SSH Key and the key will be active immediately
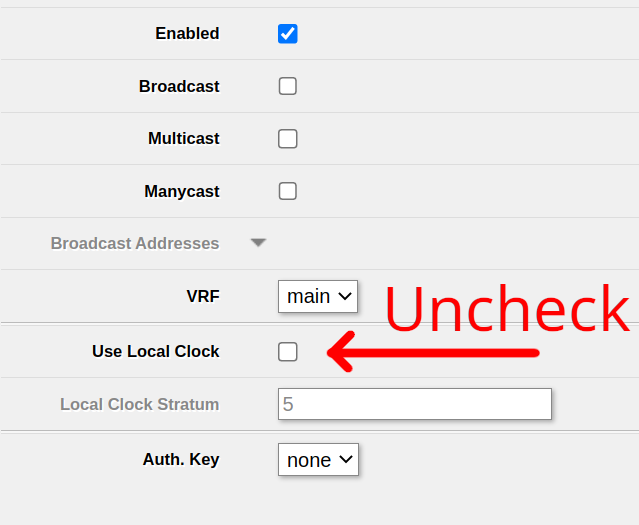
in System -> NTP client in your MikroTik router, the Status always tells you using local clock and it won’t synchronize with any NTP server.
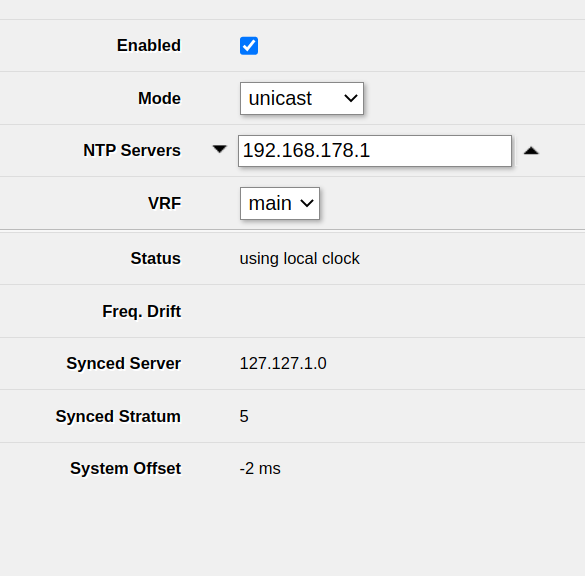
You can’t disable the local clock in System -> NTP client. Instead, you’ll be able to find the relevant setting in System -> NTP server.
Ensure that Use Local Clock is unchecked and click Apply
After that, your NTP client will be active and able to synchronize: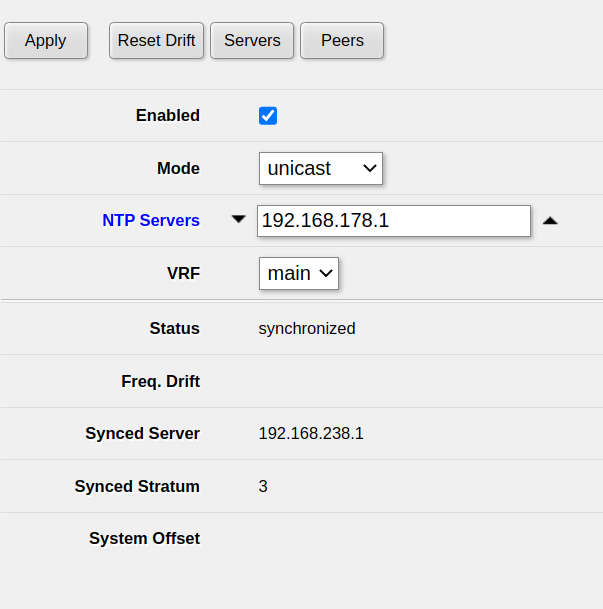
The DNS server integrated into your MikroTik router doesn’t work and the log shows a lot of
DoH server connection error: SSL: ssl: certificate not yet valid (6)
messages:
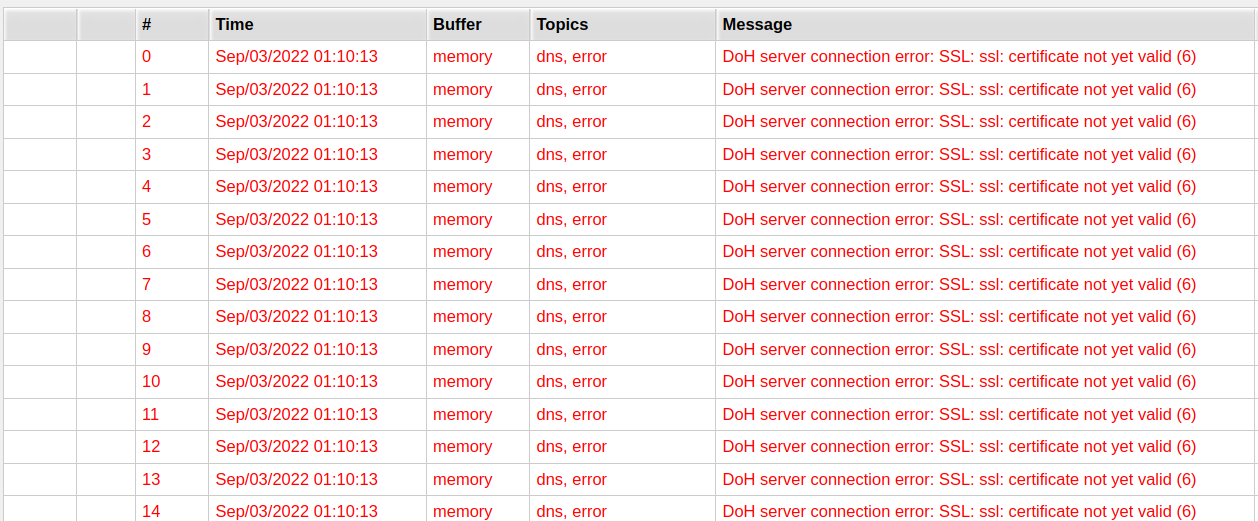
The issue here is that the clock in your MikroTik router does not (yet) know the correct time.
For example, the clock might be set to 1st of January, 1970 – however, the TLS certificate of the DNS-over-HTTPS server is only valid from, for example, 1st of November, 2022. This is why the MikroTik router tells you that the certificate isn’t valid.
Just tell the MikroTik server to get the time from a public NTP server.
Open System -> NTP client in WebFig or Winbox. Typically, you want to use the upstream router as an NTP server. In my case, that is 192.168.178.1.
Ensure that Enabled is checked, add the NTP server and click Apply.
After waiting a few seconds, you should see synchronized under Status. This means that the clock of the MikroTik router has been set correctly and the issue should be fixed.
This solution decreases the security of your system and is hence not preferred. You should always set the time of your router correctly, not doing so will lead to a bunch of issues.
If you, however, still intend to disable DNS-over-HTTPS, open IP -> DNS and remove all servers under Use DoH servers, then click Apply.
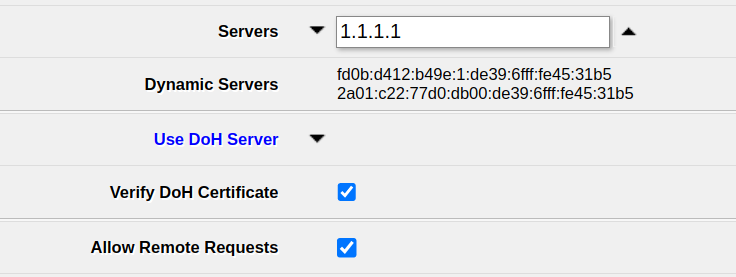
After that, your router will use the normal DNS servers – 1.1.1.1 in my case. Ensure to enter some server there to make sure DNS requests work – if in doubt, you can always use 1.1.1.1 (Cloudflare) or 8.8.8.8 (Google).
Note that requests to those servers will neither be encrypted nor authenticated, so requests can be sniffed and/or manipulated by anyone capable of manipulating traffic to your device. Even though DNS-over-HTTPS is slighly slower (which, in turn is alleviated by the caching feature of the MikroTik router’s DNS server), it provides a huge security benefit.
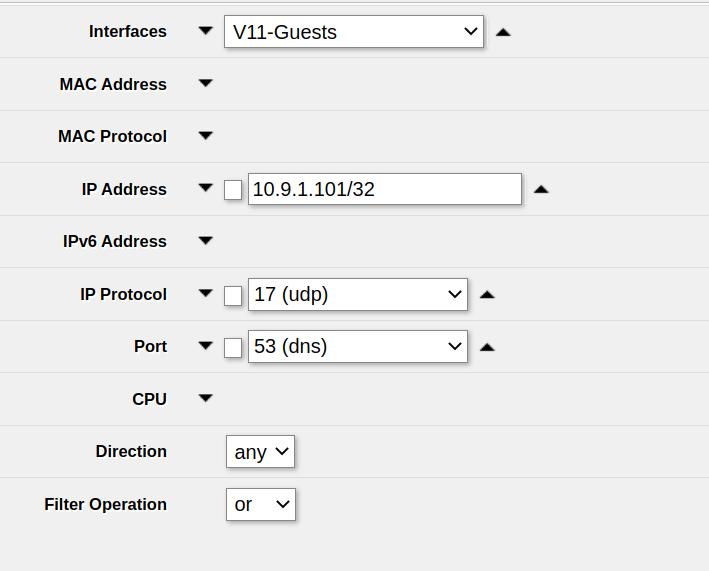
In order to packet capture just DNS packets using Tools -> Packet Sniffer, use the following settings:
udp (17 (udp))53 (dns))Note that this does not capture DNS-over-HTTPS traffic, but at the time of writing this article, this type of traffic is rare.
Example:
On RouterOS up to at least v7.4.1 you can’t select ICMPv6 as IP protocol in the Tools -> Packet Sniffer
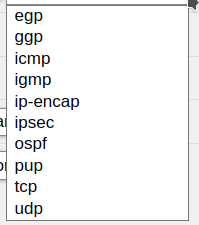
If you select icmp, you will not sniff any ICMPv6 traffic.
The solution is to enter the ICMPv6 IP protocol ID – 58 – into the IP protocol field manually:

After that, ensure that you apply the settings. You can start sniffing ICMPv6 traffic immediately.
On Ubuntu or other Linux distribution, you can easily install radtest using
sudo apt -y install freeradius-utils
After that, you need to create a Router representing your test PC on the MikroTik device so that RADIUS requests will be accepted.
Now you can run radtest like this:
radtest -t mschap [Username of the user to authenticate] [Password of the user to authenticate] [MikroTik IP] 1812 [Router shared secret]
Note the Router shared secret is the password that you used when setting up the Router instance for radtest in User manager -> Routers before and not the router’s admin password etc.
1812 is the default (and recommended) port for RADIUS.
When trying to add for example a router to MikroTik’s User Manager, you see the following error popup:
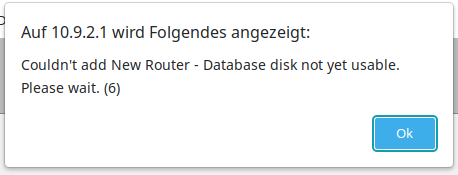
Initialize the database by using the following command in the terminal:
/user-manager/database save name=""
After that, the database is initialized and you will be able to use it.
In multiple models of MikroTik routers running RouterOS v7.5 I got Error: Connection refused when running simple SSH port forwarding commands such as
ssh [email protected] -L 8080:192.168.178.1:80
but in the RouterLS log I could see multiple local forwarding forbidden error messages:

In this case, the solution was simple: Go to IP -> SSH in WebFig or Winbox and set Forwarding Enabled to Both and click Apply.
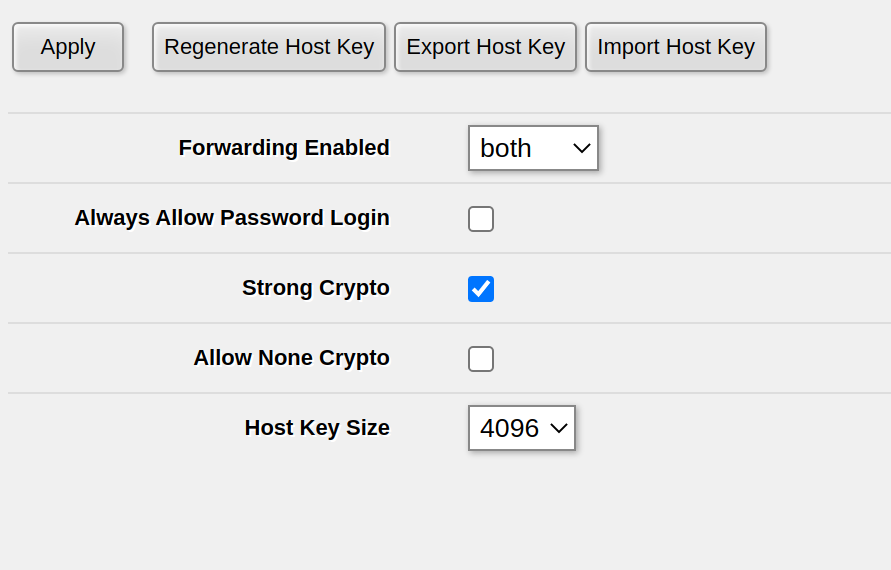
If you have already set Forwarding Enabled to Both or Local, on one of my routers this setting wasn’t properly activated – possibly after a RoutreOS upgrade. In order to fix this, set Forwarding Enabled to no, click Apply, then set Forwarding Enabled to Both and click Apply again. For me, this fixed the issue of being unable to do SSH port forwarding.
In RouterOS, you can simply import .pem files using /certificate import no matter if the file contains a certificate and/or a private key.
First, upload them either via WebFig (Files) or via SCP to the filesystem of the Router.
We will assume the certificate is called cert.pem while the private key is called privkey.pem
After that, import the certificate and the private key, one after another:
/certificate/import file-name="cert.pem" passphrase="" name="mikrotik.mydomain.net"
/certificate/import file-name="privkey.pem" passphrase="" name="mikrotik.mydomain.net"
This will tell you that first the certificate and then the private key have been successfully imported:
[admin@MyRouter] > /certificate/import file-name=cert.pem passphrase="" name="mikrotik.mydomain.com"
     certificates-imported: 1
     private-keys-imported: 0
            files-imported: 1
       decryption-failures: 0
  keys-with-no-certificate: 0

[admin@MyRouter] > /certificate/import file-name=privkey.pem passphrase="" name="mikrotik.mydomain.com"
     certificates-imported: 0
     private-keys-imported: 1
            files-imported: 1
       decryption-failures: 0
  keys-with-no-certificate: 0
In order to get the current time in RouterOS, use
/system clock get time
The time returned will be in hh:mm:dd format and local time
For example, the following command will print the current time:
:put [/system clock get time]
In order to print from within a RouterOS script on a MikroTik router, use
:put
For example,
:put [/system clock get time]
will print, for example
[admin@MyRouter] > :put [/system clock get time]
22:55:11
My experience is that PXE on MikroTik devices only works properly when you trigger it using the hardware reset button. You can also trigger it using System -> RouterBOARD -> Settings but this reproducibly didn’t work for me.
This method was tested on the hEX PoE Lite (i.e. RB750UPr2)
RESET buttonImportant note: Flashing OpenWRT permanently breaks PoE out functionality even after reinstalling RouterOS! PoE does not work on OpenWRT either!
I had significant problem with the official instructions of flashing OpenWRT on the MikroTik hEX PoE Lite as described on the OpenWRT wiki. I used RouterOS 7.4.1 and a Linux host for the flash process.
Specificially, starting the flash process from within RouterOS via System -> RouterBoard -> Settings did not work, neither with the backup bootloader nor without it, neither with DHCP nor with BOOTP. This caused a boot-and-DHCP-request loop with the log shown blow
… and probably most other RouterOS boards. There is no specific requirement for the firmware version. RouterOS 6.47 works. RouterOS 7.4.1 works. I didn’t check any one beside that, but most likely it won’t make a difference. Specifically, there is no need to downgrade if using this method! The RouterOS downgrade is only neccessary for some old-ish Windows based flash method.
1 – Connect a ethernet cable from your flashing computer to the first Ethernet connector of the router.
PXE will only work on this specific port and will not work on other ports!
2 – Setup your flashing computer’s IP interface config.
We’ll use eth0 in this example. Be sure to use the correct interface
sudo ifconfig eth0 192.168.1.10 netmask 255.255.255.0
I read somewhere that MikroTiks expect the PXE host to be at IP 192.168.1.10 – this definitively works. Other IP addresses might or might not also work, I didn’t check. Just use that one.
3 – Setup dnsmasq
sudo apt -y install dnsmasq
and then do not forget to stop dnsmasq and remove the default config
sudo systemctl disable --now dnsmasq
sudo mv /etc/dnsmasq.conf /etc/dnsmasq.default.conf
4 – Download the correct image from OpenWRT
Google for OpenWRT + your RouterBoard type, e.g. OpenWRT RB750UPr2. This will lead you to a site like this one. Scroll down and download both the Firmware OpenWrt Install URL and the Firmware OpenWrt Upgrade URL! In the end you will need both anyway, but for now we need the one ending with ...-initramfs-kernel.img!
Save that file with the original name. The name does not matter – what matters is only that you use the correct image, not the ...-sysupgrade.bin for PXE boot! There is absolutely no need to name the file vmlinux etc.
5 – Startup dnsmasq server
In the following command, be sure to set the correct image name in the --dhcp-boot line
sudo /usr/sbin/dnsmasq \
--no-daemon \
--listen-address 192.168.1.10 \
--bind-interfaces \
-p0 \
--dhcp-authoritative \
--dhcp-range=192.168.1.100,192.168.1.200 \
--bootp-dynamic \
--dhcp-boot=openwrt-19.07.10-ar71xx-mikrotik-rb-nor-flash-16M-initramfs-kernel.bin \
--log-dhcp \
--enable-tftp \
--tftp-root=$(pwd)
6 – Reset the router into PXE boot mode
As noted above, resetting via RouterOS did not work for me at all. I can only recommend this method, which I also described in my blogpost How to make MikroTik router boot using PXE (netboot) / BOOTP
7 – Proceed with OpenWRT
If the reset & PXE boot worked, OpenWRT is running on 192.168.1.1. On most MikroTik devices, you need to plugin the Ethernet to one of the LAN ports (typically every port except the first port) in order to access OpenWRT. Note that DHCP is not active by default.
The next step is basically to check if OpenWRT works properly and then install it to the flash using the ...-sysupgrade.bin image which we have downloaded before. This is rather easy and performed using the Web UI, it’s best to check the OpenWRT wiki page for more details.
See above for the procedure that works. This error occured when I didn’t start the PXE process via the Reset button
dnsmasq-dhcp: 1534706347 vendor class: Mips_boot
dnsmasq-dhcp: 1534706347 DHCPDISCOVER(eth1) dc:2c:6e:d7:60:9d
dnsmasq-dhcp: 1534706347 tags: eth1
dnsmasq-dhcp: 1534706347 DHCPOFFER(eth1) 192.168.1.100 dc:2c:6e:d7:60:9d
dnsmasq-dhcp: 1534706347 requested options: 1:netmask, 3:router
dnsmasq-dhcp: 1534706347 bootfile name: rb-nor-flash-16M-initramfs-kernel.bin
dnsmasq-dhcp: 1534706347 next server: 192.168.1.10
dnsmasq-dhcp: 1534706347 sent size:  1 option: 53 message-type  2
dnsmasq-dhcp: 1534706347 sent size:  4 option: 54 server-identifier  192.168.1.10
dnsmasq-dhcp: 1534706347 sent size:  4 option: 51 lease-time  1h
dnsmasq-dhcp: 1534706347 sent size:  4 option: 58 T1  30m
dnsmasq-dhcp: 1534706347 sent size:  4 option: 59 T2  52m30s
dnsmasq-dhcp: 1534706347 sent size:  4 option:  1 netmask  255.255.255.0
dnsmasq-dhcp: 1534706347 sent size:  4 option: 28 broadcast  192.168.1.255
dnsmasq-dhcp: 1534706347 sent size:  4 option:  3 router  192.168.1.10
dnsmasq-dhcp: 4257818828 available DHCP range: 192.168.1.100 -- 192.168.1.200
dnsmasq-dhcp: 4257818828 vendor class: Mips_boot
dnsmasq-dhcp: 4257818828 DHCPDISCOVER(eth1) dc:2c:6e:d7:60:9d
dnsmasq-dhcp: 4257818828 tags: eth1
dnsmasq-dhcp: 4257818828 DHCPOFFER(eth1) 192.168.1.100 dc:2c:6e:d7:60:9d
dnsmasq-dhcp: 4257818828 requested options: 1:netmask, 3:router
dnsmasq-dhcp: 4257818828 bootfile name: rb-nor-flash-16M-initramfs-kernel.bin
dnsmasq-dhcp: 4257818828 next server: 192.168.1.10
dnsmasq-dhcp: 4257818828 sent size:  1 option: 53 message-type  2
dnsmasq-dhcp: 4257818828 sent size:  4 option: 54 server-identifier  192.168.1.10
dnsmasq-dhcp: 4257818828 sent size:  4 option: 51 lease-time  1h
dnsmasq-dhcp: 4257818828 sent size:  4 option: 58 T1  30m
dnsmasq-dhcp: 4257818828 sent size:  4 option: 59 T2  52m30s
dnsmasq-dhcp: 4257818828 sent size:  4 option:  1 netmask  255.255.255.0
dnsmasq-dhcp: 4257818828 sent size:  4 option: 28 broadcast  192.168.1.255
dnsmasq-dhcp: 4257818828 sent size:  4 option:  3 router  192.168.1.10
dnsmasq-dhcp: 1683968382 available DHCP range: 192.168.1.100 -- 192.168.1.200
dnsmasq-dhcp: 1683968382 vendor class: Mips_boot
dnsmasq-dhcp: 1683968382 DHCPDISCOVER(eth1) dc:2c:6e:d7:60:9d
dnsmasq-dhcp: 1683968382 tags: eth1
dnsmasq-dhcp: 1683968382 DHCPOFFER(eth1) 192.168.1.100 dc:2c:6e:d7:60:9d
dnsmasq-dhcp: 1683968382 requested options: 1:netmask, 3:router
dnsmasq-dhcp: 1683968382 bootfile name: rb-nor-flash-16M-initramfs-kernel.bin
dnsmasq-dhcp: 1683968382 next server: 192.168.1.10
dnsmasq-dhcp: 1683968382 sent size:  1 option: 53 message-type  2
dnsmasq-dhcp: 1683968382 sent size:  4 option: 54 server-identifier  192.168.1.10
dnsmasq-dhcp: 1683968382 sent size:  4 option: 51 lease-time  1h
dnsmasq-dhcp: 1683968382 sent size:  4 option: 58 T1  30m
dnsmasq-dhcp: 1683968382 sent size:  4 option: 59 T2  52m30s
dnsmasq-dhcp: 1683968382 sent size:  4 option:  1 netmask  255.255.255.0
dnsmasq-dhcp: 1683968382 sent size:  4 option: 28 broadcast  192.168.1.255
dnsmasq-dhcp: 1683968382 sent size:  4 option:  3 router  192.168.1.10
dnsmasq-dhcp: 424531201 available DHCP range: 192.168.1.100 -- 192.168.1.200
dnsmasq-dhcp: 424531201 vendor class: Mips_boot
dnsmasq-dhcp: 424531201 DHCPDISCOVER(eth1) dc:2c:6e:d7:60:9d
dnsmasq-dhcp: 424531201 tags: eth1
dnsmasq-dhcp: 424531201 DHCPOFFER(eth1) 192.168.1.100 dc:2c:6e:d7:60:9d
dnsmasq-dhcp: 424531201 requested options: 1:netmask, 3:router
dnsmasq-dhcp: 424531201 bootfile name: rb-nor-flash-16M-initramfs-kernel.bin
dnsmasq-dhcp: 424531201 next server: 192.168.1.10
dnsmasq-dhcp: 424531201 sent size:  1 option: 53 message-type  2
dnsmasq-dhcp: 424531201 sent size:  4 option: 54 server-identifier  192.168.1.10
dnsmasq-dhcp: 424531201 sent size:  4 option: 51 lease-time  1h
dnsmasq-dhcp: 424531201 sent size:  4 option: 58 T1  30m
dnsmasq-dhcp: 424531201 sent size:  4 option: 59 T2  52m30s
dnsmasq-dhcp: 424531201 sent size:  4 option:  1 netmask  255.255.255.0
dnsmasq-dhcp: 424531201 sent size:  4 option: 28 broadcast  192.168.1.255
dnsmasq-dhcp: 424531201 sent size:  4 option:  3 router  192.168.1.10
dnsmasq-dhcp: 3459997603 available DHCP range: 192.168.1.100 -- 192.168.1.200
dnsmasq-dhcp: 3459997603 vendor class: Mips_boot
dnsmasq-dhcp: 3459997603 DHCPDISCOVER(eth1) dc:2c:6e:d7:60:9d
dnsmasq-dhcp: 3459997603 tags: eth1
dnsmasq-dhcp: 3459997603 DHCPOFFER(eth1) 192.168.1.100 dc:2c:6e:d7:60:9d
dnsmasq-dhcp: 3459997603 requested options: 1:netmask, 3:router
dnsmasq-dhcp: 3459997603 bootfile name: rb-nor-flash-16M-initramfs-kernel.bin
dnsmasq-dhcp: 3459997603 next server: 192.168.1.10
dnsmasq-dhcp: 3459997603 sent size:  1 option: 53 message-type  2
dnsmasq-dhcp: 3459997603 sent size:  4 option: 54 server-identifier  192.168.1.10
dnsmasq-dhcp: 3459997603 sent size:  4 option: 51 lease-time  1h
dnsmasq-dhcp: 3459997603 sent size:  4 option: 58 T1  30m
dnsmasq-dhcp: 3459997603 sent size:  4 option: 59 T2  52m30s
dnsmasq-dhcp: 3459997603 sent size:  4 option:  1 netmask  255.255.255.0
dnsmasq-dhcp: 3459997603 sent size:  4 option: 28 broadcast  192.168.1.255
dnsmasq-dhcp: 3459997603 sent size:  4 option:  3 router  192.168.1.10
dnsmasq-dhcp: 657189184 available DHCP range: 192.168.1.100 -- 192.168.1.200
dnsmasq-dhcp: 657189184 vendor class: Mips_boot
dnsmasq-dhcp: 657189184 DHCPDISCOVER(eth1) dc:2c:6e:d7:60:9d
dnsmasq-dhcp: 657189184 tags: eth1
dnsmasq-dhcp: 657189184 DHCPOFFER(eth1) 192.168.1.100 dc:2c:6e:d7:60:9d
dnsmasq-dhcp: 657189184 requested options: 1:netmask, 3:router
dnsmasq-dhcp: 657189184 bootfile name: rb-nor-flash-16M-initramfs-kernel.bin
dnsmasq-dhcp: 657189184 next server: 192.168.1.10
dnsmasq-dhcp: 657189184 sent size:  1 option: 53 message-type  2
dnsmasq-dhcp: 657189184 sent size:  4 option: 54 server-identifier  192.168.1.10
dnsmasq-dhcp: 657189184 sent size:  4 option: 51 lease-time  1h
dnsmasq-dhcp: 657189184 sent size:  4 option: 58 T1  30m
dnsmasq-dhcp: 657189184 sent size:  4 option: 59 T2  52m30s
dnsmasq-dhcp: 657189184 sent size:  4 option:  1 netmask  255.255.255.0
dnsmasq-dhcp: 657189184 sent size:  4 option: 28 broadcast  192.168.1.255
dnsmasq-dhcp: 657189184 sent size:  4 option:  3 router  192.168.1.10
dnsmasq-dhcp: 3031796432 available DHCP range: 192.168.1.100 -- 192.168.1.200
dnsmasq-dhcp: 3031796432 vendor class: Mips_boot
dnsmasq-dhcp: 3031796432 available DHCP range: 192.168.1.100 -- 192.168.1.200
dnsmasq-dhcp: 3031796432 vendor class: Mips_boot
dnsmasq-dhcp: 3031796432 available DHCP range: 192.168.1.100 -- 192.168.1.200
dnsmasq-dhcp: 3031796432 vendor class: Mips_boot
dnsmasq-dhcp: 3031796432 available DHCP range: 192.168.1.100 -- 192.168.1.200
dnsmasq-dhcp: 3031796432 vendor class: Mips_boot
dnsmasq-dhcp: 3031796432 available DHCP range: 192.168.1.100 -- 192.168.1.200
dnsmasq-dhcp: 3031796432 vendor class: Mips_boot
dnsmasq-dhcp: 3031796432 available DHCP range: 192.168.1.100 -- 192.168.1.200
dnsmasq-dhcp: 3031796432 vendor class: Mips_boot
dnsmasq-dhcp: 3031796432 available DHCP range: 192.168.1.100 -- 192.168.1.200
dnsmasq-dhcp: 3031796432 vendor class: Mips_boot
dnsmasq-dhcp: 3031796432 available DHCP range: 192.168.1.100 -- 192.168.1.200
dnsmasq-dhcp: 3031796432 vendor class: Mips_boot
dnsmasq-dhcp: 3031796432 available DHCP range: 192.168.1.100 -- 192.168.1.200
dnsmasq-dhcp: 3031796432 vendor class: Mips_boot
dnsmasq-dhcp: 3031796432 available DHCP range: 192.168.1.100 -- 192.168.1.200
dnsmasq-dhcp: 3031796432 vendor class: Mips_boot
dnsmasq-dhcp: 3031796432 available DHCP range: 192.168.1.100 -- 192.168.1.200
dnsmasq-dhcp: 3031796432 vendor class: Mips_boot
dnsmasq-dhcp: 3031796432 available DHCP range: 192.168.1.100 -- 192.168.1.200
dnsmasq-dhcp: 3031796432 vendor class: Mips_boot
dnsmasq-dhcp: 3031796432 available DHCP range: 192.168.1.100 -- 192.168.1.200
dnsmasq-dhcp: 3031796432 vendor class: Mips_boot
dnsmasq-dhcp: 3031796432 available DHCP range: 192.168.1.100 -- 192.168.1.200
dnsmasq-dhcp: 3031796432 vendor class: Mips_boot
dnsmasq-dhcp: 3031796432 available DHCP range: 192.168.1.100 -- 192.168.1.200
dnsmasq-dhcp: 3031796432 vendor class: Mips_boot
dnsmasq-dhcp: 3031796432 available DHCP range: 192.168.1.100 -- 192.168.1.200
dnsmasq-dhcp: 3031796432 vendor class: Mips_boot
dnsmasq-dhcp: 3031796432 available DHCP range: 192.168.1.100 -- 192.168.1.200
dnsmasq-dhcp: 3031796432 vendor class: Mips_boot
dnsmasq-dhcp: 3031796432 available DHCP range: 192.168.1.100 -- 192.168.1.200
dnsmasq-dhcp: 3031796432 vendor class: Mips_boot
dnsmasq-dhcp: 3031796432 available DHCP range: 192.168.1.100 -- 192.168.1.200
dnsmasq-dhcp: 3031796432 vendor class: Mips_boot
dnsmasq-dhcp: 3031796432 available DHCP range: 192.168.1.100 -- 192.168.1.200
dnsmasq-dhcp: 3031796432 vendor class: Mips_boot
dnsmasq-dhcp: 3031796432 available DHCP range: 192.168.1.100 -- 192.168.1.200
dnsmasq-dhcp: 3031796432 vendor class: Mips_boot
dnsmasq-dhcp: 3031796432 available DHCP range: 192.168.1.100 -- 192.168.1.200
dnsmasq-dhcp: 3031796432 vendor class: Mips_boot
dnsmasq-dhcp: 3031796432 available DHCP range: 192.168.1.100 -- 192.168.1.200
dnsmasq-dhcp: 3031796432 vendor class: Mips_boot
dnsmasq-dhcp: 3031796432 available DHCP range: 192.168.1.100 -- 192.168.1.200
dnsmasq-dhcp: 3031796432 vendor class: Mips_boot
dnsmasq-dhcp: 3031796432 available DHCP range: 192.168.1.100 -- 192.168.1.200
dnsmasq-dhcp: 3031796432 vendor class: Mips_boot
dnsmasq-dhcp: 3031796432 available DHCP range: 192.168.1.100 -- 192.168.1.200
dnsmasq-dhcp: 3031796432 vendor class: Mips_boot
dnsmasq-dhcp: 3031796432 available DHCP range: 192.168.1.100 -- 192.168.1.200
dnsmasq-dhcp: 3031796432 vendor class: Mips_boot
dnsmasq-dhcp: 3031796432 available DHCP range: 192.168.1.100 -- 192.168.1.200
dnsmasq-dhcp: 3031796432 vendor class: Mips_boot
dnsmasq-dhcp: 3031796432 available DHCP range: 192.168.1.100 -- 192.168.1.200
dnsmasq-dhcp: 3031796432 vendor class: Mips_boot
dnsmasq-dhcp: 3031796432 available DHCP range: 192.168.1.100 -- 192.168.1.200
dnsmasq-dhcp: 3031796432 vendor class: Mips_boot
dnsmasq-dhcp: 3031796432 available DHCP range: 192.168.1.100 -- 192.168.1.200
dnsmasq-dhcp: 3031796432 vendor class: Mips_boot
dnsmasq-dhcp: 3031796432 available DHCP range: 192.168.1.100 -- 192.168.1.200
dnsmasq-dhcp: 3031796432 vendor class: Mips_boot
dnsmasq-dhcp: 3031796432 available DHCP range: 192.168.1.100 -- 192.168.1.200
dnsmasq-dhcp: 3031796432 vendor class: Mips_boot
dnsmasq-dhcp: 3031796432 available DHCP range: 192.168.1.100 -- 192.168.1.200
dnsmasq-dhcp: 3031796432 vendor class: Mips_boot
dnsmasq-dhcp: 3031796432 available DHCP range: 192.168.1.100 -- 192.168.1.200
dnsmasq-dhcp: 3031796432 vendor class: Mips_boot
dnsmasq-dhcp: 3031796432 available DHCP range: 192.168.1.100 -- 192.168.1.200
dnsmasq-dhcp: 3031796432 vendor class: Mips_boot
dnsmasq-dhcp: 3031796432 available DHCP range: 192.168.1.100 -- 192.168.1.200
dnsmasq-dhcp: 3031796432 vendor class: Mips_boot
dnsmasq-dhcp: 3031796432 available DHCP range: 192.168.1.100 -- 192.168.1.200
dnsmasq-dhcp: 3031796432 vendor class: Mips_boot
dnsmasq-dhcp: 3031796432 available DHCP range: 192.168.1.100 -- 192.168.1.200
dnsmasq-dhcp: 3031796432 vendor class: Mips_boot
dnsmasq-dhcp: 3031796432 available DHCP range: 192.168.1.100 -- 192.168.1.200
dnsmasq-dhcp: 3031796432 vendor class: Mips_boot
dnsmasq-dhcp: 3031796432 available DHCP range: 192.168.1.100 -- 192.168.1.200
dnsmasq-dhcp: 3031796432 vendor class: Mips_boot
dnsmasq-dhcp: 3031796432 available DHCP range: 192.168.1.100 -- 192.168.1.200
dnsmasq-dhcp: 3031796432 vendor class: Mips_boot
dnsmasq-dhcp: 3031796432 available DHCP range: 192.168.1.100 -- 192.168.1.200
dnsmasq-dhcp: 3031796432 vendor class: Mips_boot
dnsmasq-dhcp: 3031796432 available DHCP range: 192.168.1.100 -- 192.168.1.200
dnsmasq-dhcp: 3031796432 vendor class: Mips_boot
dnsmasq-dhcp: 3031796432 available DHCP range: 192.168.1.100 -- 192.168.1.200
dnsmasq-dhcp: 3031796432 vendor class: Mips_boot
dnsmasq-dhcp: 3031796432 available DHCP range: 192.168.1.100 -- 192.168.1.200
dnsmasq-dhcp: 3031796432 vendor class: Mips_boot
dnsmasq-dhcp: 3031796432 available DHCP range: 192.168.1.100 -- 192.168.1.200
dnsmasq-dhcp: 3031796432 vendor class: Mips_boot
dnsmasq-dhcp: 3031796432 available DHCP range: 192.168.1.100 -- 192.168.1.200
dnsmasq-dhcp: 3031796432 vendor class: Mips_boot
dnsmasq-dhcp: 3031796432 available DHCP range: 192.168.1.100 -- 192.168.1.200
dnsmasq-dhcp: 3031796432 vendor class: Mips_boot
dnsmasq-dhcp: 3031796432 available DHCP range: 192.168.1.100 -- 192.168.1.200
dnsmasq-dhcp: 3031796432 vendor class: Mips_boot
dnsmasq-dhcp: 3031796432 available DHCP range: 192.168.1.100 -- 192.168.1.200
dnsmasq-dhcp: 3031796432 vendor class: Mips_boot
dnsmasq-dhcp: 3031796432 available DHCP range: 192.168.1.100 -- 192.168.1.200
dnsmasq-dhcp: 3031796432 vendor class: Mips_boot
dnsmasq-dhcp: 3031796432 available DHCP range: 192.168.1.100 -- 192.168.1.200
dnsmasq-dhcp: 3031796432 vendor class: Mips_boot
Click on System on the left, then click on Resources. You can see the free space on the flash as Free HDD Space:

Enter the following command:
/system resource print
and look for the free-hdd-space line – for example:
[admin@CoreSwitch01] > /system resource print
                   uptime: 4d19h26m41s
                  version: 7.4.1 (stable)
               build-time: Aug/04/2022 11:48:11
         factory-software: 6.44.6
              free-memory: 408.7MiB
             total-memory: 512.0MiB
                      cpu: ARM
                cpu-count: 2
                 cpu-load: 26%
           free-hdd-space: 44.0KiB
          total-hdd-space: 15.9MiB
  write-sect-since-reboot: 35547
         write-sect-total: 520339
               bad-blocks: 0%
        architecture-name: arm
               board-name: CRS309-1G-8S+
                 platform: MikroTik
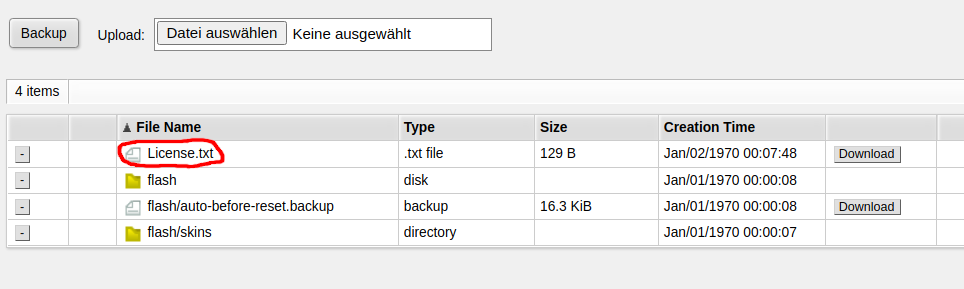
On the terminal (or via SSH / Telnet), run the following command:
/system license print file="License.txt"
Now you can find the file under Files in WebFig:
MikroTik published an official ZeroTier package for MikroTik routers. But not all Routers support
Devices which only support SwOS (SwitchOS) do not support ZeroTier. You need a device running RouterOS.
But even among the RouterOS devices, not all devices support ZeroTier. The first requirement is that you are running a recent version of RouterOS such as RouterOS 7.4.1
At the time of writing this post (2022-08-22), only devices with the ARM and ARM64 architecture support ZeroTier. For other devices, you can’t even download the package. This include CHR (cloud hosted router) running on x86 or x86_64 for which ZeroTier is currently not available.
More specifically, for RouterOS version 7.4.1 and 7.5beta11, neither x86/x86_64 nor the SMIPS/MMIPS/MIPSBE or Tile architecture support ZeroTier.
Before buying a device or commiting to ZeroTier, download the Extra packages for your architecture from the MikroTik download page and check if there’s a zerotier-....npk in the ZIP archive. If it isn’t available there, you currently can’t use ZeroTier on that device – but possibly it will be supported in the future.
When you try to reset the configuration of the MikroTik RB2011UiAS-2HnD-IN router via the integrated display, you will be asked for a PIN code for confirmation.
By default, this PIN code is 1234.
In the WebFig web UI, you can check the license level by clicking on System -> License
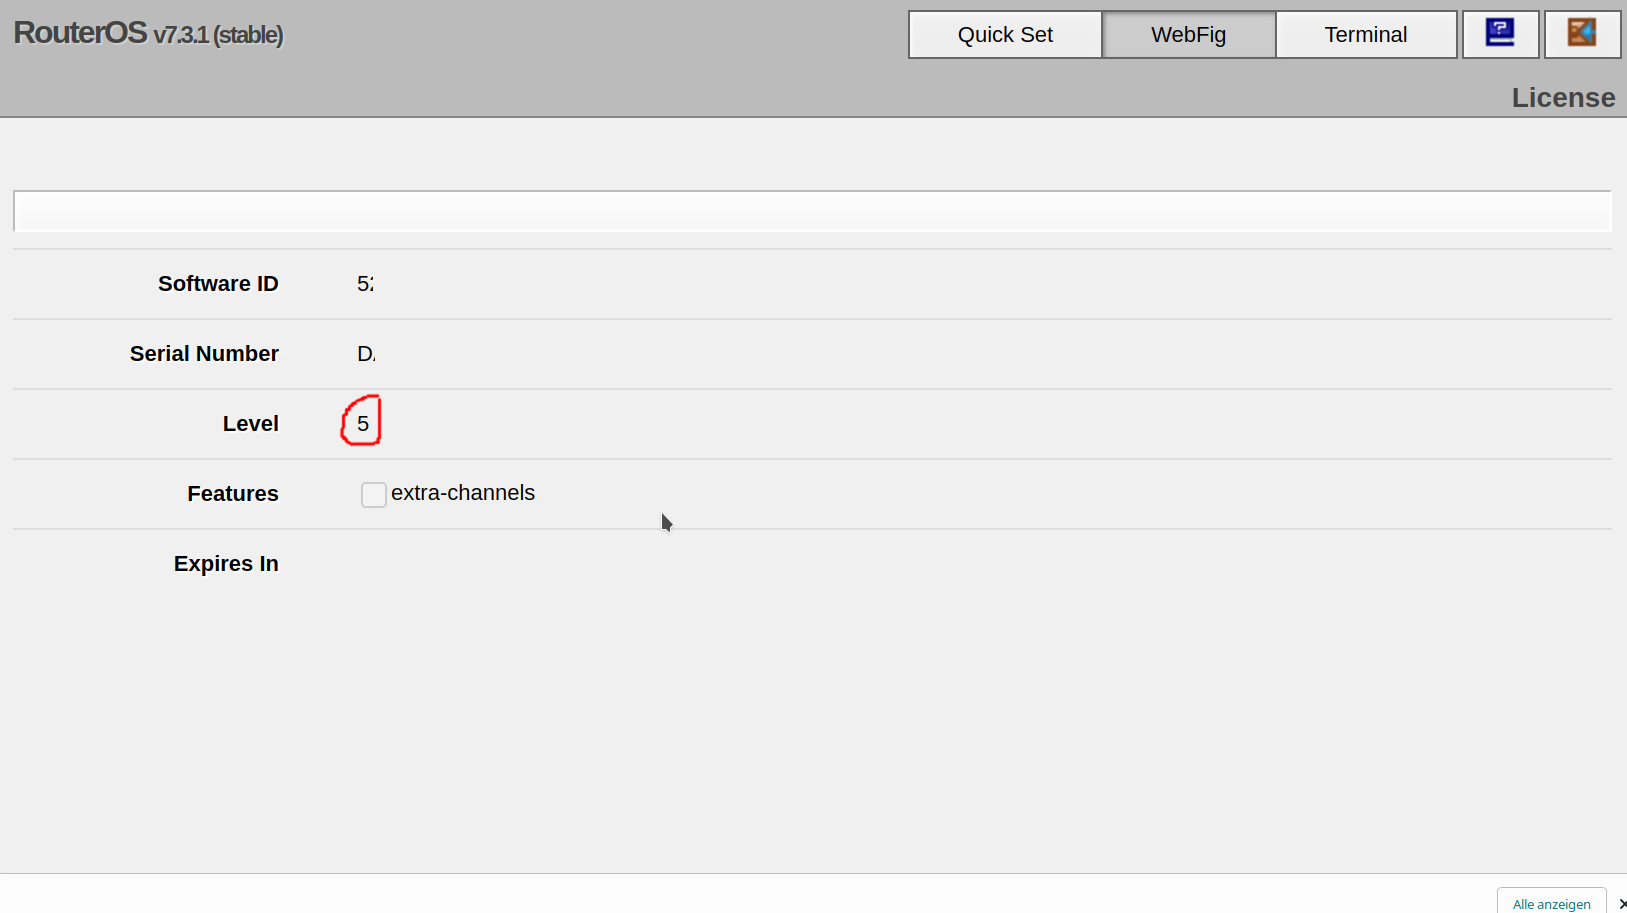
Run the following command:
/system license print
Look for the nlevel line. In the following example, the MikroTik RouterOS license level is Level 5:
[admin@MyRouter] > /system license print
  software-id: 5ABC-DEF0
       nlevel: 5
     features: