Networking

How to factory reset the GS710TUP

In order to factory reset the GS710TUP switch but maintain NETGEAR registration status, press the RESET button on the front panel (left side) for 5 seconds. You can press the button for any time between 5 and 9 seconds, but do not press the button for more than 10 seconds. Pressing the RESET button for more than 10 seconds will perform a factory reset but also delete the registration status.

Source: GS710TUP user manual

Posted by Uli Köhler in Networking

How to re-resolve DNS for Wireguard on Alpine Linux

In our previous post How to automatically re-resolve DNS in Wireguard on Linux we explored how to use the reresolve-dns.sh script that is included with wireguard-tools on Ubuntu to re-resolve DNS entries in wireguard config files.

Add the following to the root crontab using crontab -e:

*       *       *       *       *       /usr/local/bin/reresolve-dns.sh /etc/wireguard/mywg.conf

You need to add this for every wireguard config (mywg.conf for this example).

Posted by Uli Köhler in Alpine Linux, Wireguard

tcpdump : How to capture pings (ICMP echo request/reply)

The following command will capture ping request/replies (ICMP echo request / replies) on eth0 and (due to -v will decode and display them):

tcpdump -i eth0 -v 'icmp'

Example output:

13:51:16.007460 IP (tos 0x0, ttl 255, id 1522, offset 0, flags [none], proto ICMP (1), length 56)
    10.158.211.2 > 10.158.211.1: ICMP echo request, id 32000, seq 2982, length 36
13:51:16.007484 IP (tos 0x0, ttl 64, id 37357, offset 0, flags [none], proto ICMP (1), length 56)
    10.158.211.1 > 10.158.211.2: ICMP echo reply, id 32000, seq 2982, length 36


Posted by Uli Köhler in Networking

How to autostart Wireguard (wg-quick) on boot on Alpine Linux

If you have a Wireguard config file such as /etc/wireguard/wghome.conf, which you can start manually using wg-quick up wghome, this is how you autostart it on boot. Thanks to Justin Ludwig on Serverfault for the template for that init script

Create /etc/init.d/wg-quick-wghome:

#!/sbin/openrc-run
description="wg-quick wghome"

depend() {
    need net
    need localmount
}

start() {
    wg-quick up schlaftier
}

stop() {
    wg-quick down schlaftier
}

Then make it executable:

chmod a+x /etc/init.d/wg-quick-wghome

and enable it to start on boot:

rc-update add wg-quick-wghome default

and start it right now if desired:

/etc/init.d/wg-quick-wghome start

Of course you can add multiple scripts like this. Just ensure to name them differently and perform all the steps required to enable startup on boot.

Posted by Uli Köhler in Alpine Linux, Networking, Wireguard

How to enable IPv4 forwarding in Alpine Linux

You can run this simple command as root to enable IPv4 forwarding in Alpine Linux:

sysctl -w net.ipv4.ip_forward=1

This setting will not persist after reboot.

In order to make the setting persist, append net.ipv4.ip_forward=1 to /etc/sysctl.conf:

echo "net.ipv4.ip_forward=1" >> /etc/sysctl.conf


Posted by Uli Köhler in Alpine Linux, Networking

How to fix MikroTik SSH unable to load key file (wrong format or bad passphrase)!

Problem:

You want to import your SSH public key for passwordless login to your MikroTik router using either the terminal or WebFig/WinBox (as described in our previous post How to import SSH key to MikroTik RouterOS for passwordless login).

However, during import you see the following error message in the terminal:

unable to load key file (wrong format or bad passphrase)!

or in WebFig:

Couldn't perform action - unable to load key file (wrong format or bad passphrase)! (6)

Solution:

Either you are using an elliptic curve key (which is not supported by RouterOS at the moment) or you are using a file which is not an SSH key.

The file you are uploading should look like this:

ssh-rsa AAAAB3NzaC1yc2EAAAADAQABAAABAQC6EyAUma+shOkTZ0a6WcipSb552WmQb8hTKvDOMxQ234HXAeuJg3KeJ8WdkbOIdYuNq08xBrpjinaRGSZwDqhAiQMMz6O3yfkGpWZNO26lBQkngspJU1w6HLXR9tRtRaqbXwc1kV0KS6quj4sRaGLHKMciTjx0cVbEQrLxBXIJvRl7a6w/VukE+c9LhcRBZTrYB6Er7vGMM7VtgThzq+reFnql4kicG83NuPHjC/9Z78ehxpSekSrBYTYMuqiC1m8RW/l0mI8TtkUAU/qnTuwMXqVh0oOPGSWe4qvnbjCThRkDIEuK19CyCr5uyvZTV268SftEKaKOB7wcjevZlR11 uli@uli-desktop

The most important aspect is that it needs to start with ssh-rsa, else RouterOS won’t import it – RouterOS supports ed25519 keys since RouterOS 7.7, which is in beta at the time of writing this post.

You can generate a new keypair and save it to id_mikrotik and id_mikrotik.pub using

ssh-keygen -t rsa -b 8192 -f id_mikrotik


Posted by Uli Köhler in MikroTik

How to import SSH key to MikroTik RouterOS for passwordless login

Important: You can not use elliptic curve keys (tested with ed25519) as of RouterOS 7.9 – RSA keys will work!

First, upload the public key to the filesystem of the router using Files – in the following image, the SSH key is listed at the bottom:

Using the terminal:

/user/ssh-keys/import user=admin public-key-file=id_mikrotik.pub

Using WebFig or WinBox:

Now go to System -> Users, open the SSH keys tab:

There, click Import SSH Key

open the user you want to add the public key for (typically admin if you didn’t create other users before):

then click Import SSH Key and the key will be active immediately

Posted by Uli Köhler in MikroTik, Networking

How to fix Alpine Linux wg-quick (no such package)

Problem:

While trying to install wg-quick on Alpine Linux, you see the following error message:

ERROR: unable to select packages:
  wg-quick (no such package):
    required by: world[wg-quick]

Solution:

You need to install the wireguard-tools package which also contains wg-quick:

apk add wireguard-tools


Posted by Uli Köhler in Alpine Linux, Wireguard

How to fix headscale startup error “failed to configure TLS (sslmode is invalid)”

Problem:

When starting headscale 0.17.0 or newer, you see repeating error messages like

headscale_1  | 2022-11-26T20:03:39Z FTL go/src/headscale/cmd/headscale/cli/server.go:21 > Error initializing error="cannot parse `host=postgres dbname=headscale user=headscale sslmode= port=5432 password=xxxxx`: failed to configure TLS (sslmode is invalid)"

Solution:

This error occurs due to a change starting from headscale 0.17.0. In your config.yaml, add

db_ssl: false

after db_type: ...

Complete database section config example:

# # Postgres config
db_type: postgres
db_host: postgres
db_port: 5432
db_name: headscale
db_user: headscale
db_pass: Paep6AhJiZeedie5fiefieV0quohro

db_ssl: false

After that, restart headscale and the error message should disappear.

Posted by Uli Köhler in Headscale

How to generate random port number on the command line

The following Linux shell command will generate a random port number between 1024 and 65535 (inclusive):

shuf -i 1024-65535 -n 1

Example:

$ shuf -i 1024-65535 -n 1
45508


Posted by Uli Köhler in Linux, Networking

What does ethtool “Supports Wake-on: d” mean?

When you see ethtool output like

Supports Wake-on: d

this means that your network card does NOT support wake-on-LAN at all.

In case you need to use wake-on-LAN, you need to use another networking card.

Posted by Uli Köhler in Networking

How to easily update Connect X-3 firmware on Ubuntu 22.04

Step 1: Download the automatic firmware upgrade tool mlxup from NVidia . For me, the x64 Linux version worked on Ubuntu 22.04 without any issue

Step 2: chmod a+x mlxup to make mlxup executable

Step 3: sudo ./mlxup – then follow the prompts and, if desired, enter y to start the firmware upgrade

Step 4: reboot your computer for the changes to take effect

mlxup output for my card:

Querying Mellanox devices firmware ...

Device #1:
----------

  Device Type:      ConnectX3
  Part Number:      MCX311A-XCA_Ax
  Description:      ConnectX-3 EN network interface card; 10GigE; single-port SFP+; PCIe3.0 x4 8GT/s; RoHS R6
  PSID:             MT_1170110023
  PCI Device Name:  0000:03:00.0
  Port1 MAC:        248a076e6360
  Port2 MAC:        248a076e6361
  Versions:         Current        Available     
     FW             2.35.5100      2.42.5000     
     PXE            3.4.0648       3.4.0752      

  Status:           Update required

---------
Found 1 device(s) requiring firmware update...

Perform FW update? [y/N]: y
Device #1: Updating FW ...     
Done

Restart needed for updates to take effect.
Log File: /tmp/mlxup_workdir/mlxup-20221123_171552_28032.log


Posted by Uli Köhler in Networking

How to enable/disable PoE ports using pySNMP on the Netgear GS710TUP

In our previous post How to use pySNMP to query SNMPv3 information from Netgear GS710TUP we showed how to connect pySNMP to the Netgear GS710TUP to query simple informaton.

The following example script is the pySNMP equivalent to How to enable/disable PoE port power using SNMPv3 on the Netgear GS710TUP : It sets the relevant OID in 1.3.6.1.2.1.105.1.1.1.3 (pethPsePortAdminEnable).

The following OIDs for individual ports are available for the GS710TUP which has 8 PoE ports:

1.3.6.1.2.1.105.1.1.1.3.1.1 # Port 1
1.3.6.1.2.1.105.1.1.1.3.1.2 # Port 2
1.3.6.1.2.1.105.1.1.1.3.1.3 # Port 3
1.3.6.1.2.1.105.1.1.1.3.1.4 # Port 4
1.3.6.1.2.1.105.1.1.1.3.1.5 # Port 5
1.3.6.1.2.1.105.1.1.1.3.1.6 # Port 6
1.3.6.1.2.1.105.1.1.1.3.1.7 # Port 7
1.3.6.1.2.1.105.1.1.1.3.1.8 # Port 8

In our example, we’ll enable the power to port 1:

import pysnmp.hlapi as snmp

portNumber = 1

iterator = snmp.setCmd(
    snmp.SnmpEngine(),
    snmp.UsmUserData('admin', 'SWITCH_ADMIN_PASSWORD',
                     authProtocol=snmp.usmHMACSHAAuthProtocol,
                     privProtocol=snmp.usmNoPrivProtocol),
    snmp.UdpTransportTarget(('SWITCH_IP_ADDRESS', 161)),
    snmp.ContextData(),
    snmp.ObjectType(
        snmp.ObjectIdentity(f'1.3.6.1.2.1.105.1.1.1.3.1.{portNumber}'),
        snmp.Integer(1))
)

errorIndication, errorStatus, errorIndex, varBinds = next(iterator)

if errorIndication:
    print(errorIndication)
elif errorStatus:
    idx = int(errorIndex) - 1
    location = errorIndex and varBinds[idx][0] or '?'
    print(f"{errorStatus.prettyPrint()} at {location}")
else: # Success
    for varBind in varBinds:
        print(' = '.join([x.prettyPrint() for x in varBind]))

In order to disable power on port 1, replace

snmp.Integer(1)

by

snmp.Integer(2)

Note that an 1 value represents boolean true (as in enable PoE output) whereas 2 represents boolean false, disabling PoE output on the port.

Posted by Uli Köhler in Networking, PoE, Python, SNMP

How to enable/disable PoE port power using SNMPv3 on the Netgear GS710TUP

In our previous post How to query if PoE ports are enabled using SNMPv3 on the Netgear GS710TUP we showed how to use snmpwalk to check whether PoE power is enabled on the GS710TUP.

In this post we’ll show how to enable port on

The relevant OID is 1.3.6.1.2.1.105.1.1.1.3 (pethPsePortAdminEnable), therefore the OID for a given port number 1...8 is

1.3.6.1.2.1.105.1.1.1.3.1.PORTNUMBER

i.e. the following OIDs are available for the GS710TUP which has 8 PoE ports:

1.3.6.1.2.1.105.1.1.1.3.1.1 # Port 1
1.3.6.1.2.1.105.1.1.1.3.1.2 # Port 2
1.3.6.1.2.1.105.1.1.1.3.1.3 # Port 3
1.3.6.1.2.1.105.1.1.1.3.1.4 # Port 4
1.3.6.1.2.1.105.1.1.1.3.1.5 # Port 5
1.3.6.1.2.1.105.1.1.1.3.1.6 # Port 6
1.3.6.1.2.1.105.1.1.1.3.1.7 # Port 7
1.3.6.1.2.1.105.1.1.1.3.1.8 # Port 8

We can therefore enable power on port 1 by using the following command:

snmpset -v3 -l authNopriv -c public -a SHA1 -u admin -A 'switchAdminPassword' SWITCHIPADDRESS 1.3.6.1.2.1.105.1.1.1.3.1.1 i 1

or disable power on port 1:

snmpset -v3 -l authNopriv -c public -a SHA1 -u admin -A 'switchAdminPassword' SWITCHIPADDRESS 1.3.6.1.2.1.105.1.1.1.3.1.1 i 2

Remember to replace switchAdminPassword by the admin password of your switch and SWITCHIPADDRESS by the IP address of the switch.

i tells snmpset to set an INTEGER1 represents true while 2 represents false.

Example output for enabling power on port 1 successfully:

SNMPv2-SMI::mib-2.105.1.1.1.3.1.1 = INTEGER: 1
Posted by Uli Köhler in Networking, PoE, SNMP

How to query if PoE ports are enabled using SNMPv3 on the Netgear GS710TUP

In our previous post Simple SNMPv3 client example for Netgear GS710TUP we provided an example of how to use snmpwalk to show SNMP properties using SHA authentication without encryption (see the previous post for details on how to configure SNMPv3 correctly).

The Netgear GS710TUP also provides SNMP access to the PoE configuration using the POWER-ETHERNET MIB.

Given the following PoE port configuration on the web UI:

we can query if PoE is enabled or disabled using the OID 1.3.6.1.2.1.105.1.1.1.3 (pethPsePortAdminEnable):

snmpwalk -v3 -l authNopriv -c public -a SHA1 -u admin -A 'switchAdminPassword' SWITCHIPADDRESS 1.3.6.1.2.1.105.1.1.1.3

Remember to replace switchAdminPassword by the admin password of your switch and SWITCHIPADDRESS by the IP address of the switch.

Example output (without the proper MIB being installed):

SNMPv2-SMI::mib-2.105.1.1.1.3.1.1 = INTEGER: 1
SNMPv2-SMI::mib-2.105.1.1.1.3.1.2 = INTEGER: 1
SNMPv2-SMI::mib-2.105.1.1.1.3.1.3 = INTEGER: 1
SNMPv2-SMI::mib-2.105.1.1.1.3.1.4 = INTEGER: 2
SNMPv2-SMI::mib-2.105.1.1.1.3.1.5 = INTEGER: 2
SNMPv2-SMI::mib-2.105.1.1.1.3.1.6 = INTEGER: 1
SNMPv2-SMI::mib-2.105.1.1.1.3.1.7 = INTEGER: 1
SNMPv2-SMI::mib-2.105.1.1.1.3.1.8 = INTEGER: 1

The 8 lines represent the 8 PoE ports of the GS710TUP.

We can download the relevant MIB from the Netgear website and therefore get a nicer output:

snmpwalk -m GS110_710TUP_V1.0.5.9_MIBs/POWER-ETHERNET-MIB.txt -v3 -l authNopriv -c public -a SHA1 -u admin -A 'switchAdminPassword' SWITCHIPADDRESS 1.3.6.1.2.1.105.1.1.1.3

Output:

POWER-ETHERNET-MIB::pethPsePortAdminEnable.1.1 = INTEGER: true(1)
POWER-ETHERNET-MIB::pethPsePortAdminEnable.1.2 = INTEGER: true(1)
POWER-ETHERNET-MIB::pethPsePortAdminEnable.1.3 = INTEGER: true(1)
POWER-ETHERNET-MIB::pethPsePortAdminEnable.1.4 = INTEGER: false(2)
POWER-ETHERNET-MIB::pethPsePortAdminEnable.1.5 = INTEGER: false(2)
POWER-ETHERNET-MIB::pethPsePortAdminEnable.1.6 = INTEGER: true(1)
POWER-ETHERNET-MIB::pethPsePortAdminEnable.1.7 = INTEGER: true(1)
POWER-ETHERNET-MIB::pethPsePortAdminEnable.1.8 = INTEGER: true(1)


Posted by Uli Köhler in Networking, SNMP

How to use pySNMP to query SNMPv3 information from Netgear GS710TUP

First, install pysnmp using

pip install pysnmp

On the Netgear GS710TUP, I enabled SNMPv3 without encryption/privacy but with SHA1 authentication as already outlined in our previous article Simple SNMPv3 client example for Netgear GS710TUP:

Using pysnmp, you can query the device like this (using the standard admin password which you also use to login to the router:

#!/usr/bin/env python3
import pysnmp.hlapi as snmp

iterator = snmp.getCmd(
    snmp.SnmpEngine(),
    snmp.UsmUserData('admin', 'SWITCH_ADMIN_PASSWORD',
                     authProtocol=snmp.usmHMACSHAAuthProtocol,
                     privProtocol=snmp.usmNoPrivProtocol),
    snmp.UdpTransportTarget(('SWITCH_IP_ADDRESS', 161)),
    snmp.ContextData(),
    snmp.ObjectType(snmp.ObjectIdentity('SNMPv2-MIB', 'sysDescr', 0))
)

errorIndication, errorStatus, errorIndex, varBinds = next(iterator)

if errorIndication:
    print(errorIndication)
elif errorStatus:
    idx = int(errorIndex) - 1
    location = errorIndex and varBinds[idx][0] or '?'
    print(f"{errorStatus.prettyPrint()} at {location}")
else: # Success
    for varBind in varBinds:
        print(' = '.join([x.prettyPrint() for x in varBind]))

Example output:

SNMPv2-MIB::sysDescr.0 = GS710TUP 10-Port Gigabit Ethernet Ultra60 PoE++ Smart Managed Pro Switch (480W), Software Version 1.0.5.9, Boot Version 1.0.0.9
Posted by Uli Köhler in Networking, Python, SNMP

How to capture & decode SNMP traffic using tcpdump

Using the following command, you can capture & decode SNMP traffic going in and out of a specific interface (enp3s0 in this example):

tcpdump -v -i enp3s0 'udp port 161'

This works by just filtering for UDP packets on port 161 – the SNMP port. The -v flag tells tcpdump to decode the traffic in real time.

Example output:

01:28:27.915505 IP (tos 0x0, ttl 64, id 28865, offset 0, flags [DF], proto UDP (17), length 151)
    10.9.2.199.snmp > 10.9.2.15.47669:  { SNMPv3 { F=a } { USM B=1 T=608 U="admin" } { ScopedPDU E=_80_00_6a_92_03_44_a5_6e_43_5e_4c C="" { GetResponse(33) R=1015374419  105.1.1.1.5.1.2=1 } } } 
01:28:27.915646 IP (tos 0x0, ttl 64, id 38290, offset 0, flags [DF], proto UDP (17), length 150)
    10.9.2.15.47669 > 10.9.2.199.snmp:  { SNMPv3 { F=ar } { USM B=1 T=608 U="admin" } { ScopedPDU E=_80_00_6a_92_03_44_a5_6e_43_5e_4c C="" { GetNextRequest(32) R=1015374420  105.1.1.1.5.1.2 } } } 


Posted by Uli Köhler in Networking

How to fix MikroTik RouterOS NTP client: using local clock

Problem:

in System -> NTP client in your MikroTik router, the Status always tells you using local clock and it won’t synchronize with any NTP server.

Solution:

You can’t disable the local clock in System -> NTP client. Instead, you’ll be able to find the relevant setting in System -> NTP server.

Ensure that Use Local Clock is unchecked and click Apply


After that, your NTP client will be active and able to synchronize:


Posted by Uli Köhler in MikroTik, Networking

How to fix MikroTik RouterOS DoH server connection error: SSL: ssl: certificate not yet valid (6)

Problem:

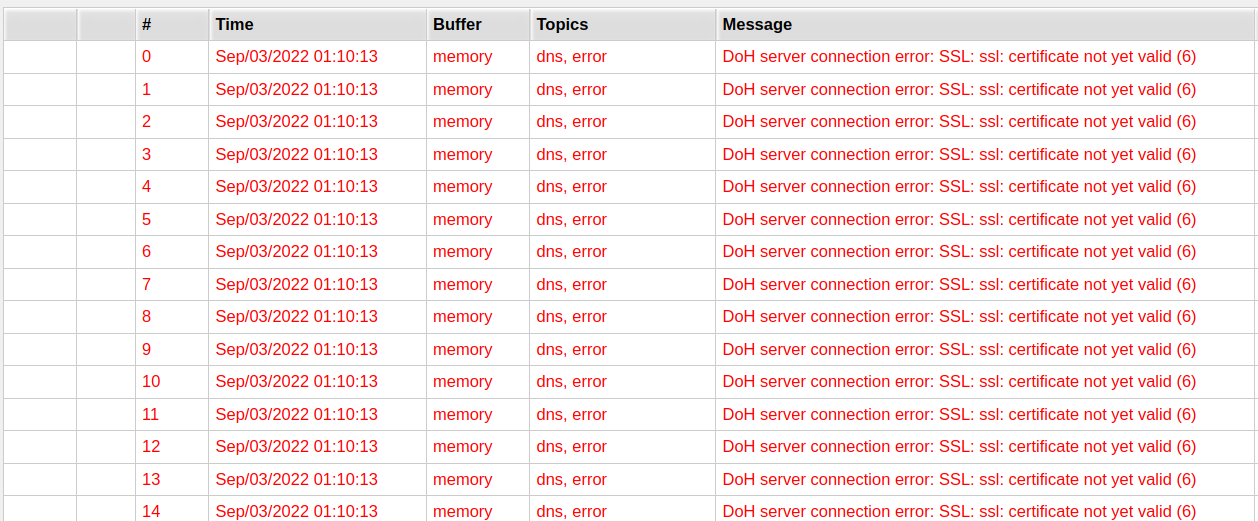
The DNS server integrated into your MikroTik router doesn’t work and the log shows a lot of

DoH server connection error: SSL: ssl: certificate not yet valid (6)

messages:

Reason for the error:

The issue here is that the clock in your MikroTik router does not (yet) know the correct time.

For example, the clock might be set to 1st of January, 1970 – however, the TLS certificate of the DNS-over-HTTPS server is only valid from, for example, 1st of November, 2022. This is why the MikroTik router tells you that the certificate isn’t valid.

Preferred solution: Fix the time using NTP

Just tell the MikroTik server to get the time from a public NTP server.

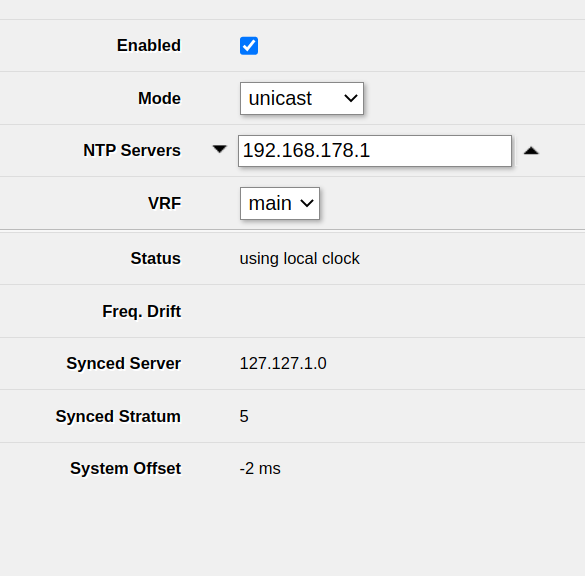
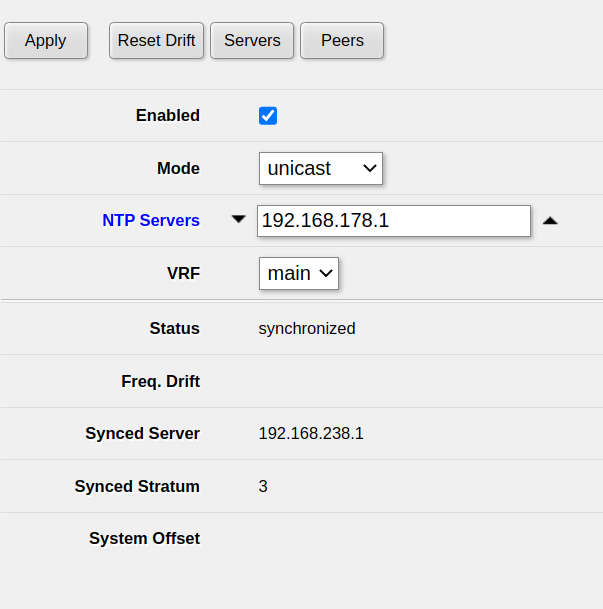
Open System -> NTP client in WebFig or Winbox. Typically, you want to use the upstream router as an NTP server. In my case, that is 192.168.178.1.

Ensure that Enabled is checked, add the NTP server and click Apply.

After waiting a few seconds, you should see synchronized under Status. This means that the clock of the MikroTik router has been set correctly and the issue should be fixed.

Alternate solution: Disable DNS-over-HTTPs

This solution decreases the security of your system and is hence not preferred. You should always set the time of your router correctly, not doing so will lead to a bunch of issues.

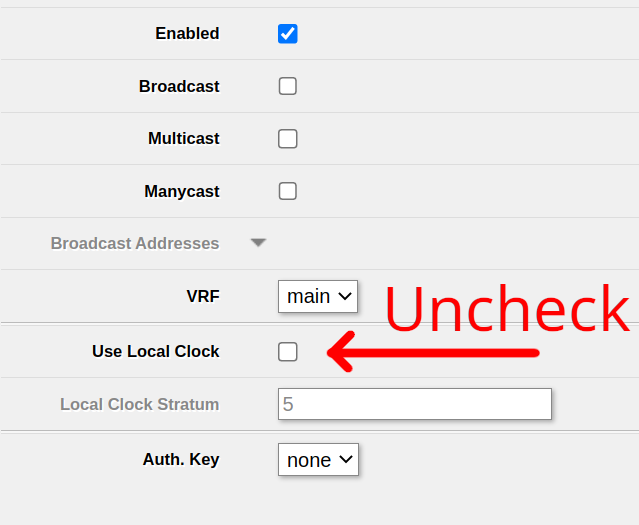
If you, however, still intend to disable DNS-over-HTTPS, open IP -> DNS and remove all servers under Use DoH servers, then click Apply.

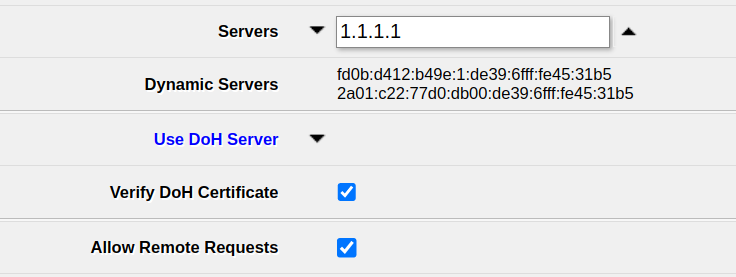
After that, your router will use the normal DNS servers – 1.1.1.1 in my case. Ensure to enter some server there to make sure DNS requests work – if in doubt, you can always use 1.1.1.1 (Cloudflare) or 8.8.8.8 (Google).

Note that requests to those servers will neither be encrypted nor authenticated, so requests can be sniffed and/or manipulated by anyone capable of manipulating traffic to your device. Even though DNS-over-HTTPS is slighly slower (which, in turn is alleviated by the caching feature of the MikroTik router’s DNS server), it provides a huge security benefit.

Posted by Uli Köhler in MikroTik, Networking

How to install additional SNMP MIBs in Ubuntu

First, download the standard set of MIBs using

sudo apt -y install snmp-mibs-downloader

This will download all available MIBS files during package installation but if at any time you want to download/update them, use

sudo download-mibs

After that, you’ll need to activate loading the MIBS for the SNMP client (original source for this command: @CameronSparr on medium.com):

sudo sed -i 's/mibs :/# mibs :/g' /etc/snmp/snmp.conf


Posted by Uli Köhler in Networking, SNMP