The default password for the EMQX admin account is public. Change it as soon as possible 🙂
27
Sep
2022
The default password for the EMQX admin account is public. Change it as soon as possible 🙂
You can simply run emqx_ctl using the following command:
docker-compose exec emqx ./bin/emqx_ctl [command]
where emqx is the name of the container to run emqx_ctl in.
Example:
docker-compose exec emqx ./bin/emqx_ctl status
When trying to run emqx_ctl in a dockerized emqx setup using a command like
docker-compose exec emqx ./bin/emqx status
you see an error message like
Node '[email protected]' not responding to pings.
/opt/emqx/bin/emqx: line 41: die: command not found
The problem here is that emqx_ctl is trying to connect to the IP address for node1.emqx.mydomain.com but that IP address does not point to the IP address for the docker container (maybe it’s the public IP address for your server?)
The solution here is to create a network alias within docker/docker-compose so that the Docker DNS system resolves node1.emqx.mydomain.com to the internal IP address of the container.
For example, in docker-compose, you can create your network using
networks:
  emqx:
    driver: bridge
and then configure the alias for the container using
services:
  emqx:
    image: emqx:4.4.4
    environment:
      - "EMQX_NAME=emqx"
      - "EMQX_HOST=node1.emqx.mydomain.com"
      - "EMQX_LOADED_PLUGINS=emqx_recon,emqx_retainer,emqx_management,emqx_dashboard"
    ports:
      - 18083:18083
      - 1883:1883
    volumes:
      - ./emqx_data:/opt/emqx/data
      - ./emqx_log:/opt/emqx/log
    networks:
      emqx:
        aliases:
          - "node1.emqx.mydomain.com"
You can create /var/lib/zerotier-one/local.conf – by default it doesn’t exist, if it does, just add these settings:
{
  "settings": {
    "primaryPort": 9994
  }
}
On my server, which was running zerotier already using docker, I wanted to install zerotier on a system level.
but whenever I ran zerotier-cli I saw the following error message:
zerotier-one: fatal error: cannot bind to local control interface port 9993
and when I tried to start the daemon using zerotier-one -d this error message was displayed:
zerotier-cli: missing port and zerotier-one.port not found in /var/lib/zerotier-one
In my case, this was due to the standard port 9993 already being used by the dockerized zerotier. Therefore I needed to configure a custom port by creating /var/lib/zerotier-one/local.conf:
{
  "settings": {
    "primaryPort": 9994
  }
}
You can choose any port you like.
When I’m not using traefik to automagically manage my Let’s Encrypt certificates, this is my preferred way to create Let’s Encrypt wildcard certificates. I use the certbot cloudflare plugin in order to perform the DNS-01 challenge which is required in order to obtain the certificate.
First, I create the script in /etc/letsencrypt/wildcard-mydomain.sh
#!/bin/sh
sudo certbot certonly -d mydomain.de,*.mydomain.de --dns-cloudflare --dns-cloudflare-credentials /etc/letsencrypt/cloudflare-mydomain.ini --preferred-challenges dns-01
and, if not already present, I also create the credentials file /etc/letsencrypt/cloudflare-mydomain.ini (replace the credentials by your cloudflare email and API key):
dns_cloudflare_email = "[email protected]"
dns_cloudflare_api_key = "f4a800573c41858be35aaead4e73d741"
After that, you only have to run the script once:
bash /etc/letsencrypt/wildcard-mydomain.sh
If the process succeeds, your certificate will be in /etc/letsencrypt/live/mydomain.de. However you need to ensure to regularly run certbot renew in order to renew the certificates which are only valid for 3 months.
In our previous post How to automatically renew Let’s Encrypt certbot certs on Ubuntu we provide a simple solution to install a system service to automatically renew the certificates daily. It’s extremely easy to install using just a single command to install the systemd service.
In multiple models of MikroTik routers running RouterOS v7.5 I got Error: Connection refused when running simple SSH port forwarding commands such as
ssh [email protected] -L 8080:192.168.178.1:80
but in the RouterLS log I could see multiple local forwarding forbidden error messages:

In this case, the solution was simple: Go to IP -> SSH in WebFig or Winbox and set Forwarding Enabled to Both and click Apply.
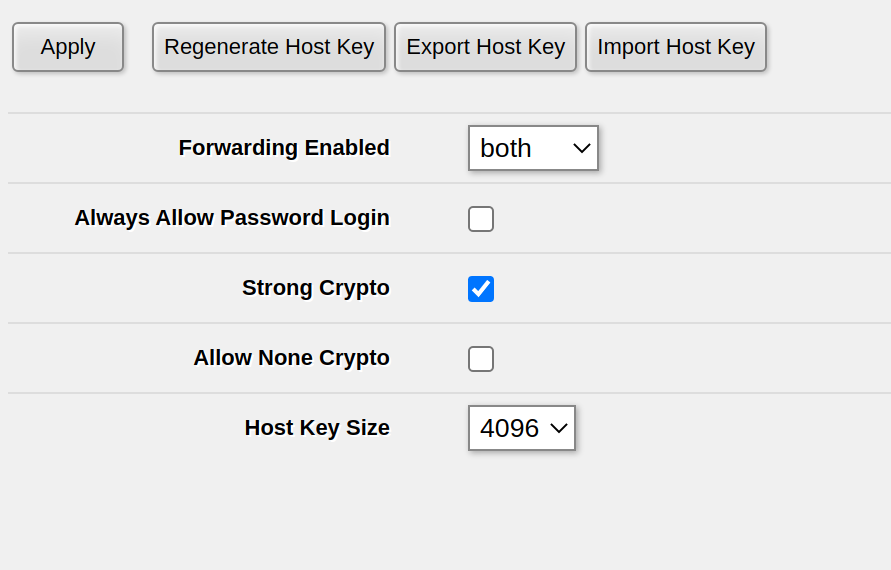
If you have already set Forwarding Enabled to Both or Local, on one of my routers this setting wasn’t properly activated – possibly after a RoutreOS upgrade. In order to fix this, set Forwarding Enabled to no, click Apply, then set Forwarding Enabled to Both and click Apply again. For me, this fixed the issue of being unable to do SSH port forwarding.
Run this command to install the ZeroTier client on Rasbian. You can use the same command to install ZeroTier on virtually any Linux platform.
curl -s https://install.zerotier.com | sudo bash
Source: ZeroTier installation website
In RouterOS, you can simply import .pem files using /certificate import no matter if the file contains a certificate and/or a private key.
First, upload them either via WebFig (Files) or via SCP to the filesystem of the Router.
We will assume the certificate is called cert.pem while the private key is called privkey.pem
After that, import the certificate and the private key, one after another:
/certificate/import file-name="cert.pem" passphrase="" name="mikrotik.mydomain.net"
/certificate/import file-name="privkey.pem" passphrase="" name="mikrotik.mydomain.net"
This will tell you that first the certificate and then the private key have been successfully imported:
[admin@MyRouter] > /certificate/import file-name=cert.pem passphrase="" name="mikrotik.mydomain.com"
     certificates-imported: 1
     private-keys-imported: 0
            files-imported: 1
       decryption-failures: 0
  keys-with-no-certificate: 0

[admin@MyRouter] > /certificate/import file-name=privkey.pem passphrase="" name="mikrotik.mydomain.com"
     certificates-imported: 0
     private-keys-imported: 1
            files-imported: 1
       decryption-failures: 0
  keys-with-no-certificate: 0
Before you call WiFi.begin(...), call this:
if (!WiFi.config(
      IPAddress(192, 168, 19, 5), // ESP's IP address
      IPAddress(192, 168, 19, 1), // Gateway
      IPAddress(255, 255, 255, 0), // IP Address
      IPAddress(192, 168, 19, 1) // DNS server
    )) {
  Serial.println("Failed to set static IP");
}
and replace the IP address etc with the static
This is based on our previous post on How to fix ESP32 not connecting to the Wifi network:
#include <Arduino.h>
#include <WiFi.h>

void setup() {
  Serial.begin(115200);
  WiFi.begin("MyWifiSSID", "MyWifiPassword");

  // Set static IP
  if (!WiFi.config(
        IPAddress(192, 168, 19, 5), // ESP's IP address
        IPAddress(192, 168, 19, 2), // Gateway
        IPAddress(255, 255, 255, 0), // IP Address
        IPAddress(192, 168, 19, 1) // DNS server
      )) {
    Serial.println("Failed to set static IP");
  }

  // Wait for wifi to be connected
  uint32_t notConnectedCounter = 0;
  while (WiFi.status() != WL_CONNECTED) {
      delay(100);
      Serial.println("Wifi connecting...");
      notConnectedCounter++;
      if(notConnectedCounter > 150) { // Reset board if not connected after 5s
          Serial.println("Resetting due to Wifi not connecting...");
          ESP.restart();
      }
  }
  Serial.print("Wifi connected, IP address: ");
  Serial.println(WiFi.localIP());
}

void loop() {
  // put your main code here, to run repeatedly:
}
Currently there is no pip install ... way of installing espota.py. The easiest way of installing it is to download it from GitHub:
wget https://raw.githubusercontent.com/espressif/arduino-esp32/master/tools/espota.py
When flashing an ESP32, especially when flashing remotely, you see the following log message
Serial port rfc2217://10.1.2.3.105:4418
Connecting...
Device PID identification is only supported on COM and /dev/ serial ports.
..
Chip is ESP32-S2
Features: WiFi, No Embedded Flash, No Embedded PSRAM, ADC and temperature sensor calibration in BLK2 of efuse V2
Crystal is 40MHz
MAC: 60:55:f9:f0:3a:16
Uploading stub...
Running stub...
Traceback (most recent call last):
  File "/usr/local/bin/esptool.py", line 34, in <module>
    esptool._main()
  File "/usr/local/lib/python3.8/dist-packages/esptool/__init__.py", line 1004, in _main
    main()
  File "/usr/local/lib/python3.8/dist-packages/esptool/__init__.py", line 684, in main
    esp = esp.run_stub()
  File "/usr/local/lib/python3.8/dist-packages/esptool/loader.py", line 912, in run_stub
    p = self.read()
  File "/usr/local/lib/python3.8/dist-packages/esptool/loader.py", line 307, in read
    return next(self._slip_reader)
StopIteration
This issue occurs not because of a hardware defect but because the latency of the connection is quite high and therefore the timeout occurs before the communication between the script and the bootloader can happen.
In order to fix it, you need to edit the hard-coded default timeout in the esptool.py installation!
First, you need to identify the location of loader.py in your installation. You can simply do that from the following part of the stack trace:
File "/usr/local/lib/python3.8/dist-packages/esptool/loader.py", line 912, in run_stub p = self.read()
In this case, loader.py is located at
/usr/local/lib/python3.8/dist-packages/esptool/loader.py
You need to edit the following line:
MEM_END_ROM_TIMEOUT = 0.05 # short timeout for ESP_MEM_END, as it may never respond
and increase the timeout – my recommendation is to increase it to 2.5 seconds.
… or you can simply change the timeout using the following command:
sed -i -e 's/MEM_END_ROM_TIMEOUT = 0.05/MEM_END_ROM_TIMEOUT = 2.5/g' /usr/local/lib/python3.8/dist-packages/esptool/loader.py
After that, your upload should work just fine.
In order to get the current time in RouterOS, use
/system clock get time
The time returned will be in hh:mm:dd format and local time
For example, the following command will print the current time:
:put [/system clock get time]
In order to print from within a RouterOS script on a MikroTik router, use
:put
For example,
:put [/system clock get time]
will print, for example
[admin@MyRouter] > :put [/system clock get time]
22:55:11
My experience is that PXE on MikroTik devices only works properly when you trigger it using the hardware reset button. You can also trigger it using System -> RouterBOARD -> Settings but this reproducibly didn’t work for me.
This method was tested on the hEX PoE Lite (i.e. RB750UPr2)
RESET buttonImportant note: Flashing OpenWRT permanently breaks PoE out functionality even after reinstalling RouterOS! PoE does not work on OpenWRT either!
I had significant problem with the official instructions of flashing OpenWRT on the MikroTik hEX PoE Lite as described on the OpenWRT wiki. I used RouterOS 7.4.1 and a Linux host for the flash process.
Specificially, starting the flash process from within RouterOS via System -> RouterBoard -> Settings did not work, neither with the backup bootloader nor without it, neither with DHCP nor with BOOTP. This caused a boot-and-DHCP-request loop with the log shown blow
… and probably most other RouterOS boards. There is no specific requirement for the firmware version. RouterOS 6.47 works. RouterOS 7.4.1 works. I didn’t check any one beside that, but most likely it won’t make a difference. Specifically, there is no need to downgrade if using this method! The RouterOS downgrade is only neccessary for some old-ish Windows based flash method.
1 – Connect a ethernet cable from your flashing computer to the first Ethernet connector of the router.
PXE will only work on this specific port and will not work on other ports!
2 – Setup your flashing computer’s IP interface config.
We’ll use eth0 in this example. Be sure to use the correct interface
sudo ifconfig eth0 192.168.1.10 netmask 255.255.255.0
I read somewhere that MikroTiks expect the PXE host to be at IP 192.168.1.10 – this definitively works. Other IP addresses might or might not also work, I didn’t check. Just use that one.
3 – Setup dnsmasq
sudo apt -y install dnsmasq
and then do not forget to stop dnsmasq and remove the default config
sudo systemctl disable --now dnsmasq
sudo mv /etc/dnsmasq.conf /etc/dnsmasq.default.conf
4 – Download the correct image from OpenWRT
Google for OpenWRT + your RouterBoard type, e.g. OpenWRT RB750UPr2. This will lead you to a site like this one. Scroll down and download both the Firmware OpenWrt Install URL and the Firmware OpenWrt Upgrade URL! In the end you will need both anyway, but for now we need the one ending with ...-initramfs-kernel.img!
Save that file with the original name. The name does not matter – what matters is only that you use the correct image, not the ...-sysupgrade.bin for PXE boot! There is absolutely no need to name the file vmlinux etc.
5 – Startup dnsmasq server
In the following command, be sure to set the correct image name in the --dhcp-boot line
sudo /usr/sbin/dnsmasq \
--no-daemon \
--listen-address 192.168.1.10 \
--bind-interfaces \
-p0 \
--dhcp-authoritative \
--dhcp-range=192.168.1.100,192.168.1.200 \
--bootp-dynamic \
--dhcp-boot=openwrt-19.07.10-ar71xx-mikrotik-rb-nor-flash-16M-initramfs-kernel.bin \
--log-dhcp \
--enable-tftp \
--tftp-root=$(pwd)
6 – Reset the router into PXE boot mode
As noted above, resetting via RouterOS did not work for me at all. I can only recommend this method, which I also described in my blogpost How to make MikroTik router boot using PXE (netboot) / BOOTP
7 – Proceed with OpenWRT
If the reset & PXE boot worked, OpenWRT is running on 192.168.1.1. On most MikroTik devices, you need to plugin the Ethernet to one of the LAN ports (typically every port except the first port) in order to access OpenWRT. Note that DHCP is not active by default.
The next step is basically to check if OpenWRT works properly and then install it to the flash using the ...-sysupgrade.bin image which we have downloaded before. This is rather easy and performed using the Web UI, it’s best to check the OpenWRT wiki page for more details.
See above for the procedure that works. This error occured when I didn’t start the PXE process via the Reset button
dnsmasq-dhcp: 1534706347 vendor class: Mips_boot
dnsmasq-dhcp: 1534706347 DHCPDISCOVER(eth1) dc:2c:6e:d7:60:9d
dnsmasq-dhcp: 1534706347 tags: eth1
dnsmasq-dhcp: 1534706347 DHCPOFFER(eth1) 192.168.1.100 dc:2c:6e:d7:60:9d
dnsmasq-dhcp: 1534706347 requested options: 1:netmask, 3:router
dnsmasq-dhcp: 1534706347 bootfile name: rb-nor-flash-16M-initramfs-kernel.bin
dnsmasq-dhcp: 1534706347 next server: 192.168.1.10
dnsmasq-dhcp: 1534706347 sent size:  1 option: 53 message-type  2
dnsmasq-dhcp: 1534706347 sent size:  4 option: 54 server-identifier  192.168.1.10
dnsmasq-dhcp: 1534706347 sent size:  4 option: 51 lease-time  1h
dnsmasq-dhcp: 1534706347 sent size:  4 option: 58 T1  30m
dnsmasq-dhcp: 1534706347 sent size:  4 option: 59 T2  52m30s
dnsmasq-dhcp: 1534706347 sent size:  4 option:  1 netmask  255.255.255.0
dnsmasq-dhcp: 1534706347 sent size:  4 option: 28 broadcast  192.168.1.255
dnsmasq-dhcp: 1534706347 sent size:  4 option:  3 router  192.168.1.10
dnsmasq-dhcp: 4257818828 available DHCP range: 192.168.1.100 -- 192.168.1.200
dnsmasq-dhcp: 4257818828 vendor class: Mips_boot
dnsmasq-dhcp: 4257818828 DHCPDISCOVER(eth1) dc:2c:6e:d7:60:9d
dnsmasq-dhcp: 4257818828 tags: eth1
dnsmasq-dhcp: 4257818828 DHCPOFFER(eth1) 192.168.1.100 dc:2c:6e:d7:60:9d
dnsmasq-dhcp: 4257818828 requested options: 1:netmask, 3:router
dnsmasq-dhcp: 4257818828 bootfile name: rb-nor-flash-16M-initramfs-kernel.bin
dnsmasq-dhcp: 4257818828 next server: 192.168.1.10
dnsmasq-dhcp: 4257818828 sent size:  1 option: 53 message-type  2
dnsmasq-dhcp: 4257818828 sent size:  4 option: 54 server-identifier  192.168.1.10
dnsmasq-dhcp: 4257818828 sent size:  4 option: 51 lease-time  1h
dnsmasq-dhcp: 4257818828 sent size:  4 option: 58 T1  30m
dnsmasq-dhcp: 4257818828 sent size:  4 option: 59 T2  52m30s
dnsmasq-dhcp: 4257818828 sent size:  4 option:  1 netmask  255.255.255.0
dnsmasq-dhcp: 4257818828 sent size:  4 option: 28 broadcast  192.168.1.255
dnsmasq-dhcp: 4257818828 sent size:  4 option:  3 router  192.168.1.10
dnsmasq-dhcp: 1683968382 available DHCP range: 192.168.1.100 -- 192.168.1.200
dnsmasq-dhcp: 1683968382 vendor class: Mips_boot
dnsmasq-dhcp: 1683968382 DHCPDISCOVER(eth1) dc:2c:6e:d7:60:9d
dnsmasq-dhcp: 1683968382 tags: eth1
dnsmasq-dhcp: 1683968382 DHCPOFFER(eth1) 192.168.1.100 dc:2c:6e:d7:60:9d
dnsmasq-dhcp: 1683968382 requested options: 1:netmask, 3:router
dnsmasq-dhcp: 1683968382 bootfile name: rb-nor-flash-16M-initramfs-kernel.bin
dnsmasq-dhcp: 1683968382 next server: 192.168.1.10
dnsmasq-dhcp: 1683968382 sent size:  1 option: 53 message-type  2
dnsmasq-dhcp: 1683968382 sent size:  4 option: 54 server-identifier  192.168.1.10
dnsmasq-dhcp: 1683968382 sent size:  4 option: 51 lease-time  1h
dnsmasq-dhcp: 1683968382 sent size:  4 option: 58 T1  30m
dnsmasq-dhcp: 1683968382 sent size:  4 option: 59 T2  52m30s
dnsmasq-dhcp: 1683968382 sent size:  4 option:  1 netmask  255.255.255.0
dnsmasq-dhcp: 1683968382 sent size:  4 option: 28 broadcast  192.168.1.255
dnsmasq-dhcp: 1683968382 sent size:  4 option:  3 router  192.168.1.10
dnsmasq-dhcp: 424531201 available DHCP range: 192.168.1.100 -- 192.168.1.200
dnsmasq-dhcp: 424531201 vendor class: Mips_boot
dnsmasq-dhcp: 424531201 DHCPDISCOVER(eth1) dc:2c:6e:d7:60:9d
dnsmasq-dhcp: 424531201 tags: eth1
dnsmasq-dhcp: 424531201 DHCPOFFER(eth1) 192.168.1.100 dc:2c:6e:d7:60:9d
dnsmasq-dhcp: 424531201 requested options: 1:netmask, 3:router
dnsmasq-dhcp: 424531201 bootfile name: rb-nor-flash-16M-initramfs-kernel.bin
dnsmasq-dhcp: 424531201 next server: 192.168.1.10
dnsmasq-dhcp: 424531201 sent size:  1 option: 53 message-type  2
dnsmasq-dhcp: 424531201 sent size:  4 option: 54 server-identifier  192.168.1.10
dnsmasq-dhcp: 424531201 sent size:  4 option: 51 lease-time  1h
dnsmasq-dhcp: 424531201 sent size:  4 option: 58 T1  30m
dnsmasq-dhcp: 424531201 sent size:  4 option: 59 T2  52m30s
dnsmasq-dhcp: 424531201 sent size:  4 option:  1 netmask  255.255.255.0
dnsmasq-dhcp: 424531201 sent size:  4 option: 28 broadcast  192.168.1.255
dnsmasq-dhcp: 424531201 sent size:  4 option:  3 router  192.168.1.10
dnsmasq-dhcp: 3459997603 available DHCP range: 192.168.1.100 -- 192.168.1.200
dnsmasq-dhcp: 3459997603 vendor class: Mips_boot
dnsmasq-dhcp: 3459997603 DHCPDISCOVER(eth1) dc:2c:6e:d7:60:9d
dnsmasq-dhcp: 3459997603 tags: eth1
dnsmasq-dhcp: 3459997603 DHCPOFFER(eth1) 192.168.1.100 dc:2c:6e:d7:60:9d
dnsmasq-dhcp: 3459997603 requested options: 1:netmask, 3:router
dnsmasq-dhcp: 3459997603 bootfile name: rb-nor-flash-16M-initramfs-kernel.bin
dnsmasq-dhcp: 3459997603 next server: 192.168.1.10
dnsmasq-dhcp: 3459997603 sent size:  1 option: 53 message-type  2
dnsmasq-dhcp: 3459997603 sent size:  4 option: 54 server-identifier  192.168.1.10
dnsmasq-dhcp: 3459997603 sent size:  4 option: 51 lease-time  1h
dnsmasq-dhcp: 3459997603 sent size:  4 option: 58 T1  30m
dnsmasq-dhcp: 3459997603 sent size:  4 option: 59 T2  52m30s
dnsmasq-dhcp: 3459997603 sent size:  4 option:  1 netmask  255.255.255.0
dnsmasq-dhcp: 3459997603 sent size:  4 option: 28 broadcast  192.168.1.255
dnsmasq-dhcp: 3459997603 sent size:  4 option:  3 router  192.168.1.10
dnsmasq-dhcp: 657189184 available DHCP range: 192.168.1.100 -- 192.168.1.200
dnsmasq-dhcp: 657189184 vendor class: Mips_boot
dnsmasq-dhcp: 657189184 DHCPDISCOVER(eth1) dc:2c:6e:d7:60:9d
dnsmasq-dhcp: 657189184 tags: eth1
dnsmasq-dhcp: 657189184 DHCPOFFER(eth1) 192.168.1.100 dc:2c:6e:d7:60:9d
dnsmasq-dhcp: 657189184 requested options: 1:netmask, 3:router
dnsmasq-dhcp: 657189184 bootfile name: rb-nor-flash-16M-initramfs-kernel.bin
dnsmasq-dhcp: 657189184 next server: 192.168.1.10
dnsmasq-dhcp: 657189184 sent size:  1 option: 53 message-type  2
dnsmasq-dhcp: 657189184 sent size:  4 option: 54 server-identifier  192.168.1.10
dnsmasq-dhcp: 657189184 sent size:  4 option: 51 lease-time  1h
dnsmasq-dhcp: 657189184 sent size:  4 option: 58 T1  30m
dnsmasq-dhcp: 657189184 sent size:  4 option: 59 T2  52m30s
dnsmasq-dhcp: 657189184 sent size:  4 option:  1 netmask  255.255.255.0
dnsmasq-dhcp: 657189184 sent size:  4 option: 28 broadcast  192.168.1.255
dnsmasq-dhcp: 657189184 sent size:  4 option:  3 router  192.168.1.10
dnsmasq-dhcp: 3031796432 available DHCP range: 192.168.1.100 -- 192.168.1.200
dnsmasq-dhcp: 3031796432 vendor class: Mips_boot
dnsmasq-dhcp: 3031796432 available DHCP range: 192.168.1.100 -- 192.168.1.200
dnsmasq-dhcp: 3031796432 vendor class: Mips_boot
dnsmasq-dhcp: 3031796432 available DHCP range: 192.168.1.100 -- 192.168.1.200
dnsmasq-dhcp: 3031796432 vendor class: Mips_boot
dnsmasq-dhcp: 3031796432 available DHCP range: 192.168.1.100 -- 192.168.1.200
dnsmasq-dhcp: 3031796432 vendor class: Mips_boot
dnsmasq-dhcp: 3031796432 available DHCP range: 192.168.1.100 -- 192.168.1.200
dnsmasq-dhcp: 3031796432 vendor class: Mips_boot
dnsmasq-dhcp: 3031796432 available DHCP range: 192.168.1.100 -- 192.168.1.200
dnsmasq-dhcp: 3031796432 vendor class: Mips_boot
dnsmasq-dhcp: 3031796432 available DHCP range: 192.168.1.100 -- 192.168.1.200
dnsmasq-dhcp: 3031796432 vendor class: Mips_boot
dnsmasq-dhcp: 3031796432 available DHCP range: 192.168.1.100 -- 192.168.1.200
dnsmasq-dhcp: 3031796432 vendor class: Mips_boot
dnsmasq-dhcp: 3031796432 available DHCP range: 192.168.1.100 -- 192.168.1.200
dnsmasq-dhcp: 3031796432 vendor class: Mips_boot
dnsmasq-dhcp: 3031796432 available DHCP range: 192.168.1.100 -- 192.168.1.200
dnsmasq-dhcp: 3031796432 vendor class: Mips_boot
dnsmasq-dhcp: 3031796432 available DHCP range: 192.168.1.100 -- 192.168.1.200
dnsmasq-dhcp: 3031796432 vendor class: Mips_boot
dnsmasq-dhcp: 3031796432 available DHCP range: 192.168.1.100 -- 192.168.1.200
dnsmasq-dhcp: 3031796432 vendor class: Mips_boot
dnsmasq-dhcp: 3031796432 available DHCP range: 192.168.1.100 -- 192.168.1.200
dnsmasq-dhcp: 3031796432 vendor class: Mips_boot
dnsmasq-dhcp: 3031796432 available DHCP range: 192.168.1.100 -- 192.168.1.200
dnsmasq-dhcp: 3031796432 vendor class: Mips_boot
dnsmasq-dhcp: 3031796432 available DHCP range: 192.168.1.100 -- 192.168.1.200
dnsmasq-dhcp: 3031796432 vendor class: Mips_boot
dnsmasq-dhcp: 3031796432 available DHCP range: 192.168.1.100 -- 192.168.1.200
dnsmasq-dhcp: 3031796432 vendor class: Mips_boot
dnsmasq-dhcp: 3031796432 available DHCP range: 192.168.1.100 -- 192.168.1.200
dnsmasq-dhcp: 3031796432 vendor class: Mips_boot
dnsmasq-dhcp: 3031796432 available DHCP range: 192.168.1.100 -- 192.168.1.200
dnsmasq-dhcp: 3031796432 vendor class: Mips_boot
dnsmasq-dhcp: 3031796432 available DHCP range: 192.168.1.100 -- 192.168.1.200
dnsmasq-dhcp: 3031796432 vendor class: Mips_boot
dnsmasq-dhcp: 3031796432 available DHCP range: 192.168.1.100 -- 192.168.1.200
dnsmasq-dhcp: 3031796432 vendor class: Mips_boot
dnsmasq-dhcp: 3031796432 available DHCP range: 192.168.1.100 -- 192.168.1.200
dnsmasq-dhcp: 3031796432 vendor class: Mips_boot
dnsmasq-dhcp: 3031796432 available DHCP range: 192.168.1.100 -- 192.168.1.200
dnsmasq-dhcp: 3031796432 vendor class: Mips_boot
dnsmasq-dhcp: 3031796432 available DHCP range: 192.168.1.100 -- 192.168.1.200
dnsmasq-dhcp: 3031796432 vendor class: Mips_boot
dnsmasq-dhcp: 3031796432 available DHCP range: 192.168.1.100 -- 192.168.1.200
dnsmasq-dhcp: 3031796432 vendor class: Mips_boot
dnsmasq-dhcp: 3031796432 available DHCP range: 192.168.1.100 -- 192.168.1.200
dnsmasq-dhcp: 3031796432 vendor class: Mips_boot
dnsmasq-dhcp: 3031796432 available DHCP range: 192.168.1.100 -- 192.168.1.200
dnsmasq-dhcp: 3031796432 vendor class: Mips_boot
dnsmasq-dhcp: 3031796432 available DHCP range: 192.168.1.100 -- 192.168.1.200
dnsmasq-dhcp: 3031796432 vendor class: Mips_boot
dnsmasq-dhcp: 3031796432 available DHCP range: 192.168.1.100 -- 192.168.1.200
dnsmasq-dhcp: 3031796432 vendor class: Mips_boot
dnsmasq-dhcp: 3031796432 available DHCP range: 192.168.1.100 -- 192.168.1.200
dnsmasq-dhcp: 3031796432 vendor class: Mips_boot
dnsmasq-dhcp: 3031796432 available DHCP range: 192.168.1.100 -- 192.168.1.200
dnsmasq-dhcp: 3031796432 vendor class: Mips_boot
dnsmasq-dhcp: 3031796432 available DHCP range: 192.168.1.100 -- 192.168.1.200
dnsmasq-dhcp: 3031796432 vendor class: Mips_boot
dnsmasq-dhcp: 3031796432 available DHCP range: 192.168.1.100 -- 192.168.1.200
dnsmasq-dhcp: 3031796432 vendor class: Mips_boot
dnsmasq-dhcp: 3031796432 available DHCP range: 192.168.1.100 -- 192.168.1.200
dnsmasq-dhcp: 3031796432 vendor class: Mips_boot
dnsmasq-dhcp: 3031796432 available DHCP range: 192.168.1.100 -- 192.168.1.200
dnsmasq-dhcp: 3031796432 vendor class: Mips_boot
dnsmasq-dhcp: 3031796432 available DHCP range: 192.168.1.100 -- 192.168.1.200
dnsmasq-dhcp: 3031796432 vendor class: Mips_boot
dnsmasq-dhcp: 3031796432 available DHCP range: 192.168.1.100 -- 192.168.1.200
dnsmasq-dhcp: 3031796432 vendor class: Mips_boot
dnsmasq-dhcp: 3031796432 available DHCP range: 192.168.1.100 -- 192.168.1.200
dnsmasq-dhcp: 3031796432 vendor class: Mips_boot
dnsmasq-dhcp: 3031796432 available DHCP range: 192.168.1.100 -- 192.168.1.200
dnsmasq-dhcp: 3031796432 vendor class: Mips_boot
dnsmasq-dhcp: 3031796432 available DHCP range: 192.168.1.100 -- 192.168.1.200
dnsmasq-dhcp: 3031796432 vendor class: Mips_boot
dnsmasq-dhcp: 3031796432 available DHCP range: 192.168.1.100 -- 192.168.1.200
dnsmasq-dhcp: 3031796432 vendor class: Mips_boot
dnsmasq-dhcp: 3031796432 available DHCP range: 192.168.1.100 -- 192.168.1.200
dnsmasq-dhcp: 3031796432 vendor class: Mips_boot
dnsmasq-dhcp: 3031796432 available DHCP range: 192.168.1.100 -- 192.168.1.200
dnsmasq-dhcp: 3031796432 vendor class: Mips_boot
dnsmasq-dhcp: 3031796432 available DHCP range: 192.168.1.100 -- 192.168.1.200
dnsmasq-dhcp: 3031796432 vendor class: Mips_boot
dnsmasq-dhcp: 3031796432 available DHCP range: 192.168.1.100 -- 192.168.1.200
dnsmasq-dhcp: 3031796432 vendor class: Mips_boot
dnsmasq-dhcp: 3031796432 available DHCP range: 192.168.1.100 -- 192.168.1.200
dnsmasq-dhcp: 3031796432 vendor class: Mips_boot
dnsmasq-dhcp: 3031796432 available DHCP range: 192.168.1.100 -- 192.168.1.200
dnsmasq-dhcp: 3031796432 vendor class: Mips_boot
dnsmasq-dhcp: 3031796432 available DHCP range: 192.168.1.100 -- 192.168.1.200
dnsmasq-dhcp: 3031796432 vendor class: Mips_boot
dnsmasq-dhcp: 3031796432 available DHCP range: 192.168.1.100 -- 192.168.1.200
dnsmasq-dhcp: 3031796432 vendor class: Mips_boot
dnsmasq-dhcp: 3031796432 available DHCP range: 192.168.1.100 -- 192.168.1.200
dnsmasq-dhcp: 3031796432 vendor class: Mips_boot
dnsmasq-dhcp: 3031796432 available DHCP range: 192.168.1.100 -- 192.168.1.200
dnsmasq-dhcp: 3031796432 vendor class: Mips_boot
dnsmasq-dhcp: 3031796432 available DHCP range: 192.168.1.100 -- 192.168.1.200
dnsmasq-dhcp: 3031796432 vendor class: Mips_boot
dnsmasq-dhcp: 3031796432 available DHCP range: 192.168.1.100 -- 192.168.1.200
dnsmasq-dhcp: 3031796432 vendor class: Mips_boot
dnsmasq-dhcp: 3031796432 available DHCP range: 192.168.1.100 -- 192.168.1.200
dnsmasq-dhcp: 3031796432 vendor class: Mips_boot
Click on System on the left, then click on Resources. You can see the free space on the flash as Free HDD Space:

Enter the following command:
/system resource print
and look for the free-hdd-space line – for example:
[admin@CoreSwitch01] > /system resource print
                   uptime: 4d19h26m41s
                  version: 7.4.1 (stable)
               build-time: Aug/04/2022 11:48:11
         factory-software: 6.44.6
              free-memory: 408.7MiB
             total-memory: 512.0MiB
                      cpu: ARM
                cpu-count: 2
                 cpu-load: 26%
           free-hdd-space: 44.0KiB
          total-hdd-space: 15.9MiB
  write-sect-since-reboot: 35547
         write-sect-total: 520339
               bad-blocks: 0%
        architecture-name: arm
               board-name: CRS309-1G-8S+
                 platform: MikroTik
No, tailscale can’t be installed using opkg on OpenWRT 19.xx. I have experimentally verified this using a MIPSBE router with OpenWRT 19.07.10.
However, tailscale is available on OpenWRT starting from version 21.02 – source: tailscale package page on OpenWRT.
Yes, ZeroTier is available via
opkg update
opkg install zerotier
on OpenWRT 19.07. On my router, which is running OpenWRT 19.07.10 I could install ZeroTier without any modifications or extra package repositories.
When using a modern Linux client to connect with an OpenWRT device using SSH, you an error message like the following:
Unable to negotiate with 192.168.1.1 port 22: no matching host key type found. Their offer: ssh-rsa
You can explicitly tell SSH to allow ssh-rsa by using -oHostKeyAlgorithms=+ssh-rsa, for example:
ssh -oHostKeyAlgorithms=+ssh-rsa [email protected]
Using this command should allow you to connect to your OpenWRT device.