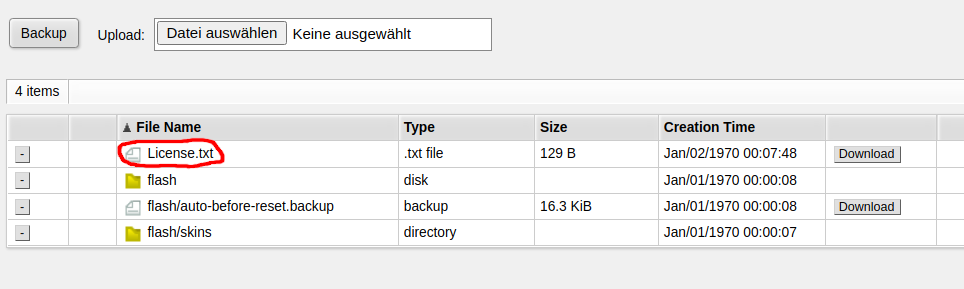
On the terminal (or via SSH / Telnet), run the following command:
/system license print file="License.txt"
Now you can find the file under Files in WebFig:
On the terminal (or via SSH / Telnet), run the following command:
/system license print file="License.txt"
Now you can find the file under Files in WebFig:
MikroTik published an official ZeroTier package for MikroTik routers. But not all Routers support
Devices which only support SwOS (SwitchOS) do not support ZeroTier. You need a device running RouterOS.
But even among the RouterOS devices, not all devices support ZeroTier. The first requirement is that you are running a recent version of RouterOS such as RouterOS 7.4.1
At the time of writing this post (2022-08-22), only devices with the ARM and ARM64 architecture support ZeroTier. For other devices, you can’t even download the package. This include CHR (cloud hosted router) running on x86 or x86_64 for which ZeroTier is currently not available.
More specifically, for RouterOS version 7.4.1 and 7.5beta11, neither x86/x86_64 nor the SMIPS/MMIPS/MIPSBE or Tile architecture support ZeroTier.
Before buying a device or commiting to ZeroTier, download the Extra packages for your architecture from the MikroTik download page and check if there’s a zerotier-....npk in the ZIP archive. If it isn’t available there, you currently can’t use ZeroTier on that device – but possibly it will be supported in the future.
Just run these commands in your Shell in Ubuntu to install netclient
curl -sL 'https://apt.netmaker.org/gpg.key' | sudo tee /etc/apt/trusted.gpg.d/netclient.asc
curl -sL 'https://apt.netmaker.org/debian.deb.txt' | sudo tee /etc/apt/sources.list.d/netclient.list
sudo apt update
sudo apt install netclient
Source: Netmaker installation page
When you try to reset the configuration of the MikroTik RB2011UiAS-2HnD-IN router via the integrated display, you will be asked for a PIN code for confirmation.
By default, this PIN code is 1234.
In our setup, a virtual machine (running on an XCP-NG host) on was connected to my Desktop (HP Z240, i7-6700 @3.4 GHz running Ubuntu 22.04) in a purely switched network with 1Gbit links. Both devices were connected using a MikroTik 10G switch (Marvell chip
I ran iperf3 -s on the VM and ran iperf3 -c [IP address] on the desktop. Reverse tests have not been performed.
Connecting to host 10.9.2.103, port 5201
[  5] local 10.9.2.10 port 56848 connected to 10.9.2.103 port 5201
[ ID] Interval           Transfer     Bitrate         Retr  Cwnd
[  5]   0.00-1.00   sec  92.8 MBytes   779 Mbits/sec    0    444 KBytes
[  5]   1.00-2.00   sec  90.7 MBytes   761 Mbits/sec    0    543 KBytes
[  5]   2.00-3.00   sec  88.6 MBytes   743 Mbits/sec    0    816 KBytes
[  5]   3.00-4.00   sec  90.0 MBytes   755 Mbits/sec    0    816 KBytes
[  5]   4.00-5.00   sec  90.0 MBytes   755 Mbits/sec    0    856 KBytes
[  5]   5.00-6.00   sec  88.8 MBytes   744 Mbits/sec    0    946 KBytes
[  5]   6.00-7.00   sec  88.8 MBytes   745 Mbits/sec    0    946 KBytes
[  5]   7.00-8.00   sec  90.0 MBytes   755 Mbits/sec    0    993 KBytes
[  5]   8.00-9.00   sec  90.0 MBytes   755 Mbits/sec    0    993 KBytes
[  5]   9.00-10.00  sec  88.8 MBytes   744 Mbits/sec    0    993 KBytes
- - - - - - - - - - - - - - - - - - - - - - - - -
[ ID] Interval           Transfer     Bitrate         Retr
[  5]   0.00-10.00  sec   898 MBytes   754 Mbits/sec    0             sender
[  5]   0.00-10.01  sec   896 MBytes   751 Mbits/sec                  receiver
Connecting to host 10.80.246.34, port 5201
[  5] local 10.80.246.38 port 35474 connected to 10.80.246.34 port 5201
[ ID] Interval           Transfer     Bitrate         Retr  Cwnd
[  5]   0.00-1.00   sec  59.9 MBytes   503 Mbits/sec  338    102 KBytes
[  5]   1.00-2.00   sec  60.2 MBytes   505 Mbits/sec  313    188 KBytes
[  5]   2.00-3.00   sec  63.9 MBytes   536 Mbits/sec  176   99.3 KBytes
[  5]   3.00-4.00   sec  74.3 MBytes   623 Mbits/sec  174    113 KBytes
[  5]   4.00-5.00   sec  67.7 MBytes   568 Mbits/sec  197   83.2 KBytes
[  5]   5.00-6.00   sec  72.5 MBytes   609 Mbits/sec  218    228 KBytes
[  5]   6.00-7.00   sec  61.3 MBytes   514 Mbits/sec  281   77.8 KBytes
[  5]   7.00-8.00   sec  72.0 MBytes   604 Mbits/sec  213   91.2 KBytes
[  5]   8.00-9.00   sec  65.4 MBytes   549 Mbits/sec  309    156 KBytes
[  5]   9.00-10.00  sec  53.9 MBytes   453 Mbits/sec  190    121 KBytes
- - - - - - - - - - - - - - - - - - - - - - - - -
[ ID] Interval           Transfer     Bitrate         Retr
[  5]   0.00-10.00  sec   651 MBytes   546 Mbits/sec  2409             sender
[  5]   0.00-10.01  sec   650 MBytes   545 Mbits/sec                  receiver
Netmaker internally uses a normal (kernel-based) wireguard connection, so in some respect this is a test of Wireguard performance
Connecting to host 10.230.113.3, port 5201
[  5] local 10.230.113.1 port 35534 connected to 10.230.113.3 port 5201
[ ID] Interval           Transfer     Bitrate         Retr  Cwnd
[  5]   0.00-1.00   sec   105 MBytes   881 Mbits/sec    0   1.01 MBytes
[  5]   1.00-2.00   sec   104 MBytes   870 Mbits/sec   86    422 KBytes
[  5]   2.00-3.00   sec   101 MBytes   849 Mbits/sec    0    488 KBytes
[  5]   3.00-4.00   sec  98.8 MBytes   828 Mbits/sec    0    535 KBytes
[  5]   4.00-5.00   sec  98.8 MBytes   828 Mbits/sec    0    584 KBytes
[  5]   5.00-6.00   sec   104 MBytes   870 Mbits/sec    0    615 KBytes
[  5]   6.00-7.00   sec  97.5 MBytes   818 Mbits/sec    7    472 KBytes
[  5]   7.00-8.00   sec   104 MBytes   870 Mbits/sec    0    522 KBytes
[  5]   8.00-9.00   sec   101 MBytes   849 Mbits/sec    0    580 KBytes
[  5]   9.00-10.00  sec   102 MBytes   860 Mbits/sec    0    606 KBytes
- - - - - - - - - - - - - - - - - - - - - - - - -
[ ID] Interval           Transfer     Bitrate         Retr
[  5]   0.00-10.00  sec  1016 MBytes   852 Mbits/sec   93             sender
[  5]   0.00-10.00  sec  1014 MBytes   850 Mbits/sec                  receiver
Tailscale 1.28.0 has been used for this test.
During this test, I ensured that the tailscale connection was established using the switched network and was not going through a DERP server or the routed network.
$ tailscale ping 100.64.0.3
pong from vm (fd5d:7b60:4742::3) via 10.9.2.103:41641 in 1ms
Results:
Connecting to host 100.64.0.3, port 5201
[  5] local 100.64.0.2 port 40690 connected to 100.64.0.3 port 5201
[ ID] Interval           Transfer     Bitrate         Retr  Cwnd
[  5]   0.00-1.00   sec  38.3 MBytes   321 Mbits/sec  389   60.0 KBytes
[  5]   1.00-2.00   sec  37.6 MBytes   315 Mbits/sec  366   43.2 KBytes
[  5]   2.00-3.00   sec  36.7 MBytes   308 Mbits/sec  431   52.8 KBytes
[  5]   3.00-4.00   sec  38.5 MBytes   323 Mbits/sec  488   80.3 KBytes
[  5]   4.00-5.00   sec  29.3 MBytes   246 Mbits/sec  356   38.4 KBytes
[  5]   5.00-6.00   sec  31.0 MBytes   260 Mbits/sec  351   86.3 KBytes
[  5]   6.00-7.00   sec  27.1 MBytes   227 Mbits/sec  287   50.4 KBytes
[  5]   7.00-8.00   sec  26.1 MBytes   219 Mbits/sec  210   46.8 KBytes
[  5]   8.00-9.00   sec  27.1 MBytes   227 Mbits/sec  261   39.6 KBytes
[  5]   9.00-10.00  sec  27.5 MBytes   231 Mbits/sec  222   40.8 KBytes
- - - - - - - - - - - - - - - - - - - - - - - - -
[ ID] Interval           Transfer     Bitrate         Retr
[  5]   0.00-10.00  sec   319 MBytes   268 Mbits/sec  3361             sender
[  5]   0.00-10.01  sec   318 MBytes   267 Mbits/sec                  receiver
The approximate performance expectation in this specific scenario is:
300 Mbit/s550 Mbit/s850 Mbit/s750 Mbit/sCuriously, netmaker performed better than the direct connection. The reason for this is not known at this point, but a similar effect has been observed in this medium.com article.
Generally, one can see that Tailscale (which internally uses software wireguard) is approximately half the speed of ZeroTier, which in turn is outperformed significantly by Netmaker.
In a followup post I will describe advantages and disadvantages of those solutions and explore under which scenarios I would use the solutions.
Joining a network is as simple as
sudo zerotier-cli join [network-id]
for example:
sudo zerotier-cli join 9ecbaef5759219ad
Run this command to install the ZeroTier client on any recent Ubuntu version. Tested on Ubuntu 22.04
curl -s https://install.zerotier.com | sudo bash
Source: ZeroTier installation website
While starting up a dockerized netmaker instance, you see the following error message:
[netmaker] Fatal: Unable to initialize iptables on host: lookup coredns: Try again
In the docker-compose.yml or other environment config for netmaker, set
DNS_MODE: "off"
and comment out PORT_FORWARD_SERVICES
# PORT_FORWARD_SERVICES: "ssh,mq"
After that, you possibly need to remove the netmaker data directories (volumes). After doing a clean start, netmaker should work fine.
While trying to request a Let’s encrypt certificate using certbot with the DNS-01 challenge using the Cloudflare DNS provider, you see the following error message:
certbot: error: unrecognized arguments: --dns-cloudflare-credentials /etc/letsencrypt/cloudflare-akamba.ini
You need to install the cloudflare plugin for certbot using
sudo pip3 install --upgrade certbot-dns-cloudflare
After that, certbot will recognize the --dns-cloudflare-credentials command line option
While running certbot , you see an error message like the following one:
An unexpected error occurred:
pkg_resources.ContextualVersionConflict: (zope.interface 4.7.1 (/usr/lib/python3/dist-packages), Requirement.parse('zope.interface>=5.3.0a1'), {'zope.component'})
Your installed version of zope.interface is too old. Upgrade it using
sudo pip3 install --upgrade zope.interface
After that, certbot should work fine.
While starting your dockerized wekan setup, you see an error message like this:
wekan_1    | errorClass [Error]: [FilesCollection.attachments] Path "/data/attachments" is not writable! [401]
wekan_1    |     at new FilesCollection (packages/ostrio:files/server.js:354:15)
wekan_1    |     at module (models/attachments.js:52:15)
wekan_1    |     at fileEvaluate (packages/modules-runtime.js:336:7)
wekan_1    |     at Module.require (packages/modules-runtime.js:238:14)
wekan_1    |     at Module.moduleLink [as link] (/build/programs/server/npm/node_modules/meteor/modules/node_modules/@meteorjs/reify/lib/runtime/index.js:52:22)
wekan_1    |     at module (server/publications/attachments.js:1:24)
wekan_1    |     at fileEvaluate (packages/modules-runtime.js:336:7)
wekan_1    |     at Module.require (packages/modules-runtime.js:238:14)
wekan_1    |     at require (packages/modules-runtime.js:258:21)
wekan_1    |     at /build/programs/server/app/app.js:162362:1
wekan_1    |     at /build/programs/server/boot.js:401:38
wekan_1    |     at Array.forEach (<anonymous>)
wekan_1    |     at /build/programs/server/boot.js:226:21
wekan_1    |     at /build/programs/server/boot.js:464:7
wekan_1    |     at Function.run (/build/programs/server/profile.js:280:14)
wekan_1    |     at /build/programs/server/boot.js:463:13 {
wekan_1    |   isClientSafe: true,
wekan_1    |   error: 401,
wekan_1    |   reason: '[FilesCollection.attachments] Path "/data/attachments" is not writable!',
wekan_1    |   details: Error: EACCES: permission denied, mkdir '/data/attachments'
wekan_1    |       at Object.mkdirSync (fs.js:1014:3)
wekan_1    |       at new FilesCollection (packages/ostrio:files/server.js:348:10)
wekan_1    |       at module (models/attachments.js:52:15)
wekan_1    |       at fileEvaluate (packages/modules-runtime.js:336:7)
wekan_1    |       at Module.require (packages/modules-runtime.js:238:14)
wekan_1    |       at Module.moduleLink [as link] (/build/programs/server/npm/node_modules/meteor/modules/node_modules/@meteorjs/reify/lib/runtime/index.js:52:22)
wekan_1    |       at module (server/publications/attachments.js:1:24)
wekan_1    |       at fileEvaluate (packages/modules-runtime.js:336:7)
wekan_1    |       at Module.require (packages/modules-runtime.js:238:14)
wekan_1    |       at require (packages/modules-runtime.js:258:21)
wekan_1    |       at /build/programs/server/app/app.js:162362:1
wekan_1    |       at /build/programs/server/boot.js:401:38
wekan_1    |       at Array.forEach (<anonymous>)
wekan_1    |       at /build/programs/server/boot.js:226:21
wekan_1    |       at /build/programs/server/boot.js:464:7
wekan_1    |       at Function.run (/build/programs/server/profile.js:280:14)
wekan_1    |       at /build/programs/server/boot.js:463:13 {
wekan_1    |     errno: -13,
wekan_1    |     syscall: 'mkdir',
wekan_1    |     code: 'EACCES',
wekan_1    |     path: '/data/attachments'
wekan_1    |   },
wekan_1    |   errorType: 'Meteor.Error'
wekan_1    | }
You have mounted a local directory as wekan data directory, for example like this in docker-compose.yml:
wekan:
  image: quay.io/wekan/wekan
  /* ... */
  environment:
    /*...*/
    - WRITABLE_PATH=/data
  volumes:
    - ./wekan_data:/data
But this directory does not have the correct permissions set. You can fix it using this command on the directory (wekan_data in this example):
sudo chown -R 999:999 wekan_data
After that, restart wekan and the issue should be fixed.
First, create a directory for the ZeroTier One / ZTNCUI files to reside in, e.g.:
mkdir /opt/zerotier-mydomain
Now, create docker-compose.yml in that directory
version: '3.4'

services:
  ztncui:
    container_name: ztncui
    restart: always
    image: keynetworks/ztncui
    ports:
      - 9993:9993/udp
      - 3180:3180
      - 3443:3443
    volumes:
      - ./etc:/opt/key-networks/ztncui/etc
      - ./zt1:/var/lib/zerotier-one
After that, create .env in said directory containing some info about your node:
NODE_ENV=production
HTTPS_PORT=3443
MYDOMAIN=zerotier.mydomain.com
Now we’ll use the script from Create a systemd service for your docker-compose project in 10 seconds in order to create a systemd service to automatically run the service:
curl -fsSL https://techoverflow.net/scripts/create-docker-compose-service.sh | sudo bash /dev/stdin
This script will also automatically start the service (i.e. docker-compose up). ZTNCUI (which comes packaged with ZeroTier One) will generate a temporary admin password automatically, which we can extract from the log using this simple command:
docker-compose exec ztncui cat /var/log/docker-ztncui.log | grep "Current Password" | tail -n 1
2022/08/19 14:32:37 Current Password: esh0Eengai
Be sure to open the ports 9993/udp, 3180 and (unless you are using a reverse proxy) 3443 in your firewall, for example:
sudo ufw allow 9993/udp
sudo ufw allow 3180
sudo ufw allow 3443
Now we can open https://[IP]:3443 to open the webinterface (ignore the certificate validation error). You can also setup a reverse proxy at this stage, which we’ll cover in future posts.
You should see a page like this one:
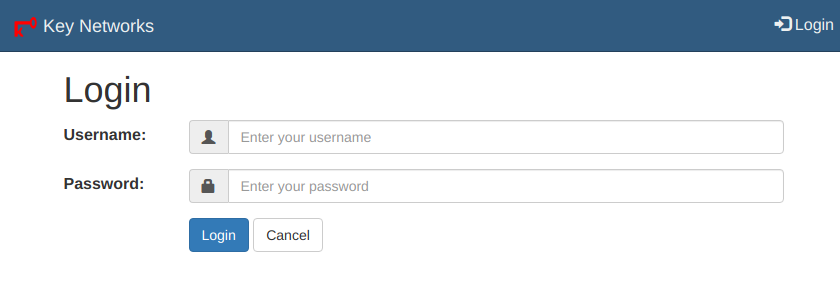
Click Login at the top right:
Enter admin as username and the password we extracted above (esh0Eengai in this example).
You will be asked to change your password, and after that you can create ZeroTier networks.
In order to turn off the DL3021 electronic load (as in: disable any constant current/resistance/voltage/power function) via LXI, run the following command:
:SOURCE:INPUT:STATE Off
For more info, see PyVISA Rigol DL3021 via LXI (TCP SCPI) example
#!/usr/bin/env python3

rm = pyvisa.ResourceManager()
inst = rm.open_resource("TCPIP0::192.168.178.112::INSTR")
# Query if instrument is present
# Prints e.g. "RIGOL TECHNOLOGIES,DL3021,DL3A204800938,00.01.05.00.01"
print(inst.query("*IDN?"))

# Turn electronic load off
inst.write(":SOURCE:INPUT:STATE Off")
When trying to mount a CIFS/SMB share, you see the following error log in dmesg:
[  139.680974] CIFS: Attempting to mount \\10.10.10.10\test
[  139.686714] CIFS: VFS: cifs_mount failed w/return code = -22
This is a currently a bug in Samba or the Kernel but you can easily work around it by adding vers=2.0to the mount options, either in /etc/fstab or if using mount manually, by using the -o vers=2.0 option. This forces Samba to use SMB version 2.0 which does not have the bug.
Using either 10 nF capacitors or 100 nF capacitors. My recommendation is to go with 10 nF unless you have a specific reason to use 10 nF caps. The argument to use lower value capacitors is to reject more lower-frequency common mode noise which might be overlaid on the high speed signal.
Note that many SFP modules already contain AC coupling capacitors.
X5R or X7R capacitors should be fine, you don’t need to use NP0/C0G for this.
Sources:
Marvell 88E3015/88E3018 datasheet, section 6.2, figure 34: 10nF
Microchip application note, page 14 reference schematic: 100nF
Also see my post on selecting a suitable 100Base-FX Ethernet PHY.
Note that sometimes the capacitors and the 100 Ohm termination resistor is integrated in the specific SFP module in use! In that case, replace the capacitors by 0 Ohm resistors and omit the 100 Ohm resistor. My recommendation is to check out the datasheet of the SFP module or just try it out with the capacitors & termination if you don’t know.
100Base-FX transceivers are pretty easy to connect to the PHY, but you have to terminate the high speed interface correctly. Since PECL logic is used, the termination scheme is somewhat difference.
The first thing is understand is that while all SFP modules are equal (i.e. subject to the SFP multi-source agreement), some are more equal than others.
More specifically, some of them include termination resistors, some of them include AC coupling capacitors, some of them include both and some of them include none. My recommendation is to assume that the SFP module contains both AC coupling caps and the transmit termination, but have spare component footprints in case you need to add them. Similar strategies are recommended
What you absolutely need is:
What you might or might not need, depending on SFP, PHY and board layout is:
The following information is based on Microchip’s application note for the LAN93xx series. The basic termination strategy is to use a 100R differential transmit termination, included with the note that some transceivers already contain the termination resistor inside them and using an extra termination resistor.
Note that in one of the schematics Microchip swapped the termination resistors. The 130 Ohm resistor should go toward 3.3V and not toward ground.
Furthermore, Microchip requires 50 Ohm (read: 49.9 Ohm) pull-up resistors to be fitted to the transmit lines. These resistors are required for the Microchip drivers, but not required for all drivers.
In Marvell’s 88E3015/88E3018 datasheet, a slightly different termination scheme is implemented which omits the differential 100R termination resistor in favour of a pair of
Note that the Marvell device does not specify 50R pullup resistors. As far as I could find out SFP modules never appear to require these pullups, but some PHYs do. The only safe variant is to include these pullups into the schematic and do not populated them.
A good idea with high speed signals, especially with different transceivers is to include all possible options and then just try out what works best.

My recommendations on what to start with are as follows:
NA values: Do not populate, populate only if needed experimentallyIn addition to the high speed data connection from the SFP module to the PHY, you want to find the LOS (loss of signal) pin, sometimes called signal detect or link detect and also connect it directly from the SFP module to the PHY (no termination or pullups required).
Regarding the layout, as usual with high speed connections, ensure that the components are placed near to the relevant components and try to place the PHY and the SFP module as close together as possible.
While trying to update Nextcloud using the command line (e.g. SSH) using a command like
php updater/updater.phar
you see an error message containing PHP Fatal error: Allowed memory size of ... bytes exhausted such as this one:
[✔] Check for expected files
[✔] Check for write permissions
[✔] Create backup
[✔] Downloading
[ ] Verify integrity ...PHP Fatal error:  Allowed memory size of 134217728 bytes exhausted (tried to allocate 155061456 bytes) in phar:///owncloud.mydomain.com/updater/updater.phar/lib/Updater.php on line 637
First, try to adjust the memory limit in your webhosting panel or php.ini. If this is not possible – such as for my hoster, which has different settings for the FastCGI PHP as opposed to the command line (CLI) PHP, you can manually set the memory limit using
php -d memory_limit=512M updater/updater.phar
While trying to update Nextcloud using the command line (e.g. SSH) using a command like
php updater/updater.phar
you see the following error message:
Nextcloud Updater - version: v20.0.0beta4-11-g68fa0d4

Step 5 is currently in process. Please call this command later.
No matter if the step that appears to be currently in progress is Step 3, Step 5 or any other step, the solution is always the same: Reset the update by deleting the data/updater-occ[random-string] folder.
Recommended: If you are paranoid about losing data, just rename the directory:
mv data/updater-occ* ../DELETEME-updater
Not recommended: You can also just delete the directory
rm -rf data/updater-occ*
For the basic configuration & setup of the Unifi controller via docker-compose, see Simple Unifi controller setup using docker-compose ! This post just covers the Traefik label part.
This setup is based on our previous post on the Unifi docker-compose setup. Furthermore, our traefik configuration is discussed in more detail in our post on Simple Traefik docker-compose setup with Lets Encrypt Cloudflare DNS-01 & TLS-ALPN-01 & HTTP-01 challenges.
For this example, we’ll use a wildcart Let’s Encrypt certificate for the domain *.mydomain.com via the Traefik certificate provider named cloudflare, with the Unifi controller running on unifi.mydomain.com
Here’s the container label config:
labels:
  - "traefik.enable=true"
  - "traefik.http.routers.unifi.rule=Host(`unifi.mydomain.com`)"
  - "traefik.http.routers.unifi.entrypoints=websecure"
  - "traefik.http.routers.unifi.tls.certresolver=cloudflare"
  - "traefik.http.routers.unifi.tls.domains[0].main=mydomain.com"
  - "traefik.http.routers.unifi.tls.domains[0].sans=*.mydomain.com"
  - "traefik.http.services.unifi.loadbalancer.server.port=8443"
  - "traefik.http.services.unifi.loadbalancer.server.scheme=https"
Note particularly these lines which make Traefik access the Unifi controller via HTTPS:
- "traefik.http.services.unifi.loadbalancer.server.port=8443"
- "traefik.http.services.unifi.loadbalancer.server.scheme=https"
version: '2.3'
services:
  mongo_unifi:
    image: mongo:3.6
    network_mode: host
    restart: always
    volumes:
      - ./mongo_db:/data/db
      - ./mongo/dbcfg:/data/configdb
    command: mongod --port 29718
  controller:
    image: "jacobalberty/unifi:latest"
    depends_on:
      - mongo_unifi
    init: true
    network_mode: host
    restart: always
    volumes:
      - ./unifi_dir:/unifi
      - ./unifi_data:/unifi/data
      - ./unifi_log:/unifi/log
      - ./unifi_cert:/unifi/cert
      - ./unifi_init:/unifi/init.d
      - ./unifi_run:/var/run/unifi
      - ./unifi_backup:/unifi/data/backup
#    sysctls:
#      net.ipv4.ip_unprivileged_port_start: 0
    environment:
      - DB_URI=mongodb://localhost:29718/unifi
      - STATDB_URI=mongodb://localhost:29718/unifi_stat
      - DB_NAME=unifi
      - UNIFI_HTTP_PORT=8090
    labels:
      - "traefik.enable=true"
      - "traefik.http.routers.unifi.rule=Host(`unifi.mydomain.com`)"
      - "traefik.http.routers.unifi.entrypoints=websecure"
      - "traefik.http.routers.unifi.tls.certresolver=cloudflare"
      - "traefik.http.routers.unifi.tls.domains[0].main=mydomain.com"
      - "traefik.http.routers.unifi.tls.domains[0].sans=*.mydomain.com"
      - "traefik.http.services.unifi.loadbalancer.server.port=8443"
      - "traefik.http.services.unifi.loadbalancer.server.scheme=https"
# Ports commentet out since network mode is set to "host"
#    ports:
#      - "3478:3478/udp" # STUN
#      - "6789:6789/tcp" # Speed test
#      - "8080:8080/tcp" # Device/ controller comm.
#      - "8443:8443/tcp" # Controller GUI/API as seen in a web browser
#      - "8880:8880/tcp" # HTTP portal redirection
#      - "8843:8843/tcp" # HTTPS portal redirection
#      - "10001:10001/udp" # AP discovery
  logs:
    image: bash
    depends_on:
      - controller
    command: bash -c 'tail -F /unifi/log/*.log'
    restart: always
    volumes:
- ./unifi_log:/unifi/logIn the WebFig web UI, you can check the license level by clicking on System -> License
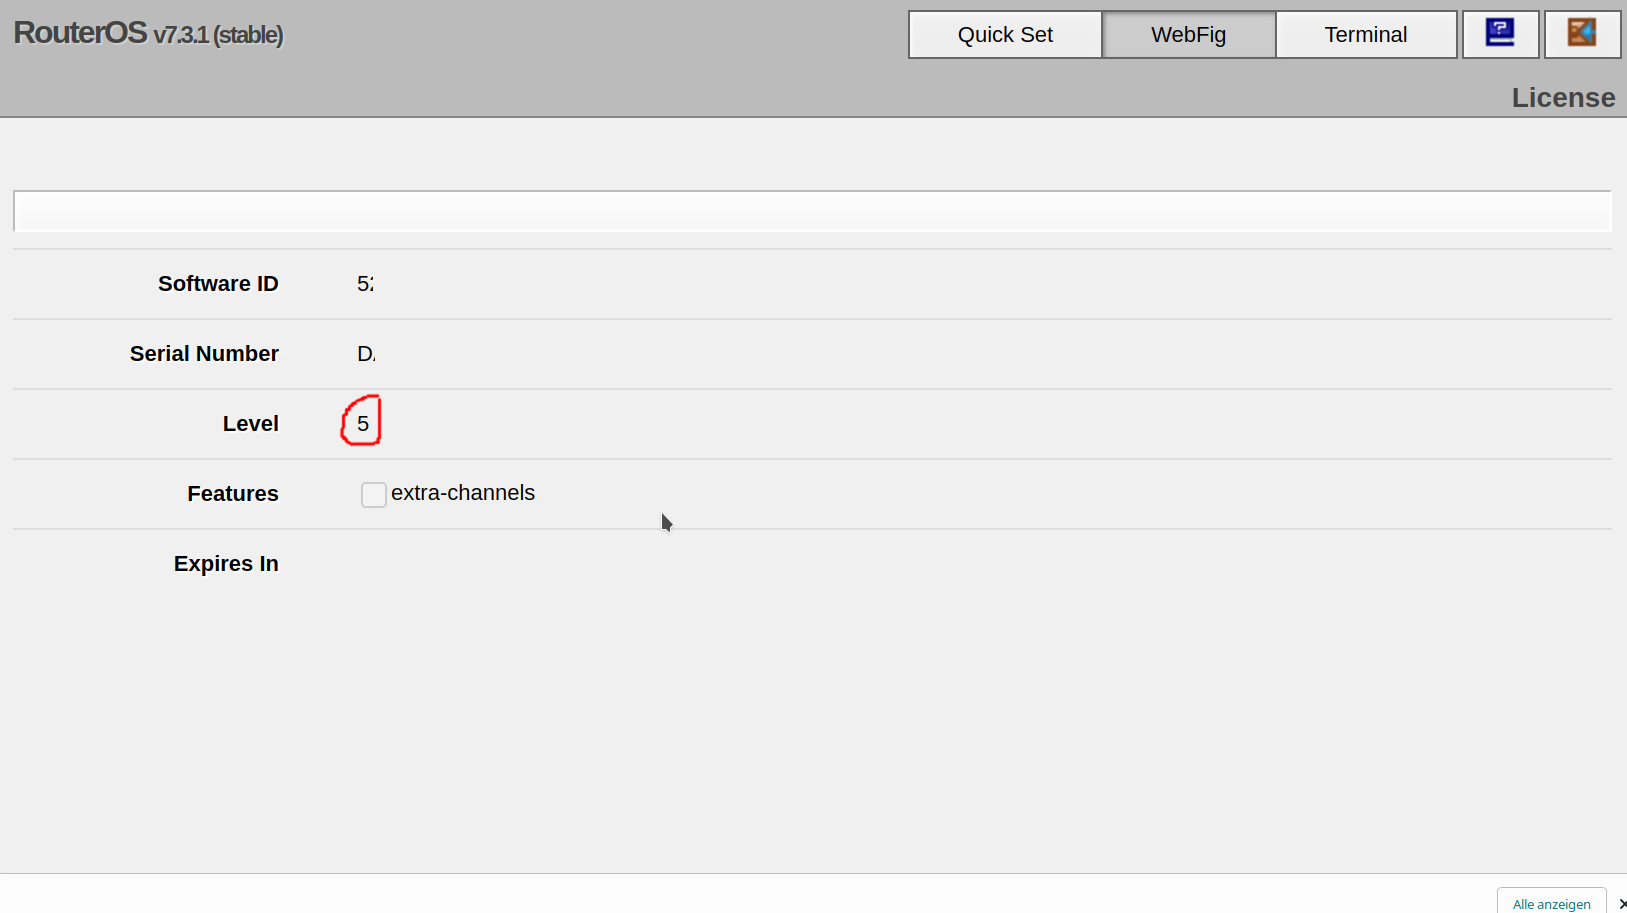
Run the following command:
/system license print
Look for the nlevel line. In the following example, the MikroTik RouterOS license level is Level 5:
[admin@MyRouter] > /system license print
  software-id: 5ABC-DEF0
       nlevel: 5
     features: